This project uses Unity version 2022.3.15f1.
The Scripts/ directory in Assets/ is a submodule whose source is from alianlbj23.
- .NET SDK 8.0
- After cloning the repository, navigate to
Assets/Scenes/in Unity and double-click the scene file. e.g.SampleScene
Reference: https://github.com/Unity-Technologies/URDF-Importer
-
Open the Package Manager from the Unity Menu. Click
Window -> Package Manager. A new package manager window will appear. -
Click on the
+sign on the top left corner of the package manager window and click onAdd Package from Git URL. -
Enter the git URL for the URDF Importer with the latest version tag (currently v0.5.2)
https://github.com/Unity-Technologies/URDF-Importer.git?path=/com.unity.robotics.urdf-importer#v0.5.2in the text box and pressEnter. -
Click
Import URDF.
Reference: https://github.com/Unity-Technologies/ROS-TCP-Connector
- Open the Package Manager from the Unity Menu. Click
Window -> Package Manager. A new package manager window will appear. - Click on the
+sign on the top left corner of the package manager window and click onAdd Package from Git URL. - Enter the git URL for the URDF Importer with the latest version tag (currently v0.5.2)
https://github.com/Unity-Technologies/ROS-TCP-Connector.git?path=/com.unity.robotics.ros-tcp-connectorin the text box and pressEnter.
Reference: https://github.com/GlitchEnzo/NuGetForUnity
- Open Package Manager window (Window | Package Manager)
- Click the
+button on the upper-left of a window, and select "Add package from git URL..." - Enter the following URL and click the
Addbutton
https://github.com/GlitchEnzo/NuGetForUnity.git?path=/src/NuGetForUnity
- At this point, you'll see NuGet in the Unity Menu. If doesn't, restart the Unity.
*NOTE:* To install a concrete version, specify the version by prepending #v{version} e.g.
#v2.0.0. For more see Unity UPM Documentation.
- Open the NuGet from the Unity Menu. Click
Nuget -> Manage NuGet Packages. A new NuGet for Unity window will appear. - Search the package
websocketsharp-netstanderdand then install it.
Reference: https://www.nuget.org/packages/Newtonsoft.Json/
- Open the NuGet from the Unity Menu. Click
Nuget -> Manage NuGet Packages. A new NuGet for Unity window will appear. - Search the package
Newtonsoft.jsonand then install it.
You have to modify the URDF file to add the base_footprint link at the appropriate part.
	...
</gazebo>

<link name="base_footprint" />
<joint name="base_joint" type="fixed">
    <parent link="base_footprint" />
    <child link="base_link" />
    <origin rpy="0 0 0" xyz="0 0 0.010" />
</joint>

<link name="base_link">
....
├── car_v2_copy1019_description
│ ├── meshes
│ │ ├── base_link.prefab
│ │ ├── base_link.stl
│ │ ├── base_link_0.asset
│ │ ├── base_link_1.asset
│ │ ├── ...
│ │ ├── base_link_23.asset
│ │ ├── c2_v1_1.prefab
│ │ ├── c2_v1_1.stl
│ │ ├── c2_v1_1_0.asset
│ │ ├── c2_v1_1_1.asset
│ │ ├── c2_v1__1__1.prefab
│ │ ├── c2_v1__1__1.stl
│ │ ├── c2_v1__1__1_0.asset
│ │ ├── c2_v1__1__1_1.asset
│ │ ├── lidar_v1_1.prefab
│ │ ├── lidar_v1_1.stl
│ │ ├── lidar_v1_1_0.asset
│ │ ├── lidar_v1_1_1.asset
│ └── meshes.meta
├── test_abb_4600.urdfWe show the part of the URDF file test_abb_4600.urdf.
...
<link name="base_link">
    <inertial>
      <origin xyz="-0.033614332957262155 -0.004539784516663659 0.05035636914443814" rpy="0 0 0"/>
      <mass value="10.997959919526476"/>
      <inertia ixx="0.068393" iyy="0.12963" izz="0.139744" ixy="1.4e-05" iyz="-4e-06" ixz="-0.00959"/>
    </inertial>
    <visual>
      <origin xyz="0 0 0" rpy="0 0 0"/>
      <geometry>
        <mesh filename="package://car_v2_copy1019_description/meshes/base_link.stl" scale="0.001 0.001 0.001"/>
      </geometry>
      <material name="silver"/>
    </visual>
    ...
</link>
...
Pay some attention to the mesh tag. It specifies the locations of the packages. Hence, you must put the corresponding mesh .stl files like the above structure.
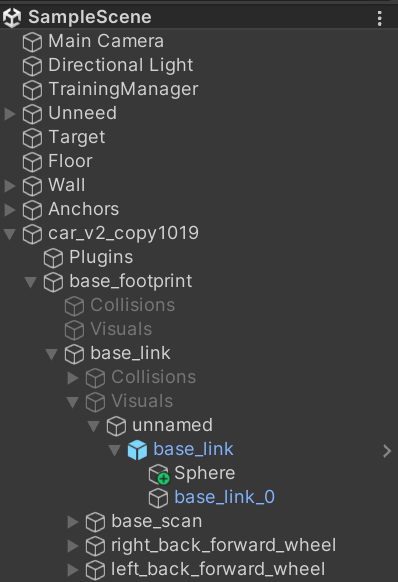
base_scan
right_back_forward_wheel
left_back_forward_wheel
Create a sphere at the location of the structure shown above.
- Click on the
base_footprintcomponent. - Click the
Add Componentin the Inspector, search for theArticulation Bodyand add it.
- Click on the
base_scancomponent. - Add the
LidarSensor.cscomponent to thebase_scan.
- Click on your car model name. In the case shown above, click
car_v2_copy1019. - Toggle (Uncheck) the Controller Script shown in the Inspector in Unity.
- Add the
Robot.cscomponent to this car model object.
- Click on your car model name. In the case shown above, click
car_v2_copy1019. - Add
base_scancomponent intoLidarfield inRobot.csscript in the Inspector in Unity.
- Click on your wheels.
- Add
MotorMoveForward.csinto your wheel components.
- Create a 3D object and rename it to
Target - In the inspector field, scale the object size to 0.1.
- Move the target to the appropriate location by moving the axes.
Just create the 3D objects.
頑張って
- Create the empty objects
- Put them into the corners of the wall and assign them to either clockwise or counterclockwise order.
- Put them into the
TrainingManager.csscript in theTrainingManagerUnity object.
- Create a new empty Unity object and rename it to
TrainingManager - Add the
TrainingManager.cscomponent to this object. - Add the Target into the
Targetfield inTrainingManager.csscript in the Inspector in Unity.
- The submodule is set to the main branch because the codes in the develop branch have bugs.
- Modify the
MotionSensorclass inMotionSensor.cs
public class MotionSensor : MonoBehaviour
{
    ...
}- Since we've added a
base_footprintin our URDF car model, theTrainManager.cshave to match this structure.
void Start()
{
    base_footprint = robot.transform.Find("base_footprint");
    baselink = base_footprint.transform.Find("base_link");
    if (baselink == null)
    {
        Debug.Log("Testing");
    }
...
}- There are still many scripts in
TrainingManager.cslikeTarget,Obstacle 1, ..., etc. You have to create empty objects and put them into these scripts. We've created and put them into theUnneedobject.
