In this workshop, we will be exploring concepts related to virtualization by understanding virtualization concepts in depth, and then manually constructing a virtual machine.
You must be able to pass the opunit checks for virtualization, and bakerx, and VirtualBox installed.
You may need to seek help if you are unable to get virtualization to work on your device.
We will create a simple virtual machine using bakerx. Our primary goal is to ensure the basics are working, we will not be doing anything fancy—yet. We will explain all the bits in the next section.
Pull an ubuntu image.
bakerx pull focal cloud-images.ubuntu.com Check which images are available on your system.
bakerx imagesVerify your image downloaded.
│ 'focal' │ 'box.ovf' │ 'vbox' │
Error: If your image download failed, or failed to extract, you can run the following to delete the image. You can then try to run the pull command again.
bakerx delete image focalCreate a new VM instance, named "v1".
bakerx run v1 focalIn a terminal, try bakerx ssh v1, so we can connect to the virtual machine. You can use exit to end your ssh sesssion.
Let's ensure we can interact with the VM by clicking "Show". This will open a small terminal into virtual box. This is useful for quickly determining if your VM is working, which could fail to boot, or otherwise not be reachable if networking is broken.
📹 Watch: The short video, demoing the virtual machine creation and inspection (note using alpine vm instead).
Close the preview window, but still leave the VM "Continue running in the background".

The image is loaded as a DVD into a disk drive. Note: the size of the image: 26MB.
You can control when a VM is running, saved, or turned off.
When a virtual machine is not being used, you have to option to "Power-off" the machine, which is essentially like pulling the power cord on a machine. There is a small risk that any work you saved on the virtual disk may not be persisted in the event of a sudden outtage.
You can also "Save" the VM machine, which will persist the entire state of the machine, including RAM. Similiarly, you can take a "Snapshot" which will copy the state of the VM.
Your VM would not be very useful if it does not have any way to connect to a network. There are four primary ways to virtualize the network:
-
Network Address Translation (NAT)
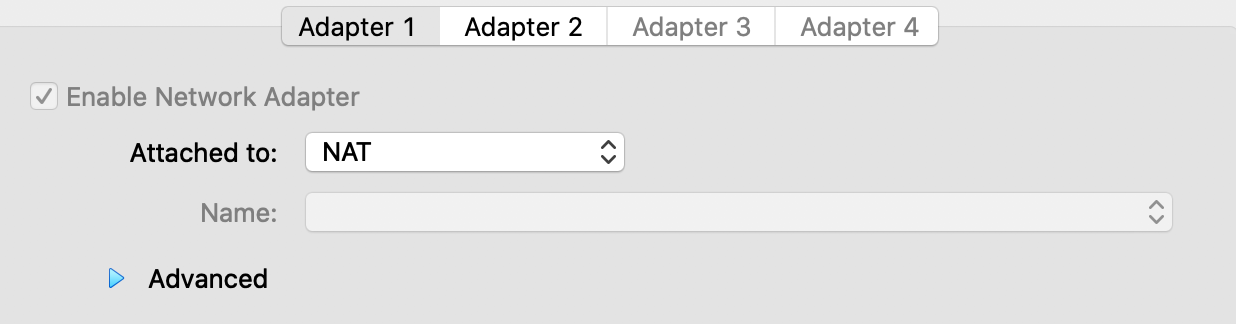 A NAT network provides a simple way for your VM to connect to external networks. Incoming network requests are translated by the virtualization software and routed to the appropriate VM.
Inside the VM, the network will appear as a private network.
nanobox:~# ifconfig
eth0      Link encap:Ethernet  HWaddr 08:00:27:DE:D2:AD
          inet addr:10.0.2.15  Bcast:10.0.2.255  Mask:255.255.255.0
          inet6 addr: fe80::a00:27ff:fede:d2ad/64 Scope:Link
          UP BROADCAST RUNNING MULTICAST  MTU:1500  Metric:1
The address will not be addressable from the host machine.
$ ping 10.0.2.15
PING 10.0.2.15 (10.0.2.15): 56 data bytes
Request timeout for icmp_seq 0
Request timeout for icmp_seq 1
-
Bridged network
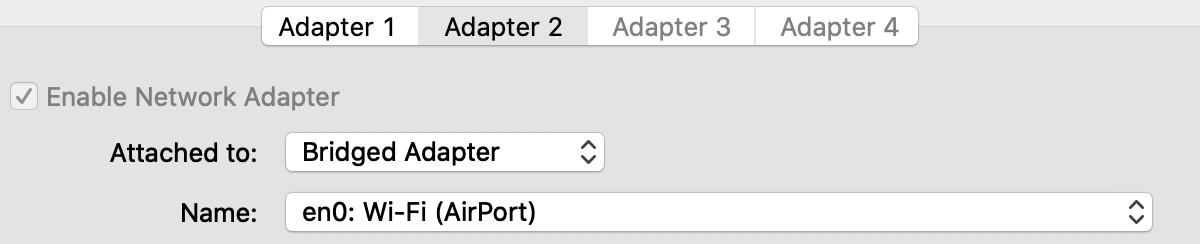 A bridged network will share a host network interface, by filtering and routing network traffic belonging to the VM to a virtual network interface. In effect, your VM is on the same network as your host computer.
On the host computer, you can see the following network.
$ ifconfig
en0: flags=8863<UP,BROADCAST,SMART,RUNNING,SIMPLEX,MULTICAST> mtu 1500 options=400<CHANNEL_IO>
   inet6 fe80::4f:70a1:5a:8e6a%en0 prefixlen 64 secured scopeid 0x5
   inet 10.154.40.185 netmask 0xffffc000 broadcast 10.154.63.255
Inside the VM, it shares the same 10.154.x.x subnet as the host.
nanobox:~# ifconfig
eth1      Link encap:Ethernet  HWaddr 08:00:27:EF:CE:8F
          inet addr:10.154.62.77  Bcast:10.154.63.255  Mask:255.255.192.0
A bridged network can be useful if you want to interact with your VM from your host or even other computers on your network.
-
Internal network
An internal network allows multiple VMs on the same internal network to communicate; however, the network cannot be reached by the host.
-
Host-Only network
A host-only network creates a local loopback network on the host machine. Hosts and VMs can then communicate on the host-only network.
$ ifconfig
vboxnet24: flags=8843<UP,BROADCAST,RUNNING,SIMPLEX,MULTICAST> mtu 1500
  ether 0a:00:27:00:00:18
  inet 172.30.25.1 netmask 0xffffff00 broadcast 172.30.25.255
Typically, VMs are statically assigned an IP address on the host-only network.
One disadvantange of a host-only network is that it requires sudo/admin privilenges to create the host-only network on the host (the first time it is created).


Finally, another strategy to allow access to your VM without requiring additional network configuration on the host or VM is to use port forwarding, which is usually used in addition to NAT networking. For example, you can see this configuration setting in Networking => Adapter 1 => Advanced => Port Forwarding.

How did bakerx create the VM?
bakerx will first look for an available port for forwarding the ssh connection. It reads through other VMs in virtualbox and will exclude ports already used by machines (even dormant/powered off ones) as well as ports actively used on the host.
$ bakerx run v1 focal
Creating v1 using vbox...
Searching between ports 2002 and 2999 for ssh on localhost for this vm.
Excluding the following ports already used by VirtualBox VMS: 2002,2010,2003,2004,2005,2006,2007
Port 2008 is available for ssh on localhost!
Then, the machine "v1" is registered with VirtualBox with a template image.
Executing VBoxManage import "/Users/cjparnin/.bakerx/.persist/images/focal/box.ovf" --vsys 0 --vmname v1
The VM will boot using the attached disk and not bother loading the BIOS menu.
Executing VBoxManage modifyvm v1 --boot1 disk
Executing VBoxManage modifyvm v1 --biosbootmenu disabled
Set the memory size and number of CPUs. Turn off the serial port, which can result in occasional boot errors.
Executing VBoxManage modifyvm v1 --memory 1024 --cpus 1
Executing VBoxManage modifyvm v1  --uart1 0x3f8 4 --uartmode1 disconnected
Create a network interface (eth0) configured with NAT networking.
Create a network interface (eth1) configured with bridged networking with the wireless interface (en0) on the host machine. Finally, add a portforward [host:2008 => VM:22]. Note that the suffix of the commands correspond to which NIC is being addressed (e.g. --natpf1 corresponds to the first NIC, and --natpf2 would correspond to a second NIC).
Executing VBoxManage modifyvm v1 --nic1 nat
Executing VBoxManage modifyvm v1 --nictype1 virtio
Executing VBoxManage modifyvm v1 --natpf1 "guestssh,tcp,,2008,,22"
Stop any previous instances of the machine, then "boot" the virtual machine.
Executing VBoxManage startvm v1 --type emergencystop
Executing VBoxManage startvm v1 --type headless
Wait for the VM to boot and for the sshd daemon to start listening on 22. A socket is opened and listens for data to be received from the ssh server:
⠸ Waiting for VM network to initialize... (can take a few seconds or minutes on slower hosts).data:  SSH-2.0-OpenSSH_7.9
The VM is now ready. You can run this ssh command to connect to it.
Finally, a ssh connection is provided, using an identify file, and the port 2008, which will be forwarded the the VM's ssh port. StrictHostKeyChecking=no is also used because conflicting host signatures often exist when you create multiple VMs that use the same port number over time.
ssh -i /Users/cjparnin/.bakerx/insecure_private_key vagrant@127.0.0.1 -p 2008 -o StrictHostKeyChecking=no
Imagine you wanted to create a simple script that let you easily create a simple development environment.
Create the following script, called ./up.sh.
#!/bin/bash

# Create VM, with bridged networking enabled.
bakerx run app-vm focal

# Get ssh command
ssh_cmd=$(bakerx ssh-info app-vm|tr -d '"')
echo $ssh_cmd

# Use heredoc to send script over ssh
$ssh_cmd << 'END_DOC'

# Install packages
sudo apt-get update
sudo apt-get install git -y
# Get projects
git clone https://github.com/CSC-DevOps/App
exit
END_DOC
Inside a bash or Git Bash shell, run the script for ./up.sh.
Then, using the terminal, perform the following steps:
- Run
bakerx ssh app-vmto access the virtual machine. - Update the script to install nodejs.
- Update the script to run npm install.
Inside the VM.
-
Start the node.js server, by running
cd App; node main.js start 9000. -
In your browser, visit
http://[ip]:9000/--- you should be able to see a message in the browser from your program! -
Try adding a port forward. You can use
bakerx delete vm app-vmto remove the VM in case you need to start again.The following command can be used when the VM is running to add the port forward:
VBoxManage controlvm ubuntu-vm natpf1 nodeport,tcp,,8089,,9000 -
Check that you can visit your app on the ubuntu machine, by visiting http://localhost:8089.
-
Adding a bridge network or host-only network in ubuntu. The default ubuntu image does not come with secondary NIC, so you will only have the private network on
enp0s3. You can add-b, to enable bridged networking or--ip 192.168.33.100to enable a NAT network with a static ip.Update your script to copy the following to
/etc/netplan/52-bridge.yamlon your VM.network: ethernets: enp0s8: dhcp4: true version: 2
Then run
sudo netplan apply. Runningifconfigwill show the updated network configuration. -
Reimplement your Up script to use VBoxManage. You can run the sequence of VBoxManage commands inside your script instead of running through
bakerx run. -
Add sync folders. You can mount your host file system and use it within the VM. This can be very useful for editing files on your host computer (e.g. Code), but running your VM.
This can be a bit complicated. Example code here.
If you followed most of these steps, you have essentially just built vagrant, which is a classic tool for creating simple virtual machines.
$ vagrant init hashicorp/bionic64

$ vagrant up
Bringing machine 'default' up with 'virtualbox' provider...
==> default: Importing base box 'hashicorp/bionic64'...
==> default: Forwarding ports...
default: 22 (guest) => 2222 (host) (adapter 1)
==> default: Waiting for machine to boot...

$ vagrant ssh
vagrant@bionic64:~$ _