The I2C Device Library (i2cdevlib) is a collection of uniform and well-documented classes to provide simple and intuitive interfaces to I2C devices, made by Jeff Rowberg.
My effort is make a simulation of Arduino to run the library on RaspberryPi without (or minimum) tweaks of his code. Therefore, we will gain benefits of further update from the original project.
The library only tested on devices I already have. Testing progress are reported at Supported Devices table. All contribution of coding or testing devices are welcome.
This project inherits The MIT license from original project.
Copyright 2012 Jeff Rowberg (i2cdevlib).
Copyright 2019 Thinh Pham (wrapper).
Since I made an install bash script, you simply run it once for all:
$ git clone https://github.com/mrlordkaj/i2cdevlib-pi.git

$ cd i2cdevlib-pi

$ ./install.sh
After script process all done, you can use the library with your linker -li2cdev.
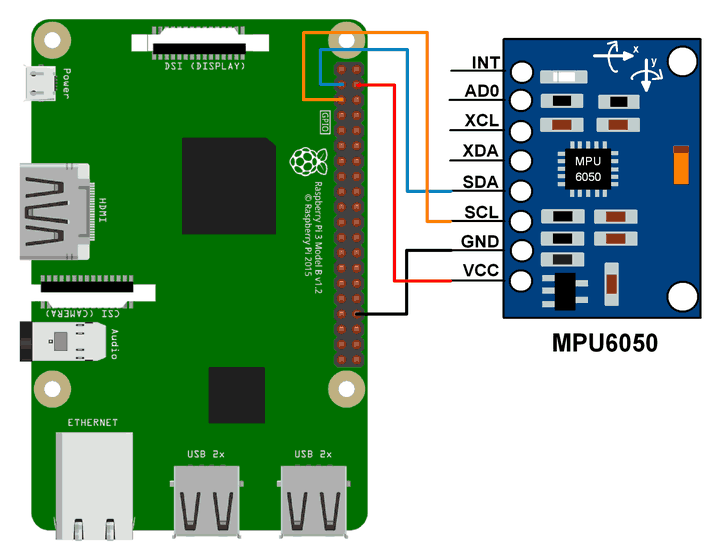
Let's write first app which shows raw data of MPU6050 device.
Connect your MPU6050 device to the Raspberry Pi board:
Create new file named mpu_raw.cpp and write its code:
#include <unistd.h> // standard libs
#include <Arduino.h> // abstract layer
#include <i2cdevlib/MPU6050.h>

int main() {
    int16_t ax, ay, az; // accelerometer raw
    int16_t gx, gy, gz; // gyroscope raw
    MPU6050 mpu;
    mpu.initialize();
    if (mpu.testConnection()) { // test sensor connection
        while (true) {
            mpu.getMotion6(&ax, &ay, &az, &gx, &gy, &gz); // get raw data
            printf("a/g: ");
            printf("%6d %6d %6d / ", ax, ay, az);
            printf("%6d %6d %6d\r\n", gx, gy, gz);
            fflush(stdout); // force show new line
            sleep(1); // sleep 1 second
        }
    } else {
        fprintf(stderr, "MPU6050 connection failed");
        return 1;
    }
    return 0;
}
Build the code:
$ g++ mpu_raw.cpp -o mpu_raw -li2cdev
And run it:
$ ./mpu_raw
Most of devices come with various demos. This section guides you to build MPU6050's demos (all other demo can be built by the same way).
Make sure you are working on the root directory of the project, then enter MPU6050 directory:
$ cd MPU6050
Head to the Supported Devices table below, you see MPU6050 device have 3 types of demo, they are raw, dmp6, and teapot.
In example, to build all of them, you just run make command with specified name:
$ make CONF=raw

$ make CONF=dmp6

$ make CONF=teapot
After make process all done, your demo application will ready in demo directory, you can run it now:
$ ./demo/teapot
| Device | Build Status | Tested | Demos |
|---|---|---|---|
| AD7746 | Passed | No | - |
| ADS1115 | Passed | No | single, differential |
| ADXL345 | Passed | No | raw |
| AK8963 | Passed | No | - |
| AK8975 | Passed | No | raw, mpu_raw, mpu_heading |
| BMA150 | Passed | No | raw |
| BMP085 | Passed | No | basic |
| DS1307 | Passed | No | tick |
| HMC5843 | Passed | No | raw |
| HMC5883L | Passed | No | raw |
| HTU21D | Passed | No | simple |
| IAQ2000 | Passed | No | demo |
| ITG3200 | Passed | No | raw |
| L3G4200D | Passed | No | raw |
| L3GD20H | Passed | No | basic |
| LM73 | Passed | No | - |
| LSM303DLHC | Passed | No | test |
| MPR121 | Passed | No | - |
| MPU6050 | Passed | Yes | raw, dmp6, teapot |
| MPU9150 | Passed | No | raw |
| MS5803 | Failed (AVR only) | - | test |
| SSD1308 | Passed | No | - |
| TCA6424A | Passed | No | - |
