This tutorial is intended to walk you through an opinionated demonstration of how ECS Anywhere works. The initial steps will show you how to deploy a (somewhat) sophisticated multi services application in an AWS region as an ECS service running on AWS Fargate. Further in the tutorial, the steps will guide you through how to deploy parts of this application on ECS Anywhere managed instances in a customer managed infrastructure outside of the AWS region. This tutorial is based on the code and workflow that has been used for the re:Invent 2020 announcement of ECS Anywhere.
NOTE
This tutorial requires a bit of more work than what you'd need to do to deploy a standalone nginx container on ECS Anywhere for a quick test purpose. This tutorial tries to mimic a real life scenario with its own story; as a result the workflows are slightly longer. It is likely that you will learn more than just ECS Anywhere going through this but it will require a bit more time to unpack.
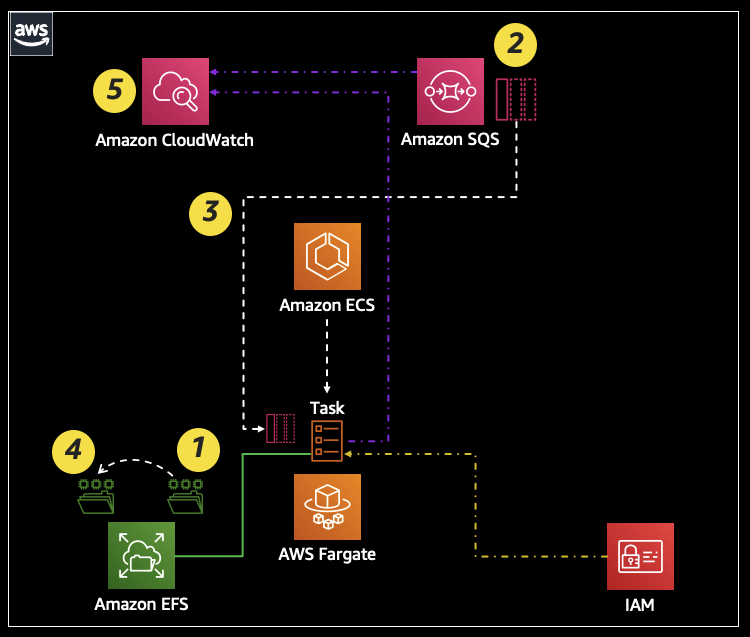
The application is written in Python and includes instructions for both x86 and ARM architectures. Below is a high level diagram of the application and the flow it supports. (1) The logic of the code implements a worker that continuously checks for new messages in an Amazon SQS queue. (2) If the queue contains new messages, the body of these messages are checked against the name of the files hosted in a source folder on Amazon EFS. (3) If there is a match between the body of the message and the file name, (4) the file is renamed and moved to a destination folder (also on Amazon EFS). (5) The application logs all its activity to Amazon CloudWatch and Fargate pulls the application image from Amazon ECR. This setup makes heavy usage of AWS native integrations such as IAM roles assigned to the ECS task for the application to transparently read from the SQS queue, pull from ECR, access the EFS share and log to CloudWatch.
Assume this is an application that has been developed for a global deployment. However, some of the contries where this application needs to be available have stringent requirements in terms of data residency. In particular the files that are being processed by the application contains personal identifiable information (PII) that needs to remain within specific country's border. Unfortunately, in these countries AWS doesn't have a regional presence. In addition, some of these countries have additional compliance requirements that requires data to be hosted on IT systems that are fully controlled by local customer teams. The team that built this application is hesitant to embark into investigating brand new tools to facilitate hybrid deployments and, in addition, they are very happy with the fully managed nature of the architecture they are using.
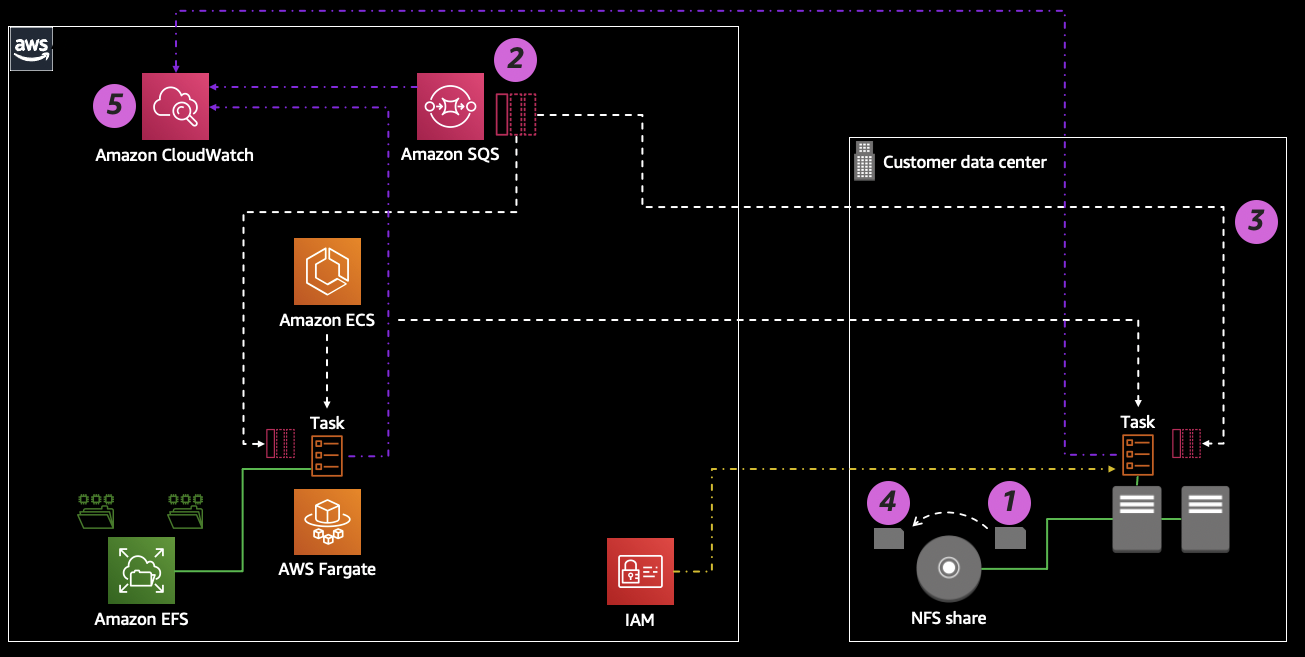
The application team can leverage ECS Anywhere to continue maintaining all the architectural benefits and hand-off to AWS as many operations as possible. ECS Anywhere allows the team to literally decompose the architecture and stretch the deployment in a way that makes the setup fully compliant with the requirements of these countries and making their stretched deployment a viable and acceptable operational exception. This requires maintaining the data on the customer-managed infrastructure and moving the Python application running on the same infrastructure. ECS Anywhere allows the task to participate in the native AWS integrations. In particular it will retain the possibility (via IAM task roles and IAM execution task roles) to read from the SQS queue, pull from ECR and log to CloudWatch without the team having to deal with distributing credentials outside of the region. In addition, ECS Anywhere and its regional control plane architecture will mitigate greatly operational concerns. This is a high level diagram of the stretched application deployment mechanism that they can treat as an exception on a need basis:
Follow the steps below for the tutorial:

