For the purpose of the webinar we will be working on the head node of an HPC cluster running Slurm. This is the most likely infrastructure that fellow bioinformaticians already find themselves using on a regular basis.
The execution of the Snakemake workflow will actually take place on the cluster head node with jobs being submitted to Slurm for queing and processing. From the head node, Snakemake will monitor the submitted jobs for their completion status and submit new jobs as dependent jobs complete sucessfully.
See also: https://snakemake.readthedocs.io/en/stable/getting_started/installation.html
The recommended installation route for Snakemake is through a conda environemnt. As such, you need Anaconda3, usually avaiable to you on your cluster via the module system.
# Load the Anaconda3 module on your cluster
# If it's unavailable contact the cluster sysadmin
module load \
  Anaconda3

# Create a new conda environment for snakemake v5.4.0 (currently the latest version)
# https://anaconda.org/search?q=snakemake
conda create \
  --name snakemake \
  --channel bioconda --channel conda-forge \
  --yes \
snakemake=5.4.0First, load the conda environment you set up:
# Load the Anaconda3 module on your cluster
# If it's unavailable contact the cluster sysadmin
module load \
  Anaconda3

# activate the conda environment you created above
source activate snakemake# Clone this repo
git clone https://github.com/UofABioinformaticsHub/2019_EMBL-ABR_Snakemake_webinar
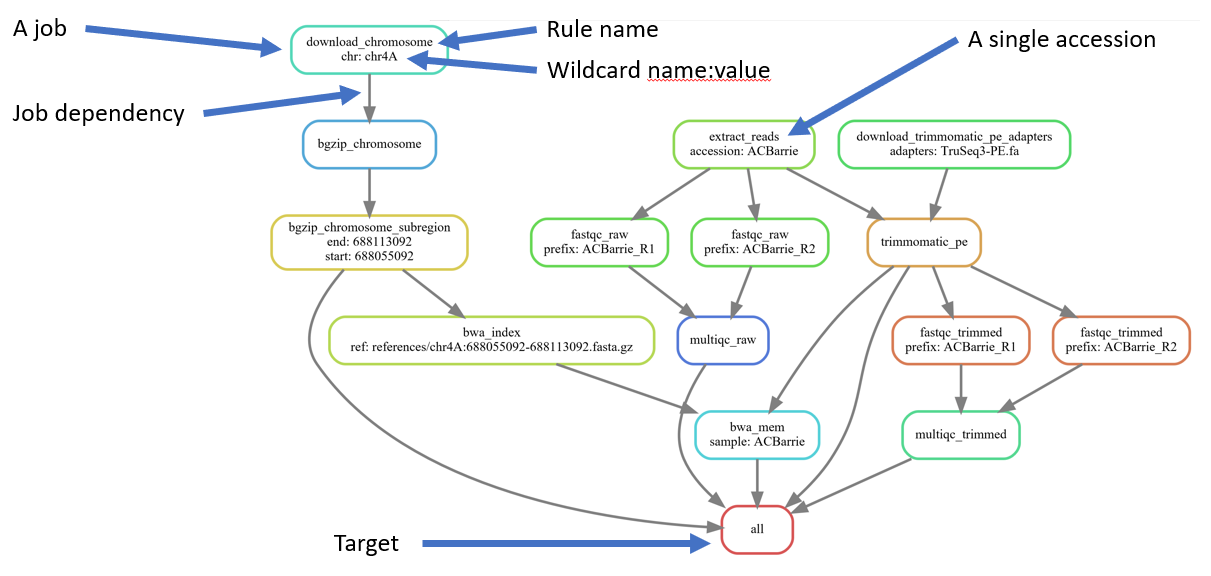
cd 2019_EMBL-ABR_Snakemake_webinar/snakemake-tutorialNow you are ready to run Snakemake. Lets visalise the DAG of job dependencies:
snakemake \
  --dag \
  | dot -Tsvg \
  > dag.svg
See what rules and commands would be executed for a couple of differet targets:
# The "setup_data" target can be used to create a small reference and read data sets for testing purposes
snakemake \
  setup_data \
  --dryrun --printshellcmds

# Run the whole pipeline (target "all"), which would also generate the test data set
snakemake \
  --dryrun --printshellcmds
Provided in this repo is a slurm profile, cluster config files and a conda environment file. This allows Snakemake to interact with Slurm and have the relevant software available to each rule.
Running the pipeline, for real, can be accomplished using:
# Load Singularity if planning to specify --use-singularity
module load \
  Singularity

snakemake \
  --profile profiles/slurm \
  --cluster-config cluster-configs/default.yaml \
  --cluster-config cluster-configs/phoenix.yaml \
  --use-singularity --use-conda
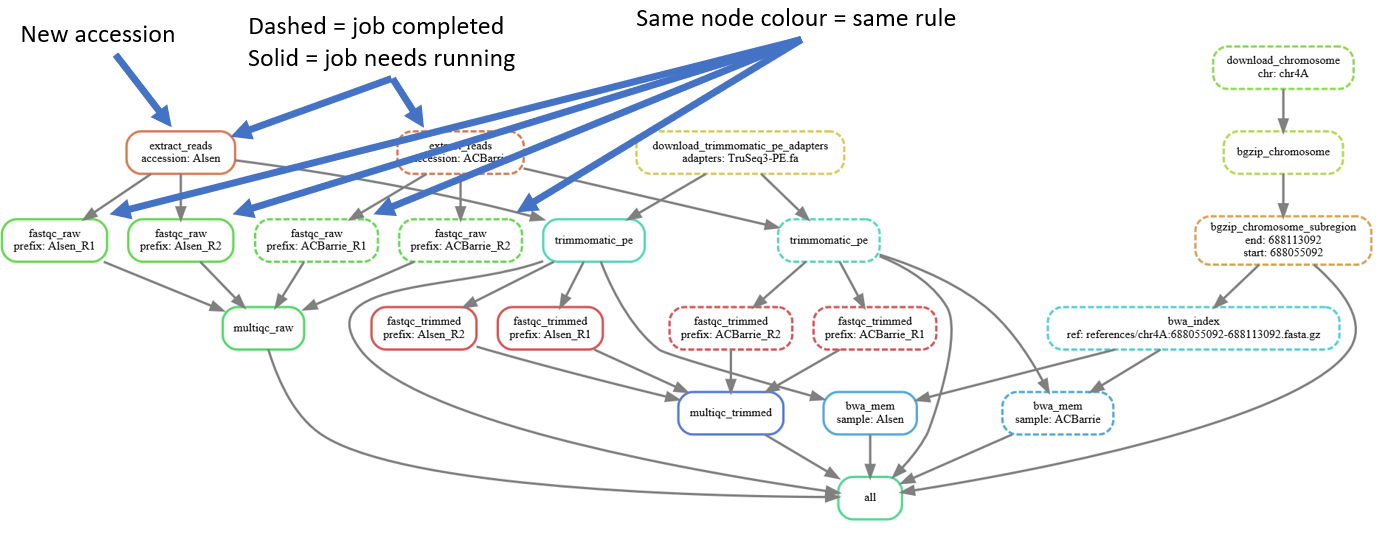
Add a new accession and take a look at the DAG of job dependencies
# Uncomment the "Alsen" line
sed -i 's/^#  "(Alsen)",/  "\1",/' Snakefile

# Generate DAG of job dependencies
snakemake \
  --dag \
  | dot -Tsvg \
  > dag2.svg
Add in the remaining accessions:
# Uncomment all the accessions
sed -i -r 's/^#  "(.+)",/  "\1",/' Snakefile

# Generate DAG of job dependencies
snakemake \
  --dag \
  | dot -Tsvg \
  > dag3.svg
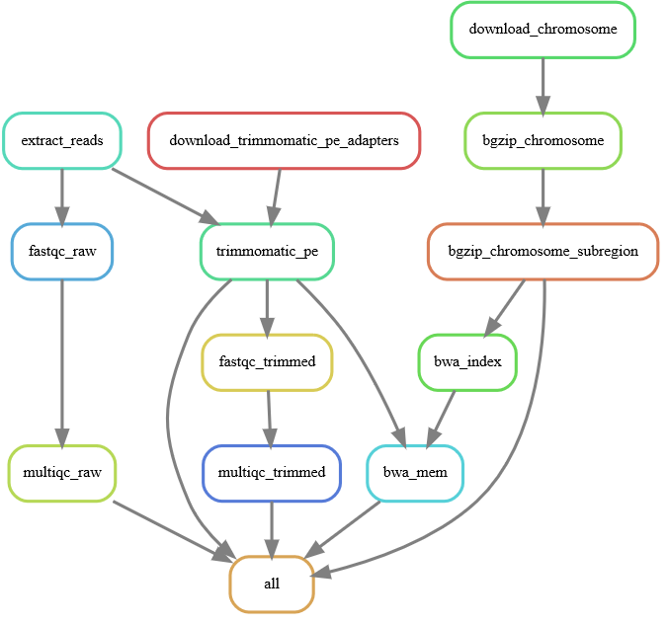
Wow, that's a big/messy DAG of jobs. Lets look at the simpler DAG of rules:
snakemake \
  --rulegraph \
  | dot -Tsvg \
  > rulegraph.svg
Lets just have a look at a count of jobs that would be executed:
# Get a count of all jobs that would be run
snakemake \
  --dryrun \
  --quiet
Run all the new jobs:
snakemake \
  --profile profiles/slurm \
  --cluster-config cluster-configs/default.yaml \
  --cluster-config cluster-configs/phoenix.yaml \
--use-singularity --use-condaThe provided Slurm profile profiles/slurm and cluster config files cluster-configs/default.yaml and
cluster-configs/phoenix.yaml provide a means to specify the cluster resources required for each job submitted to Slurm.
The cluster-configs/default.yaml file contains the default values for all jobs and can be used for job-specific values.
cluster-configs/phoenix.yaml provides some override values for things specific to my own Slurm cluster; namely Slurm
account and partition settings.
Rather than hard-coding resource values directly in these files, one can use {resources.<some_name>} and Snakemake will substitute in the value supplied
via the resources keyword in the corresponding Snakefile rule. Like so:
rule bwa_mem :
	input:     ...
	output:    ...
	resources:
		mem_mb = 10000,
		time_mins = 60,
	shell:     ...
The values for these resources must be integers.
While static rule resources are convienient, what happens to the rule resource requirements if you have higher coverage data or want to use the workflow on a much larger (or smaller) species or project? Will the rules still have sufficient resources or will they be vastly over specified?
A solution is to have the resources dynamically scale according to the input file sizes. This is possible by using Python lambda (annonymous) functions.
In Snakemake these these are called with at least wildcards and optionally input, threads and attempt. By default, the supplied profile sets
restart-times to 2 (see profiles/slurm/config.yaml) which asks Snakemake to retry failed jobs twice. By using the attempt
count and a lambda function, we can scale the resources for each retry:
rule bwa_mem :
	input:     ...
	output:    ...
	resources:
		mem_mb = lambda wildcards, attempt: 10000 * attempt,
		time_mins = lambda wildcards, attempt: 60 * attempt,
	shell:     ...
Perhaps this is too much of a "brute-force" approach and you would prefer a more subtle scaling, sam increase by 10% per retry:
rule bwa_mem :
	input:     ...
	output:    ...
	resources:
		mem_mb = lambda wildcards, attempt: math.ceil(10000 * (1+(attempt-1)/10)),
		time_mins = lambda wildcards, attempt: math.ceil(60 * (1+(attempt-1)/10)),
	shell:     ...
This approach still doesn't help with scaling accroding to input size, so here's how that might be achived:
import os

rule myrule :
	input: index = ...,
		...
	output:    ...
	resources:
		mem_mb = lambda wildcards, input, attempt: math.ceil( sum(os.path.getsize(f) for f in input['index'] if os.path.isfile(f)) / 1024**2*(1+(attempt-1)/10)),
	shell:     ...
If you decide to go this way, you will need to test and benchmark your pipeline against a varied set of input sizes so you can get the resource scaling right for each job.
Snakemake provides a means to benchmark runs using the benchmark keyword in rules to specify the name of the file into which benchmark information is stored. Together
with the repeat() function, the bencmarking of a rule can be repeated multiple times:
N_BENCHMARKS = 3

rule bwa_mem :
	input:     ...
	output:    ...
	benchmark:
		repeat("benchmarks/bwa_mem/{prefix}.txt", N_BENCHMARKS),
	shell:     ...
Once we have finished, we will deactive the conda environment:
source deactivate


