-
- 代码上传到nodejs文件夹下
You should download this project on your own in section A2.
.
└── workspace_DDSHelloWorld
    ├── build
    ├── CMakeLists.txt
    └── src
        ├── HelloWorld.cxx
        ├── HelloWorld.h
        ├── HelloWorld.idl
        ├── HelloWorldCdrAux.hpp
        ├── HelloWorldCdrAux.ipp
        ├── HelloWorldPublisher.cpp
        ├── HelloWorldPubSubTypes.cxx
        ├── HelloWorldPubSubTypes.h
        └── HelloWorldSubscriber.cpp
-
OS: Windows 10/11
-
IDE: Visual Studio 2022 (with
Desktop development with C++) -
- Tick all boxes of environment variable setup.
- Recommend changing the folder name to
fastrtps, which has no spacing.
-
CMake installing. Recommend:
Windows x64 Installer: cmake-3.29.0-windows-x86_64.msi. Run the.msifile. -
Chocolatey installing. Just run the following commands:
Set-ExecutionPolicy Bypass -Scope Process -Force; [System.Net.ServicePointManager]::SecurityProtocol = [System.Net.ServicePointManager]::SecurityProtocol -bor 3072; iex ((New-Object System.Net.WebClient).DownloadString('https://chocolatey.org/install.ps1')) -
After downloading these packages, open an administrative shell with PowerShell and execute the following command:
choco install -y -s <PATH_TO_DOWNLOADS> asio tinyxml2where
<PATH_TO_DOWNLOADS>is the folder into which the packages have been downloaded. -
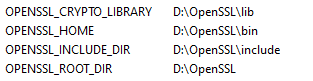
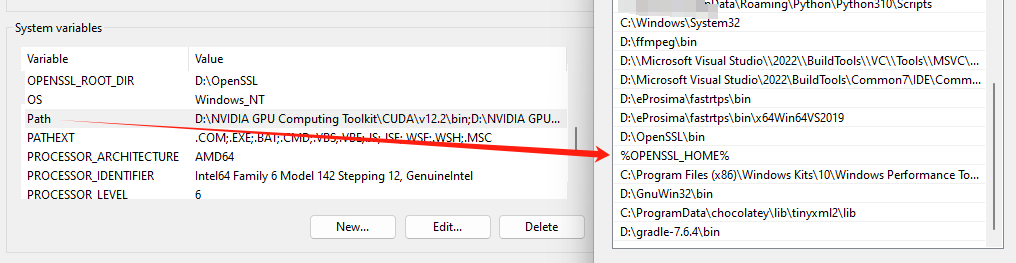
OpenSSL is a robust toolkit for the TLS and SSL protocols and a general-purpose cryptography library. Install it by running the following command inside an administrative shell with PowerShell:
choco install -y opensslMake sure to configure your system variables:
-
Run following commands in
build/:cmake .. cmake --build . cd build/Debug/ DDSHelloWorldPublisher.exe DDSHelloWorldSubscriber.exe -
Succeed!


You should download this project on your own in section B2.
.
└── 2_hello_world
    │  hello_world.idl
    ├─c++11
    │      application.hpp
    │      hello_world_publisher.cxx
    │      hello_world_subscriber.cxx
    │      USER_QOS_PROFILES.xml
    ├─c++98
    ├─csharp
    └─python
-
OS: Windows 10/11
-
IDE: Visual Studio 2017 (with
Windows 10 SDK 10.0.17134.0) -
Fill in the form at Try Connext for Free. Download the
.exefile. -
Follow the instructions at Installing an Evaluation or LM Version.
- Run the
.exefile downloaded.
- Run the
-
(Follow the instructions at 2.2. Hands-On 1: Your First DataWriter and DataReader) Open a command prompt window. Run command
<installdir>\resource\scripts\rtisetenv_<architecture>.bat. For example:C:\Program Files\rti_connext_dds-<version>\resource\scripts\rtisetenv_x64Win64VS2017.bat. -
Inside the repository you have cloned, there is a directory named
2_hello_world, which contains the HelloWorld type definition in a file namedhello_world.idl. You can run following commands:cd 2_hello_world rtiddsgen -language c++11 -platform <architecture> -create makefiles -create typefiles -d c++11 -ppDisable hello_world.idl -
Open the
c++11directory to review the code. -
In the
2_hello_world/c++11directory, openhello_world_publisher.cxxin your IDE of choice. -
Change the Topic name from “Example HelloWorld” to “HelloWorld Topic”:
// A Topic has a name and a datatype. Create a Topic named
// "HelloWorld Topic" with type HelloWorld
dds::topic::Topic<HelloWorld> topic(participant, "HelloWorld Topic");
-
Modify the code to send the message “Hello world!” with a count. In the for loop in the snippet, add the highlighted line, just after the comment
// Modify the data to be written here. This will set sample.msg to “Hello world!” with a count:// Create data sample for writing HelloWorld sample; for (int count = 0; running && (count < sample_count || sample_count == 0); count++) { // Modify the data to be written here sample.msg("Hello world! " + std::to_string(count)); std::cout << "Writing HelloWorld, count " << count << std::endl; writer.write(sample); rti::util::sleep(dds::core::Duration(4)); } -
Open
hello_world_subscriber.cxx. Change the Topic name from “Example HelloWorld” to “HelloWorld Topic”, just as you did in the publishing application.// A Topic has a name and a datatype. Create a Topic named // "HelloWorld Topic" with type HelloWorld dds::topic::Topic<HelloWorld> topic(participant, "HelloWorld Topic");
-
Launch Visual Studio by typing hello_world-x64Win64VS2017.sln in the Command Prompt window.
-
Select Build Solution from the Build menu. (You can also right-click
hello_world_publisherorhello_world_subscriberand chooseBuild; do for each.) -
Make sure you have run
rtisetenv_<architecture>in any new command prompt window, to avoid issues with paths and licensing. From within the2_hello_world/c++11directory, enter the following full path using the SAME command prompt window:objs\<architecture>\hello_world_publisher.exe
-
Open another command prompt window, run
rtisetenv_<architecture>if you haven’t already in that window, and from within the2_hello_world/c++11directory, enter the following full path:objs\<architecture>\hello_world_subscriber.exe -
You should see this in the window:
Writing HelloWorld, count 0
...
---
HelloWorld subscriber sleeping for 4 sec...
[msg: Hello world! 1]
...
Succeed!


Note: FastDDS and RTI Connext DDS use the same structure in the .idl file to generate their own codes, and use the same topic; you can open Publisher in one DDS and Subscriber in another DDS (as long as the DDS of both manufacturers comply with OMG's communication specifications, they could work together under the DSCP model).
This project is provided under the root folder.
.
├─2_hello_world
│  │  hello_world.idl
│  ├─c++11
│  ├─c++98
│  ├─csharp
│  └─python
│
└─rticonnextdds-connector-js-master
   │  .eslintrc.json
   │  ...
   ├─docs
   ├─examples
   │  └─nodejs
   │      │  ShapeExample.xml
   │      ├─simple
   │      ├─transformation
   │      ├─web_http
   │      └─web_socket
   ├─node_modules
   └─test
-
Codes under
./2_hello_world/c++11/andhello_world.idlwere modeified. Accordingly, Follow step 12-16 in Section B2 to build the RTI Connext DDS (C++) project. -
Codes under
./rticonnextdds-connector-js-master/were also modified (the original project could be got from here). -
Run your node.js reader as follows:
node examples/nodejs/simple/reader.js -
Run your C++ publisher as step 14 in Section B2.
-
Succeed!