CuisinePlus is online restaurant reservation platform for diners. The goal of the application is to aggregate and showcase restaurants in Ireland. Users are able to find a restaurant they love from the featured restaurants across Ireland and make reservations at their chosen restaurants. Also, signed in users should be able to leave a review, read reviews left by other users, and like a restaurant.
The site is built in Django using Python, JavaScript, CSS, and HTML. It provides full CRUD functionality reservations: users can create, read, update, and delete their bookings.

Please Note: the needs within this project are for illustrative and educational purpose.
- Validator Testing
- Accessibility Testing
- Chrome Lighthouse
- Device Testing and Browser Compatibility
- Manual Testing
-
As a a registered user I want to sign in using my username and preferred password so that I can search for a restaurant and make a booking.
Acceptance Criteria 1:
Given that I’m a registered user
and I’m on the Sign-In page
When I enter my Username and Password
and I click the Sign-In button
Then I am logged in to my account so that I can access my personal account information and I can search for a restaurant and book a table.Acceptance Criteria 2:
Given that I’m a registered user
and I’m on the Sign-In page
When I click the Sign-In button
and I am logged in to my account
Then I can see a displayed message that I have successfully signed in . -
Task 1 – Create a link to a Sign-In page
-
Task 2 - Create a Sign-In form for registered users to enter their login details
-
Task 3 - Implement a functionality to show a successfully signed in message.
-
As a a registered user I can check a remember me checkbox before I sign in so that I can always have automatic access to my account from the same system until I manually sign out.
-
Acceptance Criteria
Given that I’m a registered user
and I’m on the Sign-In page
When I enter my login details and check “Remember Me” checkbox
and I click the Sign-In button
Then I am logged in and I can always have automatic access to my account from the same system until I manually sign out -
Task – Implement a “remember me” functionality on login page.
-
As a a registered user I want to sign in into my account using social network so that I have a convenient alternative to login into my account.
Acceptance Criteria 1:
Given that I’m a new user
When I’m on the Sign-in page with a social Login (Facebook, Google, Apple)\ Then I can sign in using my existing social account IDs so that I can access the application.Acceptance Criteria 2:
Given that I’m a registered user
When I click my preferred social media account
Then I am logged in using my existing social account IDs so that I can access my personal account information. -
Task 1 - Create a social Sign-in feature for users to login with their social media accounts
-
Task 2 - Create a method to redirect the new user to the home page on successful registration.
-
As a new user I can register by creating a username and password so that I have access to featured restaurants and menus.
Acceptance Criteria 1
Given that I’m a new user
and I’m on the Sign-Up page
When I enter mandatory registration information (Username, Password)
and I click the Sign-Up button
Then I can see a confirmation message that an account has been created for me successfullyAcceptance Criteria 2:
Given that I’m a user
and I’m on the Sign-Up page
When I enter Username that already exists and a Password
and I click the Sign-Up button
Then I am not registered and I can see an error message that a user with that username already exists. -
Task 1 – Modify the AllAuth accounts templates
-
Task 2 - Create a link to a Sign-Up page
-
Task 3 - Use allauth authentication system to validate the user registration data and to prevent multiple accounts creation with same username.
-
Task 4 - Create a method to redirect the new user to the home page on successful registration.
-
As a new user I can sign up using a social network provider so that I can access the application using my existing social account IDs.
Acceptance Criteria
Given that I’m a new user
and I’m on the Sign-Up page with a social Login(Facebook, Google, Apple)
When I click my preferred social media account\ Then I can sign up using my existing social account IDs so that I can access the application. -
Task 1 - Create a social Sign-Up feature for users to register with their social media accounts
-
As a user I want to make a booking so that I can dine in my preferred restaurant.
Acceptance Criteria
Given that I’m a logged in user
When I am on a given restaurant page
Then I can see a form to book the restaurant -
Task 1 - Create a booking form on a restaurant page
-
Task 2 - Implement a functionality to validate Number of guests and Date fields
-
As a User I want to view my booking so that I can be sure my booking information is correct
Acceptance Criteria
Given that I’m a logged in user
and I have booked a restaurant
When I see Manage Booking menu on My Account dropdown\ Then I can click the Manage My Booking to view my booking. -
Task 1 - Create Manage Booking menu on My Account dropdown
-
Task 2 - Implement functionality for users to view their booking
-
As a User I want to edit my booking so that I can update my booking information such as date, time, and number of guests.
Acceptance Criteria 1
Given that I’m a logged in user
and I’m on my account page\ When I see Manage Booking menu on My Account dropdown
Then I can click Manage My Booking to edit or delete my booking.Acceptance Criteria 2
Given that I’m a logged in user
and I’m on Manage Booking page\ When I click the edit button\ Then I can edit my booking and save changes successfully.Acceptance Criteria 3/ Given that I’m a logged in user/ and I’m on Manage Booking page/
When I click the delete button/ and, I click to confirm the deletion request/ Then I can delete the booking and redirected to homepage. -
Task 1 - Implement a method for users to edit their booking
-
Task 2 – Implement a method for users to delete their booking
-
Task 3 – Create a confirmation form for user to effectively delete booking.
-
As a logged in user I want to leave a review so that I can provide my honest comment based on my experience with the restaurant and their cuisine.
Acceptance Criteria 1
Given that I’m a logged in User
When I am impressed with a restaurant and their meal
Then I can leave a review for the restaurant as a feedback.Acceptance Criteria 2
Given that I’m a logged in User
When I leave a review for the restaurant\ Then I can see and read the reviews left by others. -
Task 1 – Create a functionality to display reviews to all users.
-
Task 2 – Create a functionality that lets logged in users write a review.
-
As a logged in user I can rate a restaurant so that I can leave my impression of the food.
Acceptance Criteria 1
Given that I’m a logged in User
When I am impressed with a restaurant and their meal
Then I can see a like button and click to Like the restaurant as a positive feedback.Acceptance Criteria 2
Given that I’m a logged in User
When I Like the restaurant as a positive feedback
Then I can see the number of likes for the restaurant increased by one like. -
Task 1 – Create a functionality that allows users to rate a restaurant by liking it.
-
Task 2 – Develop a counter for number of a restaurant Likes.
-
As a logged in user I can view ratings left by others so that I can choose the meal that is best for me.
Acceptance Criterion
Given that I’m a User
When I am on the site's homepage\ Then I can see the ratings left by others by the number of Likes for the restaurants. -
Task 1 – Create a functionality that shows restaurants rating by the number of their likes.
- As a logged in user I want to update my password regularly so that I can prevent my account access if it was compromised.
-
As a logged in user I want to reset my password so that if I forget it I can create a new password.
Acceptance Criteria
Given that I’m a registered user
and I’m on the Sign-In page
When I click the “Forgot Password?” link
Then I can reset my password if I’ve forgotten it or I want to update it for security reasons. -
Task – Implement a method to reset password on login page.
-
As a User I want to view a list of Restaurants in my search so that I can select one to book a table in.
Acceptance Criteria
Given that I’m a User
When I can see the search bar at the top of the page in a visually distinguishable way
Then I can search for restaurant by typing the name in the search bar -
Task 1 - Implement search bar functionality that is visible to the user on every page
-
Task 2 – Implement a method for user to Search for a restaurant by name
-
As a User I want to search for meal so that I can find the restaurant that offers a country’s meal of my choice.
Acceptance Criteria
Given that I’m a logged in User
and I can see the search bar at the top of the\ page in a visually distinguishable way
When I search for meal by typing the meal name in the search bar
Then I can find the restaurant that offers a country’s meal of my choice -
Task 1 - Implement search bar functionality that is visible to the user on every page
-
Task 2 – Implement a method for user to Search for a restaurant by meal
-
As a User I want to search location so that I can find the restaurant near me.
Acceptance Criteria
Given that I’m a logged in User
and I can see the search bar at the top of the page in a visually distinguishable way
When I search by typing location in the search bar
Then I can find the restaurant near me in my city -
Task 1 - Implement search bar functionality that is visible to the user on every page
-
Task 2 – Implement a method for user to Search a restaurant by location
-
As a User I want to search a date/time frame so that I can book a restaurant based on my preferred date and time.
Acceptance Criteria
Given that I’m a logged in User
When I see a date/time select box\
Then I can book restaurant based on my preferred date and time -
Task 1 - Implement search bar functionality with a date/time select box visible to the user on every page
-
Task 2 – Implement a method for user to sort restaurants by date and time

- Roboto
- Sans-serif
The main font used for the website is Roboto with sans-serif as the fallback. Friendly and straightforward in appearance, Roboto is a “neo-grotesque” sans-serif typeface family. To keep things simple and clean, Roboto is the only font used throughout the website, but with font weights of bold 700 for headings and lower headings and thin 100 for body text. The beauty of Roboto is that it is modern, contemporary, minimalistic, readable, and serves well for an e-commerce website.
The colors used are Green (#00FF00), Red (#E84610), Blue (#0275d8), White (#ffffff), and Black (#000000).
| Color | Hex |
|---|---|
| Green Color | |
| Red Color | |
| Blue Color | |
| White Color | |
| Black Color |
|
The Black and white are default colours, used as the site’s as core building blocks. CuisinePlus is a representation of food and hospitality industry so the Green and Blue colours are used to visually communicate nourishment and the feeling of human emotions. The red colour represents warmth and passion; the heart icon changes from black to red colour when a user likes a restaurant. These five colours in combination express the aesthetic beauty that shapes the site's form and function in order to please and delight the site’s visitors.

The color values were then checked for accessible contrast using EightShapes’’ color contrast grid tool to ensure they meet WCAG 2.0 criteria.
The wireframe was created using Balsamiq. And it was designed for desktop only.


The header has the logo and navigation menus arranged in order of priority of information and features.
![]()
The logo is a Font Awesome bow of rice icon, a symbolic representation of sustenance and abundance, a symbol of nourishment of the physical body and well-being. The logo and title have an implicit link to the homepage, following a long-standing web convention and for fluid user experience.
| Navbar - Users View | Navbar - Logged In Users View |
|---|---|
 |
 |
The navigation menus, for anonymous users Home, Bookings, Sign Up, and Login. And for the logged in users, only Home and My Account menus are visible to logged in users. And My Account drop-down has Manage Bookings and Logout menus.
This Full responsive header is fixed and consistent across in all pages of the website to allow for easy navigation and without the user having to rely on the browser’s “forward” and “back” arrows as navigation substitutes.

The main section is split into three areas: the background image that displays an image of a dinning environment, How CuisinePlus works section that sums up the three critical processes of choosing the restaurant of your choice, book the restaurant, and arrive the restaurant at the expected date and time to have your meal. The third second is the Featured Restaurants that has only eight restaurants on display.
The main section introduces the user/customer to the relevant sections of the site, and takes a progressive disclosure approach by revealing to the user that CuisinePlus is an online restaurant reservation platform for diners, and more importantly, encourages them to go further beyond the homepage to create fluid user experience.

All users can view the list of restaurants on display, but only registered logged in users have access to the full detail of each restaurant. When non-registered or non-logged in users click on any of the displayed restaurant, they are taking to the sign in page to log in first.
And when logged in users click on any of the displayed restaurant, they are taken to the individual restaurant page of that specific product to continue with their purchase.
The Individual Restaurant Page has an image of either one of the restaurant’s menus or the building itself and summary of restaurant name, cuisine types, like icon (with a counter, if the restaurant has been liked by a happy customer. A liked icon is highlighted in red colour and a yet-to-liked icon is black) and a review icon.
In broader terms, the individual restaurant page has has three broad sections: Overview, Reviews, and Menus sections:

The overview section that shows the restaurant information such as about the restaurant, address, open hours, Cuisines, phone number, and a booking form for users to make a booking.

The Reviews section is divided into two sections. The first section shows customers’ reviews and the second section contains a form to leave a review about the restaurant.

The Menus section holds the menu image and menu description.
A registered logged in user can manage his booking by clicking on the Manage Bookings menu on My Account drop-down. This page holds only the list of reservation made by the user.

The reservation contains the information about the reservation. There is edit and delete button should the user wants to change their booking information or to delete their booking.

When the users click on the edit button, it opens the edit form that contains the user’s booking information such as name, number of guests, booking date and time, and any additional information entered by the user when making the reservation. The user can then make changes and click the “Save Changes” button to update the information. But should the users no longer wants to make any changes to their button, they can click the “Cancel” button and go back to Your Reservations page.

Users may choose to delete the booking completely. Should that be the case, the user will have to click the delete button.
A deletion requires a second level for confirmation for deletion to take effect. So, when the logged users click on the delete button, it opens the confirmation form with a warning that deleting the booking will also delete related items. To go ahead, the user has to click the “Yes, I’m sure” button. And should the users change their mind, they have to click the “No, take me back” button to return to the Your Reservations page.
The process from navigation menus to bookings deletion, as progressive action of the user, is graphically represented in the information architecture and database scheme below.


- Django
- Gunicorn
- Cloudinary
- Dj3-Cloudinary-storage
- Dj-database-url
- Psycopg2
- Pylint-Django
- Pep8
- Heroku
- django-multiselectfield
- Django Crispy Forms
- Summernote
- Jinja template language support for VSCode.
- Markdown lint - used For style checking and to maintaining standard.
- Pylance – a language support for python for writing a better code.
- Code Spell Checker – a language support for python for writing a better code.
-
W3C Markup Validator was used to check the markup validity of the HTML5 for technical quality and correctness, and no errors found.
-
W3C CSS Validation Service was used to check the markup validity of the CSS3 for technical quality and correctness, and found error in menu-image class margin-top, which has no unit after 10.

.menu-image{
    aspect-ratio:3/1;
    margin-top: 10;
    min-width: 100%;
    height: 30vh;
}
Fixed bug:
Fixed issue by adding rem unit: margin-top: 0.6rem;

Accessibility Insights was used to check and fix accessibility issues.
It found one issue of aria-hidden focus on homepage.

Fixed bug:
The accessibility issue was as a result of not closing the target=“_blank” for Twitter and Instagram icons on footer. I had to close it to fix the issue and add other accessibility requirements for links that open to external websites.

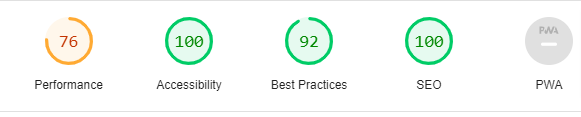
Chrome's Lighthouse was used to test accessibility, and the check returned the initial reports below:

-
Initial accessibility score was 98 as a result of “failed element”, which was due to improperly ordered heading in one of the “How CuisinePlus Works” section. While the header had h2 heading, the sub-sections had h5 heading:
<div class="container-fluid text-center">
    <div class="row pt-5">
        <h2><strong>How CuisinePlus Works</strong></h2>
    </div>
    <div class="row pt-4 pb-5">
        <div class="col-md-4">
            <i class="fa-solid fa-utensils fa-3x" aria-hidden="true"></i>
            <h5>Pick from our featured Restaurants</h5>
        </div>
        <div class="col-md-4">
            <i class="fa-solid fa-table fa-3x" aria-hidden="true"></i>
            <h5>Make a booking by providing date, time, and number of guests</h5>
        </div>
        <div class="col-md-4 fa-3x">
            <i class="fa-solid fa-door-open" aria-hidden="true"></i>
            <h5>Looking forward to seeing you</h5>
        </div>
    </div>
</div>
Fixed bug:
Fixed issue by changing all the h5 tags to h3 in the subsections for properly ordered heading. When tested a second time, Accessibility reports 100% as shown below:
-
Best practices rating was a bit poor at 83 due to images with incorrect aspect ratio.
Fixed bug: Fixed issue by resizing all the restaurants' images and deleting height value from img-restaurant-list class in style.css.
When tested a second time, Accessibility reports rose to 100 and Best Practices improved significantly from 83 to 92, as shown below:

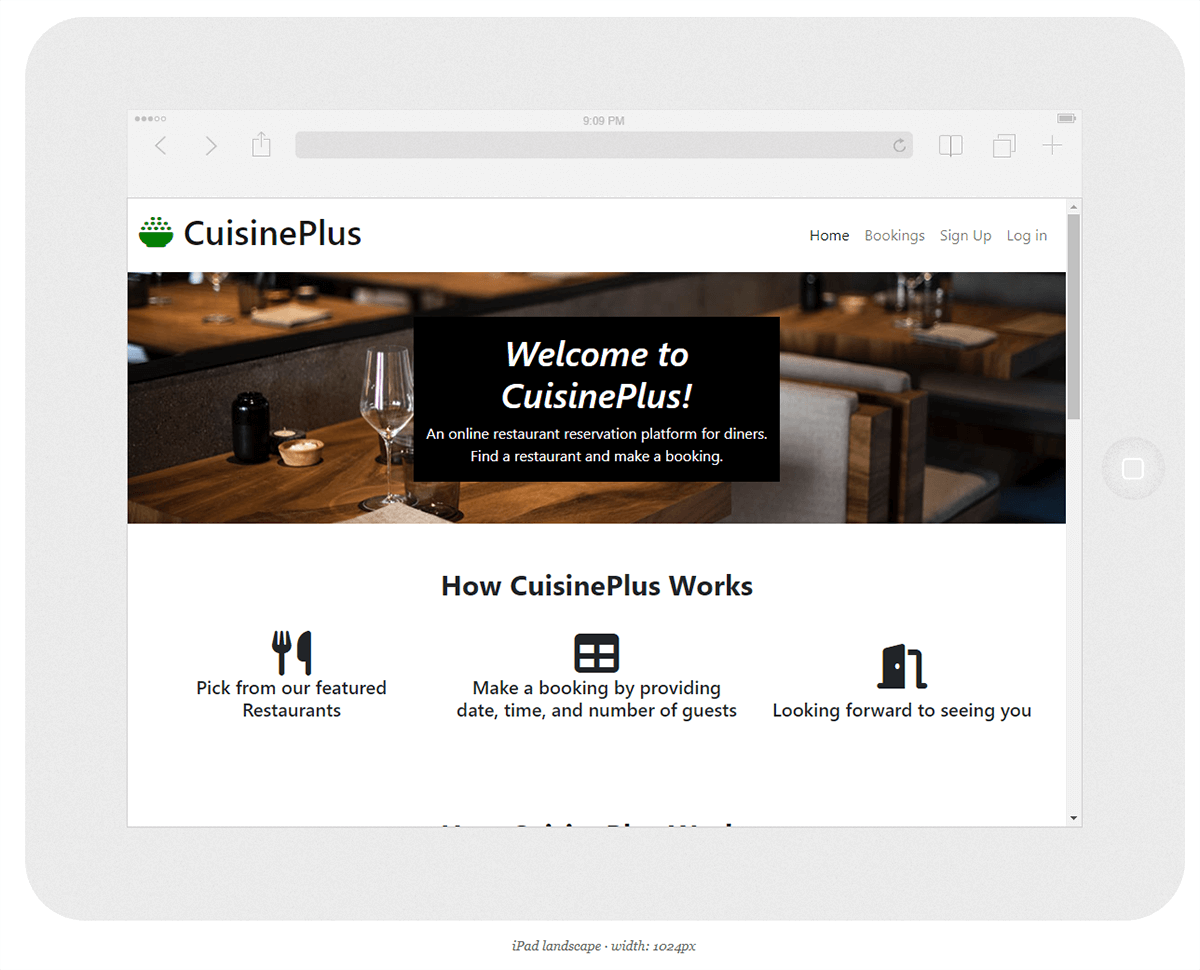
- Responsinator was used to test the site on real mobile devices.
| iPhone 12 | iPad Portrait |
|---|---|
 |
 |
-
iPad Landscape

All pages, links, buttons, and forms were tested to ensure they work as expected:
| Feature | Expected | Works as Expected |
|---|---|---|
| Logo | Click the logo | Opens the homepage |
| home | Click the home link | Opens the homepage |
| Sign Up | Click the Sign Up link | Opens the Sign Up page |
| Log In | Click the Log In link | Opens the Log In page |
Eight restaurants are displayed on the homepage. Click a restaurant name, it opens the individual restaurant’s detail page for logged in users and opens the login page for the non-logged in users, both as expected:
| Feature | Expected | Works as Expected |
|---|---|---|
| restaurants | Click a restaurant name - non-logged-in Users) | Opens the Log In page |
| restaurants | Click a restaurant name - logged-in Users) | Opens individual restaurant’s detail page |
The footer contains the copyright information and social networks icons, Instagram, GitHub, and Twitter. Click each social media icon, it opens the social media page on a new tab, as expected:
| Feature | Expected | Works as Expected |
|---|---|---|
| GitHub | Click the GitHub icon | Opens GitHub page in a new tab |
| Click the Instagram icon | Opens Instagram page in a new tab | |
| Click the Twitter icon | Opens Twitter page in a new tab |
The Restaurant detail page contains the restaurant relevant information, and forms to leave a review, and make a booking.
| Feature | Expected | Works as Expected |
|---|---|---|
| Individual Restaurant Page | Click the Restaurant Name link | Opens Individual Restaurant Page |
| Restaurant information | View the Restaurant information | |
| Booking form | View the Booking form | |
| Customers Reviews and Review form | View the Review form | |
| Restaurant menu | View the Restaurant menu |
| Feature | Prepopulated fields | Required attributes | Cancel Button | Submit Button | Validation message | Toast Message | Saved in Database |
|---|---|---|---|---|---|---|---|
| Sign Up form | No | Yes | No | Yes | Yes | Yes | Yes |
| Login form | No | Yes | No | Yes | Yes | Yes | Yes |
| Booking form | No | Yes | No | Yes | Yes | Yes | Yes |
| Edit Booking | Yes | No | Yes | Yes | No | No | Yes |
| Delete Booking | No | No | Yes | Yes | Yes | No | No |
| Review form | No | Yes | No | Yes | Yes | Yes | Yes |
| Edit Review | No | No | No | No | No | No | No |
-
Clone from GitHub to VSCode:
- Log in to GitHub
- Click on the code button beside the green gitpod button.
- Copy the link and go to VSCode
- Press F1 to display the command palette.
- Enter gitcl, select the Git: Clone command, press Enter
- When prompted for the Repository URL, enter the copied GitHub repository url, then press Enter.
- Select (or create) the local directory into which you want to clone the project.
- Repository is now ready for development
-
Environment Variable:
- Create virtual environment in the project folder - d:\workspaces>python –m venv my_project\venv
- Activate the virtual environment - d:\workspaces>my_project\venv\Scripts\activate.ps1
- cd into new project folder - d:\workspaces>cd my_project
- To open in VSCode - d:\workspaces\my_project>code.
- Open VSCode and Press CONTROL+SHIFT+P, type‘Python Interpreter’ and select it.
- Either select the venv environment from the list or click ‘Enter interpreter path’ and navigate to the venv folder, and proceed into Scripts and select python.exe
- venv\Scripts\python.exe
- Log in to Heroku
- Create new Heroku App
- Add Database to App Resources
- Located in the Resources Tab, Add-ons, search and add e.g. ‘Heroku Postgres’
- Copy DATABASE_URL value
-
In VSCode (also in gitpod, if its your IDE), create new env.py file on top level directory
-
In the env.py, import os library
-
Set environment variables
-
Add in secret key
import os
os.environ["DATABASE_URL"] = "Paste in Heroku DATABASE_URL Link"
os.environ["SECRET_KEY"] = "Make up your own randomSecretKey"
Back to Heroku Dashboard
- Click the settings tab
- Click Reveal Config Vars
- Add Secret Key to Config Vars
SECRET_KEY, “randomSecretKey”
-
In settings.py, reference env.py:
import os import dj_database_url if os.path.isfile("env.py"): import env -
Remove the insecure secret key and replace - links to the SECRET_KEY variable on Heroku:
SECRET_KEY = os.environ.get('SECRET_KEY') -
Comment out the old DataBases Section and Add new DATABASES Section:
DATABASES = { 'default': dj_database_url.parse(os.environ.get("DATABASE_URL")) } -
Save all files and Make Migrations
-
Login to Cloudinary and Copy your CLOUDINARY_URL e.g. API Environment Variable
-
Back to env.py and Add Cloudinary URL
os.environ["CLOUDINARY_URL"] = "cloudinary://************************" -
Go to Heroku Dashboard and in Config Vars:
- Add Cloudinary URL
- Add DISABLE_COLLECTSTATIC, 1
-
Back to VSCode and in settings.py
-
Add Cloudinary Libraries to installed apps
INSTALLED_APPS = [
    …,
    'cloudinary_storage',
    'django.contrib.staticfiles',
    'cloudinary',
    …,
]
Note that the order is important
-
Tell Django to use Cloudinary to store media and static files (pPlace under the Static files Note).
STATIC_URL = '/static/' STATICFILES_STORAGE = 'cloudinary_storage.storage.StaticHashedCloudinaryStorage' STATICFILES_DIRS = [os.path.join(BASE_DIR, 'static')] STATIC_ROOT = os.path.join(BASE_DIR, 'staticfiles') MEDIA_URL = '/media/' DEFAULT_FILE_STORAGE = 'cloudinary_storage.storage.MediaCloudinaryStorage' -
Link file to the templates directory in Heroku (place under the BASE_DIR line)
TEMPLATES_DIR = os.path.join(BASE_DIR, 'templates') -
Change the templates directory to TEMPLATES_DIR (Place within the TEMPLATES array)
TEMPLATES = [ { …, 'DIRS': [TEMPLATES_DIR], …, ], }, }, ] -
Add Heroku Hostname to ALLOWED_HOSTS (e.g. cuisineplus)
ALLOWED_HOSTS = ["PROJ_NAME.herokuapp.com", "localhost"] -
Create Procfile (with a capital P) on the top level directory
-
In Procfile, Add code:
web: gunicorn PROJ_NAME.wsgi -
Add, Commit, and Push
- Code Institute lectures and “Hello Django” and "Django Blog" walkthrough projects shaped and firmed the ideas and techniques that frame this Portfolio Project 4 for Diploma the Full Stack Software Development.
- I drew inspiration for the structural makeup of the site from DineSurf.
- Mark Down Guide
- Bootstrap
- Django documentation -
- Customizing Form Fields, Widgets, Placeholders, & CSS - Python & Django - quite a helpful video on how to customize Form Fields, Widgets, and Placeholders in Django.
- Tinypng.com – used to reduce the file size.
- Stackoverflow, always an important resource for answers to almost all knotty coding issues.
I am eternally grateful for your care, love, help, and support:
- Andrew Dempsey;
- Akshat Garg and Jubril Akolade, my Code Institute mentors;
- Code Institute tutors: Ed, Gemma, John, and Scott;
- Rachel and the Code Institute Student care team.