This example creates an Autonomous Database (JSON) exposed to the public Internet.
During this UseCase we're going to:
- Use Github Actions to build a pipeline. We have configured 2 different workflows: one for testing (CI) and the other for deploy the resources (CD).
- Use OCI S3 as backend for the terraform state.
- Deploy IaC using Terraform, in this case an ADB resource.
-
Clone this repo in OraHub and create you own repository.
-
The first thing you’ll need to do before your GitHub Actions can run is to add your credentials to the repository. To do this you will need to follow these steps:
--Navigate to your repository and select the Settings tab. -- Once there you should see on the left a Secrets section third from the bottom of the list, click on that. -- Click on the New repository secret button. -- Add the next secrets:
user_id
api_fingerprint
token
-
token is a personal github token.
-
We want to use a S3-Compatible Backend , read the documentation carefully. You need to provide an OCI object storage bucket called "terraform-backend".
-
Create a "Customer Secret keys" also named as "Amazon S3 Compatibility API keys". A Customer Secret key consists of an Access Key/Secret key pair.
-
Add the Custome Secret Keys like secret variables as the previus ones:
access_key_id
secret_access_key
-
The pipelines configuration is defined in .github/workflows, in this case we have created plan.yaml and apply.yaml
-
Add your api_private_key to the file user.pem
-
Rename the file terraform.tfvars.template to terraform.tfvars and add the values of your tenancy_ocid and compartment_ocid
-
Complete the values of your region and adb_password in the file adb.auto.tfvars
-
Complete the values of your region and namespace in the file remote_backend.tf
-
Create a new branch, and change your code, for example the database name in the file adb.auto.tfvars
-
Go to your github repository page and start a "pull request" .
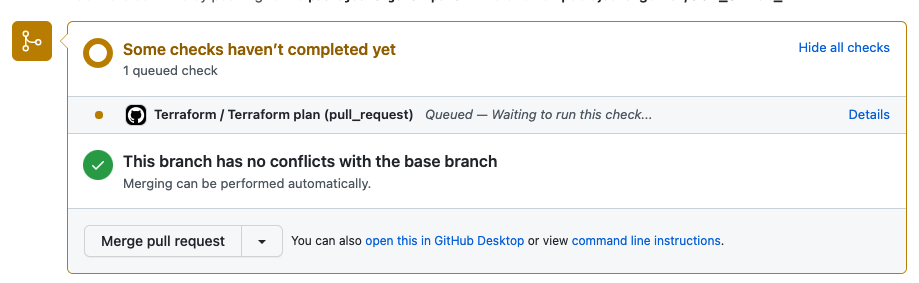
-
This is the outcome of actions/github-script@v6 , you can review the plan outcome before do the merge.

-
Just when the "merge pull request" is closed the workflow with the apply job is launched. (CD)

-
If we review the pipelines ( plan and apply) in the tab "actions"

-
We can see the different workflows/pipelines steps...


-
Check that now you can see the database provisioned in your compartment.

-
After the provisioning, the outcome of the apply step is showed in the merge request page.

-
Remove manually (using OCI Console) the ADB created previously.

