
This project is yet another TUPPLUR Roller Blind automation project. It's based on an ESP8266 which utilizes MQTT for communication with HomeAssistant. It supports command, postion, availability, and set_position topics with the default payloads used by the MQTT Cover Platform. There are also a few configuration/calibration topics (details further down).
My goal is to integrate all of this into Tasmota and to have as close to a plug-n-play solution as possible.
HomeAssistant configuration to operate Rapid TUPPLUR:
# Example configuration.yaml entry
cover:
  - platform: mqtt
    name: "Shade 1"
    command_topic: "shade1/set"
    position_topic: "shade1/position"
    availability_topic: "shade1/availability"
    set_position_topic: "shade1/set_position"
    qos: 0
    retain: false
    payload_open: "OPEN"
    payload_close: "CLOSE"
    payload_stop: "STOP"
    position_open: 100
    position_closed: 0
    payload_available: "online"
    payload_not_available: "offline"
    optimistic: false
    value_template: '{{ value.x }}'
Source: https://www.home-assistant.io/components/cover.mqtt/#full-configuration-state-topic-without-tilt
At some point I hope to migrate this firmware to a Tasmota template.
You'll need to build a Rapid TUPPLUR before you can add it to HomeAssistant.
Besides the Ikea TUPPLUR Roller Blind you'll need an ESP8266, like a NodeMCU, and a 28BYJ-48 stepper motor with ULN2003 driver. You'll also want to select a mounting bracket.

Nikodem Bartnik created an excellent overview video that explains how to work with this stepper motor: https://www.youtube.com/watch?v=avrdDZD7qEQ
The 28BYJ-48 ULN2003 has 2048 steps per revolution and that value is baked into the firmware. If you're using this for a different stepper motor (NEMA17 has 200 steps) you'll need to modify the code.
Microstepping is not supported for the same reasons Nikodem outlines.
IMPORTANT BLIND SIZE NOTE: TUPPLUR come in widths from 23" to 48". The 28BYJ-48 ULN2003 stepper motor/driver combo is one of the cheapest you can find. But it has limited torque (functionally only 300 g/cm). Retracting the blind from a fully closed position can be a problem for the larger blinds. The 28BYJ-48 comes in a 5v and 12v version. The 5v version should be able to operate blinds up to 30", however, the 12v version is advisable for larger blinds. And the 48" blind might not work at all. Though Samir Sogay seems to have gotten his to work with some effort: https://youtu.be/7t00NgeBgO8?t=120.
The ULN2003 needs four output pins to control the stepping plus GND and 5-12 VCC. You can repurpose commercial hardware for this project (like a Sonoff). But a standard Sonoff doesn't have the full range of 16 GPIO pins availabele on a header. So keep that in mind if you're wanting to use something like a Sonoff (you'll need to do some soldering). I chose to use a NodeMCU like Martin Engström to have easy access to the GPIO pins.
Here are two options that should work depending on how you want your blinds mounted.
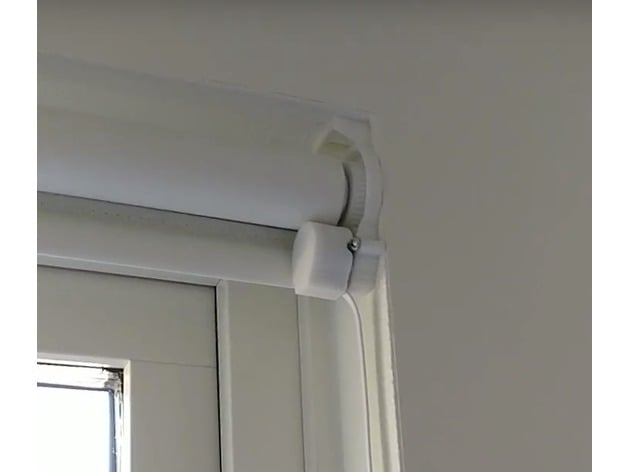
- Inside mount (w/ gear reduction): https://www.thingiverse.com/thing:2392856
- Outside mount (w/ gear reduction): https://www.thingiverse.com/thing:2530155
- Outside mount: https://www.thingiverse.com/thing:2065722
Gear Reduction: The inside/outside mounts with gear reduction includes a 10:19 gear reduction to help increase the output torque of the 28BYJ-48. If you're using one of the larger sized blinds these options are advisable. The reduction almost doubles the torque but also reduces the operation speed by half.
Install Tip: If you are using a bracket with a gear reduction, before installing the motor you want to mark one of the teeth (that you can see) that is attached to the motor (the smaller gear). This will let you count motor rotations later.
- Clone this repo and configure your MQTT and Wifi details in RapidTupplur.
- Compile and flash to your ESP8266
- Screw everything together and hang the blind on the wall.
- Configure the blind:
- With power off, manually pull your blind all the way down and count the number of motor rotations needed to get to the bottom. See Install Tip above.
- Power up your hardware
- Send MQTT message to
shade1/set_travelwith a payload of the number of rotations (eg24.3) - Send MQTT message to
shade1/set_current_positionwith a payload of100 - Retract the shade through HomeAssistant or by sending message to
shade1/setofOPEN. - Repeat: 1-5 while fine tunning the number of rotations in 3 until the blind retracts as desired. These settings are stored to flash so future power cycles will retain the configuration.
shade1/set: OPEN, CLOSE, STOPshade1/set_position: int 0 - 100. 0 is fully open, 100 is fully closed.shade1/position: int 0 - 100. Current position of the blind.shade1/availability: online, offlineshade1/set_travel: float 0.0 - 500.0. This value calibrates the blind and sets the # of motor rotations needed to fully open/close the blind.shade1/set_set_current_position: int 0 - 100. If the blind is out of sync (thinks the blind is down but it's up) you can use this to force a new current position.
- Add MQTT Cover yaml (above) to your configuration.yaml
- Restart HomeAssistant
- Add a cool automation!
Automations to try-
- Sun rise/set (blinds down at sun set and up at sun rise)
- Plex Play (blinds down when plex is playing)
- Hot Day (blinds down if outside temps >92deg)
https://www.youtube.com/watch?v=cdtB0BqNfGk
Niklas' blind project revolves around a Raspberry Pi and commercial 12v roller blind motors sourced from https://m.nu. Each TUPPLUR blind needs one of the 69.90 € motors. The project pages on Niklas' website are no longer available.
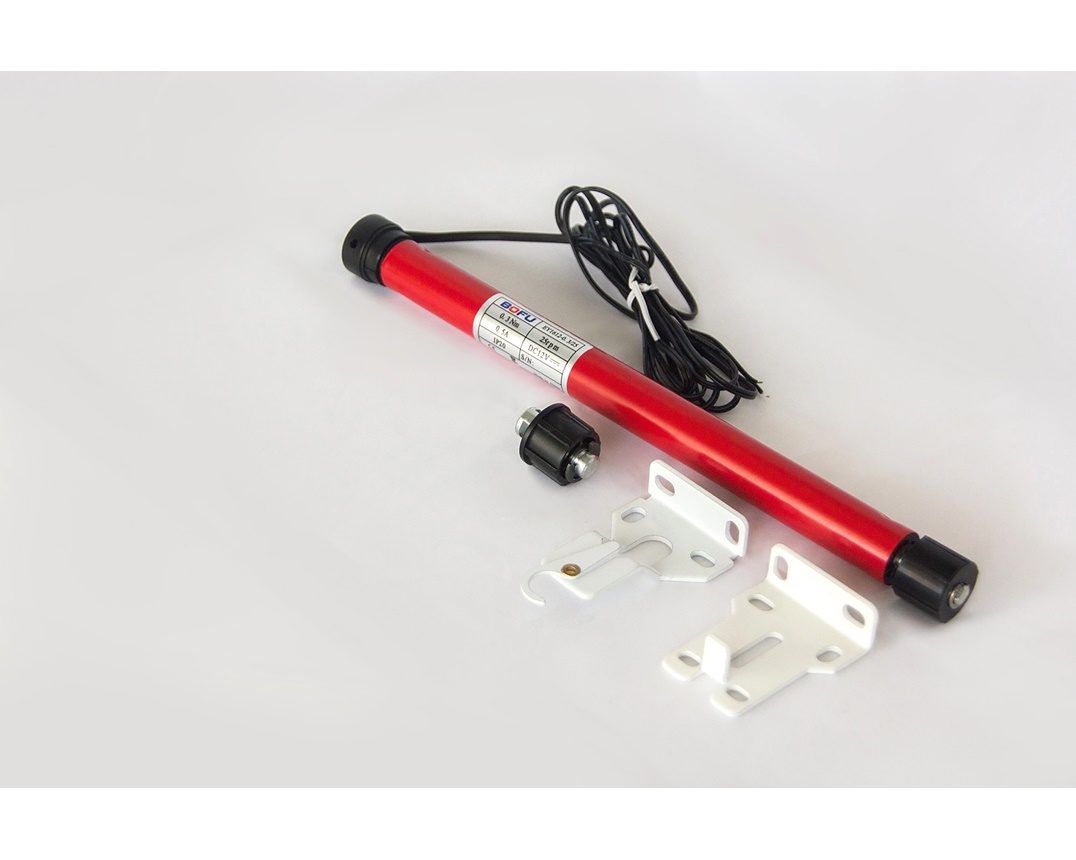
If you can afford commercial 12v roller blind motors then this is potentially a good solution. I have no doubt that a $70 motor will have more than enough torque to run the largest TUPPLUR blind. But for installations requiring many blinds, this is an expensive option.
Also, since the original project pages are no longer available there is not control code available.
https://www.instructables.com/id/Motorized-WiFi-IKEA-Roller-Blind/
Martin's project is an excellent guide and I prefer his solution over other automated blind systems I've seen. The combination of ESP8266, 28BYJ-48 stepper, and 3D printed brackets make this build very affordable. And I get the impression that many Ikea roller blind projects that have come since Martin's project have been inspired by it.
Martin used Lua firmware that he wrote for his NodeMCU (ESP8266). His manual calibration method with a single button (long/short presses) is nice, but I didn't like the form factor of the extra box to house the switch. I also wanted MQTT calibration. And I wanted "native" HomeAssistant MQTT Cover Platform support.
https://www.youtube.com/watch?v=Dka4of30YOY
Peter's project was inspired by Martin Engström. Peter's mounting hardware allows for inside window frame mounting and introduces a gear reduction to help overcome the problems with larger blinds.
Peter also provides his own firmware with an onboard web UI to operate the blinds. The firmware includes OTA updates and JSON configurations saved to SPIFFS. All in all, very nice. In a lot of ways Peter's current project is better than this one.

Peter's github repo has been archived and he doesn't seem to have plans to do future improvements. Also, I wanted an out of the box HomeAssistant solution and preferably Tasmota firmware with a blind Template.