NOTE: Pictures and diagrams without mentioned source are taken from Quera.
Linux is an open-source Unix-like operating system based on the Linux kernel, an operating system kernel first released on September 17, 1991, by Linus Torvalds. Linux is typically packaged as a Linux distribution.
Linux is one of the most popular operating systems, with around 3-3.5 billion users worldwide. Thanks to its extensibility and nature as an open-source, it has led to the creation of many Linux-based distributions that have strong features.

You can find a complete tree of linux distros here
Shell is an interface that connects you to the operating system (OS) and lets you work with it. Shell is responsible for interpreting commands and returning the results back. The default shell in Ubuntu (and many other distros) is bash.
A terminal is a graphical software that you can access any shell you want through it.

COMMAND [OPTIONS] [ARGUMENTS]- COMMAND: This part is the command that is sent to the OS. Every command is a program that tells the OS to do something.
- OPTIONS: We can put zero or more options here. They specify the details of our command. Options are denoted by "-" or "--" sign.
- ARGUMENTS: These are the inputs that the command is going to operate on.
Be aware: All of the above parts are case-sensitive.
Help: You can get information about a command, using one of the following commands:
COMMAND --helpor
man COMMANDNOTE: Super key is the key with windows sign on it (= Windows key).
| Key | Action |
|---|---|
| Super key | Opens Activities search |
| Ctrl + Alt + T | Ubuntu terminal shortcut |
| Super + L or Ctrl + Alt + L | Locks the screen |
| Super + D or Ctrl + Alt + D | Show desktop |
| Super + A | Shows the application menu |
| Super + Tab or Alt + Tab | Switch between running applications |
| Super + Arrow keys | Snap windows |
| Super + M | Toggle notification tray |
| Super + Space | Change input keyboard (for multilingual setup) |
| Alt + F2 | Run console |
| Ctrl + Q | Close an application window |
| Ctrl + Alt + arrow | Move between workspaces |
| Ctrl + Alt + Del | Log out |
echo <argument>The simplest command in Linux is echo which simply prints out every argument that is passed to it. Try typing echo hello Linux! in your terminal!
pwdIn Linux, a directory is something that contains some other files and directories. When you open the terminal, you are in /home/<username> by default (where <username> is your account name).
By entering pwd in your terminal (which stands for print work directory), you can see where you are in the file system.
cd <address>cd stands for change directory and as its name implies, we can use it to move in the file system.
(<address> can be either relative or absolute)
NOTE: We can use . and .. in the <address> part. . is current directory and .. is parent directory. For example, if we are in /home/parsa and we run cd .., we will be moved to /home.
~ : This sign stands for the current user's home directory which is /home/<username>. For example cd ~/Downloads/ will move me to /home/parsa/Downloads/.
ls [OPTIONS]... [FILE]...This command lists information about the FILEs (We often use this command without any arguments which takes the current directory as an argument by default)
important options
| option | effect |
|---|---|
| -a or --all | do not ignore entries starting with . |
| -l | use a long listing format (in more details) |
| -h or --human-readable | with -l and -s, print sizes like 1K 234M 2G etc. |
| -r or --reverse | reverse order while sorting |
| -t | sort by time, newest first |
history [<number of commands>]If we enter history in the terminal, we can see the complete history of our entered commands. We can also restrict the number of commands to see. For instance, by entering history 3, we can see our last 3 commands.
Moreover, we are able to clear our history using the history -c command.
mkdir [OPTION]... DIRECTORY...This command creates the DIRECTORY(ies), if they don't already exist.
An important option: If we want to make nested directories with normal mkdir commands, we should do this:
mkdir parent
cd parent/
mkdir child
But using -p or --parents option, we can do it in a single command:
mkdir -p parent/childrmdir [OPTIONS]... [DIRECTORY]...This command removes DIRECTORY(ies) if they're empty. We have the -p option just like the one we had in the mkdir command.
To remove a non-empty directory, we should use the rm command which we will learn about later.
touch file_nameThis command creates a new file, if it doesn't already exist. Otherwise, it will update the modification time of the existing file to the current time.
cat [OPTION]... file_nameWe can see the contents of a file using the cat command. This command has some useful options like -n for printing line numbers, -b for ignoring blank lines, and so on. Use cat --help for more information.
Use of cat in redirections
If the cat command is used without any arguments, it will copy stdin into stdout. This attribute is useful in redirection (which we will learn about in a minute).
For example, we can use the following command to simply write in a file:
cat > file_nameTry it :)
cp SOURCE DESTWe use cp simply to copy a file or directory. For directories, we should use -r option to copy recursively.
mv SOURCE DESTThis command moves a file or directory (You can think about it like cut and paste). As always, don't forget to use --help or man for more information :)
NOTE: We also use mv command to rename files.
rm [OPTION]... FILE...We use rm to delete a file or directory. Note that to delete a non-empty directory, we use rm -r to remove recursively.
date [OPTION]... [+FORMAT]This command is a powerful tool to see the time in any desired format.
To output the current time in a specific format, we use date '+FORMAT' where FORMAT can be made using the following characters (This is from date --help):
FORMAT controls the output.  Interpreted sequences are:

  %%   a literal %
  %a   locale's abbreviated weekday name (e.g., Sun)
  %A   locale's full weekday name (e.g., Sunday)
  %b   locale's abbreviated month name (e.g., Jan)
  %B   locale's full month name (e.g., January)
  %c   locale's date and time (e.g., Thu Mar  3 23:05:25 2005)
  %C   century; like %Y, except omit last two digits (e.g., 20)
  %d   day of month (e.g., 01)
  %D   date; same as %m/%d/%y
  %e   day of month, space padded; same as %_d
  %F   full date; like %+4Y-%m-%d
  %g   last two digits of year of ISO week number (see %G)
  %G   year of ISO week number (see %V); normally useful only with %V
  %h   same as %b
  %H   hour (00..23)
  %I   hour (01..12)
  %j   day of year (001..366)
  %k   hour, space padded ( 0..23); same as %_H
  %l   hour, space padded ( 1..12); same as %_I
  %m   month (01..12)
  %M   minute (00..59)
  %n   a newline
  %N   nanoseconds (000000000..999999999)
  %p   locale's equivalent of either AM or PM; blank if not known
  %P   like %p, but lower case
  %q   quarter of year (1..4)
  %r   locale's 12-hour clock time (e.g., 11:11:04 PM)
  %R   24-hour hour and minute; same as %H:%M
  %s   seconds since 1970-01-01 00:00:00 UTC
  %S   second (00..60)
  %t   a tab
  %T   time; same as %H:%M:%S
  %u   day of week (1..7); 1 is Monday
  %U   week number of year, with Sunday as first day of week (00..53)
  %V   ISO week number, with Monday as first day of week (01..53)
  %w   day of week (0..6); 0 is Sunday
  %W   week number of year, with Monday as first day of week (00..53)
  %x   locale's date representation (e.g., 12/31/99)
  %X   locale's time representation (e.g., 23:13:48)
  %y   last two digits of year (00..99)
  %Y   year
  %z   +hhmm numeric time zone (e.g., -0400)
  %:z  +hh:mm numeric time zone (e.g., -04:00)
  %::z  +hh:mm:ss numeric time zone (e.g., -04:00:00)
  %:::z  numeric time zone with : to necessary precision (e.g., -04, +05:30)
  %Z   alphabetic time zone abbreviation (e.g., EDT)
To see a specific time we can use --date option. See the following example:
$ date --date="2 year ago"
Fri Oct 16 12:13:24 AM +0330 2020
$ date --date="34 sec ago"
Sun Oct 16 12:13:50 AM +0330 2022A stream is simply a river of data. Linux commands (or more precisely, Linux processes) talk to each other in terms of streams.
Each Linux process has three standard streams to communicate with others. It gets and gives data through them. The standard streams are "Standard Input", "Standard Output", and "Standard Error". Each of them has a code which you can see here:

-
stdin: The command can get its input through the stdin (standard input) stream. In raw use of commands, the stdin comes from the keyboard as you type in the terminal.
-
stdout: While the command is running, it sends some outputs that go through the stdin (standard output). In raw use of commands, the stdout stream is shown in the terminal.
-
stderr: During the execution of a process, it may encounter an error. The program sends errors through the stderr (standard error) steam. In raw use of commands, the stderr stream is shown in the terminal too.
Redirection is a way to use files as stdin and stdout instead of terminal. Namely, we can either give a file to a command as its standard input or save the standard output of a command in a file.
Here are different types of redirections:
$ echo "Put this in file.txt" > file.txt  # overwrite the file
$ echo "Add this to file.txt" >> file.txt  # append to the file
$ wc < file.txt  # give the file as input of wc command
$ cat << MARKER > file.txt  # another way of giving input to a command's stdin
some
data
here
MARKER
Pipelines let us give the output of a command as input of another one. Consider the following picture:

Using pipelines, we can combine multiple commands and make powerful commands to do a lot of things in a single line.
The general structure of pipelines is like this:
command1 | command2 | ...As an example, here I introduce a pipeline that I often use when I want to find out a specific option of a command:
COMMAND --help | grep "what I'm looking for"Use it and enjoy :)
Package Managers are essentially software applications that help users to Search, Download, Install, Remove, and Update software applications on their computer. Experienced Linux users will very rarely download software from websites or any other location. The primary reasons for this included aspects such as ease of use, security, and the fact that most Linux distributions have a list of sources where users can download free open-source software packages.
For most novice users of Linux, the most common and popular package manager they are likely to first start using is the apt (Advanced Package Tool) because it is most widely shipped as the default Package Manager for users of Debian, Ubuntu, and Mint. We will cover some basic and common commands of apt:
First of all, we update our package manager, meaning that it updates its package list if there is any new package or new version of a package available.
sudo apt updateWe can also search for a package:
sudo apt search [PACKAGE_NAME]Then we can install a package:
sudo apt install [PACAKGE_NAME]If we don't want a package anymore, we can delete it:
sudo apt remove [PACKAGE_NAME]By executing the following command, if there is a new version available for a package that has been already installed, it will upgrade to the new version:
sudo apt upgradedu [OPTIONS] [ARGUMENT]This command indicates the disk usage (as its name implies) and can be used without arguments in which the current directory is passed by default. Some of its useful options are -h, --human-readable, -s, --summarize, -c, --total, and --time.
file [OPTIONS] file_nameThis command determines type of a file. In Linux, file extensions don't matter, So the file command helps us to figure out the file type. We can use -b option to get rid of extra information about the file and only see its type.
Vim editor is among the best editors used in the command-line interface to open, edit and save files. Vim is the updated version of Vi editor that’s why vim is abbreviated as “Vi improved”.
To install vim, enter sudo apt install vim -y in your terminal. Then to open a file in vim, use the following command (It will create a file if it doesn't exist):
vim file_nameNow you are in the vim environment. Vim has two modes:
When you open any file with vim, you are in the command mode by default. In command mode, you can perform different tasks by using the commands for example to delete a line, to copy the line, and to navigate the cursor in any specified position of the file. If for any reason you are not in the command mode, simply press the ESC key, to enter in the command mode.
Crucial Note: To save changes, just enter :w in command mode and to exit vim, enter :q.
To insert something, you have to choose the insert mode, for this purpose, simply press the i key to enter the insert mode. In this mode, you can write anything and can add anything to the file. Once you are done inserting, press the ESC key from the keyboard and switch insert mode to command-line mode.
There are an infinite number of commands in vim :) but you don't need to learn them all when you start working with it. As you go further in vim, you'll find new commands one by one based on your needs. So the best way of learning vim is to just use it every day.
But if you are quite new to vim, start with vimtutor. Simply type vimtutor command in your terminal. This is a good way to start working with vim.
In Linux and many other operating systems, directories can be structured in a tree-like hierarchy. All the files are arranged as a tree and its branches. The topmost directory is called the root (/) directory. All other directories in Linux can be accessed from the root directory.
The following figure summarizes Linux standard file system hierarchy:

Be sure to refer to the official Linux Filesystem Hierarchy Standard (FHS) web page for details about each of these directories and their many subdirectories. Wikipedia also has a good description of the FHS. This standard should be followed as closely as possible to ensure operational and functional consistency.
We have already learned the cat command to view files. Here, we introduce some more commands to do this.
NOTE: All of the following commands also work for multiple files.
This command is for better viewing long text files in the terminal. Using this command, we can view the file one page at a time. We can also move in the file with arrow keys. Some keys we can use in the more command:
space: Next pageenter: Next lineB: Previous page=: Current line numberq: Exit back to the terminal
If we want to display a file beginning from line number N, we should open the file like this:
more +<N> example.txtThis command is like more, but it has more advanced options! Some of them are given here:
G: First pageShift + G: Last page:<N>: Go aheadNlines/[string]: Search forward for the specified string?[string]: Search backward for the specified stringN: Next match during a searchShift + N: Previous match during a search
These two commands are faster with big files because they load them page by page (a text editor loads the whole file into the memory), so these commands are often used in pipelines too. If you want to see the results of a command which takes a lot of time to completely execute, just pass the output to less or more. For instance, if you want to see all log files of your system, you can run:
find / -name "*.log" | lessPrints the first 10 lines of a file. To change this number, there are two options:
-c, --bytes=[-]NUM: Print the first NUM bytes; with the leading '-', print all but the last NUM bytes-n, --lines=[-]NUM: Print the first NUM lines; with the leading '-', print all but the last NUM lines
Prints the last 10 lines of a file. To change this number, there are two options:
-c, --bytes=[+]NUM: Print the last NUM bytes; or use -c +NUM to print starting with byte NUM-n, --lines=[+]NUM: output the last NUM lines; or use -n +NUM to output starting with line NUM
As always, we can use these commands in pipelines. For example, suppose we want to print lines 117 to 122 of a file. We can use the following pipeline command:
cat file.txt | head -n 122 | tail +117This command is used to print selected parts of lines of a file. Suppose we want to print the first 5 characters of each line of the file. We can use -b or -c options:
cut -b 1-5 file.txtIf we do not type any number on each side of -, it will be interpreted as the end or beginning of the line. For instance, the following command prints from the 8th character to the end of each line:
cut -c 8- file.txtSuppose we have a .csv file in which fields are delimited using the character "," and we want to print only some columns of it (let's say 2nd and 4th columns). We first specify the delimiter using -d option and then we select the field we want using -d option:
cut -d "," -f 2,4 file.csvNote that the default output delimiter is the input delimiter. If we want to specify our own desired output delimiter, we could use --output-delimiter=STRING.
This command prints line, word, and byte count for a file. Some of its options are listed below:
-c, --bytes: print the byte counts-m, --chars: print the character counts-w, --words: print the word counts-l, --lines: print the newline counts-L, --max-line-length: print the maximum display width
Using this command, we will be able to sort the output (i.e. the content of files). Some important options are given here:
-f, --ignore-case: fold lower case to upper case characters-r, --reverse: reverse the result of comparisons-n, --numeric-sort: compare according to string numerical value-k, --key=[KEYDEF]: sort via a key; KEYDEF gives location and type-t, --field-separator=SEP: use SEP instead of non-blank to blank transition
Suppose we have a .csv file and we want to sort according to the values in the third column. We can do this by the sort command in the following manner:
sort -t ',' -k 3 -n -r << EOF
parsa,bashari,19,pass
amir,hamidzade,17,pass
alireza,sohrabi,20,pass
ehsan,karbalae,8,fail
arash,ziyae,18,pass
reza,dadashpoor,4,fail
EOF
and the output will be:
alireza,sohrabi,20,pass
parsa,bashari,19,pass
arash,ziyae,18,pass
amir,hamidzade,17,pass
ehsan,karbalae,8,fail
reza,dadashpoor,4,failThis command is a powerful tool for searching for a pattern in files. The total structure of this command is as follows:
grep [OPTION]... PATTERNS [FILE]...Note that patterns are in regex format. If you are not familiar with regex or regular expressions, you can see this tutorial. For practicing and testing your regular expressions, regex101 is a very useful tool.
grep has a lot of useful options which enable you to perform complicated searches. So, it is highly recommended to run grep --help and see them all. But here is a list of some useful options of this command:
-i, --ignore-case: ignore case distinctions in pattern and data-w, --word-regexp: match only whole words-v, --inverse-match: select non-matching lines-c, --count: print only a count of selected lines-n, --line-number: print line number with output lines--color: use markers to highlight the matching string
For example, suppose we want to see errors and warnings when compiling a C program. We can use the following command:
gcc test.c |& grep --color -iE "error|warning"Note that the |& is a way to send stderr instead of stdout through the pipeline to the next command. As a practice, search about -E option (obvoiusly first see --help).
This command is used to search files in the terminal. It doesn't obey the general structure of previous commands and it has the following structure:
find <where to start searching> <expression determines what to find> <-options> <what to find> -name option: With this option, we specify the name of the files or directories we are looking for. For instance:
find . -name "file/dir name"-type option: If we are only looking for files with that name, we use this option with f (for directories we use d). For example:
find . -type d -name "dir name"-size [+/-] [SIZE] [c/k/M/G]: We can specify our desirable size using this option. Consider the following examples:
find . -type f -size 100c  # exactly 100 bytes
find . -type f -size +1M   # more than 1 megabyte
find . -type f -size +100k -size -800k  # between 100 and 800 kilobytes
-maxdepth and -mindepth options: We can specify the maximum and minimum depth of search in the directories with these options.
-empty: This option only shows empty files and directories. For example, if we are looking for empty directories at a maximum depth of 2, we can use the following command:
find . -type d -maxdepth 2 -empty -name "dir name"find has two parts search and action. We told about the search part. Now, we introduce the action part.
We can do an operation on each of our search results. The default action in the find command is -print. We can change this by the -exec option. Using this action, we can perform commands on the results of the find command. For example, we want to show the type of each file:
find . -name *.py -exec file {} \;The arguments of -exec are:
- Command: Every command that is executable in our shell
- Placeholder: The
{}is the place where the search results will be in - Delimiter: A sign to show that the command is finished. We can use
+or;. The;sign runsncommands where+sign runs one command withnarguments.
We can use -delete action to delete the found files.
Wildcard characters in Unix/Linux allow the matching of files in an abstract way. Three main wildcards are:
- *: Zero or more characters
- ?: One character
- [ ]: One of the characters between brackets
For instance, if we have downloaded a large video file that was split into lots of small chunks. What is the easiest way to merge them back into one single video? If the files were named as ironman.001.mpeg to ironman.099.mpeg, we could merge them through one line of command:
cat ironman.*.mpeg > ironman.mpegor we can do this:
cat ironman.0??.mpeg > ironman.mpegFor example, suppose we want to download a whole season of a TV series. We could do this using brace expansion:
wget download.example.com/Friends.S04.E{01..24}.mkvNote that brace expansion also works for English letters (e.g. {p..w}).
Compression of big files is an important task in the data age. Here we introduce some basic compression capabilities of Linux. To start, we need a large file to perform compression. We create a file with a size of 100M using the following command:
cat /dev/random | tr -dc "[:alpha:]" | head -c 100M > largefileThis command enables us to compress a large file to a .gz file:
gzip largefileYou can check the result with ls -lh. Then we can decompress largefile.gz file using gunzip command:
gunzip largefile.gzThis command is similar to gzip but makes more compression and also takes longer to compress. The compress and decompress commands are really similar to gzip:
bzip2 largefile
bunzip2 largefile.bz2In gzip and bzip2 commands, we could only compress one giant file. In order to compress multiple files into a single file, we first need to put them together in a largefile and then compress it using previous commands. The process of putting together in Linux is called archiving. We use tar command to do so. It has so many options and as usual, I recommend seeing tar --help for more information.
To create a new archive, use -c option, and to specify the files, use -f option.
tar -cf archive.tar foo bar  # Create archive.tar from files foo and bar
tar -cvf archive.tar file{3..10} folder{1..2}  # -v option prints the file names
Using -t option, you can see the list of the contents of an archive.
tar -tf archive.tarThen we can use -x to extract files from an archive.
tar -xf archive.tarAlthough we can manually compress the generated tar file using gzip, the tar command has provided us with an option (-z, --gzip) to do this automatically.
tar -zcvf friends.tar.gz friends.S03.E{01..24}Then we can decompress and extract our files using the following command:
tar -zxvf friends.tar.gzWe can use -j, --bzip2 instead of -z to do the compression using bzip2.
Awk is a scripting language used for manipulating structured data and generating reports. The general structure of this command is:
awk '{action}' fileWe can apply different actions but we here only cover print. Suppose we have a .csv file. We can print the second and fourth columns using the following command:
awk '{print $2, $4}' data.csvWe can use $NF variable to access the last column.
awk '{print $1, $NF}' data.csvWe also can use regex to select only rows that match a specific pattern. In this case, the general structure of the awk command becomes this:
awk '/REGEX/{action}' fileThe awk command is a very broad topic and I'm not explaining it in detail here. But I highly recommend searching and learning it. You can start by reading this geeksforgeeks tutorial.
Linux’s major difference from other operating systems is its ability to have multiple users. Linux is designed to allow more than one user to have access to the system at the same time. In order for this multiuser design to work properly, there needs to be a method to protect users from each other. This is where permissions come into play.
NOTE: For more information on the topics in this chapter, I recommend seeing here.
A user is an entity that can manipulate files and perform several other operations. Each user is assigned an ID that is unique for each user in the operating system.
Linux-based systems have two types of users: system and normal users. System users are entities created by the system to run non-interactive processes, i.e., the processes that run in the background and do not require human interaction.
After installation of the operating system, the ID 0 is assigned to the root user, and the IDs 1 to 999 (both inclusive) are assigned to the system users hence the ids for local user begins from 1000 onwards.
Groups are collections of users. Creating and managing groups is one of the simplest ways to deal with multiple users simultaneously, especially when dealing with permissions. So, instead of manipulating each user's permissions one by one, we just need to add the user to a group with some specific set of permissions.
A record of the users of a system is stored in the file /etc/passwd. Each line of this file represents a user account in the following format:
[username]:[password]:[UID]:[GID]:[Extra Info]:[home directory]:[shell]The GID here is the Primary Group ID. When a Linux user logs into their system, the primary group is usually the default group associated with the logged in account.
To find my account information in this file, I use the whoami command which returns the username of the logged in user:
cat /etc/passwd | grep $(whoami)and the output will be something like this:
parsa:x:1000:1000:parsa,,,:/home/parsa:/bin/bashYou can see that there is an x in the password field. This is due to the fact that your OS stores the encoded value of passwords in /etc/shadow which as a normal user, you do not have permission to read.
Using the id command, you can see user and group information about each specified user or (when the user argument is omitted) for the current user.
Curiosity: This file is a good file to practice what you learned in the previous chapter. Try awk and sort commands on it.
NOTE: You may need root privileges to execute some of the following commands. We will discuss the root user later. For now, just add sudo before your commands.
To create a new standard user, use the useradd command. The syntax is as follows:
useradd [options] usernameSome useful options are shown here:
-d, --home-dir [HOME_DIR]: home directory of the new account-e, --expiredate [EXPIRE_DATE]: expiration date of the new account-m, --create-home: create the user's home directory-s, --shell [SHELL]: login shell of the new account
You need to set a password for the new user by using the passwd command. The syntax is as follows:
passwd usernameThere is another way to create a new user which is easier. Instead of useradd, try adduser! It will ask you some questions (most of them are optional).
After you created a new user, go and check the last row of /etc/passwd. You will see there is a new account added to this file, and also a new group has been created as its primary group.
In order to delete a user account, we can use deluser or userdel commands. There both have options for deleting the home directory and the files owned by the user. User their help pages to find out.
There are two commands for creating a new group, just like the ones for creating a new user:
sudo groupadd name
sudo addgroup name
In order to delete a group, we can use the delgroup or groupdel commands. As always, see the help pages!
The usermod command is used to change user properties. Some of its options are here:
-g, --gid [GROUP]: force use GROUP as new primary group-G, --groups [GROUPS]: new list of supplementary GROUPS-a, --append: append the user to the supplemental GROUPS mentioned by the -G option without removing the user from other groups-d, --home HOME_DIR: new home directory for the user account-m, --move-home: move contents of the home directory to the new location (use only with-d)-u, --uid: new UID for the user account-s, --shell: new login shell for the user account
So, in order to add a user to a group, we should run the following command:
sudo usermod -aG [groupname] [username]Now, if you run id [username], you will see that the new group is added to its groups list.
To delete a user from a group, we can use the gpasswd command with -d option, or we can simply do it using the deluser command with two arguments as follows:
sudo deluser [username] [groupname]root is the super user and has the ability to do anything on a system. If you have the password of the root user, you can log in to the root account using the su command and then log out using the exit command. In order to have an additional layer of security, a sudo user is generally used in place of the root. While sudo is used to give another user limited access to another user’s account for the purpose of performing tasks (in most cases the root user or the superuser), sudo may be best explained as a tool that allows users and groups to have access to commands they normally would not be able to use. sudo enables a user to have administration privileges without logging in directly as root. A sample of the sudo command is as follows:
sudo apt-get install [package]In order to provide a user with the sudo ability, they need to be added to a sudo enabled group, or their username needs to be added to the sudoers file with a set of permissions. This file is sensitive and important as an access and security control, and should not be edited directly with a text editor. If the sudoers file is edited incorrectly it could result in preventing access to the system or other unintended permission changes.
The visudo command should be used to edit the sudoers file. At a command line, log into your system as root and enter the command visudo. For more information see here.
Permissions are the “rights” to act on a file or directory. The basic rights are read, write, and execute.
- Read: read permission allows the contents of the file to be viewed. A read permission on a directory allows you to list the contents of a directory.
- Write: write permission on a file allows you to modify the contents of that file. For a directory, the write permission allows you to edit the contents of a directory (e.g. add/delete files).
- Execute: for a file, the executable permission allows you to run the file and execute a program or script. For a directory, the execute permission allows you to change to a different directory and make it your current working directory.
To view the permissions on a file or directory, issue the command ls -l or ll:
-rw-r--r-- 1 root root 2887 Jul 28 13:31 /etc/passwdThe first ten characters show the access permissions. The first dash (-) indicates the type of file (d for directory, s for special file, and - for a regular file). The next three characters (rw-) define the owner’s permission to the file. In this example, the file owner has read and write permissions only. The next three characters (r--) are the permissions for the members of the same group as the file owner (which in this example is read-only). The last three characters (r--) show the permissions for all other users and in this example, it is read-only. The following picture gives a summary:

As we mentioned before, each file or directory has two owners: a user owner and a group owner. The chown command enables us to change these owners. The general structure of this command is:
sudo chown [USER]:[GROUP] [FILE]One of the most useful commands which enable us to change the permissions of a file or a directory is chmod (i.e. change mode). This command can be used in two different ways:
chmod MODE[,MODE,...] FILE  # using letters
# where each MODE is of the following format:
[ugoa][+-=][rwx]
or
chmod OCTAL-MODE FILE # using numbersIn the first method, each character has its own meaning:
u: file ownerg: group ownero: all other usersa: all users, identical tougo+: grant permission-: remove permission=: replace (set) permissionsr: read permissionw: write permissionx: execute permission
For instance, consider the following command:
chmod u+rw,go-w,a-x file.shThis command grants read and write permissions to the file owner. Then it gets the write permission from the group owner and all other users. Finally, it removes execute permission from all users. If we run ls -l before and after this command, we might see something like this:
$ ls -l
-r-xrw-r-- 1 parsa parsa   25 Jul 28 16:15 file.sh
$ chmod u+rw,go-w,a-x file.sh
$ ls -l
-rw-r--r-- 1 parsa parsa   25 Jul 28 16:15 file.sh
In the second method, we put 0 or 1 instead of each letter in rwx and the read the result number in binary format. Then we do this for three groups (file owner, group owner, and other users) and we put the three numbers together to form a 3-digit number. For instance, we show r-xrw---x by 561 in the following command:
$ chmod 561 file.sh
$ ls -l
-r-xrw---x 1 parsa parsa 25 Jul 28 16:15 file.shA bash script is a file that we run a set of processes by executing it.
Shebang: A shebang is a line at the beginning of the script (or every executable file). We use it to tell the OS how to interpret this file. This line consists of #! followed by the address of the desired interpreter. For example, the shebang we should use at the beginning of a bash script file is #! /bin/bash.
We can define variables in bash scripts just like in other languages. For instance:
#! /bin/bash
name=parsa
echo "hello $name"
Output: hello parsa
We can access the arguments passed to our script using $n which will give us the nth argument if it exists and "" if it doesn't. (If n has more than one digit, we have to use ${n}) For example:
If our script file hello.sh is:
#! /bin/bash
echo "$1 says hello to $2"
the output will be:
$ ./hello.sh parsa mahyar
parsa says hello to mahyar
There are some special variables in bash scripts:
| Variable | Value |
|---|---|
| $0 | The filename of the current script. |
| $1-$9 | Stores the names of the first 9 arguments or can be used as the arguments’ positions. |
| $$ | The process id of the current shell. |
| $# | The number of arguments supplied to a script. |
| $* | Stores all the command line arguments by joining them together. |
| $@ | Stores the list of arguments as an array. |
| $? | Specifies the exit status of the last command or the most recent execution process. |
| $! | Shows the id of the last background command. |
| $- | Shows the options set used in the current bash shell. |
Example:
#! /bin/bash

# sample.sh

echo "Process id of shell = $$"
echo "Name of shell script = $0"
echo "Number of args = $#"
echo "Argument 1 = $1"
echo "Argument 2 = $2"
Output:
$ ./sample.sh 1 2 3
process id of shell = 22342
Name of shell script = ./sample.sh
Number of args = 3
Argument 1 = 1
Argument 2 = 2
We can use the output of a command in another command. For instance:
$ ./hello.sh $(whoami) mahyar
parsa says hello to mahyarWe can define arrays in two ways:
-
Evaluate inline:
my_array=(1 "parsa" 56 'h')
hint: variables in an array should not be the same type.
-
Create an empty array:
declare -a my_array
We can append one or more elements to an array like this:
my_array += (23)
my_array += ("ali" "sara" 174)We can access all elements in our array like this:
echo ${my_array[@]}   # print the whole array
echo ${my_array[*]}   # print the whole array
We can also access the element in a specific index like this:
echo ${my_array[0]}   # arrays start at 0
echo ${my_array[1]}
echo ${my_array[-1]}  # you can use a negative index to index from the end

my_array[0]=hello     # you can change an index value
my_array[10]='new'    # accessing an "out of range" index would result in an append!
Moreover, to access the length of an array use #. For example:
echo "the array contains ${#my_array[@]} elements"To access the indices of our array use !. Like this:
echo "${!my_array[@]}"Also, we can use the unset command to remove an index from our array:
a1=(1 2 3 4 5 6 7)
unset a1[1]
unset a1[3]
echo ${!a1[@]}          # index 1 and 3 are removed
echo ${#a1[@]}          # arrays size is decreased by 2
echo ${a1[@]}           # the values of those indices are lost too
and the output will be:
$ ./hello.sh
0 2 4 5 6
5
1 3 5 6 7
Hashmaps are just like arrays and we can use the scripts that we have written for arrays, for hashmaps too.
The only difference between arrays and hashmaps is the way they're defined:
declare -A fruits

fruits=([pineapple]=10 [banana]=3 [apple]=2)
fruits+=([potato]=1 [mango]=12 [apple]=3)

echo ${!fruits[@]}          # keys
echo ${fruits[@]}           # values
# notice that "apple" key appears once even though we defined it twice
# notice that the index orders are different from how we inserted them
echo ${#fruits[@]}The simplest conditional statement in bash is if-then statement:
if command
then
   commands
fi
or in this format:
if command; then
   commands
fi
NOTE: There is a subtle difference between if statements in bash and other languages. In other languages, the conditional term is either True or False. But in bash, it's a command. If the command is executed successfully (with exit code 0), then the commands will be executed (and otherwise, they won't).
Another conditional structure in bash is if-then-else statements:
if command
then
   commands
else
   commands
fi
or in this format:
if command; then
   commands
else
   commands
fiThe if-elif-else statements are in the following format:
if command-1; then
   commands-1
elif command-2; then
   commands-2
...
elif command-n; then
   commands-n
else (optional)
   commands-else
fi
Note that the else part is optional.
Another useful conditional statement in bash is switch-case structure:
case EXPRESSION in

   PATTERN_1)
      STATEMENTS
      ;;

   PATTERN_2)
      STATEMENTS
      ;;

   PATTERN_N)
      STATEMENTS
      ;;

   *)
      STATEMENTS
      ;;
esacEarlier we talked about the difference between bash and other languages in conditional terms.
Now if we want to use the True/False structure for if-statements, Linux has provided us with a useful tool that returns exit code 0 if True, and exit code 1 if False. This tool is the test command.
test conditionsor
[ conditions ]Using the test command, you can have Numeric Comparisons, String Comparisons, and File Comparisons. There are a lot of options built into the test command, so I strongly suggest you use the following command for more information:
$ man testٔNote: You can also use AND(&&) and OR(||) operations to combine conditions in the test command.
Using loops, we can repeat a piece of script.
The first loop structure is for loop. we can use it like this:
for variable in list
do
    commands
done
list is something that contains some elements. There are different ways to determine a list in a for loop:
-
manually:
#! /bin/bash
for word in "linux" "is" "perfect" "and" "windows?" "mmm," "not" "bad."
do
   echo -n "\$word "
done
echo
NOTE: The
"character is optional unless the elements have special characters like',space, etc. -
read from a file:
#! /bin/bash
for word in \$(cat list.txt)
do
   echo \$word
done
-
read from a folder:
#! /bin/bash
for word in $(pwd)/folder/*
do
   if [ -d \$word ]; then
      echo "\$word is a folder"
   elif [ -f \$word ]; then
      echo "\$word is a file"
   fi
done
-
use a counter variable:
#! /bin/bash
for (( i = 1; i <= 10; i++ ))
do
   echo "Round \$i"
done
We can use
{1..10}as a list to make the same loop as the above example.
Using a while loop we can repeat executing some commands as far as a condition is true. This is the general structure:
while command
do
    commands
done
Example:
#! /bin/bash
var=10
while [ \$var -gt 0 ]
do
   echo "Round \$var"
   ((var--))
done
NOTE: We can use break and continue statements just like every other language.
In this rather short section, we want to work with any number of arguments and options.
First, you should get to know the shift command. As its name implies, it shifts the arguments to the left by 1. This means that the first argument ($1) will be removed (and will be replaced by the second one ($2)).
Now we can combine while loop and shift commands to work with an arbitrary number of arguments. See this example:
#!/bin/bash
count=1
while [ -n "\$1" ]  # continues until there is no arguments
do
   echo "Parameter #\$count = \$1"
   ((count++))
   shift
done
Now we can work with options by combining while loop, switch-case statement, and shift operator. Consider the following example:
#! /bin/bash
OPTION1=false # Boolean Option with default value
OPTION2=hello # Parameter Option with default value

while [ -n "\$1" ]
do
   case "\$1" in
      -o1) echo "OPTION1 entered"
         OPTION1=true
         shift ;;

      -o2 | --option2) echo "OPTION2 entered"
         if [ -z \$2 ]; then
            echo "Option2 needs a parameter"
            exit 1
         fi
         OPTION2=\$2
         shift
         shift ;;

      --) shift
         break ;;

      *) echo "\$1 is not an Option"
         exit 1 ;;
   esac
done

echo "Option1: \$OPTION1, Option2: \$OPTION2"
count=1
while [ -n "\$1" ]
do
   echo "Parameter \$count = \$1"
   count=\$[ \$count + 1 ]
   shift
done
And the output will be:
$ bash options.sh -o1 --option2 bye -- Parsa Reza Amir
OPTION1 entered
OPTION2 entered
Option1: true, Option2: bye
Parameter 1 = Parsa
Parameter 2 = Reza
Parameter 3 = Amir
Another Example: How's the weather?
In this example, we write a script to get the weather of a region that is passed to the script as an argument. We also write a --help option for it :)
#! /bin/bash

case $1 in
   -h | --help)
      echo "Short Option   Long Option    Description"
      echo "-h             --help         Show help"
      echo "-l             --location     Show weather"
   -l | --location)
      curl https://wttr.in/$2
      ;;
   *)
      curl https://wttr.in
      ;;
esac
Now execute the script and see the magic :)))
We can define functions in bash, but they're a little bit different from other languages in passing arguments and using them. See the following example:
#!/bin/bash
function hello_world {
  echo hello world!
}

function greet {
  echo "hello $1"  # This is how we use the arguments that have been passed to the function in bash
}

greet mirza  # This is how we pass an argument to a function in bash
greet hovakhshatara some additional arguments  # They have no effect
hello_world these are additional argumentsWhen we want to write a mathematical expression, we should wrap it in $((here)). Example:
#!/bin/bash

# gouss law
for i in {0..10}
do
  sum=$((sum+i))
done

echo sum of first 10 integers are: $sum
echo sum of first 10 integers are: $(((10+0)*11/2))We can use the output of a function/command as a variable by wrapping it in ``. For instance:
#!/bin/bash

# gouss law
function gauss {
  for i in {0..10}
    do
      sum=$((sum+i))
  done
  echo $sum
}

echo here is the proof that Guass law was correct: `gauss` == $(((10+0)*11/2))A kernel is the main part of an Operating System that has full control over everything. It's also an interface between application software and hardware.

As always, Google it :)
The Linux Kernel is the thing that all Linux distros have in common. It's being managed by Linus Torvalds in this repository.
uname [OPTION]...This command prints certain system information. If used without options, just prints your kernel name. Options are not worth discussing here. Try uname --help for more information.
Generally, a process is referred to the execution of a program or command. In other words, when we execute a program or command, Linux creates (at least) one process for it. Each process uses an amount of system resources (like CPU, memory, etc.). In Linux, each process is identified by a PID(Process Identification Number).
A process can be executed either in Foreground or Background. By default, shell commands are executed in Foreground (and so you have to wait until the execution terminates to be able to run another foreground process).
There are some commands to control processes:
This command shows background processes. Each process has a jobs ID that you can use in other commands like bg, fg, and kill.
bg %nWhere n is the jobs ID.
This command sends the process to the background.
fg %nWhere n is the jobs ID.
This command sends the process to the foreground.
The top command is Linux's default command to see a list of processes. By executing this command, you can observe executing processes and their associated system resources. This list is sorted by CPU usage by default.
For a more user-friendly appearance, you can use the htop command. This command is not installed by default on most Linux distributions and you have to use sudo apt install htop first. This command has an interactive environment in which you can use Function Keys on your keyboard to do some changes. Try it :)
If you use the top or htop command, you will see a column named NI which stands for Niceness. Niceness is the priority of a process. The Linux kernel looks at the priority number to decide which process should run first.
Niceness is a number from -20 to 19. The higher the number, the lower the priority. To execute a command or script with a specific niceness, use the nice command:
nice -n niceness COMMANDNOTE: Only the root user can set the nice value from -20 to 19. Other users can only set nice values from 0 to 19.
To change the niceness of a running process, use the renice command:
renice -n niceness -p PIDor to change the niceness of all running processes by a user:
renice -n niceness -u usernameps [OPTIONS]This is another command for monitoring the running processes. It has a bunch of useful options that are usually used together. For example ps aux is very common. As always, you can keep learning by yourself using the commands' manual pages.
Each process in Linux has a lifecycle. The STAT column in the ps command shows where the process is in its lifecycle. Consider the following image:

Since "Everything is a file" in Linux, processes are not an exception. All processes in Linux, are tracked in a directory with address /proc.
If you open and work with this directory, you will learn a lot about processes. You can also use man 5 proc command to enter the manual page of process file system in Linux.
We use a signal to talk to a process. Not only us but a signal can be sent by another process or by the OS kernel itself.
When a process receives a signal, it decides how to react:
- Do the signal's default operation.
- Ignore the signal.
- Do something else depending on the situation.
If you want to see the list of signals, type kill -l in your terminal. Here we introduce the most important signals:
| Signal | Shortcut | Operation |
|---|---|---|
| SIGINT | Ctrl + c | terminate the process |
| SIGKILL | - | kill the process (can't be ignored) |
| SIGSTOP | Ctrl + z | stop the process |
| SIGCONT | - | continue running the stopped process |
We can send signals to a process using the kill command in the following structure:
kill -NAME PID
or
kill -NUMBER PID
Where the NAME and NUMBER are the ones you saw in the kill -l command.
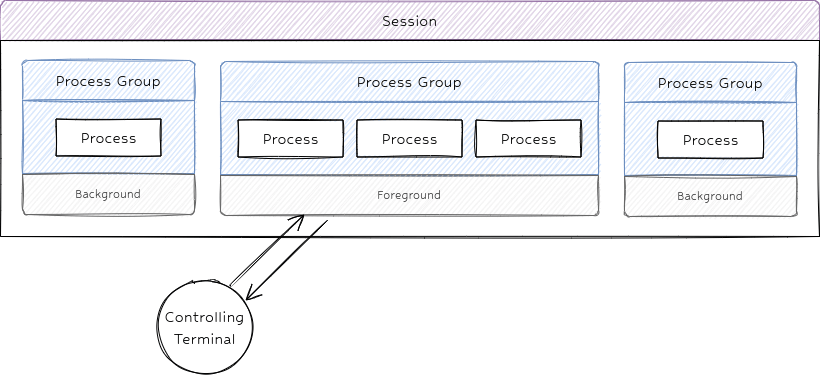
Group: A set of related processes that we can send a signal to all of them at once. Each group is identified by PGID.
Group Leader: The process that has the same PID as the PGID (PID == PGID).
Session: Each tab in your terminal is a session. In fact, the jobs command displays the processes of the session in which the jobs command is executed. Each session is identified by SID.
Session Leader: The process that has the same PID as the SID (PID == SID). When you use the fg command, you make a process (and the corresponding group), the session leader.
This image summarizes the definitions above:
NOTE: You can send a signal to a group or session just like a single process.