- Create IAM Role for EC2 and CodeDeploy
- Create EC2 Instance
- Launch EC2 Instance
- Install CodeDeploy Agent on EC2 Instance
- CodeDeploy Service Configuration
- GitHub Project
- GitHub Action
Select a particular region of AWS Services which CodeDeploy Agent and GitHub will use.
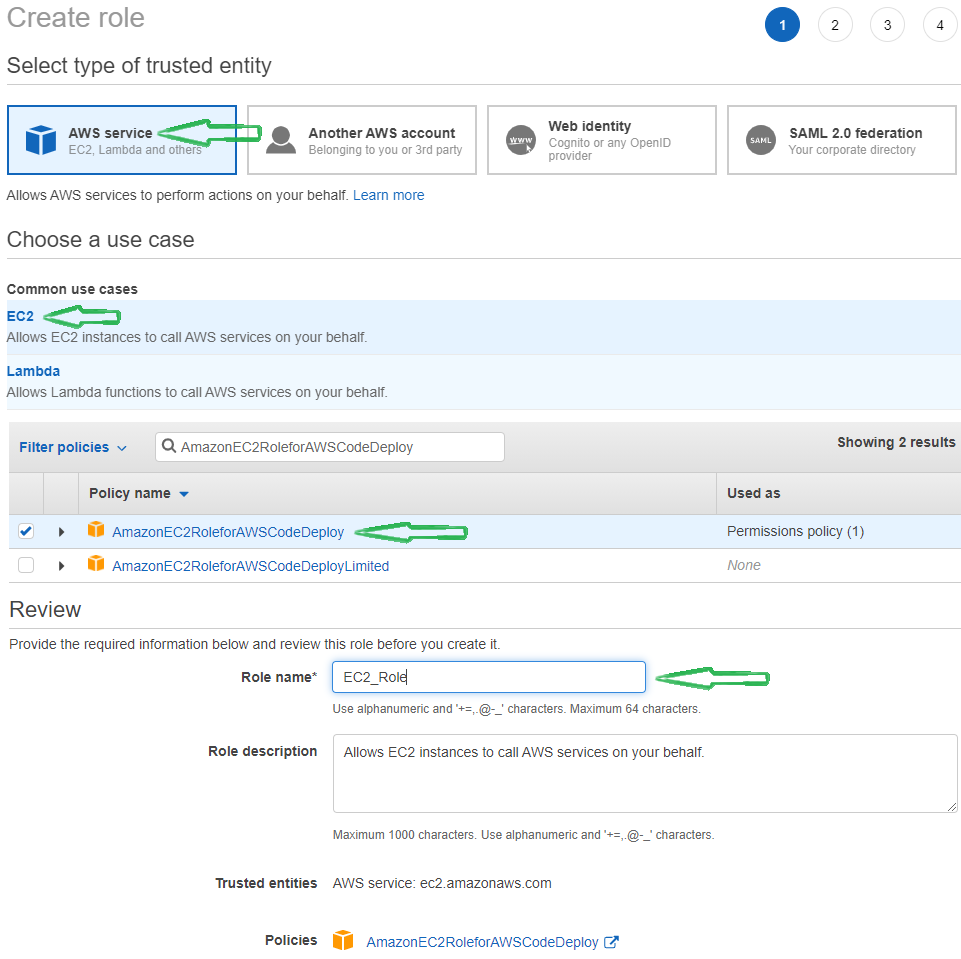
Create a role for EC2 Instance -
- Select AWS Service as trusted entity and EC2 as usecase, click on Next:Permissions.
- On the Permissions page, select AmazonEC2RoleforAWSCodeDeploy Policy and Click on Next:Tags
- Ignore the tags and click Next:Review.
- Provide the role name as EC2_Role on the review page.
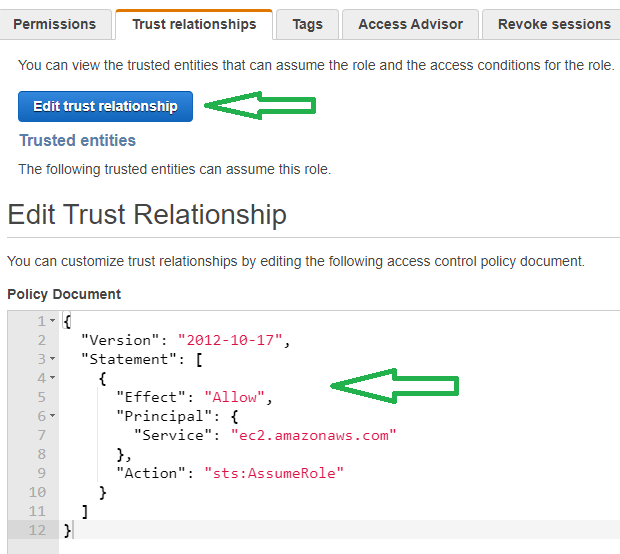
- Open the EC2_Role and go to Trust Relationships, then Edit Trust Relationship and paste below policy -
{
  "Version": "2012-10-17",
  "Statement": [
    {
      "Effect": "Allow",
      "Principal": {
        "Service": "ec2.amazonaws.com"
      },
      "Action": "sts:AssumeRole"
    }
  ]
}
Now we will create a role for CodeDeploy.
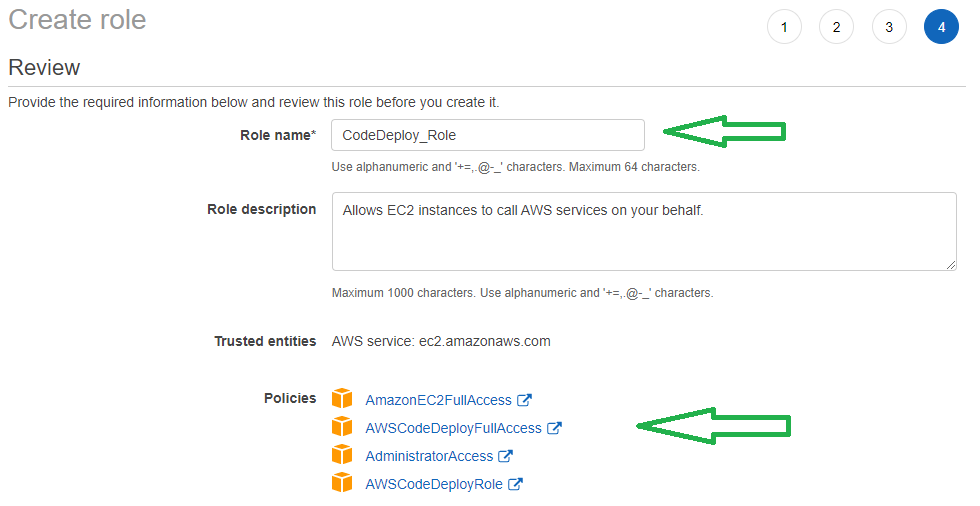
- Select AWS Service as trusted entity and EC2 as usecase, click on Next:Permissions.
- On the Permissions page, select the below policy and Click on Next:Tags.
AmazonEC2FullAccess, AWSCodeDeployFullAccess, AdministratorAccess, AWSCodeDeployRole - Tags can be ignored, click on Next:Review.
- Provide the role name as CodeDeploy_Role on the review page.
- Once CodeDeploy Role created, Open the CodeDeploy_Role and go to Trust Relationships then Edit Trust Relationship and use below policy -
json { "Version": "2012-10-17", "Statement": [ { "Effect": "Allow", "Principal": { "Service": "codedeploy.amazonaws.com" }, "Action": "sts:AssumeRole" } ] }
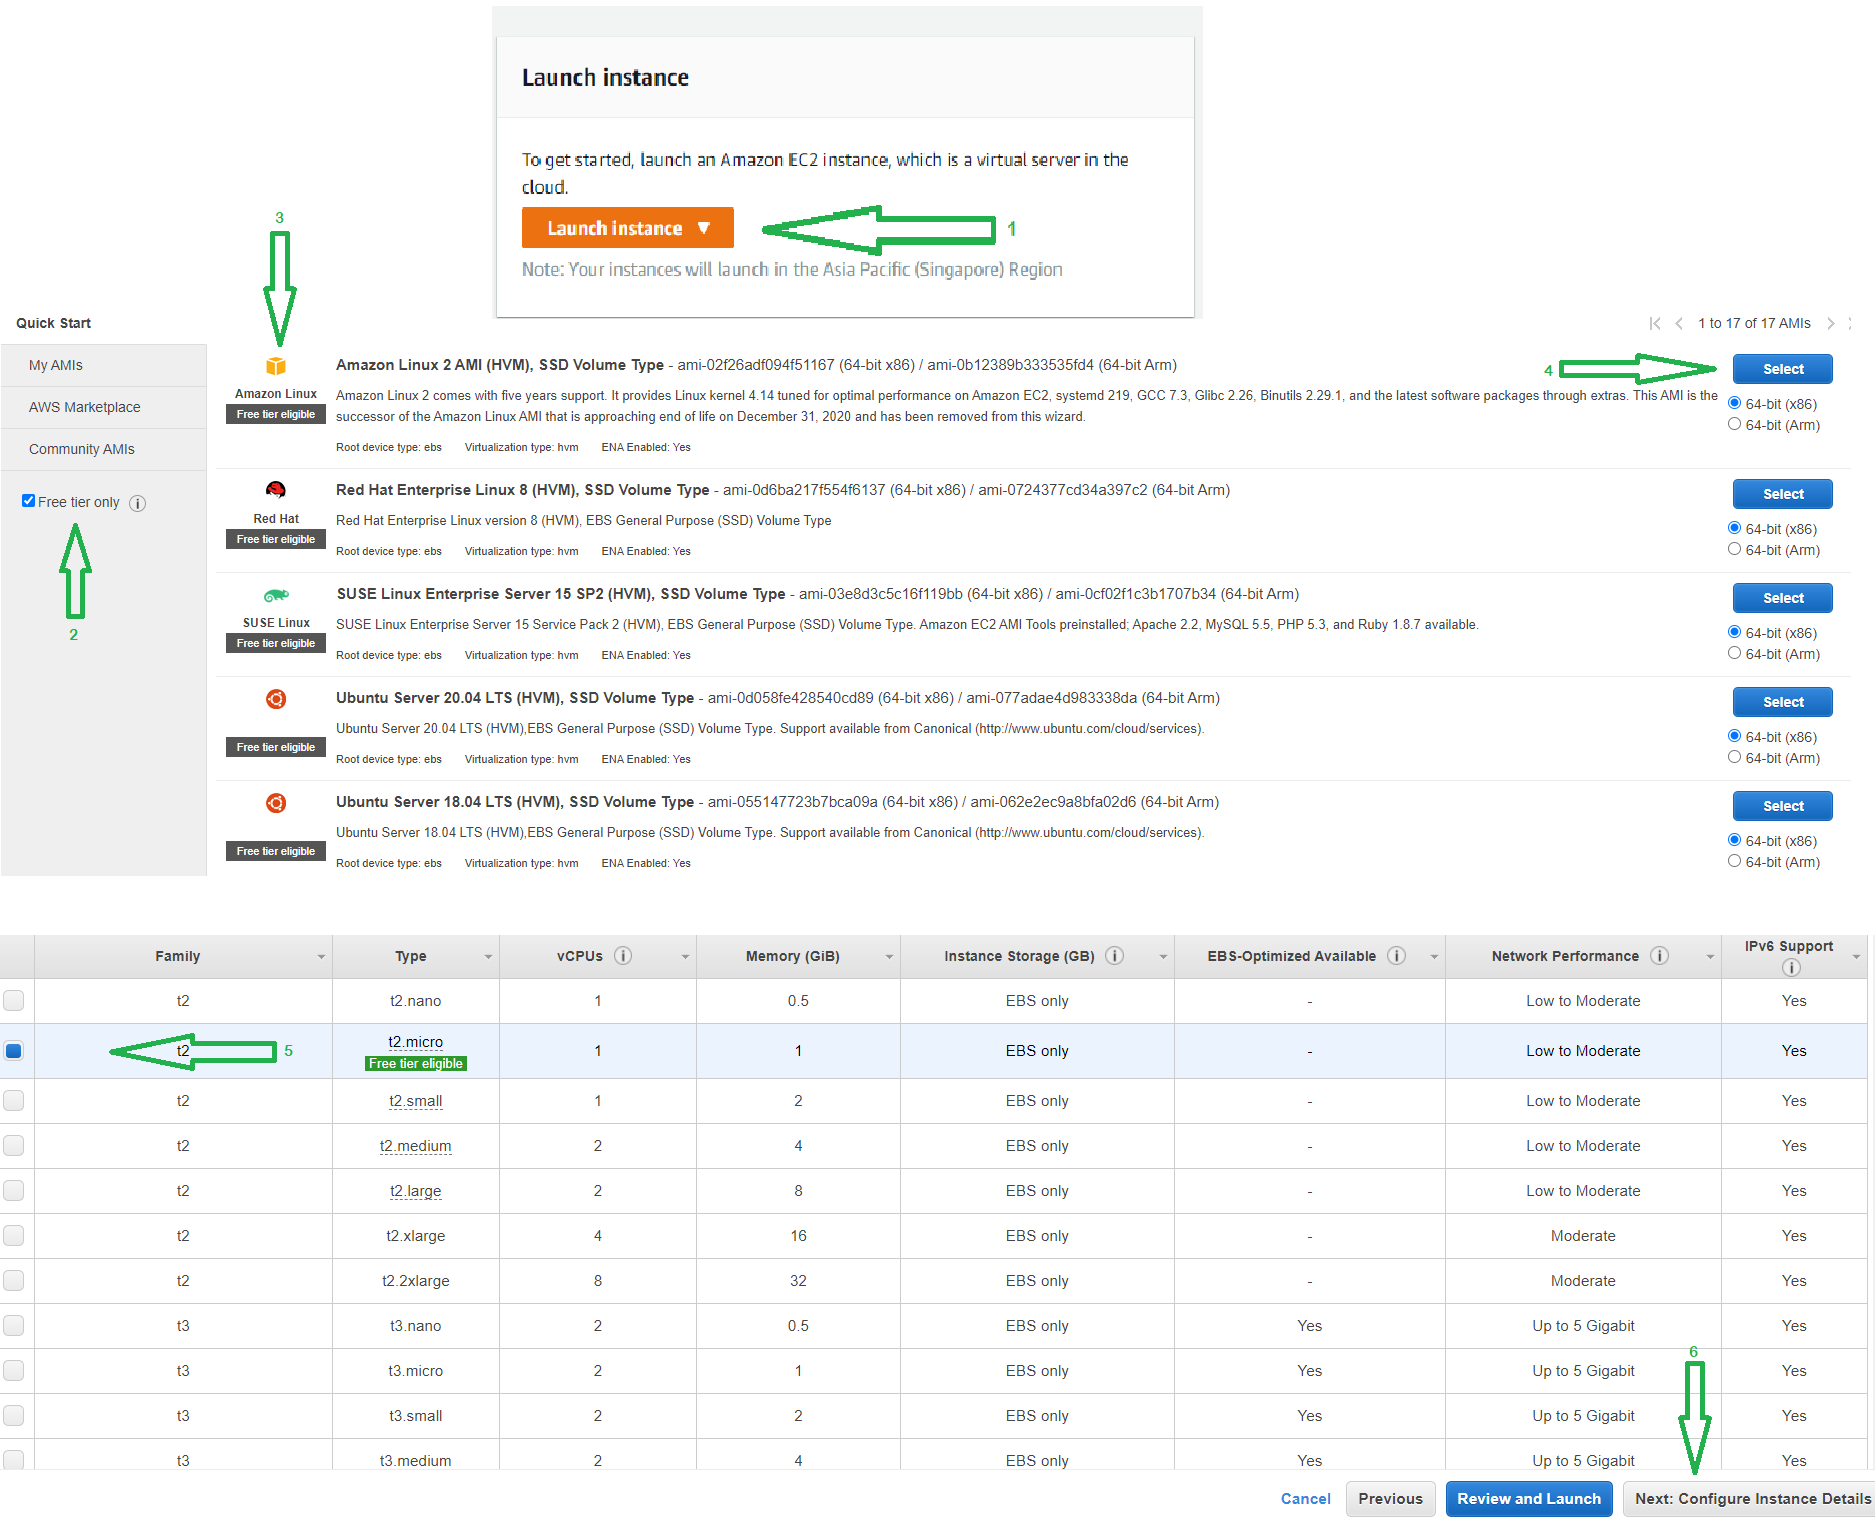
To create an EC2 instance, Go to EC2 Dashboard on AWS Management Console and click on Launch Instance.
On the AIM page, You can select any Volume Type based on your requirement. This article will choose Free Tier Amazon Linux 2 AMI (HVM), SSD Volume Type and 64-bit (x86) Volume and click on select.
Select t2.micro in Choose Instance Typ page and proceed to Configure Instance page.
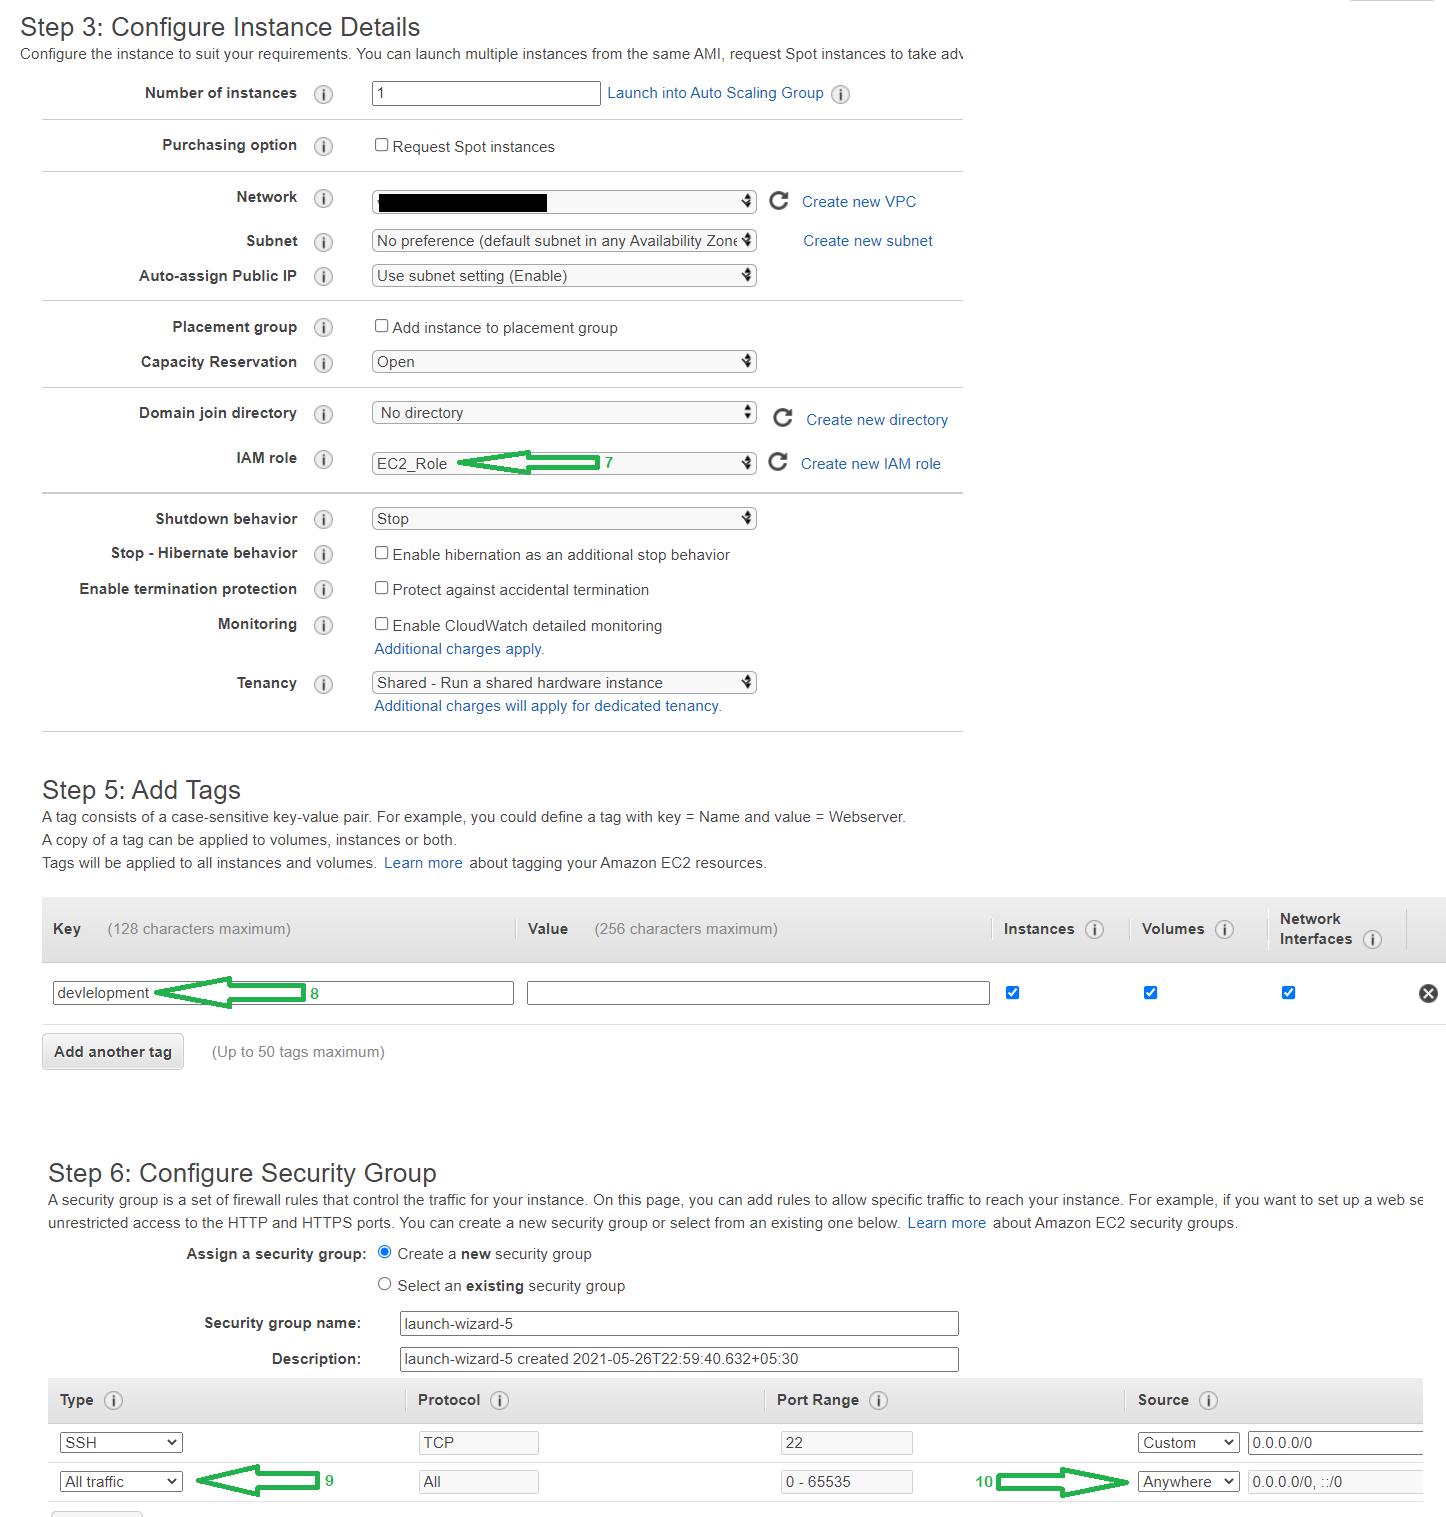
To establish the connection between EC2 instance and codeDeploy, Select EC2_Role, which we created before.
On the Tag page, add a tag called development. The tag will require creating a codeDeploy service.
In Configure Security Group page Add Rule called All traffic, select source called anywhere.
This rule will enable you to connect the Instance from anywhere. NOTE - This is not advisable in the Production environment.
Select the review page, then Launch the Instance. Wait for a few minutes to start the EC2 Instance.
If you want to access the Instance (ssh) from your local system, create a new Key Pair and download the key.
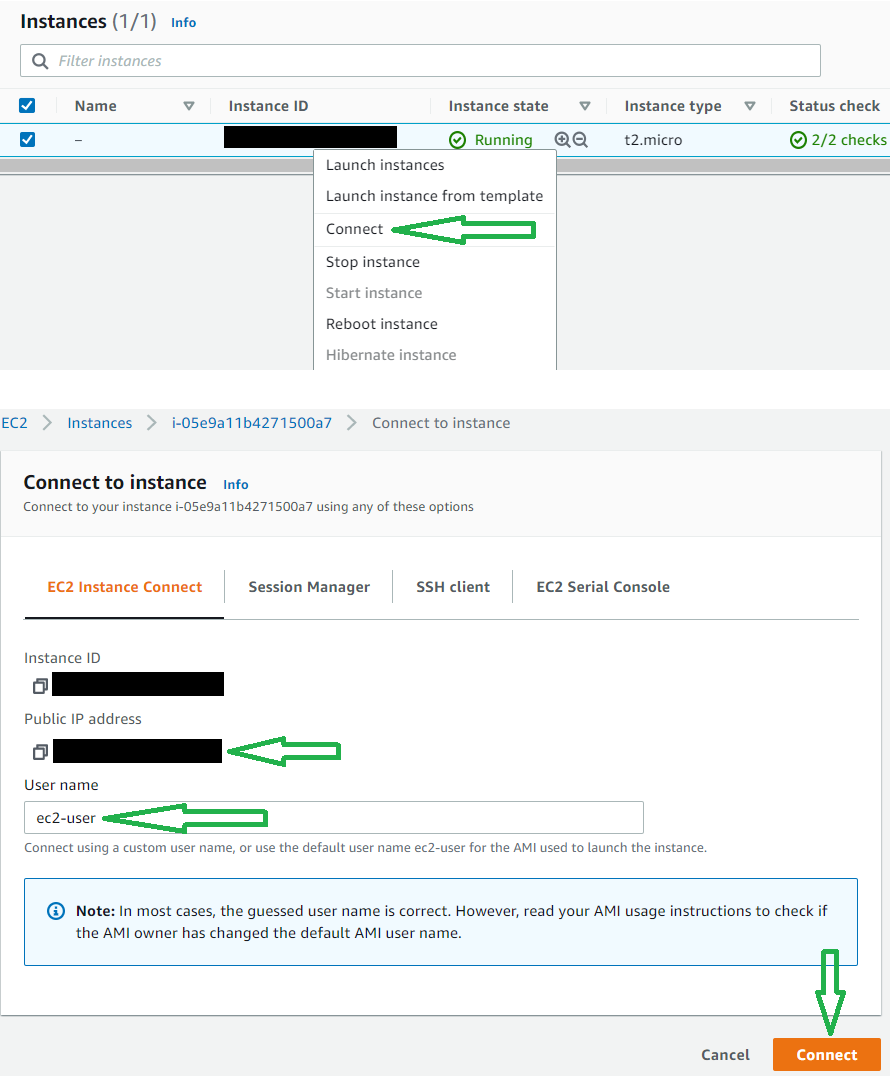
Once Instance is up and running, Right-click on instance id and click on connect.
On the next page, Take a note of the Public IP Address and connect using the default User name.
TO Deploy the git repo by using CodeDeploy Service, codeDeploy-agent must install in the EC2 instance.
Use the below commands to install codedeploy-agent.
sudo yum updatesudo yum install -y rubysudo yum install wgetwget https://bucket-name.s3.region-identifier.amazonaws.com/latest/installbucket-name is the Amazon S3 bucket containing the CodeDeploy Resource Kit files for your region. region-identifier is the identifier for your region. list of bucket names and region identifiers
For example -
wget https://aws-codedeploy-ap-south-1.s3.ap-south-1.amazonaws.com/latest/install
chmod +x ./installsudo ./install autosudo service codedeploy-agent start AWS CodeDeploy Service will automate the GitHub application deployment to EC2.
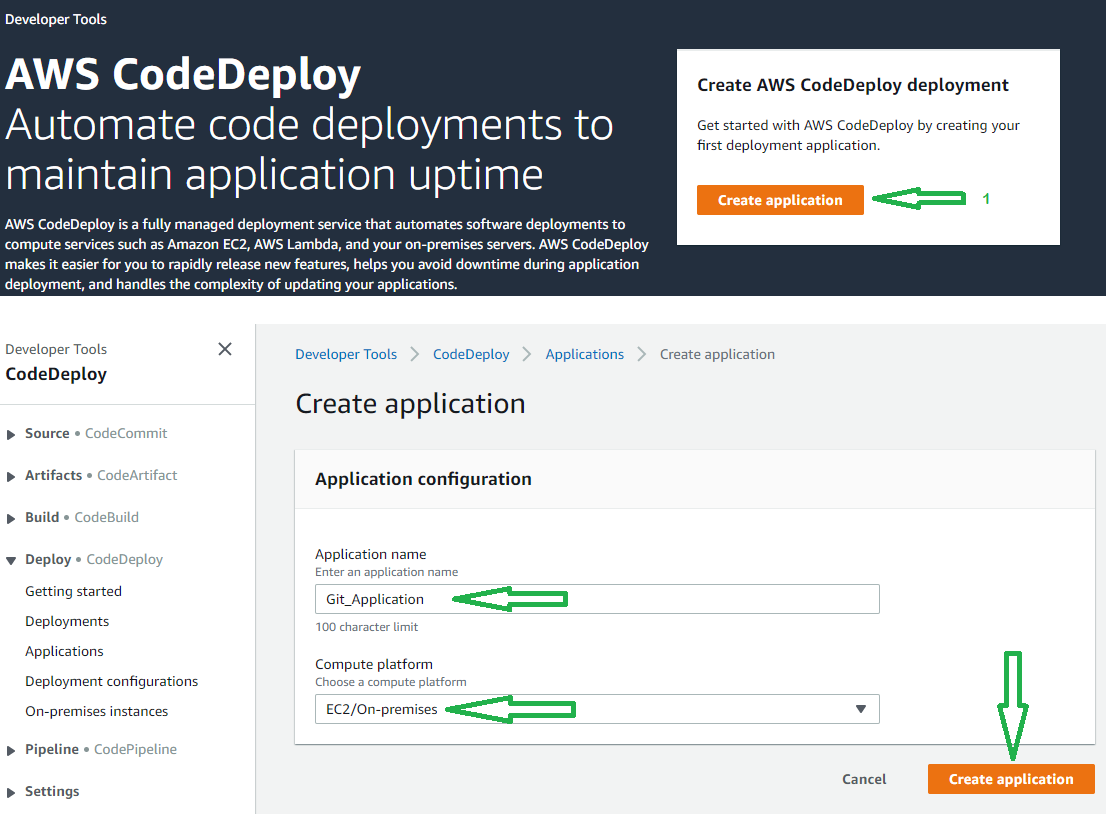
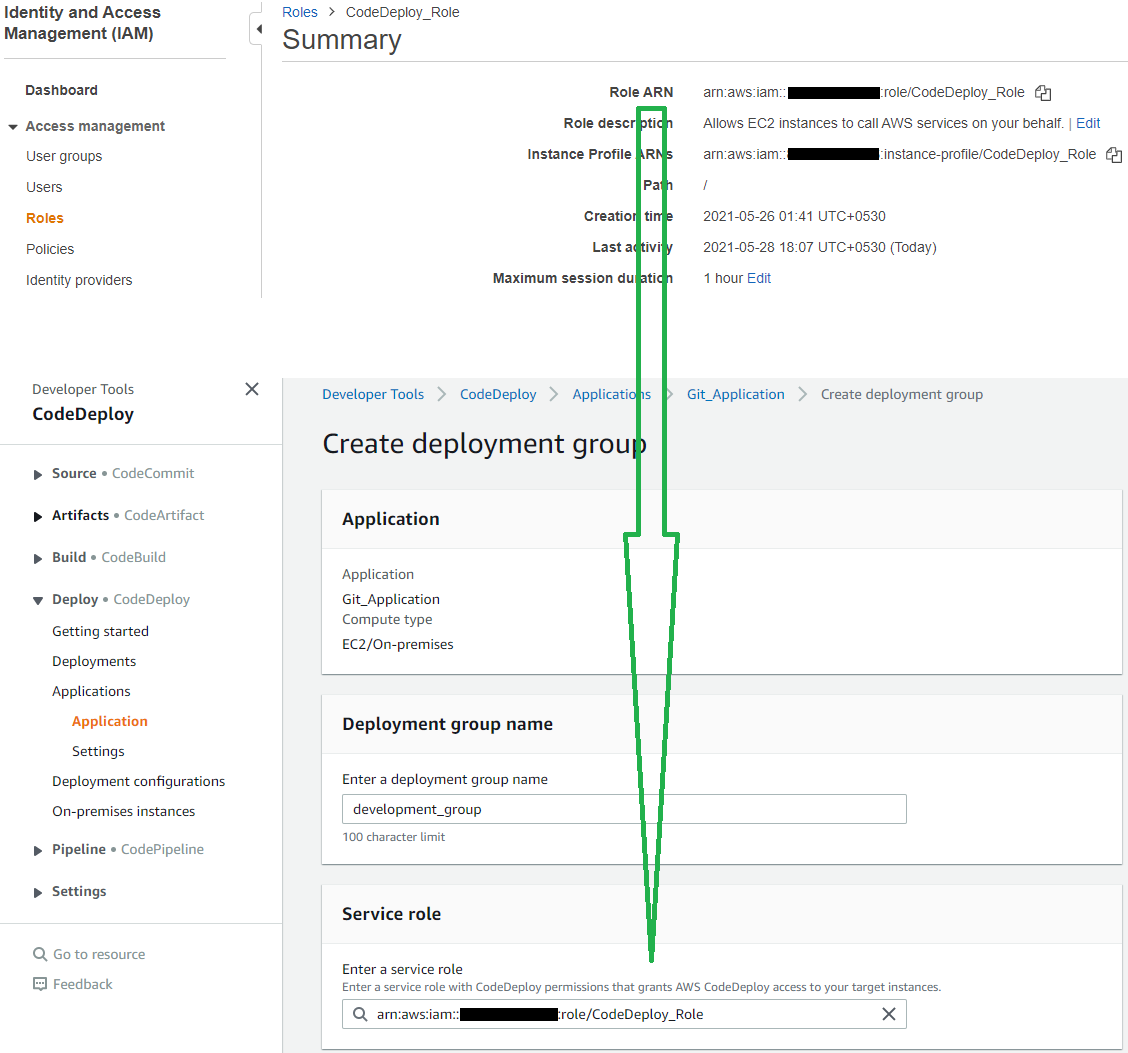
Create an Application name called Git_Application with compute platform EC2/On-premises.
GitHub Action will use the application name.
Once Application Created, Create a Deployment Group and name development_gropup. Get the Role ARN from CodeDeploy_Role, which we created before and put in the service role.
GitHub Action will use the deployment Group name.
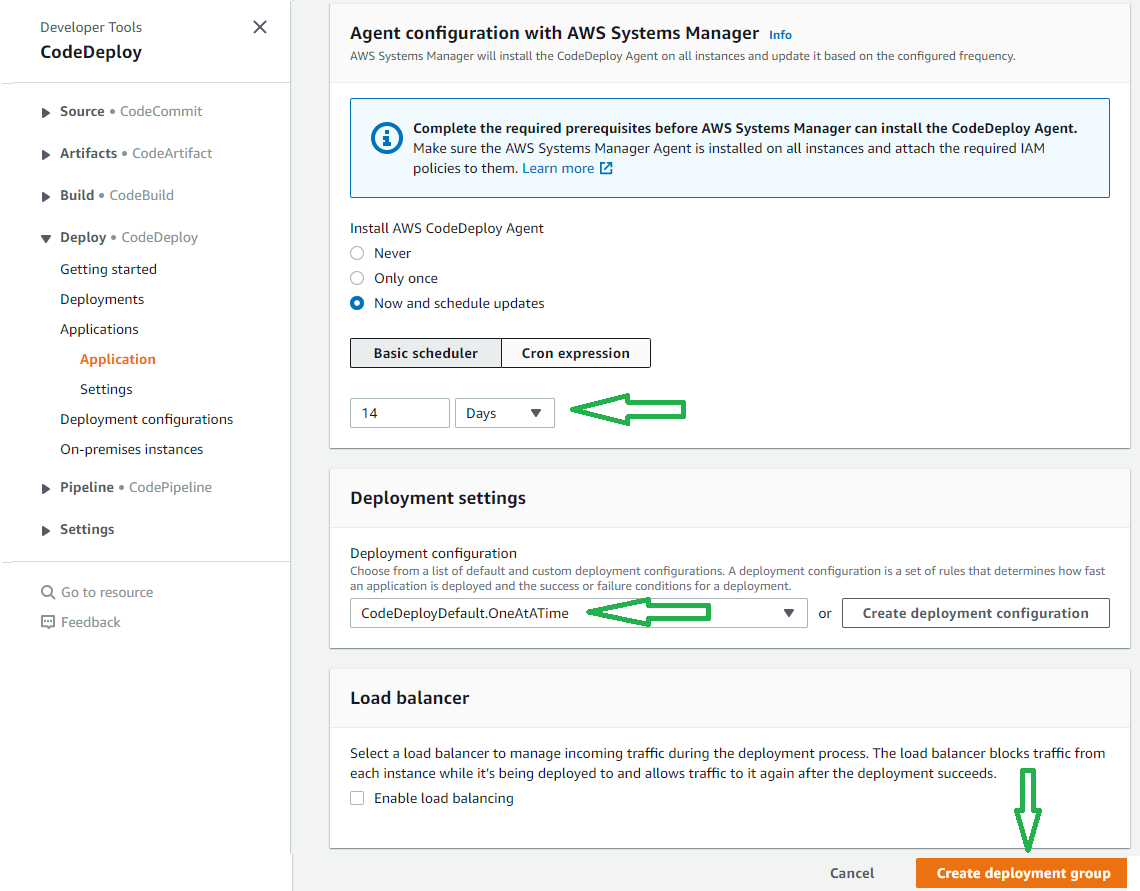
Choose In-place Deployment type. Select Amazon Ec2 Instances environment configuration and Tag key development to create AWS EC2 instance.
Select a schedule manager to install the CodeDeploy agent. Set OneAtATime deployment setting and Create Deployment Group without a load balancer.

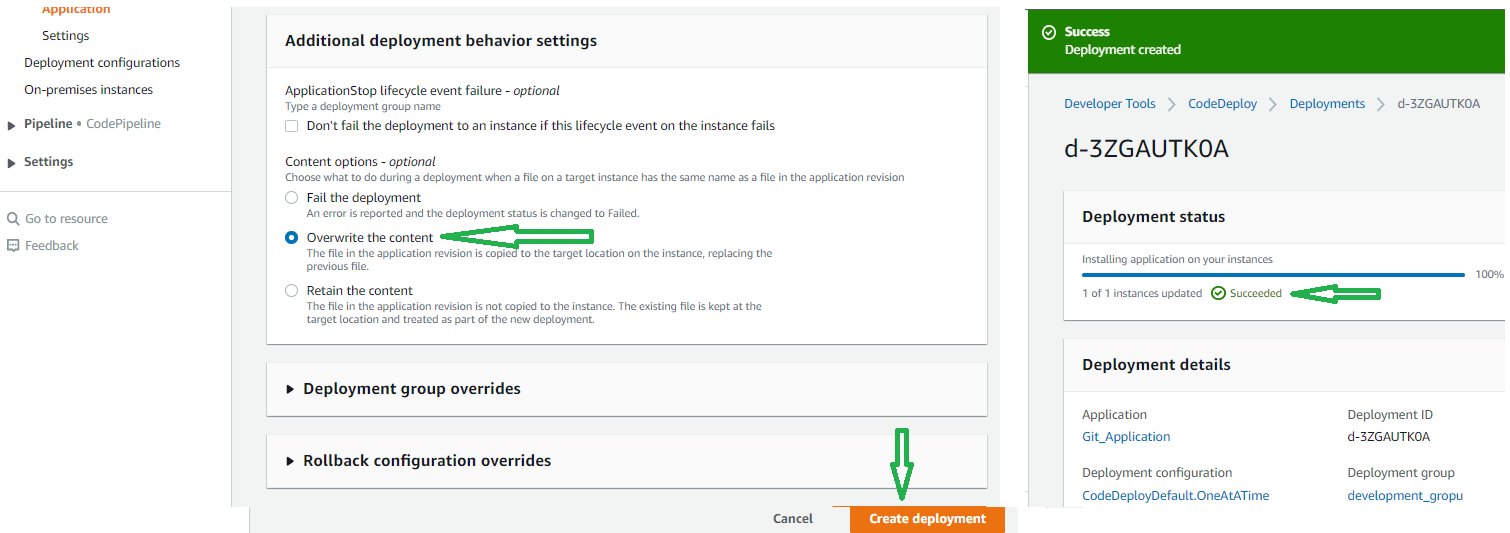
Once Deployment Group created, test the deployment by creating a Deployment with any name.
Select Revision Type My application is stored in GitHub, and select Connect to GitHub by providing the GitHub token.
Once connected to GitHub, Provide the repository name and last Commit ID. Select Overwrite the content and Create Deployment.

Wait for a few minutes ⏳ .
If Deployment status is unsuccessful, verify the deployment logs from ec2 instance /var/log/aws/codedeploy-agent/codedeploy-agent.log.
Recreate the deployment and fix this first. Once it's successful, you can access the application from a web browser or postman.
curl --location --request GET 'http://{{[ec2_public_ip]}}:8080/student'
Get ec2_public_ip from EC2 Instance
Fork the spring-boot demo project repository.
This project is a spring-boot project which uses MongoDB. For project deployment, we will use docker-compose, which includes MongoDB.
The
appspec.ymlfile used by codeDeploy to manage the deployment.
The
setup.shwill install docker and docker-compose.
The
run.shis used fordocker-compose up.
version: 0.0
os: linux
files:
  - source: .
    destination: /home/ec2-user/spring-boot-mongo/
hooks:
  AfterInstall:
   - location: setup.sh
     timeout: 300
     runas: root
  ApplicationStart:
   - location: run.sh
     timeout: 300
runas: rootFirst, create an IAM user with full AWSCodeDeployFullAccess policy and generate an access key and secret access for the user to configure GitHub Action.
Before configuring Action, set the environment in the GitHub repository.

GitHub repository changes will trigger GitHub Action, which has two CI/CD job -
The continuous-integration job will compile the code and run the JUnit Test cases. The continuous-deployment job will call AWS CodeDeploy Service -
application - Git_Application deployment-group - development_gropup
Paste below YAML in action configuration and commit.
name: CI/CD Pipeline
on:
  push:
    branches: [ main ]

jobs:
  continuous-integration:
    runs-on: ubuntu-latest
    steps:
      # Step 1
      - uses: actions/checkout@v2
      # Step 2
      - name: Set up JDK 11
        uses: actions/setup-java@v2
        with:
          java-version: '11'
          distribution: 'adopt'
      # Step 3
      - name: Build Application and Run unit Test
        run: mvn -B test --file student-service/pom.xml

  continuous-deployment:
    runs-on: ubuntu-latest
    needs: [continuous-integration]
    if: github.ref == 'refs/heads/main'
    steps:
     # Step 1
      - name: Configure AWS credentials
        uses: aws-actions/configure-aws-credentials@v1
        with:
          aws-access-key-id: ${{ secrets.AWS_ACCESS_KEY_ID }}
          aws-secret-access-key: ${{ secrets.AWS_SECRET_ACCESS_KEY }}
          aws-region: ${{ secrets.AWS_REGION }}
     # Step 2
      - name: Create CodeDeploy Deployment
        id: deploy
        run: |
          aws deploy create-deployment \
            --application-name Git_Application \
            --deployment-group-name development_gropup \
            --deployment-config-name CodeDeployDefault.OneAtATime \
            --github-location repository=${{ github.repository }},commitId=${{ github.sha }}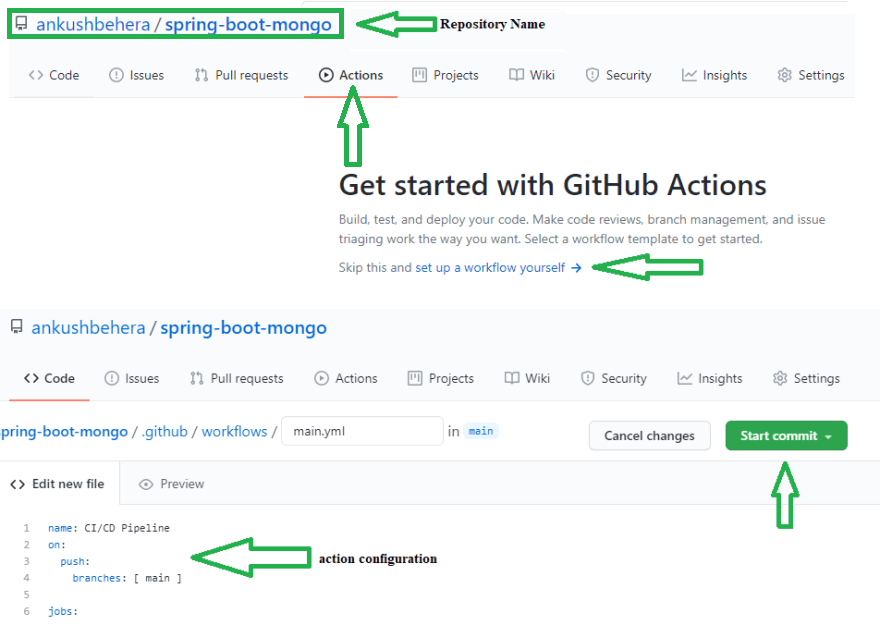
Now make a change to your repository. Your changes should automatically deploy to your EC2 server.
Access the application from a web browser or postman.
curl --location --request GET 'http://{{[ec2_public_ip]}}:8080/student'
Get ec2_public_ip from EC2 Instance
This is the test commit to run the pipeline.