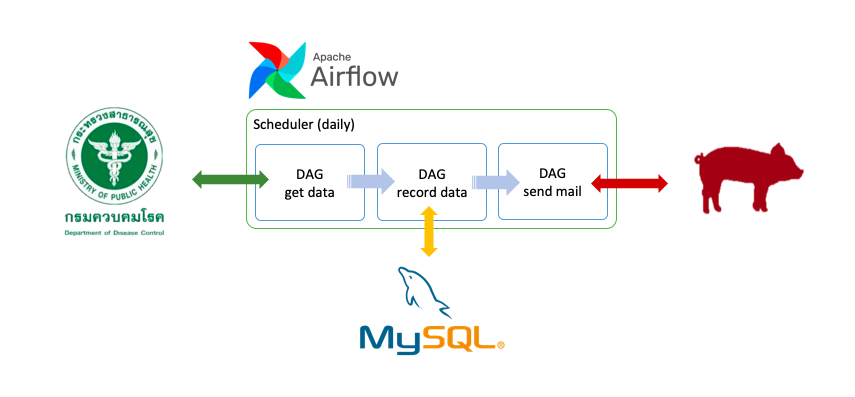
This project shows you how-to-config or set up data pipeline by using Airflow to fetch COVID-19 data from data source(Department of Disease Control) then notice developer via email.
- Airflow
- MySQL
- MailHog
- Docker daemon
- DBeaver (optional)
# Run docker-compose with specific process
$ sh run.shFor undockerize Airflow service, you MUST copy pipeline script from ./src/covid19-data-pipeline.py to your Airflow directory by default is ~/airflow/dags
then run script below :
# @root of the project

# Airflow

# Start web server to manage your Airflow service
sh start-airflow-webserver.sh
# Start Airflow scheduler
sh start-airflow-scheduler.sh

# Database

# Start MySQL (using Docker)
sh start-db.sh
# Create "data" folder to bind DB volume
mkdir -p data

# Mail

# Start mail server (using Docker)
sh start-mailhog.shAfter start Dockerize services or Undockerize services, please don't forget initial your database :
CREATE DATABASE covid19;
USE covid19;
GRANT ALL PRIVILEGES ON covid19.* TO 'root'@'%' IDENTIFIED BY 'root';
GRANT ALL PRIVILEGES ON covid19.* TO 'root'@'localhost' IDENTIFIED BY 'root';
note : for Dockerize services, intial file is in ./database/init.sql.
Ref. https://airflow.apache.org/
Directed Acyclic Graph or DAG is a finite directed graph with no directed cycles. You can declare any tasks or workflow/pipeline in DAG scope :
from datetime import datetime
from airflow import DAG

# ...

default_args = {
    'owner': 'YOUR_NAME',
    'start_date': datetime(2020, 7, 1),
    'email': ['YOUR_MAIL_HOST']
}

with DAG('covid19_data_pipeline',
  schedule_interval='@daily',
  default_args=default_args,
  description='A simple data pipeline for COVID-19 report',
  catchup=True) as dag:

  # ...
For the example, I'm preparing to fetch daily COVID-19 data by start executing on 2020-07-01.
note: Now we ready to declare our tasks.
[i] What is SimpleHttpOperator?, more detail here.
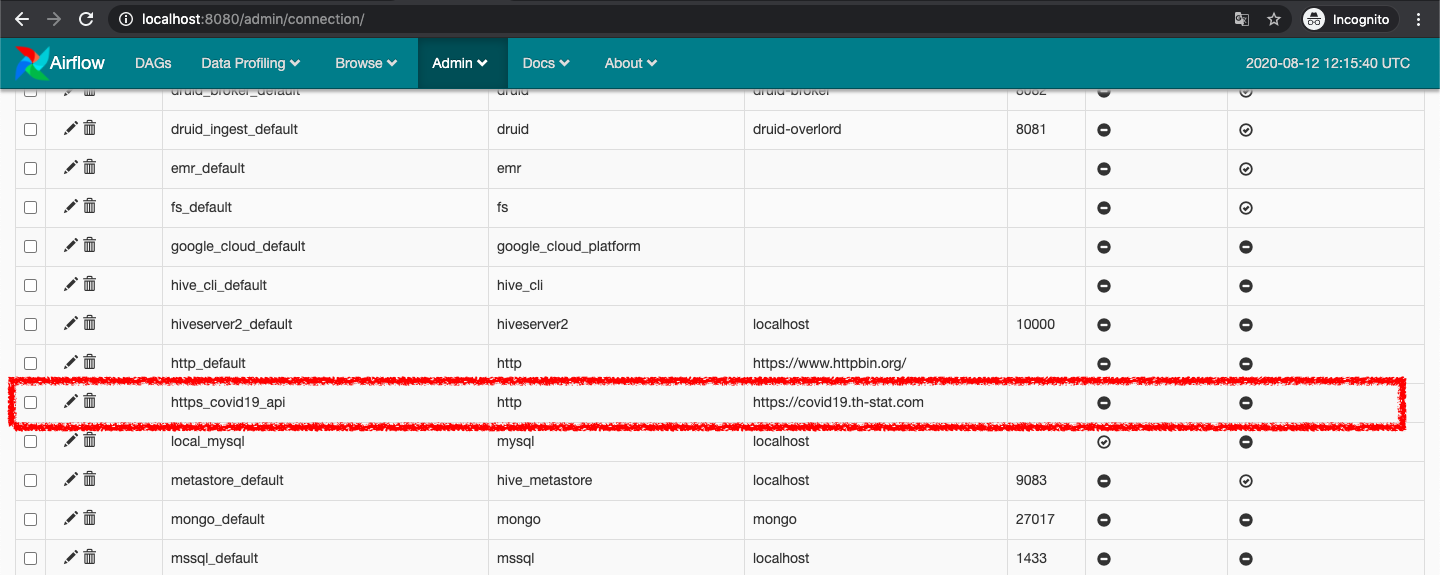
SimpleHttpOperator reference to http_conn_id, you need to set it to host of the API via :
Navigator or Toolbar in Airflow's UI > Admin > Connections
In this case, I set the connection ID to https_covid19_api :
- Conn Id : https_covid19_api
- Conn Type : HTTP
- Host : https://covid19.th-stat.com
In your DAG should look like this :
from airflow.operators.http_operator import SimpleHttpOperator

# ...

# Don't forget allow DAG to access context in XComms
default_args = {
    ...,
    'provide_context': True  # to support task instance for XComms with kwargs['ti']
}

with DAG(...) as dag:

  # Calls target endpoint on an HTTP system
  t1 = SimpleHttpOperator(
      task_id='get_covid19_report_today',
      method='GET',
      http_conn_id='https_covid19_api',
      endpoint='/api/open/today',
      headers={"Content-Type":"application/json"},
      xcom_push=True,  # Keep context or return value in this task
      dag=dag
  )

# ...[i] What is Cross-communication (or XComs) ?, more detail here.
Create database name covid19.
then create table:
CREATE TABLE daily_covid19_reports (
  id INT(6) UNSIGNED AUTO_INCREMENT PRIMARY KEY,
  confirmed INT(6),
  recovered INT(6),
  hospitalized INT(6),
  deaths INT(6),
  new_confirmed INT(6),
  new_recovered INT(6),
  new_hospitalized INT(6),
  new_deaths INT(6),
  update_date DATETIME,
  source VARCHAR(100),
  dev_by VARCHAR(100),
  server_by VARCHAR(100)
);note: the schema based on Department of Disease Control's API.
Create function to record the data, the function will get data/context from XComms by reference to ti in context object:
def save_data_into_db(**kwargs):
  # ...

  # Get task instance from context
  ti = kwargs['ti']
  # Pull the previous data
  data = ti.xcom_pull

  # ...
Full source code :
def save_data_into_db(**kwargs):

    import logging
    import sys, traceback
    import traceback

    LOGGER = logging.getLogger("airflow.task")
    LOGGER.info("Saving data...")

    # Pulling data from previous task instance (or "ti")
    ti = kwargs['ti']
    LOGGER.info("Sync XCom to pull data from previous task by ID...")

    data = ti.xcom_pull(task_ids='get_covid19_report_today')
    LOGGER.info("Data : {}".format(data))

    data = json.loads(data)

    # "covid19_db" was declare in Admin > Connections via AirFlow's UI
    mysql_hook = MySqlHook(mysql_conn_id='covid19_db')

    insert = """
        INSERT INTO daily_covid19_reports (confirmed, recovered, hospitalized, deaths, new_confirmed, new_recovered, new_hospitalized, new_deaths, update_date, source, dev_by, server_by)
        VALUES (%s, %s, %s, %s, %s, %s, %s, %s, %s, %s, %s, %s);
    """

    dt = datetime.strptime(data.get('UpdateDate'), '%d/%m/%Y %H:%M')
    mysql_hook.run(insert, parameters=(data.get('Confirmed'),
                                    data.get('Recovered'),
                                    data.get('Hospitalized'),
                                    data.get('Deaths'),
                                    data.get('NewConfirmed'),
                                    data.get('NewRecovered'),
                                    data.get('NewHospitalized'),
                                    data.get('NewDeaths'),
                                    dt,
                                    data.get('Source'),
                                    data.get('DevBy'),
data.get('SeverBy')))note: mysql_conn_id same as http_conn_id, you need to create MySQL's connection first.
- Conn Id : covid19_db
- Conn Type : MySQL
- Host : airflow-mysql (this host name refer to container name in docker-compose.yml, you can change it to your mysql instance instead)
- Schema : covid19
- Login : root
- Password : root
- Port : 3306
then
Let's create task#2 :
from airflow.operators.python_operator import PythonOperator

# ...

with DAG(...) as dag:

  t2 = PythonOperator(
    task_id='save_data_into_db',
    python_callable=save_data_into_db
)To send an email, you can use MailHog to handle it. Ref. https://github.com/mailhog/MailHog
Alternative, run with docker that I provided:
$ sh start-mailhog.shnote: default email account is test@mailhog.local
Install mhsendmail, ref. https://github.com/mailhog/mhsendmail.
$ go get github.com/mailhog/mhsendmailsend mail (you need to run MailHog first)
mhsendmail test@mailhog.local <<EOF
From: App <app@mailhog.local>
To: Test <test@mailhog.local>
Subject: Test message

Some content!
EOF
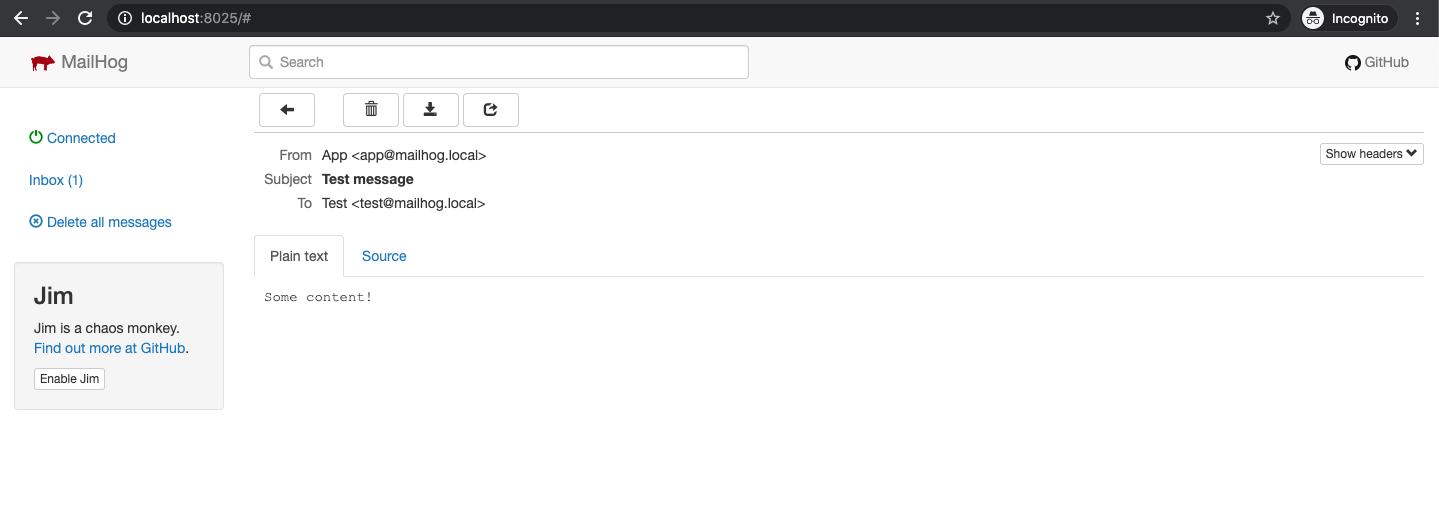
you should see the content in your inbox :
from airflow.operators.email_operator import EmailOperator

# ...

with DAG(...) as dag:

  # ...

  t3 = EmailOperator(
    task_id='send_email',
    to=['test@mailhog.local'],
    subject='Your COVID-19 report today is ready',
    html_content='Please check your dashboard. :)'
)Finally, don't forget set relation between task:
# ...

with DAG(...) as dag:

  # ...

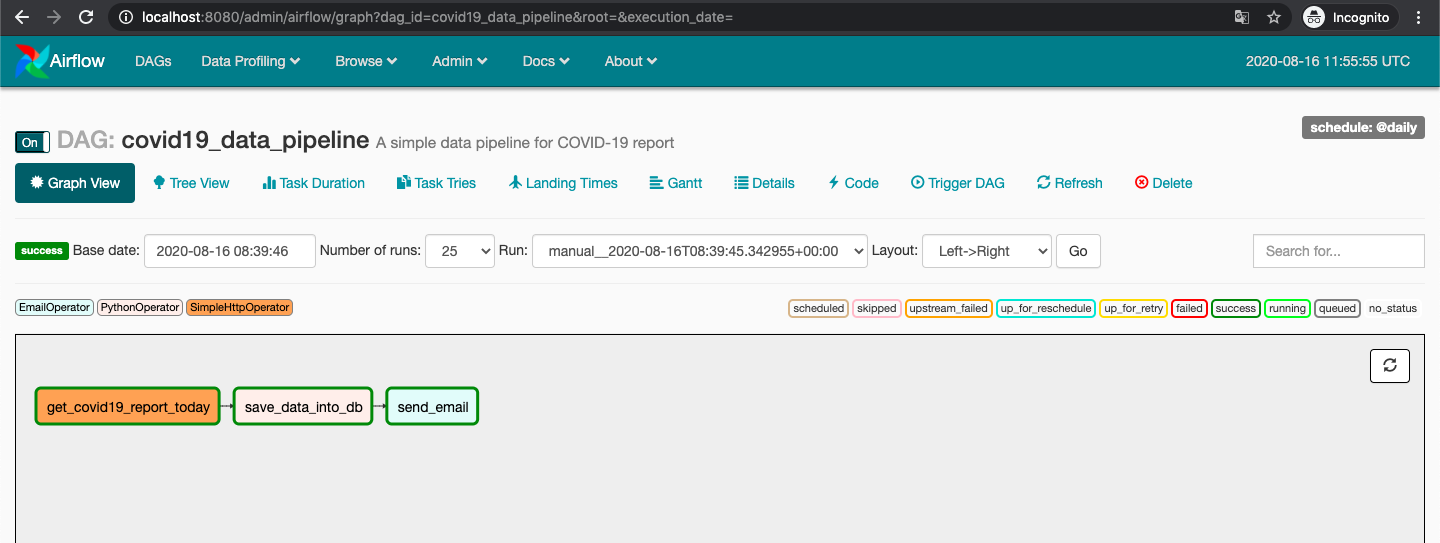
  t1 >> t2 >> t3
it should look like this :
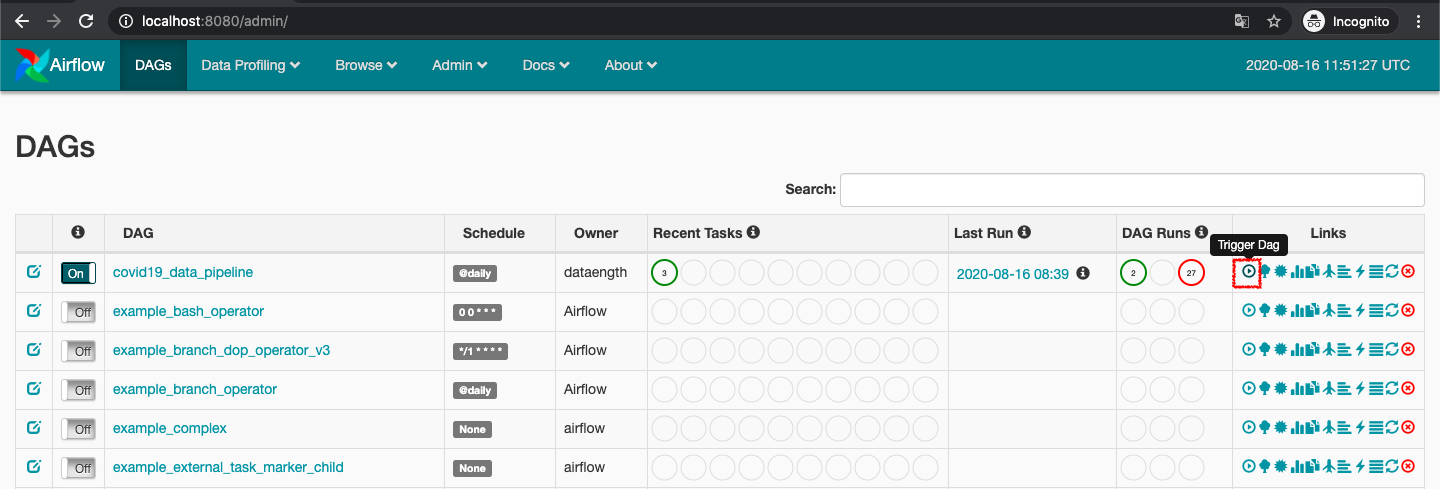
Normally I set the schedule of this DAG to be daily task. To test the pipeline, you can press Trigger Dag button on your DAG in DAGs page :
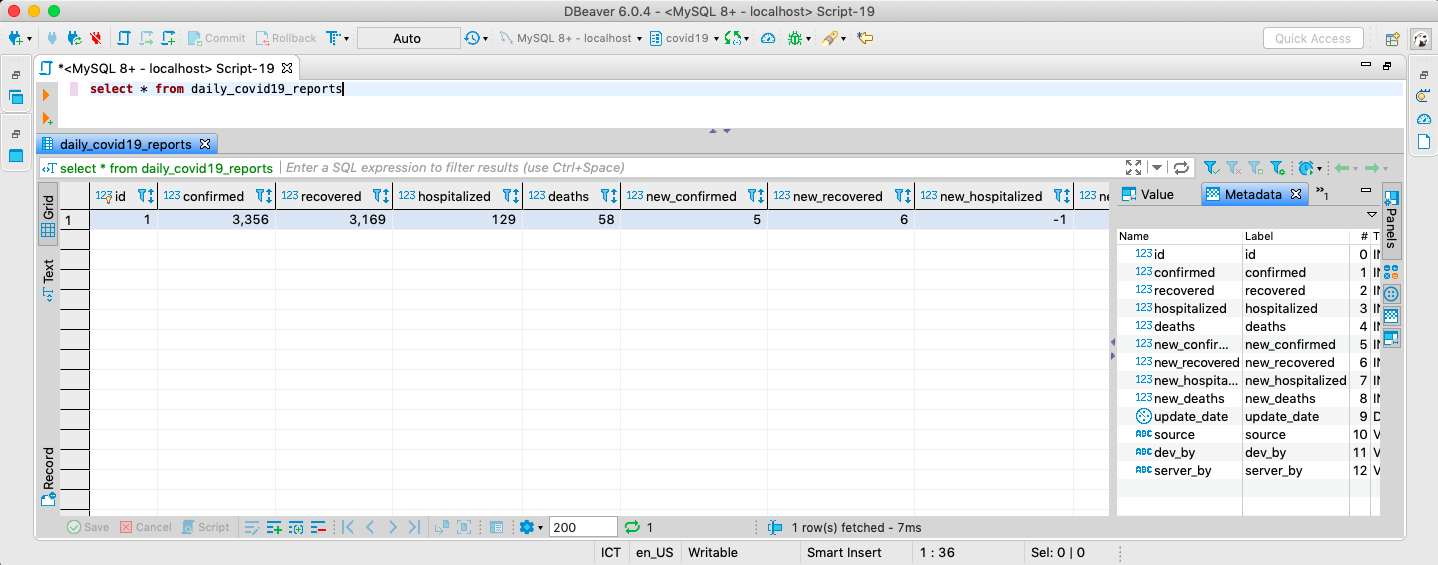
the result after run this DAG, you should :
see the data in database :
received an email that has content like this :
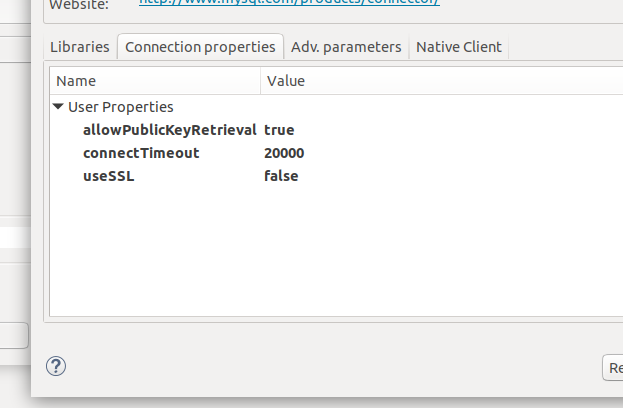
To change the settings on Dbeaver:
-
Right click your connection, choose "Edit Connection"
-
On the "Connection settings" screen (main screen) click on "Edit Driver Settings"
-
Click on "Connection properties"
-
Right click the "user properties" area and choose "Add new property"
-
Add two properties: "useSSL" and "allowPublicKeyRetrieval"
-
Set their values to "false" and "true" by double clicking on the "value" column
Save and re-test the connection. Hopefully it should work!
Full error message :
Authentication plugin 'caching_sha2_password' cannot be loaded: /usr/lib/x86_64-linux-gnu/mariadb18/plugin/caching_sha2_password.so: cannot open shared object file: No such file or directory
It occurred on MySQL8+, I'm found many method to solve it but it's not work for me on Airflow container. So I changed MySQL container image from 8 to 5.7.
MIT
