Setup guide for a Stratum 1 NTP server using GPS receiver & Raspberry Pi.
Substitutions may apply. Your mileage may vary. Additional equipment required for setup (i.e. keyboard, mouse, monitor).
- Raspberry Pi (Pi Zero not recommended)
- a quality micro SD card (class 10 recommended)
- a quality power supply
- a case (to protect, and dampen temperature fluctuations)
- Adafruit Ultimate GPS Breakout version 3
- CR1220 Lithium Coin Cell Battery 3V
- SMA to uFL/u.FL/IPX/IPEX RF Adapter Cable
- GPS Antenna, External, Active, 3-5V 28dB 5m SMA
- Optional components for clock display:
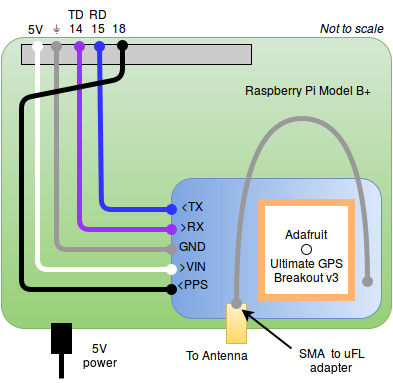
This diagram applies to the newer Pi Model 3 B+, and the original hardware used for this project, the Pi Model 1 B+:
TODO add diagram for clock display components, and include usage of prototyping board
Previously, this project used
ntpdon Raspbian Jessie. Instructions are still provided for reference purposes here.
The latest version of this project is based on Ubuntu Mate 16.04 LTS
with chrony and gpsd.
The stock configuration for Raspberry Pi Model 3 B+ hardware is to present a login over the hardware serial port, and to use the hardware uart to support Bluetooth connections To enable the hardware serial port for use with the GPS receiver, first disable the login:
sudo raspi-config
Interfacing Options > Serial
- Would you like a login shell to be accessible over serial? No
- Would you like the serial port hardware to be enabled? Yes
sudo nano /boot/config.txt
 ...
+
+# Reclaim hardware UART for hardware serial port
+dtoverlay=pi3-miniuart-bt
+
+## pps-gpio
+##     Enable kernel support for GPS receiver pulse-per-second (PPS) input
+dtoverlay=pps-gpio
sudo reboot
First, the serial port data stream:
sudo cat /dev/serial0
Next, the PPS input connection:
Ensure the GPS has signal lock (slow ~15sec LED flashes) because it will not provide a PPS signal without full signal lock.
sudo apt-get install pps-tools -y
sudo ppstest /dev/pps0
trying PPS source "/dev/pps0"
found PPS source "/dev/pps0"
ok, found 1 source(s), now start fetching data...
source 0 - assert 1455208600.181885044, sequence: 480 - clear  0.000000000, sequence: 0
source 0 - assert 1455208601.265220834, sequence: 481 - clear  0.000000000, sequence: 0
source 0 - assert 1455208602.348548499, sequence: 482 - clear  0.000000000, sequence: 0
The Adafruit Ultimate GPS Breakout v3 sends 5 NMEA sentences by default. These extra sentences introduce unnecessary processing and increase jitter.
To disable all but the Recommended Minimum GPS data sentence (GPRMC), issue the
PMTK314 command as described in the
command packet
(pg 12).
sudo bash -c "echo -e '$PMTK314,0,1,0,0,0,0,0,0,0,0,0,0,0,0,0,0,0,0,0*29\r\n' > /dev/gps0"
Optionally ensure any future re-configuration is handled automatically by adding a daily crontab entry:
sudo crontab -e
 ...
+# send modem configuration string everyday at noon (@reboot simply does not work)
+0 12 * * * echo -e '$PMTK314,0,1,0,0,0,0,0,0,0,0,0,0,0,0,0,0,0,0,0*29\r\n' > /dev/serialTo prevent the Pi from getting NTP configuration from any DHCP
servers, remove ntp-servers from the end of the request block:
sudo nano /etc/dhcp/dhclient.conf
 ...
 request subnet-mask, broadcast-address, time-offset, routers,
         ...
-        rfc3442-classless-static-routes, ntp-servers;
+        rfc3442-classless-static-routes;
...sudo apt-get install gpsd gpsd-clients -y
Update config file:
sudo nano /etc/default/gpsd
-DEVICES=""
+DEVICES="/dev/serial0"

 # Other options you want to pass to gpsd
-GPSD_OPTIONS=""
+GPSD_OPTIONS="-n"
Reboot, then test:
gpsmon -n
In latest versions of Raspbian, ntp is replaced by a client-only systemd NTP implementation. Disable it and install chrony instead:
sudo systemctl stop prefer-timesyncd.service
sudo systemctl disable prefer-timesyncd.service
sudo apt-get install chrony -y
And configure for use with GPS device:
sudo nano /etc/chrony/chrony.conf
+refclock SHM 0 offset 0 delay 0 refid GPS noselect
+refclock PPS /dev/pps0 lock GPS refid GPPS
 pool 2.debian.pool.ntp.org offline iburst
From the
chrony.confdocs:
refclockspecifies a hardware reference clock
SHMis the shared memory driver, which is utilized by gpsdPPSis for pulse-per-second signals, read from/dev/pps0lockis used to link PPS samples to another refclocknoselectis an optional flag used to signal the GPS shouldn't be used directlyrefidis the tracking label, "GPPS" indicates a PPS-enabled GPS sourceoffsetanddelayare values which will be tuned after running overnight
At this point, test the time synchronization using:
chronyc trackingchronyc sources -vchronyc sourcestats -v
If necessary, apply a step-change to system clock:
The
-aargument is required in older versions of chronyc to prevent an error.
sudo chronyc -a makestep
Immediately after starting, the sources may not provide a good time signal:
After running overnight, with a good GPS signal, you should obtain a lock to the GPPS refclock:
After warming up, the GPS refclock showed an Offset value consistently between 400-500ms, generally on the higher end. This value can be incorporated directly to improve the source:
sudo nano /etc/chrony/chrony.conf
-refclock SHM 0 offset 0 delay 0 refid GPS noselect
+refclock SHM 0 offset 0 delay 0.5 refid GPS noselect
 refclock PPS /dev/pps0 lock GPS refid GPPS
Although recommended, the makestep directive is not included in the
default chrony configuration file. Manually add it:
sudo nano /etc/chrony/chrony.conf
 ...
+# Step the clock, if necessary, for a short window after starting
+#
+
+makestep 1 5Finally, to enable this device as an NTP server, add allow directives
to /etc/chrony/chrony.conf as appropriate. See the user
documentation
for more details.
Example, to permit all clients from local subnet 192.168.1.x:
sudo nano /etc/chrony/chrony.conf
 ...
 # This directive designates subnets (or nodes) from which NTP clients are allowed
 # to access to `chronyd'.

+# allow everyone on home network
+allow 192.168.1.0/24

 #allow foo.example.net
 #allow 10/8
...In case the server loses GPS and Internet access, but network clients are still attempting to sync, use the local hardware clock as a last resort source:
sudo nano /etc/chrony/chrony.conf
-#local stratum 10
+local stratum 10