1. ldd
Linux drivers course materials Course git repository: https://github.com/niekiran/linux-device-driver-1
- 1. ldd
- 1.1. Kernel source online viewer
- 1.2. Host OS dependencies
- 1.3. Linux module building
- 1.4. Tools
- 1.5. Testing from a SHELL
- 1.6. Kernel APIs for drivers
- 1.7. Kernel dynamic memory allocation
- 1.8. Dynamic device file creation
- 1.9. Beaglebone
- 1.10. Linux kernel build steps (on BeagleBoard example)
- 1.11. Platform Bus
- 1.12. Device Tree
- Device Tree Overlays
1.1. Kernel source online viewer
1.2. Host OS dependencies
- build-essential
- lzop
- u-boot-tools
- net-tools
- bison
- flex
- libssl-dev
- libncurses5-dev
- libncursesw5-dev
- unzip
- chrpath
- xz-utils
- minicom
- wget
- git-core
sudo apt-get update
sudo apt-get install build-essential lzop u-boot-tools net-tools bison flex libssl-dev libncurses5-dev libncursesw5-dev unzip chrpath xz-utils minicom wget git-core
1.2.1. Docker
You can use docker with all dependencies.
# Build image
docker build --rm -t ldd:latest .

# run container
docker run --rm -v <path_to_source_code>:/workspace -it ldd:latest
1.3. Linux module building
# Building module
# make -C <path_to_kernel_source> M=<path_to_module_source> <target>
make -C /lib/modules/5.16.0-12parrot1-amd64/build M=$PWD modules

# Cleaning
make -C /lib/modules/5.16.0-12parrot1-amd64/build M=$PWD clean
1.3.1. Intree module building
- Download Linux Kernel source
- Create a new folder in
drivers/<type_of_driver>/<driver_name>, e.g.drivers/char/my_c_dev/ - Copy source code into the directory
- If you want your module to be visible in the
menuconfigyou should deliver alsoKconfigfile in the driver directory - Add the local Kconfig entry to upper level Kconfig, e.g.
source "drivers/char/my_c_dev/Kconfig - Create local Makefile
- Create
obj-$(config_item) += <module_name.o>Because we do not know what config was chosen (m|n|y), we can use config name preceeded with CONFIG keyword, e.g.obj-$(CONFIG_DRIVER_NAME_IN_MENUCONFIG) += main.o - Add the local level Makefile into the upper level Makefile
obj-<config [y|m|n]> += <driver_path>, e.g.obj-y += my_c_dev. Note: when config usedy, then the folder will be always enabled (not the module itself, but the folder).
Kconfig example:
menu "Menu entry header description"
config DRIVER_NAME_IN_MENUCONFIG
    tristate "Short description of the module"
    default [n|m|y]
endmenu
1.4. Tools
udevadm
1.5. Testing from a SHELL
- Writing into the driver -
echo "Message" > /dev/<driver>, e.g.echo "Hello" > /dev/pcd - Reading from the driver -
cat /dev/<driver>, e.g.cat /dev/pcd - Copying the file into the driver -
cp <file> /dev/<driver>, e.g.cp /tmp/file /dev/pcd
1.6. Kernel APIs for drivers
alloc_chrdev_region()- create device numberunregister_chrdev_region(). This allows to allocate device and assigne a device_number to it. It is allowed to allocate multiple devices at once, e.g.alloc_chrdev_region(&device_number, 0, NO_OF_DEVICES, "pcd_devices")- it allocatesNO_OF_DEVICESdevices and saves first number intodevice_number. Using any other device is allowed by merging MAJOR and MINOR numbers.cdev_init(),cdev_add()- make a char device registration with the VFScdev_del()class_create(),device_create()- create device filesclass_destroy(),device_destroy()
1.6.1. printk priorities
The default priorities can be setup in menuconfig before kernel compilation.
In runtime it can be setup by overwriting /proc/sys/kernel/printk file, e.g. we can change the console log level
to 6 by echo 6 > /proc/sys/kernel/printk. Message from printk will be printed on a console when printk
priority is lower than current console log level.
1.6.2. printk format customization
User can define its own pr_fmt macro, e.g.
#define pr_fmt(fmt) "%s:" fmt, __func__1.6.3. File operations
These are represented by struct file.
1.6.3.1. open
This operation creates struct file in the kernel space for each opened file descriptor.
Each call to open increments f_count.
File permissions which was passed to the open system call can be checked using FMODE_WRITE / FMODE_READ macros (bit masks) and the member of the struct file named f_mode, e.g. filp->f_mode & FMODE_READ.
1.6.3.2. release
This callback is issued when the last close is called. It means that the callback
is called only when f_count becomes 0.
1.6.3.3. read / write
In the prototype, there is an __user macro used. This macro is used to signal that the variable
that it corresponds to is a user space data which kernel shouldn't trust, e.g. pointer - it shouldn't
be dereferenced directly, but copy_to_user / copy_from_user should be used instead.
When __user macro is used, it is detected by sparse tool (GCC doesn't detect any errors).
copy_to_user- returns 0 on success or number of bytes that could not be copiedcopy_from_user- returns 0 on success or number of bytes that could not be copied
1.6.3.4. Error handling macros
In include/linux/err.h:
IS_ERR()PTR_ERR()ERR_PTR()
1.6.4. Resource managed kernel APIs
Full list of this APIs may be found here.
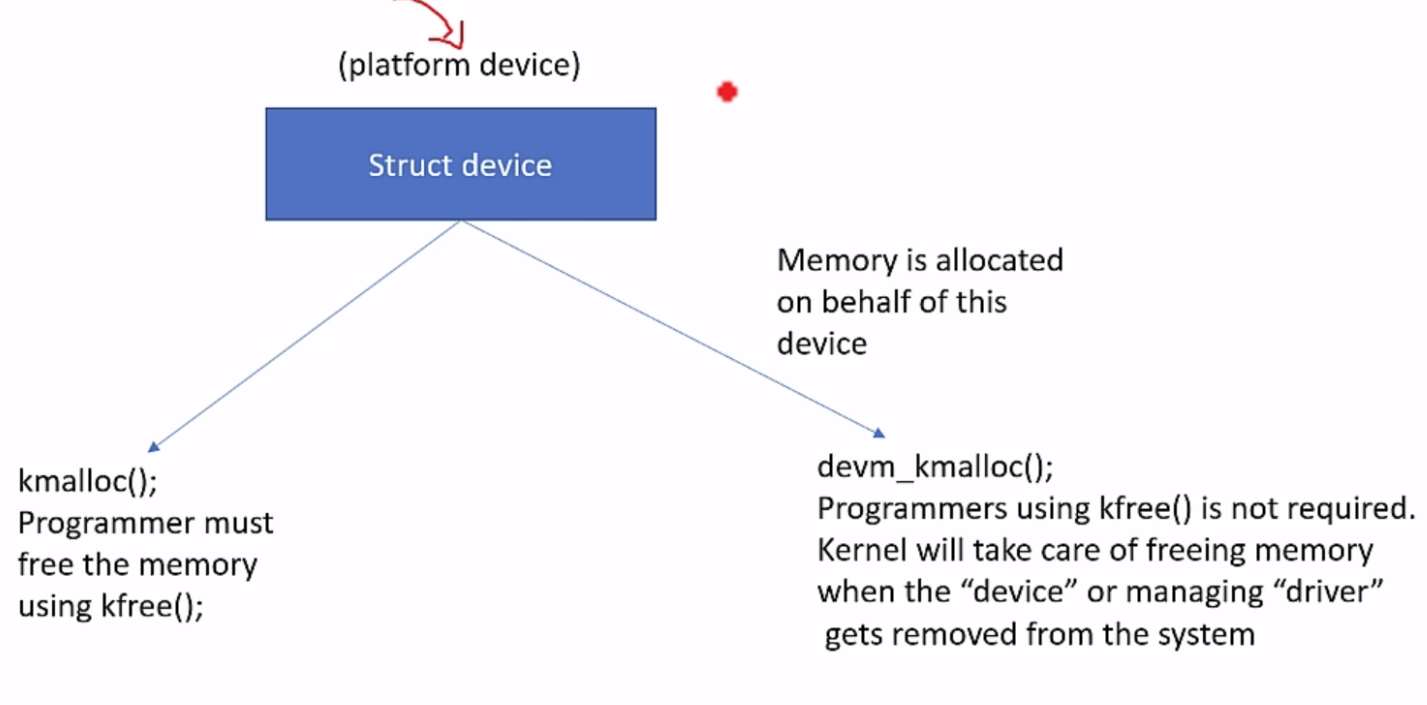
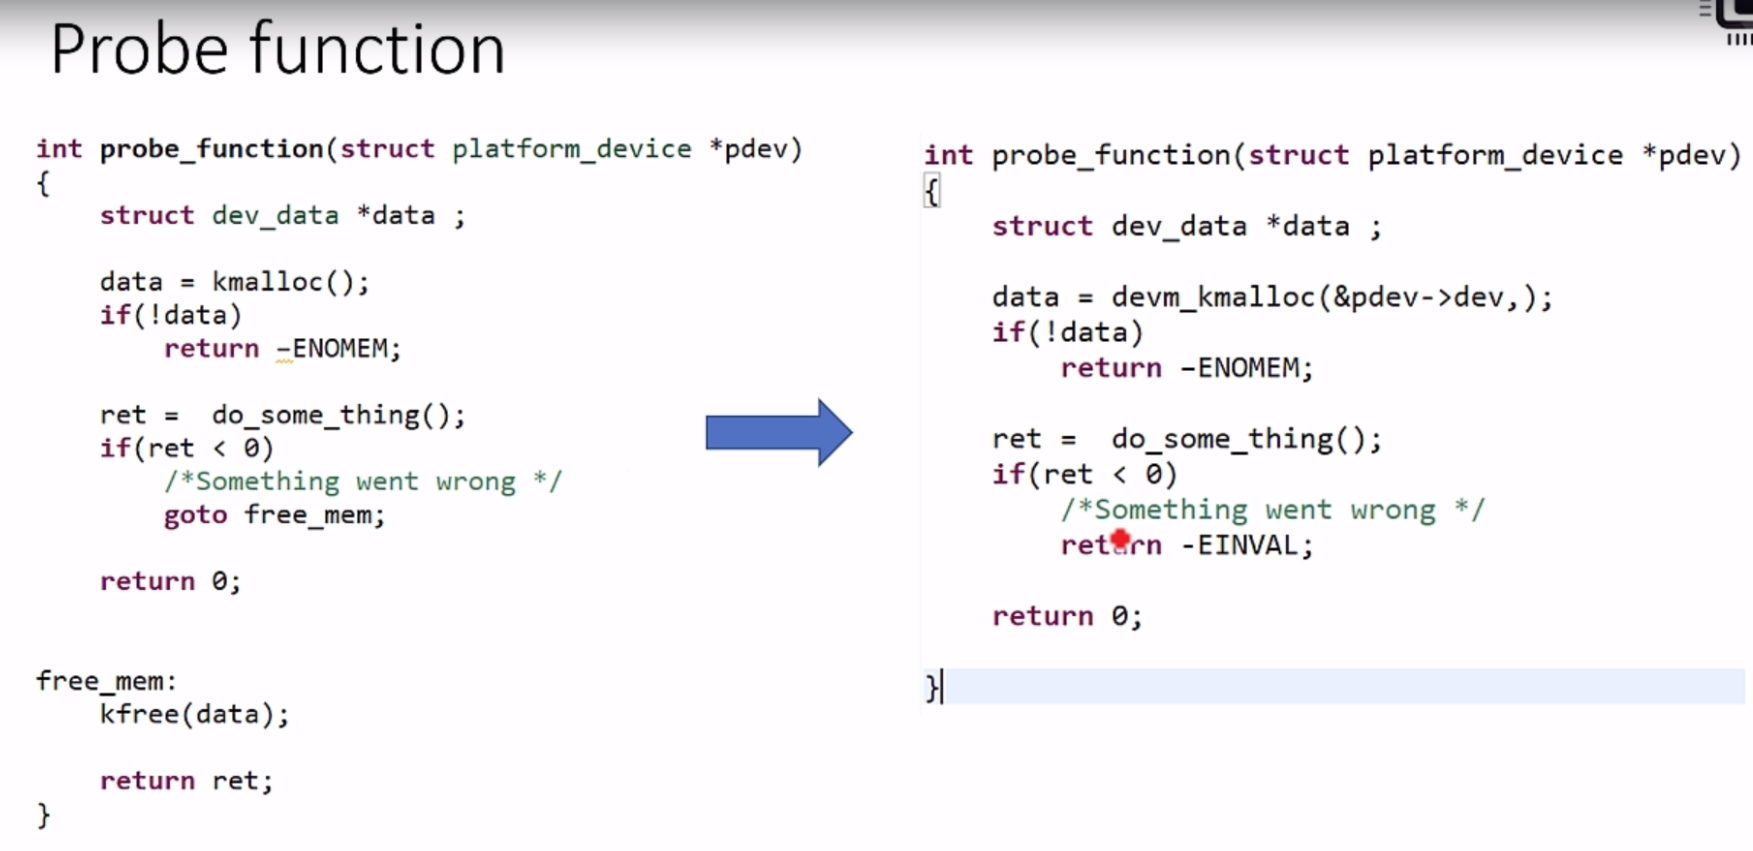
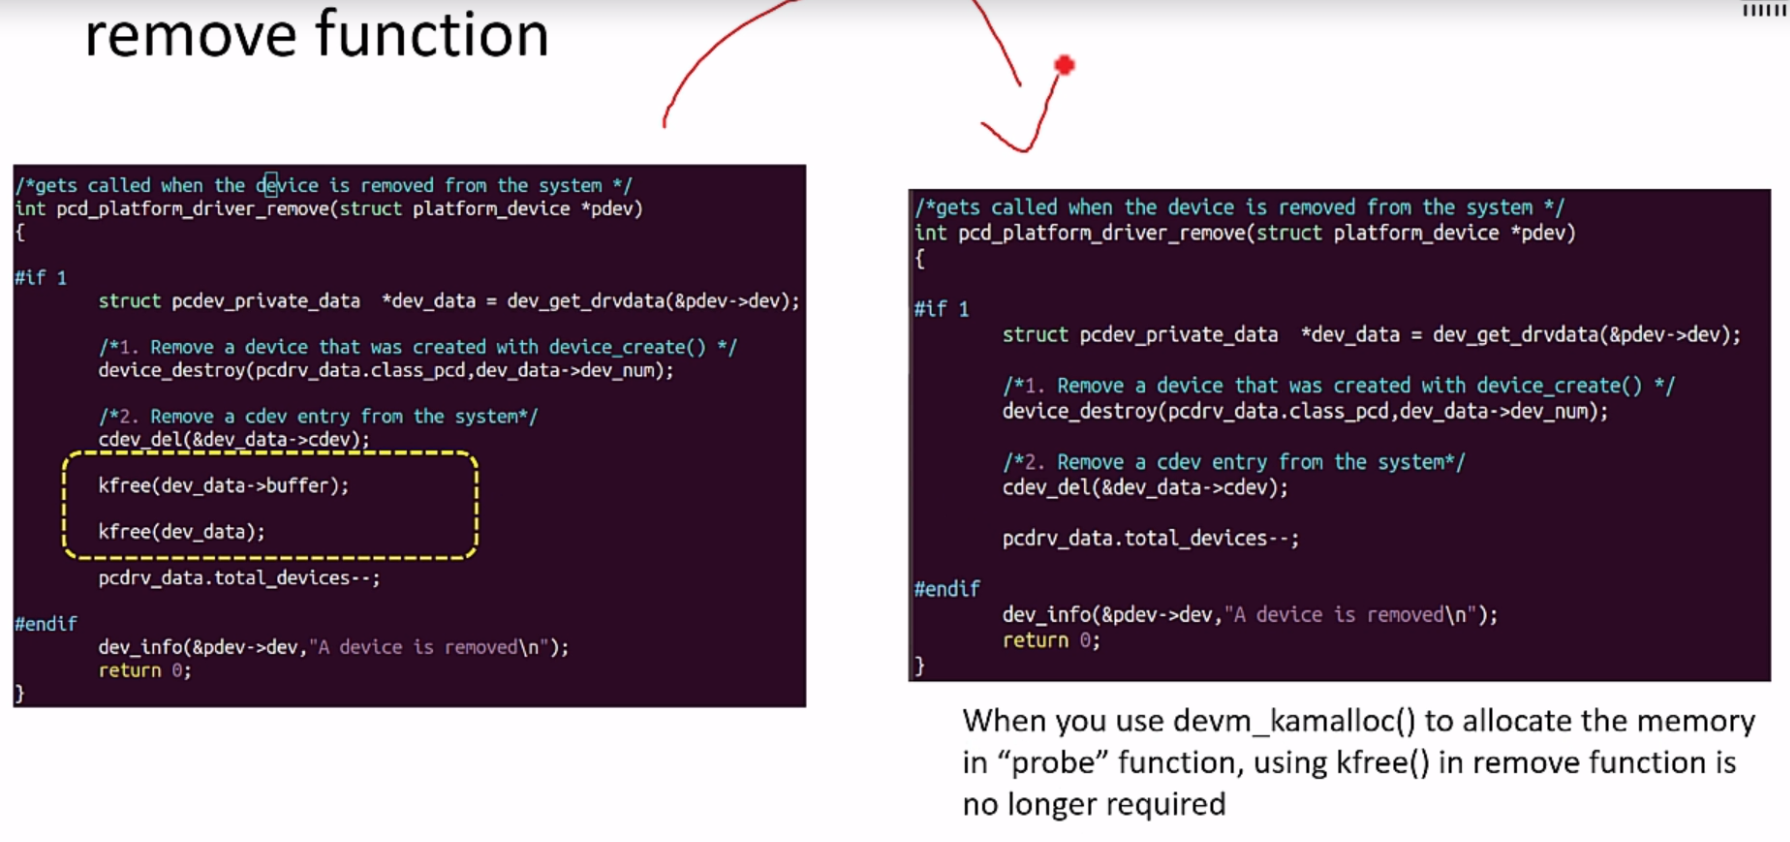
1.6.4.1. devm_kmalloc
Allocates a resource and remembers what has been allocated. Programmer won't have to use kfree
because this resource will be freed by kernel.
1.7. Kernel dynamic memory allocation
Kernel has its own implementations of allocation / deallocation functions - kmalloc and kfree.
1.7.1. void* kmalloc(size_t size, gfp_t flags)
Defined in include/linux/slab.h.
Allocated memory is contigueues and its size is limited. This is a good practice to use kmalloc for
allocations smaller than the page size (most likely 4 kB).
Important flags:
GFP_KERNEL- may block / sleep (better not to use in a time fragile code like interrupts)GFP_NOWAIT- will not blockGFP_ATOMIC- will not block. May use emergency pools.GFP_HIGHUSER- allocates from high memory on behalf of user
kmalloc flavors:
kmalloc_arraykcallockzalloc- allocated memory is set to zerokrealloc
1.7.2. void kfree(const void *p)
kfree flavors:
kzfree- frees memory and set it to zero
1.8. Dynamic device file creation
There is a tool udevd which listens to uevents generated by hot plug events or kernel modules.
When udev received the uevents, it scans the subdirectories of /sys/class looking for the
dev files to create device files. For each such dev file, which represents a combination of major an minor
number for a device, the udev program creates a corresponding device file in /dev directory.
All that a device driver needs to do, for udev to work properly with it, is ensure that any major and minor
numbers assigned to a device controlled by the driver are exported to user space through sysfs. This is done by calling
the function device_create.
Kernel functions:
class_create- creates a directory in sysfs:/sys/class/<your_class_name>device_create- creates a subdirectory under/sys/class/<your_class_name>with your device name. This function also populates sysfs entry with dev file which consists of the major and minor numbers, separated by a:character.
1.9. Beaglebone
1.9.1. Toolchain
Downloaded either from package manager or from arm-Developer page.
Required version: arm-linux-gnueabihf.
1.10. Linux kernel build steps (on BeagleBoard example)
Warning: These steps base on https://github.com/beagleboard/linux branch 4.14
STEP 1:
/*
 *removes all the temporary folder, object files, images generated during the previous build.
 *This step also deletes the .config file if created previously
 */
make ARCH=arm distclean
STEP 2:
/*creates a .config file by using default config file given by the vendor */

make ARCH=arm bb.org_defconfig
Warning: This is valid only for branch 4.14 (and maybe some others) but not for the newer ones. Newer kernel source code doesn't have the bb.org_defconfig config file, therefore this won't work anymore.
STEP 3:
/*This step is optional. Run this command only if you want to change some kernel settings before compilation */
make ARCH=arm CROSS_COMPILE=arm-linux-gnueabihf- menuconfigSTEP 4:
/*Kernel source code compilation. This stage creates a kernel image "uImage" also all the device tree source files will be compiled, and dtbs will be generated */
make ARCH=arm CROSS_COMPILE=arm-linux-gnueabihf- uImage dtbs LOADADDR=0x80008000 -j4STEP 5:
/*This step builds and generates in-tree loadable(M) kernel modules(.ko) */

make ARCH=arm CROSS_COMPILE=arm-linux-gnueabihf-  modules  -j4
STEP 6:
/* This step installs all the generated .ko files in the default path of the computer (/lib/modules/<kernel_ver>) */
sudo make ARCH=arm modules_install1.11. Platform Bus
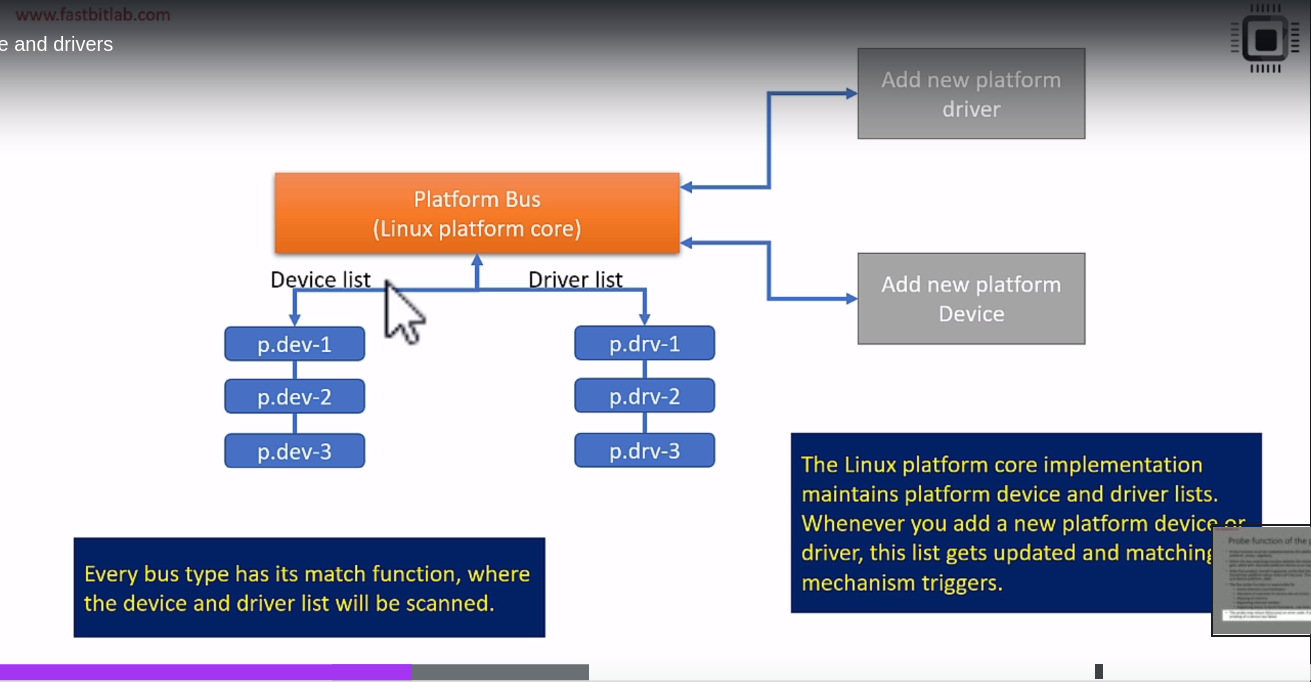
This is a virtual bus implementation in a Linux terminology. A Platform Bus is used to deliver configuration information about a peripheral to the kernel. The devices served be Platrofm Bus are non-discoverable (not hot-plug).
1.11.1. Passing configuration to the kernel
There are three ways:
- During compilation of a kernel (not recommended)
- Dynamically - by loading kernel module manually (not recommended)
- During kernel boot - Device Tree blob (recommended) link
1.11.2. Platform devices
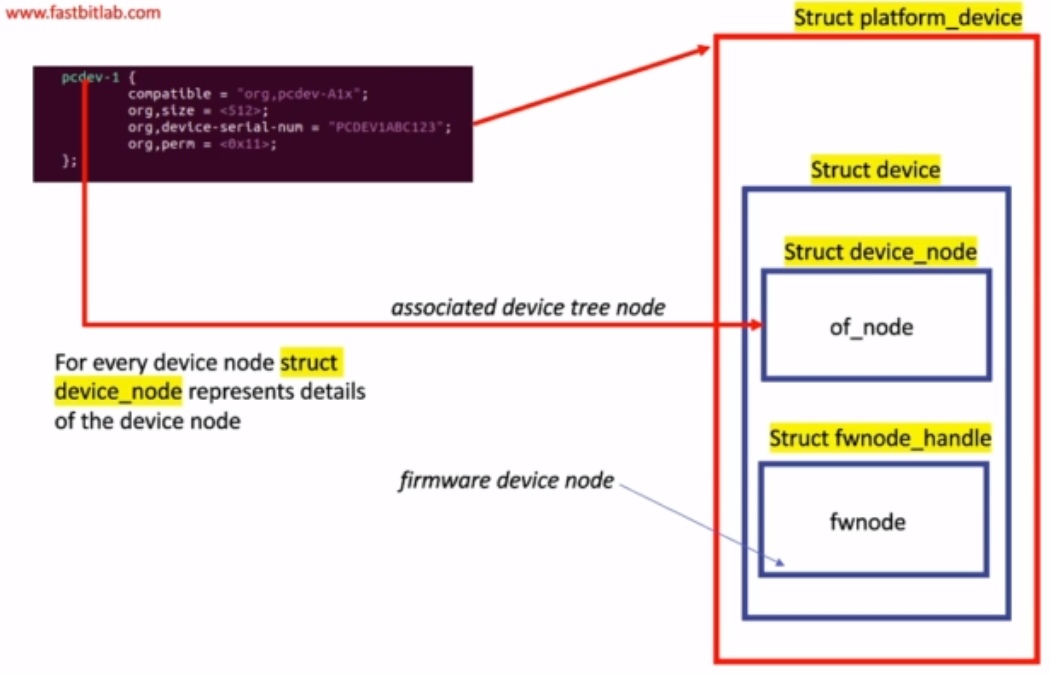
Devices that are connected to the Platform Bus (not supporting enumaration (dynamic discovery of devices)). Platform devices are created in /sys/devices/platform.
1.11.3. Platform driver
A driver who is in charge of handling a platform device.
1.11.3.1. Registering platform driver in the kernel
Use the below C-macro:
platform_driver_registerfrominclude/linux/platform_device.h
Platform driver is represented by struct platform_driver.
Note: There is also platform_add_devices function which allows to add multiple devices at once.
There is no platform_remove_devices counterpart though.
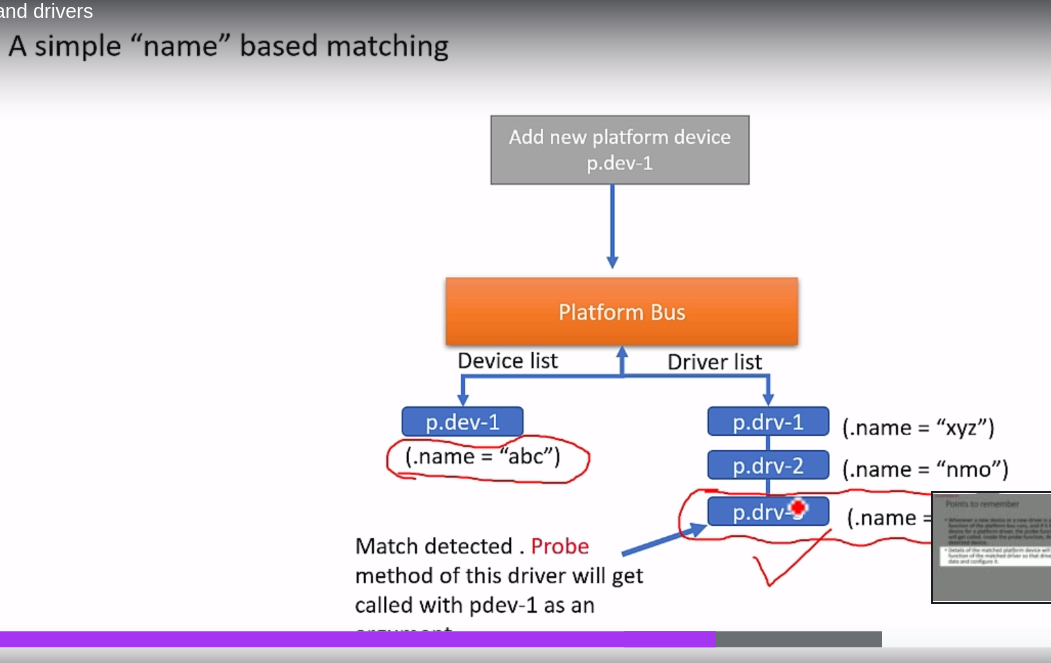
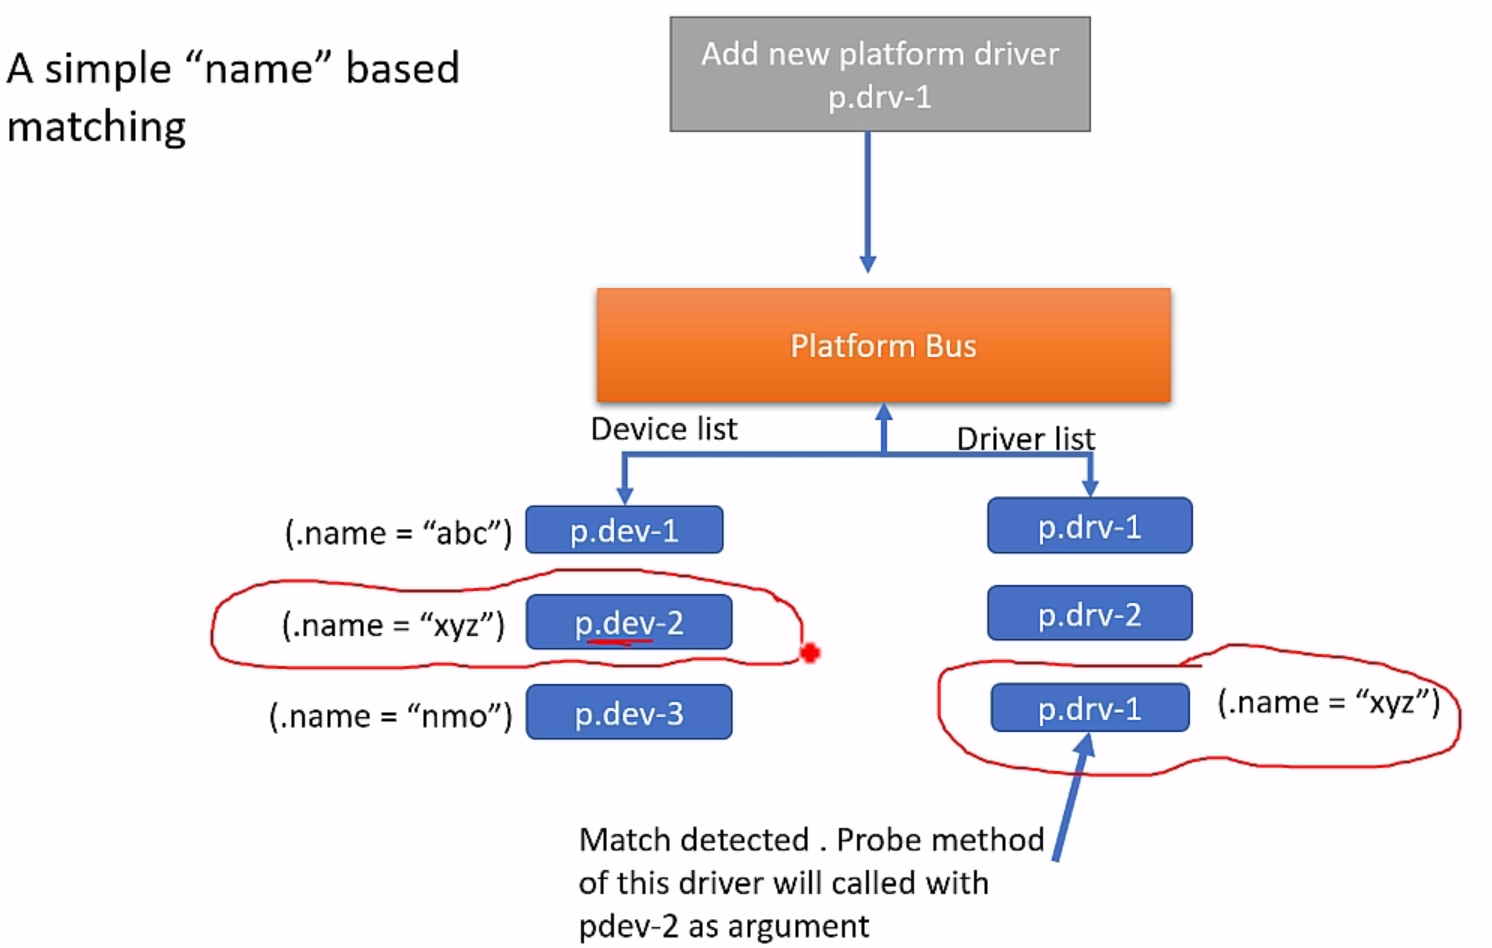
1.11.4. Platform device to platform driver matching
The kernel holds matching table basing on names of platform driver and platform device.
When there is a match the probe function of a platform driver will be called.
When a new driver is added and there already is a matching device in the kernel list, the Platform Bus
matching process will be called and then probe function of the platform driver will be called.
Matching methods:
- id table matchint
- device tree metching
1.11.4.1. Platform driver callbacks
struct platform_driver:
probeis responsible for initialization of given platform driver.removeis responsible for unbinding and clearing the device when clased.shutdownsuspendis responsible for putting the device into sleep moderesumeis responsible for bringing back the device from a sleep mode
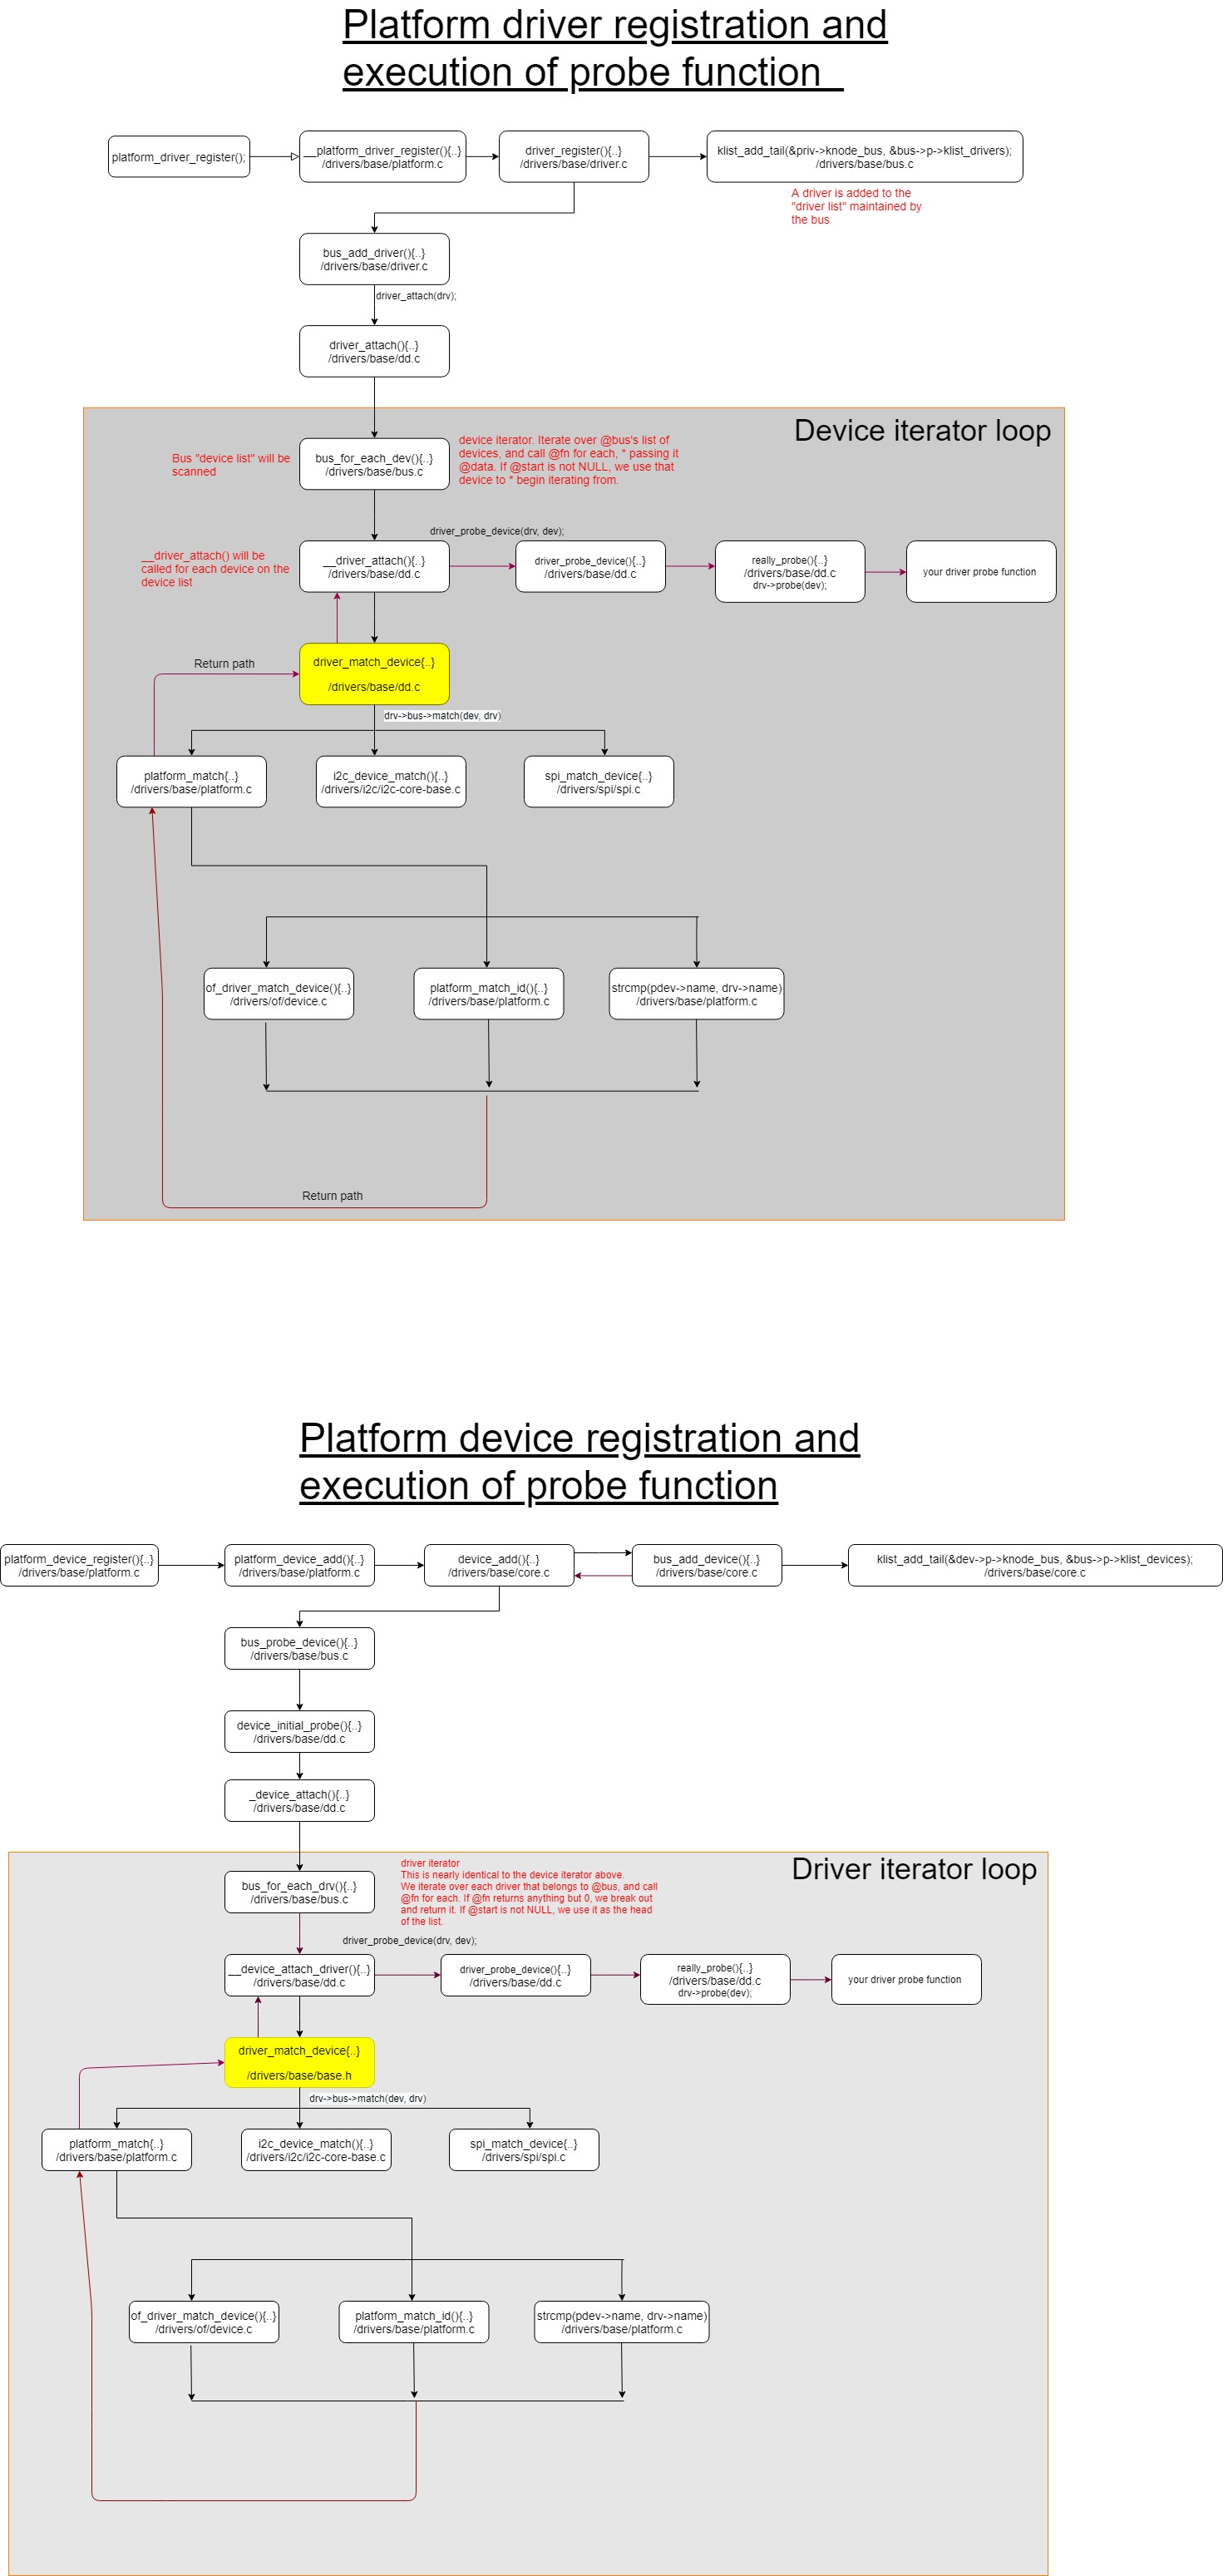
1.11.5. Platform bus flow
1.11.5.1. Platform matching mechanism
Can be found here: drivers/base/platform.c. The matching order is as below:
driver_override- OF style matching
- ACPI style matching
id_tablematching- Fall-back to driver name matching
1.12. Device Tree
Resources:
- https://www.kernel.org/doc/html/latest/devicetree/usage-model.html
- https://www.elinux.org
- https://www.devicetree.org/specifications/
Device Trees localization in a kernel sources (arm architecture example) - arch/arm/boot/dts.
Device Tree has one root node and many children. The following nodes shall be present at the root of all device trees:
- One
/CPUsnode - At least one
/memorynode
1.12.1. Properties
Full documentation can be found here: https://www.devicetree.org/specifications/.
1.12.1.1. Node name
Syntax: node-name@node-address.
node-address has to be equal to the first address specified in reg property.
1.12.1.2. Compatible
The order of Compatible drivers is from the most Compatible to the most general.
1.12.2. How to find a list of compatibilie devices to a driver
Given an example of i2c driver we can find the list of Compatible devices: <kernel_source_dir>/drivers/i2c/busses/i2c-omap.c.
Generally, the Compatible name from a device tree should match the driver name.
Open the driver source code and find the platform_driver.driver.of_match_table member which defines compatibility table.
1.12.3. Bindings
These are documentations for Device Trees. They can be found in Documentation/devicetree/bindings directory of a kernel source.
A Device Tree implementer shall deliver this documentation.
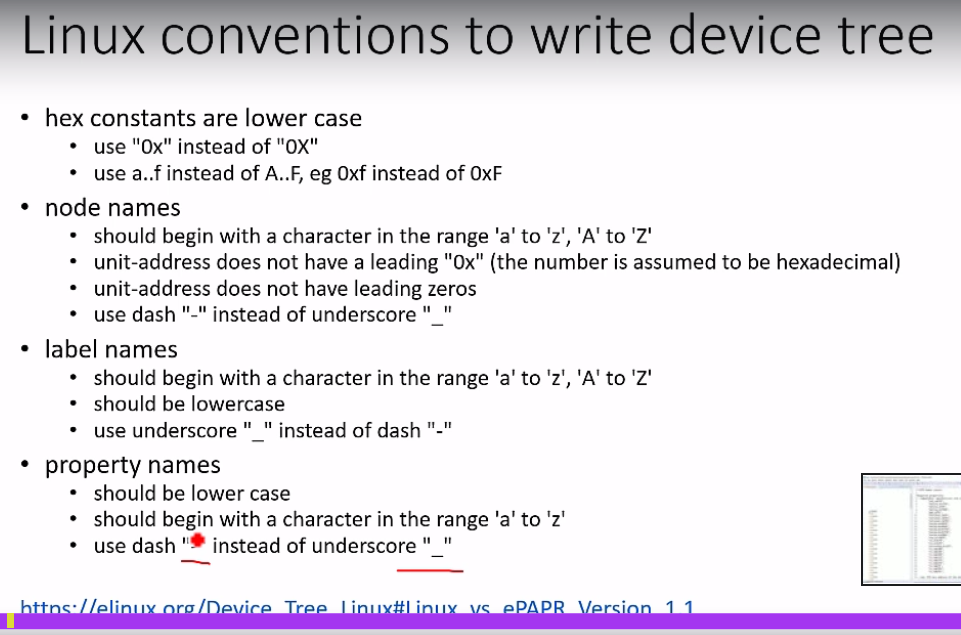
1.12.4. Linux conventions
1.12.5. Adding own Device Tree procedure
- Download kernel source
- Does a driver already exist?
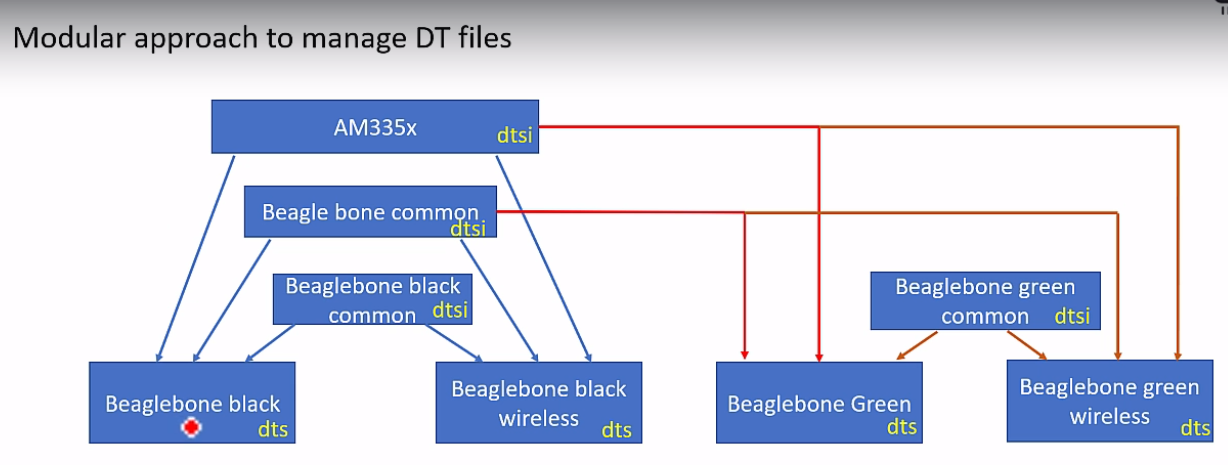
- Yes: Find a
.dtsfile you're gonna to reuse 1. Create own.dtsifile and include it into the.dtsof the driver - No: Create own
.dtsfile - Genrate
.dtb(Device Tree Binary) file and upload it into the target device
1.12.6. Usage in platform driver
There is an of_style_match in platform_match function of a kernel source.
Compatible devices should be passed in the of_match_table of a device_driver structure.
There is a helper code to work with a Device Tree in of*.h, e.g.:
linux/of.hlinux/of_device.h
1.12.7. Compiling Device Tree
After updating .dts and / or adding .dtsi into the kernel source in order to create .dtb
(Device Tree Binary) one should invoke the below command from kernel source top directory:
make ARCH=<arch> CROSS_COMPILE=<cross_compiler_prefix> <dtb_filename>.dtb, e.g. for BeagleBone Black
make ARCH=arm CROSS_COMPILE=arm-linux-gnueabiif- am335x-boneblack.dtb
1.12.7.1. Using compiled .dtb
The file should be transfered into BOOT partition of a target system. With BeagleBone this can be done
directly on SD card or from target device by mounting BOOT partition and copying the .dtb file there.
Usefull commands to accomplish this:
lsblk- find BOOT partitionmount /dev/<boot_partition> <mount_point>
1.12.7.1.1. Checking if changes in .dtb are visible on target
Go to /sys/devices/platform and list a content. In our cas there should be new devices pcdev-* visible.

One can also check a device specific properties defined in .dtsi file in /sys/devices/platform/<device_name>/of_node/ directory.

Device Tree Overlays
Documentation: https://www.kernel.org/doc/html/latest/devicetree/overlay-notes.html
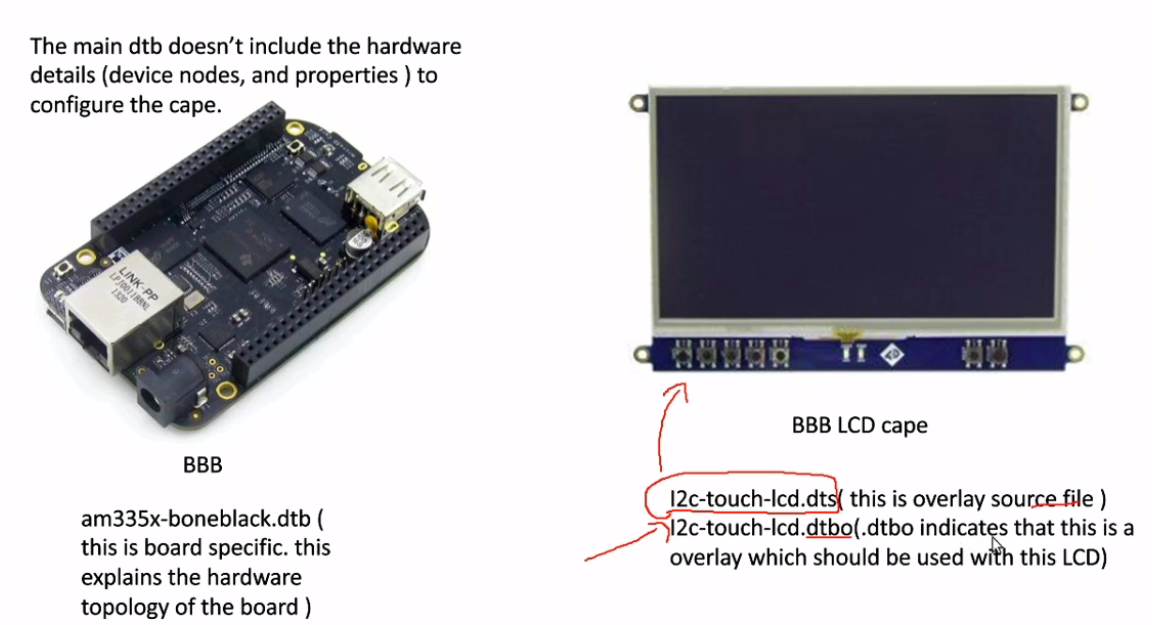
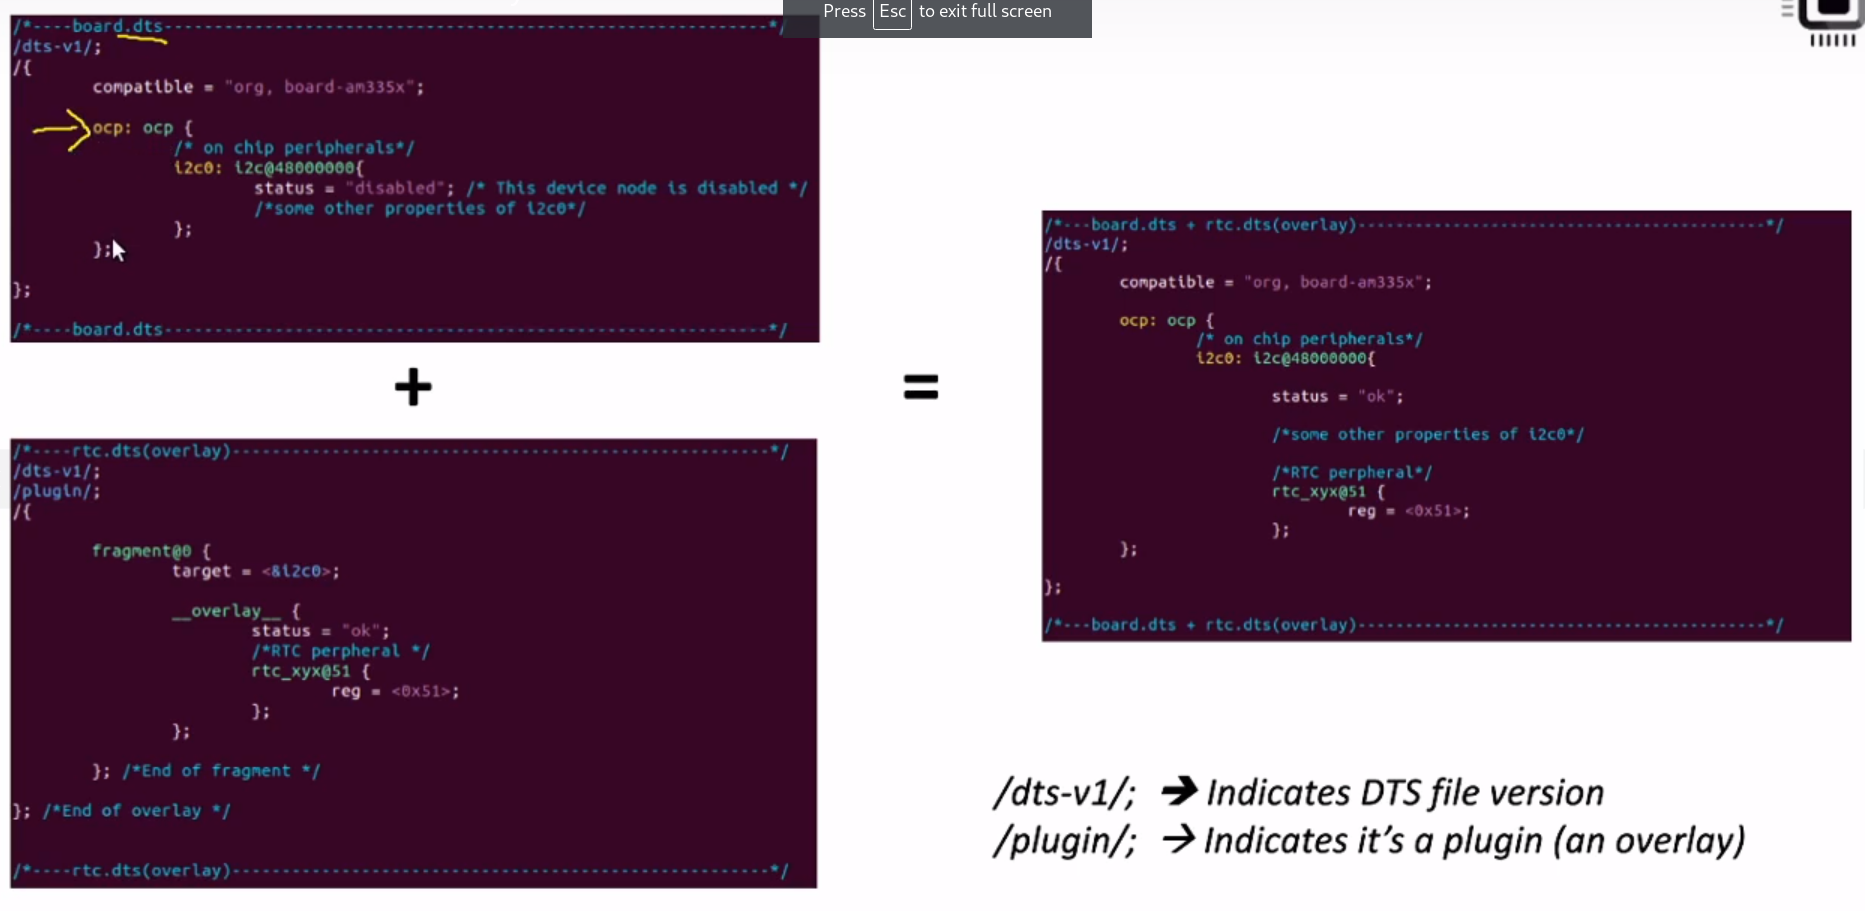
This is kind of patches for existing Device Tree Binaries (Blobs) (.dtb).
As an example let's consider BeagleBone Black board which has it's own, board specific, Device Tree (.dts) file.
Attaching LCD cape we can deliver Device Tree Overlay to patch the board specific .dts file as below:
Delivering overlays steps
- Create a Device Tree Overlay
- Compile the device tree to create
.dtbo- This step requires
device-tree-compiler:sudo apt-get install device-tree-compiler(commanddtc)
- This step requires
- Make u-boot to load the
.dtbofile during board startup
Compiling command example:
We assume that there is PCDEV0.dts overlay file.
dtc -@ -I dts -O dtb -o PCDEV0.dtbo PCDEV0.dts
Updating u-boot manually
- Transfer the
.dtbofile into the target filesystem/lib/firmwaredirectory. - Download source code for u-boot
- Go to the source code top directory
- Run
make ARCH=arm am335x_evm_defconfigto generate.configfile - Run
make ARCH=arm CROSS_COMPILE=amr-linux-gnueabihf- -j4. This should generateu-boot.imgandMLOfiles which should be transferred into BOOT partition of the target - Transfer
MLOandu-boot-imginto the BOOT partition of the target
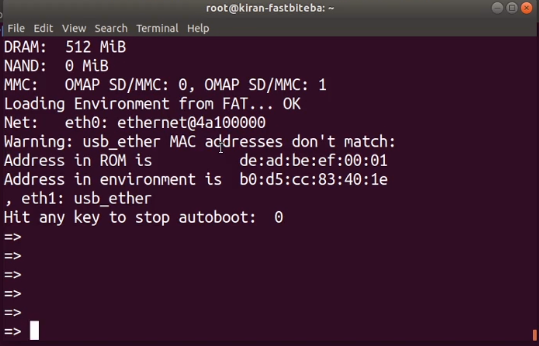
While rebooting target board you should see a countdown timer from u-boot before booting the system. You can stop it in order to configure u-boot by pressing any key, example below:
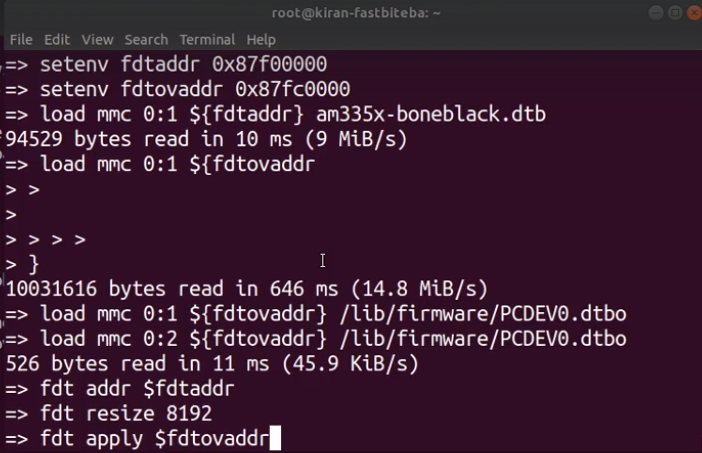
Manual updating of a u-boot with overlays is described in u-boot documentation under Manually Loading and Applying Overlays in READMY.fdt-overlays. Example below:
Next step is to boot linux image. In order to do it, we can open uEnv.txt file which is located in BOOT partition, copy and execute highlighted commands:
Next, load linux image and boot it:
Updating u-boot automatically
This can be done by doing all manual steps in uEnv.txt file located in BOOT partition of an SD card.
An example how to do it is in the custom_drivers/overlays/uEnv-dtbo.txt.
Short notes concerning the file:
- this is a shell script (shell commands should work)
- commands are executed using
runcommand - command
uenvcmdwill be run automatically by u-boot
