If you use Alfred, LaunchBar, QuickSilver or other similar products (and if you don't, you really should!), then you already know what this is all about.
Else, if you haven't and you are at least familiar with "Open Quickly" (default CMD+Shift+O), then you also know what this is all about -- it's like "Open Quickly" but for all menu bar actions, code snippets, unit tests, custom built-in actions that can operate on text or any other kind of custom action you'd like (just as long as you implement it)
Else Read along ... :)
XCActionBar is at present only partially supported in Xcode 9. The vast majority of custom actions operate on text and therefore require access to Xcode's internal text views which have changed significantly in Xcode 9. I know of a few other plugins in a similar situation and people are hard at work trying to figure out what the new hook points are. I'm currently not in a position where I can dedicate a lot of time to research this, but I will definitely get to it at some point.
Xcode 8 introduces a new extension system which enables developers to finally be able to build and distribute Xcode extensions. The drawback is that at the present time this breaks the system we've had in place until now, meaning XCActionBar (along with all other plug-ins) will stop working. Given how sparse the documentation is, it isn't clear whether most of XCActionBar's functionally can be ported over to the new system; I suspect it is not, at least not just yet. In the meantime, while not pretty, there is a workaround which will allow Xcode 8 to still load all your plugins, please check alcatraz/Alcatraz#475 for more information. Do keep in mind that this solution is inherently unsafe and definitely not the way forward, so use your judgement.
###Updates: If you'd like to keep up to date with the latest feature additions, keep an eye on the changelog page.
###Demo:
For more demos, please check out this page, we'll be updating it over time.
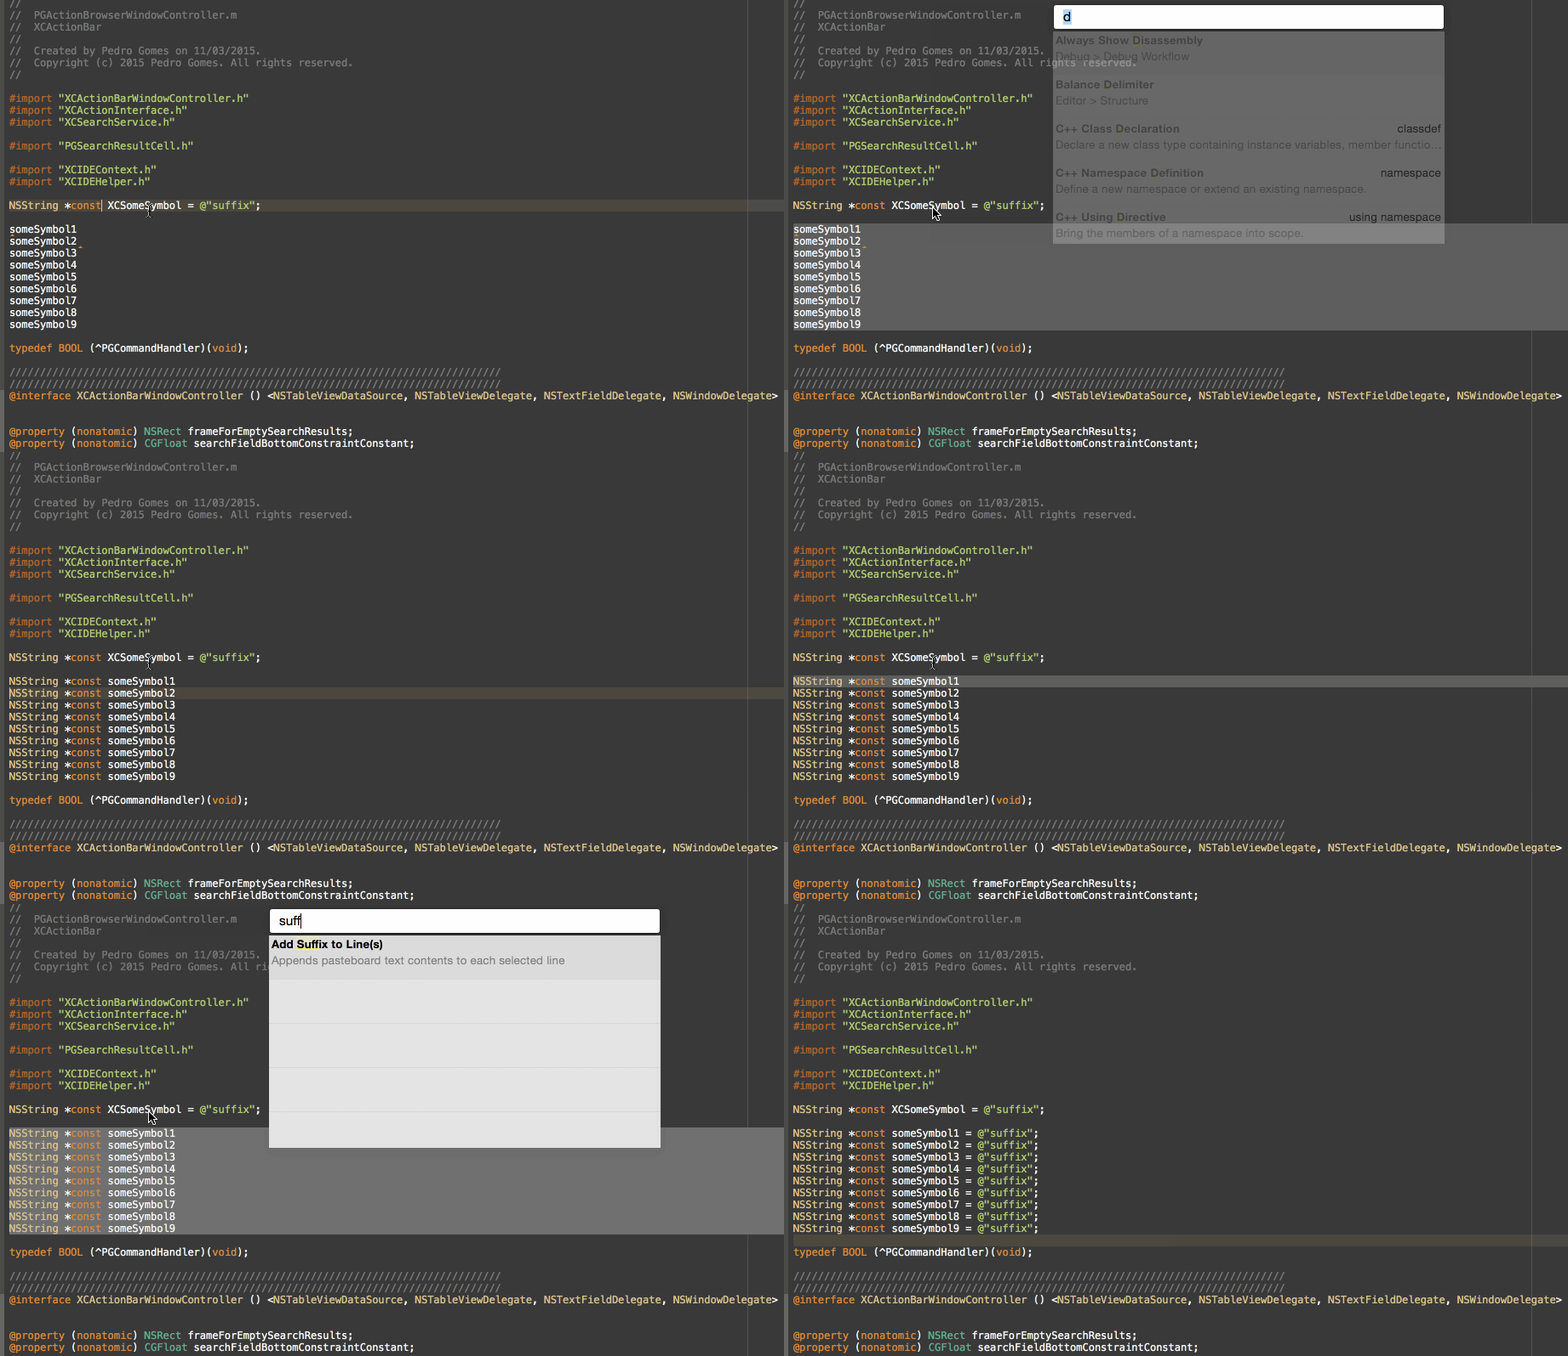
Built-in Add Prefix to Line(s) and Add Suffix to Line(s) demo:

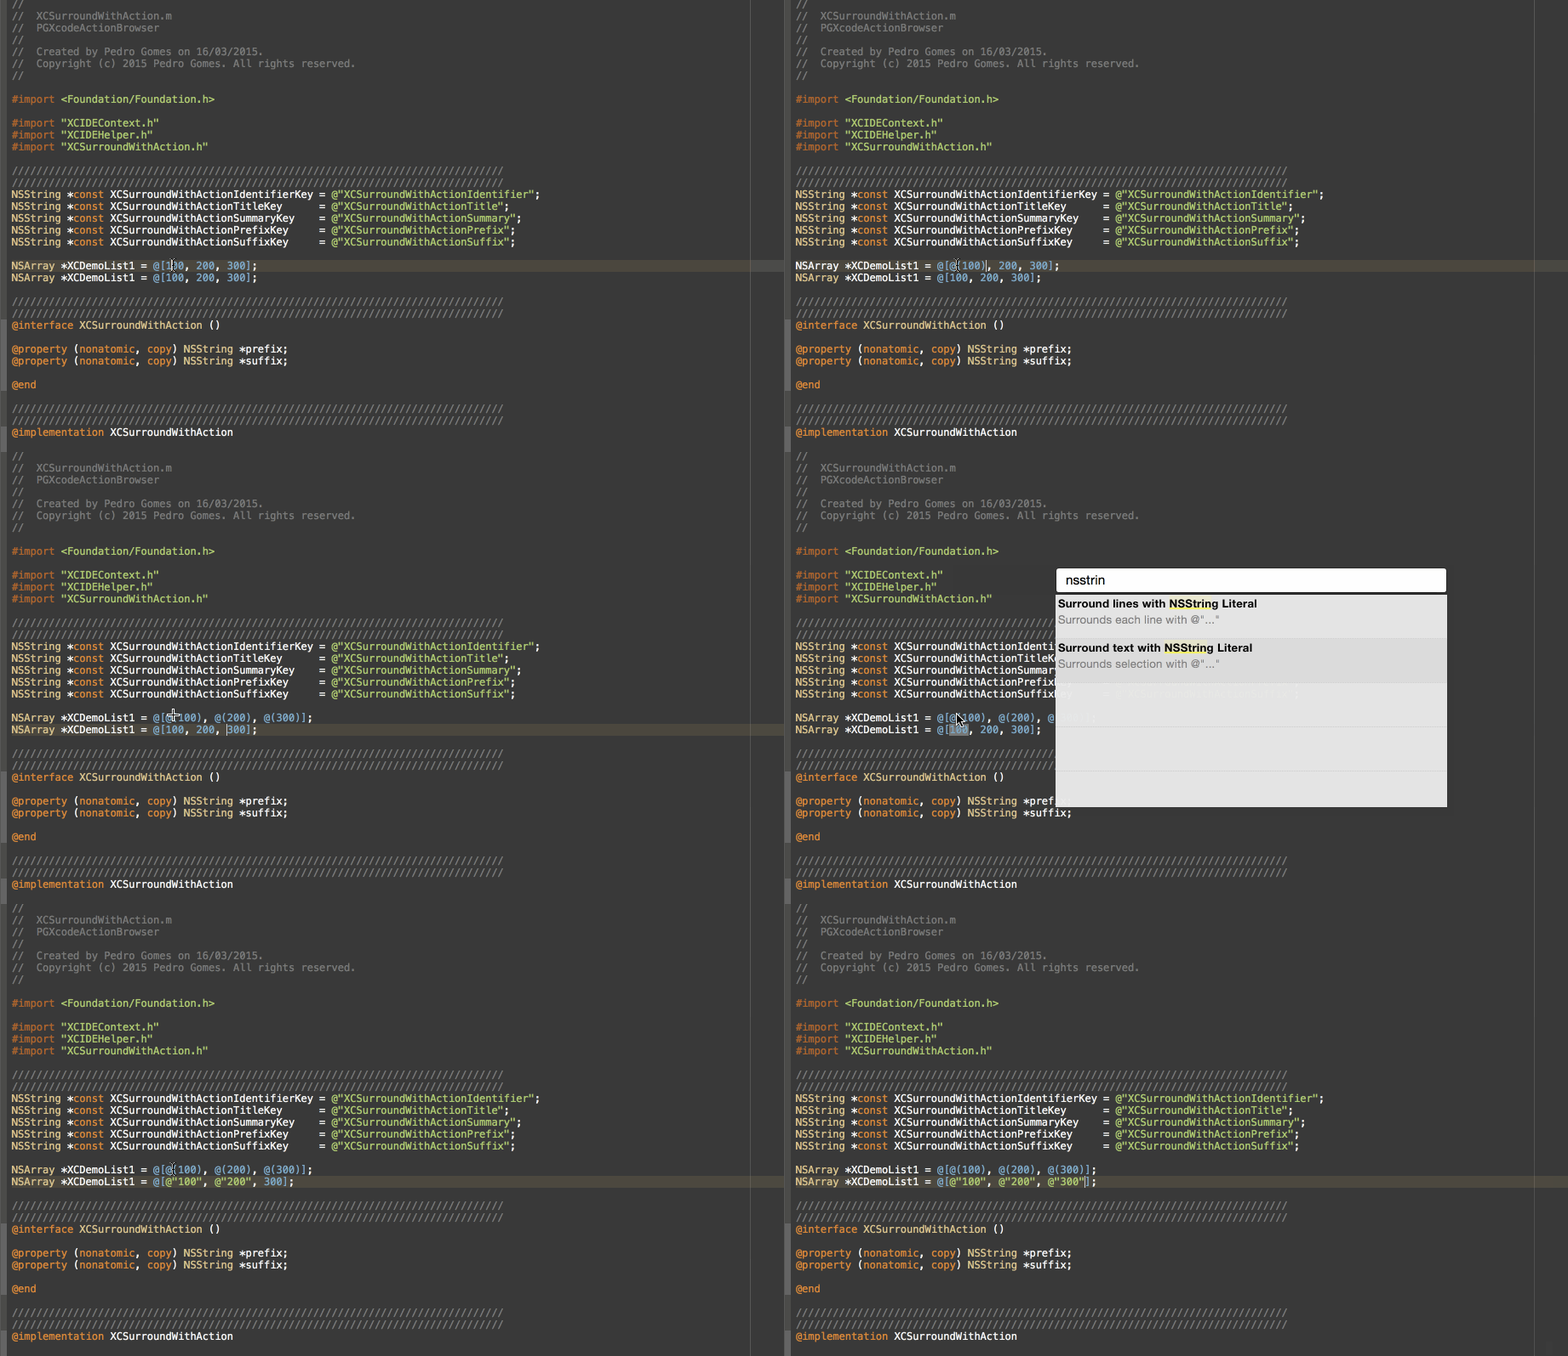
Built-in Surround With NSNumber Literal and Surround With NSString Literal demo:

###Installation:
The recommended installation method (and also the simplest) is via the Alcatraz plugin manager. Just follow their installation instructions, search for XCActionBar, click install and you're done!
Alternatively you can run the following command in your terminal:
curl -fsSL https://raw.githubusercontent.com/pdcgomes/XCActionBar/master/Scripts/install.sh | shA lot of people recommend against blindly executing shell scripts (and rightly so!), so I'd make sure to open the script first and ensure it won't delete all of your files or worse - it's good practice. If you don't feel comfortable, there's one final option:
Download or git clone XCActionBar, open the project in Xcode and simply build it. The plugin will be automatically installed. Just make sure to restart Xcode once you're done.
###Motivation:
I always try to accomplish as much as I possibly can without ever moving my hands away from the keyboard, there's simply no other means of input that feels quite as natural or efficient. Shortcuts are great, but there's only so many combinations of keys the average person can memorize. On top of that, the more shortcuts you have, the more likely you are to have to rely on multiple modifier key combinations, which may not always make them very comfortable to type.
It's much simpler and natural to type commands that actually describe what you want to achieve. I'm sure most people will agree that it's quicker to type fold or unfoldthan it is to type a four-key shortcut (which is basically as long as typing foldand probably doesn't feel as natural).
Note: This is preliminary documentation as this is very much work in progress.
###What can it do?
Here's the executive summary in three simple examples:
Example #1: Built in actions
- Place the carret on the line you'd like to move up
- Double tap
CMDor pressCMD+SHIFT+8 - Type
mluorm l u - Return
- Double tap
ALTor pressCMD+ALT+7to repeat the last action as many times as you'd like (this works for any action)
Example #2: Custom actions
- Select a block of text
- Double tap
CMDor pressCMD+SHIFT+8 - Type
nsl - Return
Notice as the selected block of text is automatically surrounded with NSLog(@"your text selection")
Hint: type surround for a list of available "Surround Text With" actions
Example #3: Code snippets
- Place the carret where you'd like to expand the snippet
- Double tap
CMDor pressCMD+SHIFT+8 - Type
inline - Select
C inline block as variable - fuckingblocksyntax.com suddenly becomes less necessary
Hopefully these short examples showcase some of the features XCActionBar currently supports. I'll continue adding features and making things generally better, so expect lots of changes in the coming weeks.
Action search currently operates on a few data sets:
- Menu Bar items and sub-items (recursively)
- Code snippet library (system and user-defined)
- Custom plugin vended actions
The current searching strategy is very simple and naive but does the job quite effectively. While it doesn't yet support fuzzy matching, it's quite flexible in how it handles partial matches. Take a look at the examples above for a few examples. I'll be working on improving this very soon, but at this stage it does seem to be quite effective.
To bring up the action bar, type in the default shortcut CMD+SHIFT+8 and enter your search terms. After performing an action, you can repeat it by typing in the repeat command shortcut CMD+ALT+7.
UPDATED:
- You can now present/dismiss the acion bar by simply double pressing
CMDquickly - You can now repeat the last executed action by simply double pressing
ALT
The original shortcuts still work. I've also added a general configuration file XCSurroundWithActions which can be used to tweak these two shortcuts -- currently it only supports the following:
NSAlternateKeyMask
NSCommandKeyMask
NSControlKeyMask
NSFunctionKeyMask
NSShiftKeyMask
This is all very much experimental so do expect changes.
As mentioned above, the plugin comes bundled with a few custom actions. Following is a catalog of all of them and a short summary of what they do:
-
XCAddPrefixToLinesActionprepends the string contents of the pasteboard to each selected line -
XCAddSuffixToLinesActionappends the string contents of the pasteboard to each selected line -
XCCopyActiveDocumentFilePathActioncopies the active file path to the pasteboard. Supportsfile://,POSIXandPOSIX escaped(useful for copying to the terminal) -
XCCopyActiveDocumentDirectoryActioncopies the active file directory to the pasteboard. Supportsfile://,POSIXandPOSIX escaped(useful for copying to the terminal) -
XCDeleteBlankLinesActiondeletes all empty strings in the selected range -
XCDeleteLineActiondeletes the line the carret is currently positioned in -
XCDuplicateLineActionduplicates the line the carret is currently positioned in, or the selected lines -
XCJoinLinesActionjoins the lines across the current selection. Lines are joined via a delimiter (default isspacebut can be user defined) -
XCSplitSelectionIntoLinesActionsplits the current selection(s) into lines by delimiter (default is,but can be user defined) -
XCSortSelectionActionperforms line sorting (ascending or descending) of the selected lines -
XCSurroundWithActionsurrounds the selected text block with an arbitrary prefix/suffix -
XCSurroundLineWithActionsurrounds each selected line with an arbitrary prefix/suffix -
XCTrimWhitespaceActiontrims whitespace for each selected line (supports leading; trailing or both) -
XCOpenActiveDocumentPathInTerminalActionopens the active document's directory in the terminal app (currently supportsiTerm.appandTerminal.appbut more can be added inXCActionBarConfiguration.plistunderXCSupportedTerminalApplications
There are also a few actions that deal with text selections:
XCSaveTextSelectionXCLoadTextSelectionXCClearTextSelectionXCMoveSelectionHere
These allow you to select non-contiguous text selections using only your keyboard by selecting a chunk of text (as you would), but with the difference that you can then save the selection -- this will mark the text in orange (color will be customizable soon), you can then proceed and make additional selections. When you're done, just load selection which will cause the marked text to be fully selected. You can then apply any text action as you would for normal selections.
Two more things: at the time of writing, the marked text will not automatically unmark itself, so you need to clear selection. Also, you can undo marking/unmarking of the text, which is pretty cool.
XCMoveSelectionHere allows you to quickly collect chunks of text and then move them to one place in one swift action - no more clunky mouse selections or multiple {cut, copy}/paste trips.
I've bundled a few XCSurroundLineWithAction and XCSurroundWithActionS:
- Autorelease pool
@autoreleasepool { ... } - Square Brackets
[ ... ] - Curly Braces
{ ... } - Inline Block
void (^BlockVariable)(void) = ^{ ... } - NSLog
NSLog(@" ... ") - NSNumber
@( ... ) - NSString
@" ... " - NSStringWithFormat
[NSString stringWithFormat:...] - Parenthesis
( ... ) - Audit Non-null region
NS_ASSUME_NONNULL_BEGIN ... NS_ASSUME_NONNULL_END - Pragma diagnostic region
- Double Quotes
" ... " - Single Quotes
' ... ' - Try/Catch
@try{ ...} catch(NSException *exception) {} - While
While(expression) { ... } - Do/While
do { ... } while(expression)
There's also a very meta action called XCSurroundWithSnippetAction that surrounds the selected block of the with a snippet from the library. There are some caveats though:
- the snippet will only show up on the list if it contains at least one
<# Token #>(otherwise we wouldn't know what would be the prefix/suffix) - the first
<# Token #>is replaced by the selected block of text
Similarly, you use XCSurroundWithTextSnippetAction to perform the same action as above, with the difference that it uses a text snippet from the pasteboard, meaning you can do ad-hoc surround operations without having to create a new snippet. You can also apply the substitution per-selected line by using XCSurroundLineWithTextSnippetAction.
Just type surr in the action bar to get a list of all available actions.
Note: currently none of these perform any character escaping Some of the don't really make much sense when applied to each line so I might strip some out in the future
Also, some actions support optional user-defined input, which can come in handy. For example, lets say you specify the XCDuplicateLineAction but you actually want to duplicate it ten times. You can hit tab with the XCDuplicateLineAction highlighted, and the input text field will change and ask you for the number of times you'd like to repeat the action. Just enter the number and hit enter - boom!
Currently the following actions support optional user input:
XCDuplicateLineActionXCAddPrefixToLinesActionXCAddSuffixToLinesActionXCAddPrefixToTextActionXCAddSuffixToTextAction
There's currently no visual hint to let you know if an action supports arguments or not but I intend to add this feature in the near future.
Continue reading for more details on how to add your own custom actions.
Code snippets are great to save time, and while <# tokens #> already provide a great deal of flexibility, sometimes you just want to be able to dynamically expand some known token or even move the cursor to a specific location. This isn't new, and other apps such as TextExpander and Dash (and maybe others) do this already. In case you don't use any of those or you simply want to be able to have this capability built directly into Xcode, look no further!
When defining a text snippet you can use the following macros:
@authorautomatically replaced by the current user's name@clipboardautomatically replaced by the clipboard's text contents (if any)@cursormoves the cursor to this location after expanding the snippet@datereplaced by the current date (format will be user configurable soon)@timereplaced by the current time (format will be user configurable soon)- others coming soon -- if you have suggestions, send them along!
One caveat: these expansions currently only work if you expand the snippets using XCActionBar. If you try to expand them via the default methods (either by just typing the snippet's name or by dragging it), they won't work. This will be probably be addressed in the future, but I don't think it's a big deal as most people would be expanding snippet via XCActionBar anyway.
There are quite a lot of ideas floating around regarding extensibility, but for a first-pass implementation there's at least a little bit you can play with, in the form of SurroundWith actions. These are currently managed by an external property list file named XCSurroundWithActions.plist which can be found in the plugin's resource folder.
You're free to add your own entries or remove the stuff you don't need.
The format for each entry is a simple dictionary with the following keys:
XCSurroundWithActionIdentifiera unique string identifier for the actionXCSurroundWithActionTitlethe action's title, displayed in the action barXCSurroundWithActionSummaryadditional info that shows in the action bar's subtitle fieldXCSurroundWithActionPrefixthe block of text that's prepended to the text you want to surroundXCSurroundWithActionSuffixthe block of text that's appended to the text you want to surround
If you're feeling more adventurous you can currently specify arbitrary actions by subclassing XCCustomAction. This is still very much in flux in terms of design and is likely to change in the future, but the way this currently works is:
When you select an action from the search results list, ultimately the - (BOOL)executeAction:(id<XCIDEContext>)context action's method will be invoked. The context object provides some information about the current IDE state (active source code document, current text selection range, etc.) which is currently mostly useful for actions that need to manipulate text (pretty much all of them at the time of writing). This may change in the future.
If you do choose to muck around and implement your own custom actions, the final step is to register them. To do so, all you need to do is to add them to XCActionBar.m under - (void)buildActionProviders:
////////////////////////////////////////////////////////////////////////////////
// Built-in Actions
////////////////////////////////////////////////////////////////////////////////
NSMutableArray *textActions =
    @[
      // Duplicate/Delete Lines
      [[XCDeleteLineAction alloc] init],
      [[XCDuplicateLineAction alloc] init],

      // Sort Selection
      [[XCSortSelectionAction alloc] initWithSortOrder:NSOrderedAscending],
      [[XCSortSelectionAction alloc] initWithSortOrder:NSOrderedDescending],

      // Sort Contents
      [[XCSortContentsAction alloc] initWithSortOrder:NSOrderedAscending],
      [[XCSortContentsAction alloc] initWithSortOrder:NSOrderedDescending],

      // Add your custom action here
      ];
These actions don't yet show up in the menu bar, but they will get automatically indexed by the plugin. Soon you'll be able to manage custom actions and their groupings via an external property list file which will also be used to derive action groups under the menu bar, so stay tuned.
The default hotkey to bring up Action Bar is CMD+SHIFT+8.
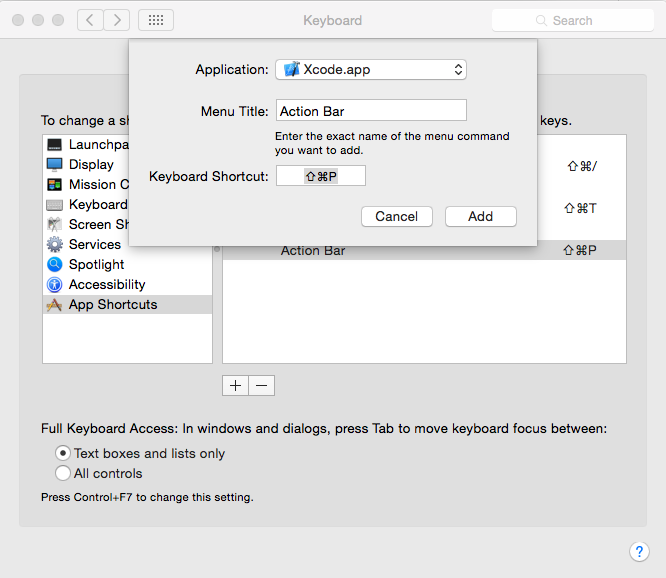
You can change this hotkey via the Keyboard Shortcuts Panel in the System Preferences.
- Open System Preferences
- Go to
Keyboard - Switch to the
Shortcutstab - Select
App Shortcutsand click the+Button.- Select
Xcode.app - Enter
Action Baras Menu Title - Enter the Shortcut you want
- Select
Alternatively you can use (my preferred) shortcuts:
- Double press the
CMDkey to present/dismiss the bar - Double press the
ALTkey to repeat the last action
These can also be customized but required a slightly more involved (but simple) process:
- Find and open the file
XCActionBarConfiguration.plistXCActionBarConfiguration.plistunder the plugin installation folder (Library/Application Support/Developer/Shared/Xcode/Plug-ins/XCActionBar.xcplugin/Contents/Resources) - Under the
Shortcutskey you'll findXCActionBarHotKeyandXCRepeatLastActionHotKey - Tweak the values to your preferences
Here's a quick explanation of the configuration keys:
XCHotKeyListenerHotKeyMaskspecifies the modifier key mask. Possible values are (declared inNSEvent.h):NSAlternateKeyMaskNSCommandKeyMaskNSControlKeyMaskNSFunctionKeyMaskNSShiftKeyMask
Just use the enum's value (for example NSCommandKeyMask = 1 << 20, so you'd use 1048576)
Please note that while these are bitmasks, XCActionBar currently only supports the definition of one key, so attempting to setup something like NSAlternateKeyMask | NSCommandKeyMask won't work.
XCHotKeyListenerRepeatCountspecifies the number of required key presses (currently only supports2or3)XCHotKeyListenerRepeatDelayspecifies the maximum delay that can occur between the keypresses for the shortcut to trigger - tweak this if you feel the defaults are too sensitive for you
Feedback is greatly appreciated -- love it? hate it? suggestions? I'd love to hear about it!
Cheers, Pedro.

