⚠️ Update 04/08/2023 There is a new additional step to make this work. Check Account Linking section.
Everytime you said something like "Alexa, add eggs to my shopping list". Alexa generates an event. We are going to add an Alexa Skill and a Lambda function which will capture that event and add the same item which was added into Alexa Shopping List into Home Assistant Shopping List.
It can work with your Home-Assistant instance be accesible from the Internet or by using Nabu Casa webhooks.
- Your Home Assitant instance should be accesible from the Internet (unless using Nabu Casa)
- Add Shopping list integration to your Home Asisstant
- Have AWS account configure in your computer with aws-cli
- Create a Long Lived Token for your Home Assistant
If your HA instance is not accesible from the internet but you are using Nabu Casa service you can still use this project. Just need more thing to make it work. You need to add an automation like this:
alias: Alexa add item to shopping list
trigger:
- platform: webhook
  webhook_id: add-shopping-list
condition: []
action:
- service: shopping_list.add_item
  data_template:
    name: '{{ trigger.json.name }}'
mode: single
Once you have created this automation go to Configuration > Home Assistant Clous > Webhooks and find out which is your webhook endpoint
In case you want to test if the webhook + automation works you can try this:
curl -X POST -H "Content-Type: application/json" \
  -d '{"name":"test item"}' \
  https://hooks.nabu.casa/webhook # Replace this with your endpoint
Go to your shopping list and check if test item is there.
Keep you webhook endpoint. You will need it to configure the skill.
Let's start by setting up the lambda:
First of all open the file lambda/.chalice/default_config.json. We will need to set you Home Assistant host url and the token to access it from the Internet.
Modify these params:
"HA_TOKEN": "XXXXXXXXXXXXXXXXXXXXXXXXXXXXXXX",
"HA_HOST": "https://your_home_assitant_url.com"
If you are using Nabu Casa put your webhook into HA_HOST and delete the section for token. You don't need it.
Now make this the valid config file: mv default_config.json config.json
make lambda-deploy
[...]
Resources deployed:
  - Lambda ARN: arn:aws:lambda:region:XXXXXXXXXXXXX:function:chalice-shopping-list-dev-lambda_handler
Copy the Lambda ARN. We will need that to setup the Alexa Skill.
Alexa lists skills can only be created by using the ASK-CLI. So, the first step is to setup the alexa command client. This requires npm. Have a look to the official docs in order to do this.
- Setup an Amazon developer account
- Set up an AWS IAM user. (awscli configure)
To install ask cli:
sudo npm install -g ask-cli  # Install Alexa CLI
ask --version # Check if installation is okBefore deploying the skill you will need to indicate which Lambda you want want to call when a new item is added to the shopping list. In order to do this you will need to edit the file skill-package/skill.json:
"events": {
  "endpoint": {
          "uri": "arn:aws:lambda:eu-west-1:XXXXXXXXXXXXX:function:chalice-shopping-list-dev-lambda_handler"
          // Change this lambda ARN for yours, from previous step.
        }
[...]
Now make this the valid config file: mv skill-package/skill_default.json skill-package/skill.json
make skill-deployVisit Alexa developers console and check if your new skill is there.
You may get this error while trying to deploy the Alexa Skill:
[Error]: {
  "skill": {
    "resources": [
      {
        "action": "CREATE",
        "errors": [
          {
            "message": "The trigger setting for the Lambda arn:aws:lambda:XXXXXXXXXX:chalice-shopping-list-dev-lambda_handler is invalid."
          }
        ],
        "name": "Manifest",
        "status": "FAILED"
      }
    ]
  },
  "status": "FAILED"
}
If you run into this problem try the next steps:
- Go to AWS Lambda console. Visit your new lambda function page.
- If there are any triggers link to it. Delete them.
- Add a new one. Select Alexa Skills Kit. Disable checking the ID.
- Now deploying the Alexa Skill should work.
Since March 2023 Alexa List Skills required account linking.
For now, to bypass this issue we can use Home Assistant auth system. In order to activate this you only need to have your Home Assistant instance accesible with HTTPS.
If you have everything setup as describe until this point just execute this command. Remember to use your own URL.
python prepare_account_linking.py example.ui.nabu.casa # Use here your HA URLIf you just need to do this extra step: After activating account linking go to the Alexa app and configure the Skill. This time you need to login in your Home-Assitant instace with your account.
Now we need to link your lambda to acept events comming from your skill. Go to AWS lambda console. Find the new lambda function.
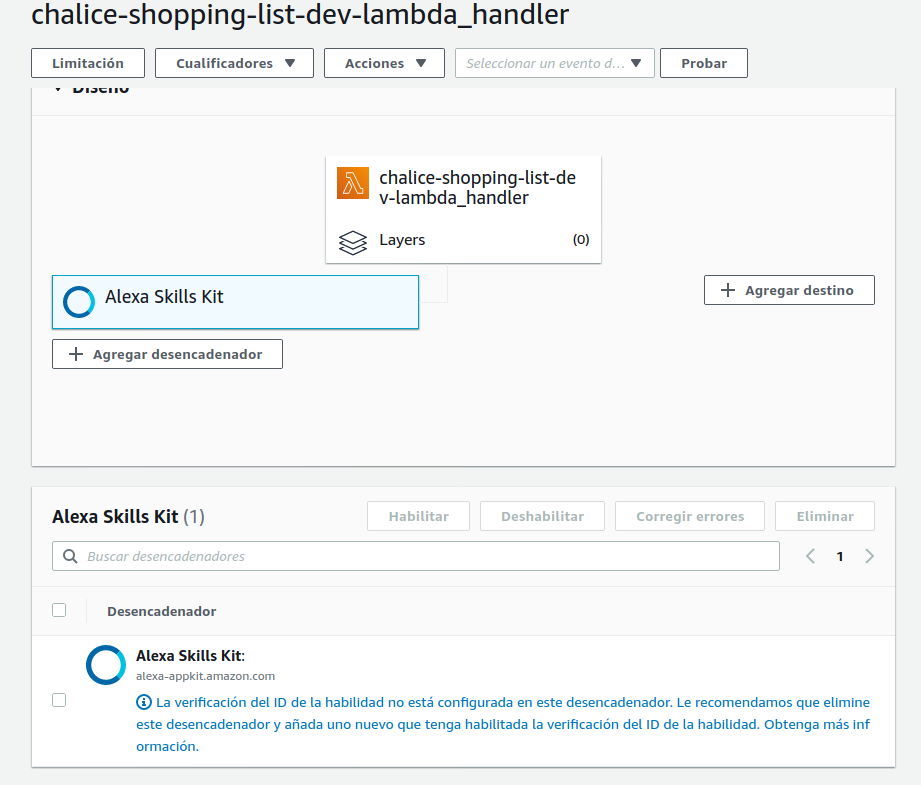
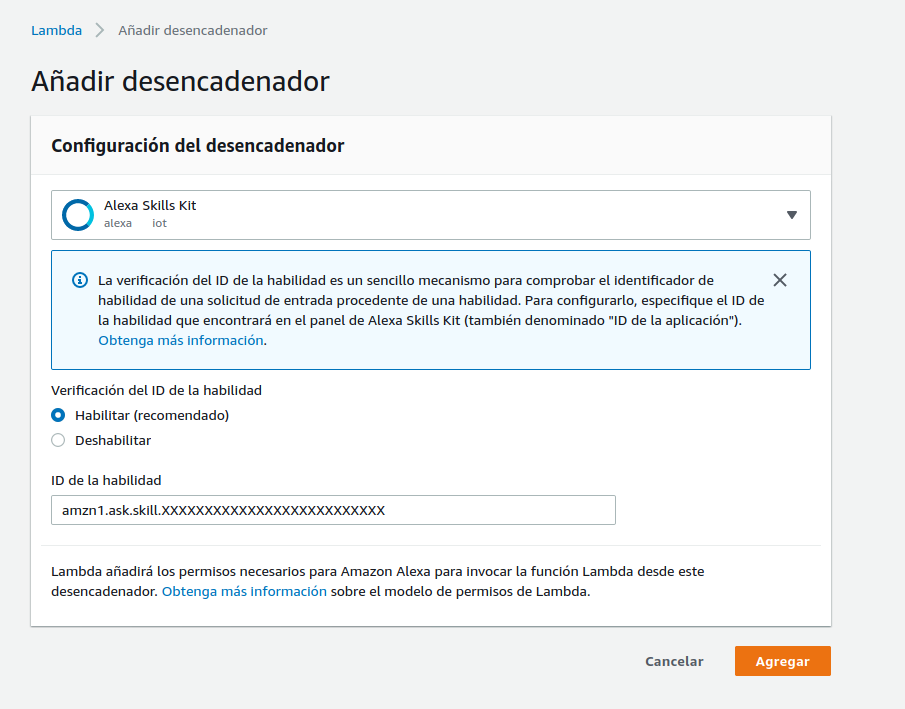
Once you see the this screen, you would be able to see that your lambda have a trigger already. But this is not especifc to your skill. Delete this trigger. Once you have deleted the old trigger we need to add a new one. Click on Add trigger. On the droplist select Alexa Skills Kit.
Now you need to add your skill ID here. You can get your skillId usgin this command make show-skill-id
Got to the Alexa app and activate the skill.
- From the Alexa app go to
Skills - Go to tab
My Skills - Select
Developers Skills - Activate the skill
HA-Shopping-List-Skill - Link the account using your home-assitant account

