Original tutorial from Richard Wen rrwen.dev@gmail.com. Additions by Dieter Pfoser dpfoser@gmu.edu.
A tutorial for creating three leaflet webmaps with express in Node.js. The applications (see code folder) range from a simple webmap (Application 1) to building a client-server application that shows GeoJSON data (Application 3). Application 2 uses Pug (formely known as jade), a template engine for building Web pages, to implement Application 1.
- Tutorial: Express Node.js Server Leaflet Webmap
- Preliminaries
- Application 1: a simple Leaflet Webapp
- VSCode
- Application 2: PUG/Jade Templating
- Application 3: Leaflet and Data
Node.js is a JavaScript run time environment which is used to create server-side applications and tools. Node.js is fast, portable, and written in JavaScript. When creating a Node.js web application, we write a single JavaScript application which listens to requests from the browser, based on the request, the function will send back some data or an HTML web page. A request handler is a JavaScript function which takes a request and sends an appropriate response. This can get complex very fast.
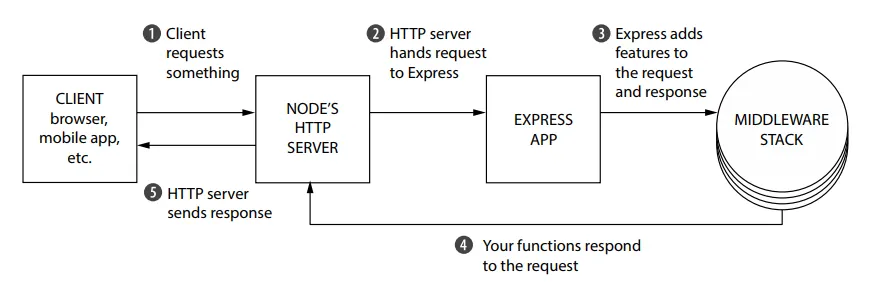
Express.js makes it easier to write Node.js web applications. Express is a light web framework which sits on top of Node.js and it adds functionality like (middleware, routing, etc.) and simplicity to Node.js. A typically client-server application using Express is shown in the following figure.
Express integrates well with a template rendering engine (aka view rendering engine) such as Pug (formely known as Jade) or EJS. A template engine enables you to use static template files and at runtime change the values of variables in those files.
Check out this tutorial for a comprehensive introduction to Express with Node.js.
- Install Node.js
- Install express-generator globally
-gwith npm - Check that the
expresscommand works by using the-hhelp option
npm install -g express-generator
express -h
Using the installed software, we can then create an express project folder with the express command. This folder will contain all the code required to serve our web pages as Hyper Text Markup Lanauge (HTML)[https://www.w3schools.com/html/] files.
Open a command line interface or terminal:

Create an express project with the express command, replacing <project_name> with the name of your project:
<project_name>should be a valid folder name with no spaces and starting with a letter
express <project_name> --no-view
A folder named <project_name> will be created with the following structure inside (note that the structure may change with express --version that is not 4.16.0):

app.js: JavaScript file that contains code needed to create and run your express server or applicationpackage.json: JSON structured package file holding all the dependencies and information about your project (can be modified with the npm command)/bin: folder containing executable codewww: executable file for starting the server
/public: folder containing files served to the client side or front endindex.html: landing page served to the clients/images: folder containing images to be served to clients/javascripts: folder containing JavaScript code files to be served to clients/stylesheets: folder containing Cascading Style Sheets (CSS) files to be served to clientsstyle.css: CSS file used to define how your web page elements will look
/routes: folder containing JavaScript files for defining routes that direct how the server responds to client requests (these files are often used in fileapp.js)index.js: defines the response to client requests at<address>/depending on how it is used in fileapp.jsusers.js: defines the response to client requests at<address>/usersdepending on how it is used in fileapp.js
After generating our project folder, we need to install the required Node.js package dependencies for express.
Move into the project folder, where <project_name> is the name of the folder you created in Step 2.2:
cd <project_name>
Inside your <project_name> folder, install the dependencies with npm, where a folder called /node_modules will contain the code files of the installed dependencies:
npm install
We can then create a JavaScript file that stores the code for our leaflet web map. Keep in mind that this code requires Node.js which is only available inside the server or back end.
Install leaflet with npm install and save it as a dependency --save to package.json:
npm install --save leaflet
Create a file for the leaflet map by using the touch command:
touch webmap.js
Open webmap.js for editing and add the following JavaScript code:
// Import the leaflet package
var L = require('leaflet');
// Creates a leaflet map binded to an html <div> with id "map"
// setView will set the initial map view to the location at coordinates
// 13 represents the initial zoom level with higher values being more zoomed in
var map = L.map('map').setView([43.659752, -79.378161], 20);
// Adds the basemap tiles to your web map
// Additional providers are available at: https://leaflet-extras.github.io/leaflet-providers/preview/
L.tileLayer('https://{s}.basemaps.cartocdn.com/dark_all/{z}/{x}/{y}{r}.png', {
attribution: '© <a href="http://www.openstreetmap.org/copyright">OpenStreetMap</a> © <a href="https://carto.com/attributions">CARTO</a>',
subdomains: 'abcd',
maxZoom: 21
}).addTo(map);
// Adds a popup marker to the webmap for GGL address
L.circleMarker([38.829772, -77.305550]).addTo(map)
.bindPopup(
'<b>Geography and Geoinformation Science Dept.</b><br>' +
'Exploratory Hall<br>' +
'George Mason University<br>' +
'Fairfax, VA'
)
.openPopup();Save the added webmap.js file (links to the actual file in our repository).
Notice that in the webmap.js, a divider <div> with the id map is required to create the leaflet webmap.
Open public/index.html for editing and replace everything with the following HTML code:
- Notice that we added a divider with id
mapto create our leaflet webmap in. - Note that the width and height of the divider must be set for the webmap to show (we will do this later in a CSS file).
<html>

<head>
	<meta charset="utf-8"/>
	<title>GGL Leaflet Webmap Tutorial</title>
	<link rel="stylesheet" href="stylesheets/style.css">
</head>

<body>
	<div id="map"></div>
</body>


</html>
Save the modified public/index.html file.
Since webmap.js is not served to the client side and requires the server's backend software to run, it needs to be built into client side code and stored inside the public folder in order to display in the browser. We need to bundle all necessary Javascript libraries into one big Javascript file. In our case this is webmap.js. This step is referred to as bundling. One such tools is browserify.
Install browserify globally -g with npm install:
npm install -g browserify
After installing browserify, we can build and bundle the leaflet code from webmap.js into public/javascripts/webmap.js with the browserify command:
browserify webmap.js -o public/javascripts/webmap.js
For convenience, we can add the browserify bundling command under scripts: build in the file package.json (saving after you add this code):
{
  "name": "leaflet",
  "version": "0.0.0",
  "private": true,
  "scripts": {
    "start": "node ./bin/www",
    "build": "browserify webmap.js -o public/javascripts/webmap.js"
  },
  "dependencies": {
    "cookie-parser": "~1.4.4",
    "debug": "~2.6.9",
    "express": "~4.16.1",
    "leaflet": "^1.7.1",
    "morgan": "~1.9.1"
  }
}
This allows us to run the same command for bundling the leaflet code with a more convenient call everytime we make changes to webmap.js:
npm run build
You will now notice that public/javascripts/webmap.js exists. This is the bundled version of your leaflet webmap source code, and will need to be added to the public/index.html file in order to display your webmap.
If you open the public/javascripts/webmap.js file, you will notice that it not only contains the webmap.js code from above, but all other javascript libraries that are needed to run the code clientside, e.g., leaflet.js. The beauty of this approach is that you won't need any external links to sites hosting javascript libraries in your code, e.g.,
<script src="https://unpkg.com/leaflet@1.7.1/dist/leaflet.js"></script>, but only have to include webmap.js, i.e.,
<script src="javascripts/webmap.js"></script>, which has them all bundled!
In this context, think about the elegant interplay of (i) npm install, (ii) require statements to include javascript libraries in node.js and (iii) a bundler such as browersify that grabs and bundles them all in a single library file, i.e., in our case public/javascripts/webmap.js
As such, replace the public/index.html code with the following:
<html>

<head>
	<meta charset="utf-8"/>
	<title>GGL Leaflet Webmap Tutorial</title>
	<link rel="stylesheet" href="/stylesheets/style.css">
</head>

<body>
	<div id="map"></div>
	<script src="javascripts/webmap.js"></script>
</body>

</html>
Save the modified public/index.html file.
A set of final touches need to be made for better web map appearance and for the leaflet code to display the map properly.
Leaflet requires a CSS file in node_modules/leaflet/dist/leaflet.css, which can be copied into the public folder that is served to the client:
cp node_modules/leaflet/dist/leaflet.css public/stylesheets/leaflet.css
You will have to also open public/index.html and edit/save it to include the stylesheets/leaflet.css file:
<html>

<head>
	<meta charset="utf-8"/>
	<title>GGL Leaflet Webmap Tutorial</title>
	<link rel="stylesheet" href="stylesheets/style.css">
	<link rel="stylesheet" href="stylesheets/leaflet.css">
</head>

<body>
	<div id="map"></div>
	<script src="javascripts/webmap.js" charset="utf-8"></script>
</body>


</html>
It is also important to include the CSS file into your build script in package.json so that it is updated everytime you rebuild webmap.js with npm run build:
{
  "name": "project-name",
  "version": "0.0.0",
  "private": true,
  "scripts": {
    "start": "node ./bin/www",
	"build": "browserify webmap.js -o public/javascripts/webmap.js & cp node_modules/leaflet/dist/leaflet.css public/stylesheets/leaflet.css"
  },
  "dependencies": {
    "cookie-parser": "~1.4.3",
    "debug": "~2.6.9",
    "express": "~4.16.0",
    "leaflet": "^1.4.0",
    "morgan": "~1.9.0"
  }
}Since leaflet requires that the dimensions be specified for the webmap divider, we can can replace the contents of the public/stylesheets/style.css file with the following to define the width and height of the webmap:
body {
	padding: 0;
	margin: 0;
}
html, body, #map {
	height: 100%;
	width: 100%;
}
Save the modified public/stylesheets/style.css file.
After going through steps 1 to 6, you should have a file structure that looks similar to the following (node_modules not shown):

The following figure provides an overview of the code structure and connections between the various files.
- When requesting the application's Web page localhost:3000/, app.js is executed by the Web server.
- In app.js the
/path is linked to theindexRoutervariable and as such to the routes/index.js file. - routes/index.js renders the public/index.html file for the
/path. - public/index.html includes public/webmap.js. Remember that this is the bundled javascript library that contains your webmap.js file and all libraries that are mentioned as dependencies in package.json.

Run the express server with the following command:
npm start
By default, express runs on port 3000 on localhost, which can be accessed in the browser by going to:
Your browser should display a map that looks similar to the one below:

When you are done running the server, shut it down by pressing Ctrl + C and then answering yes to the user prompt asking for termination.
Coming soon...
The tutorial so far has focussed on running the environment using a command line interface. Luckily, there are more comfortable developer environments such as VSCode. VSCode not only helps you with keeping your code organized, but also provides code analysis such as highlighting (linting), running and debugging, and integrates well with github.
The following video shows how to download this tutorial, edit the code and run the code examples.

The previous section showed us how to create an express project folder structure using the following command,
express <project_name> --no-view
which creates the following project structure.
.
This first express application uses basic html to embed Javascript. Application 2 now uses Pug (formerly known as Jade), which is a template engine for Node to write html. It uses a simplified syntax that compiles to HTML and creates reusable and more readable code. Check out this nice Pug overview and tutorial.
A simple modification to the above express statement creates a project that uses Pug templating instead of simple html.
express <project_name> --view=pug
The resulting folder structure in comparison to Application 1 now looks as follows.

Using this templating engine, the index.html page is replaced by Pug views. layout.pug provides the basic web page template including all stylesheet javascript library links.
// layout.pug
doctype html
html
  head
    title= title
    link(rel='stylesheet', href='/stylesheets/style.css')
    link(rel='stylesheet', href='/stylesheets/leaflet.css')
  body
    block content
layout.pug is used as a basis for actual web pages such as index.pug, which extends layout. index.pug defines one div element for our Leaflet map object and also includes our Javascript code for the Leaflet web map (remember, browserify is used to package all libraries that we require in our code.)
// index.pug
extends layout

block content
  // create a <div> map element to be referenced in webmap.js
  #map
  // the leaflet javascript code...
  script(src='/javascripts/webmap.js')
And that is it! In a nutshell, this example replaces index.html with layout.pug and index.pug, two Pug views (html template files).
The commands to build your code, i.e., copy all relevant files to the public directory, and to start the application remain the same, and the web application will be available at localhost:3000.
npm run build
npm start
Building on Application 2, we want to expand its scope by showing markers based on a GeoJSON dataset. We will work off an express project structure created by the following command express leaflet_express_pug_data --view=pug, which creates the skeleton project structure in code/leaflet_express_pug_data. Go check it out!
Using the Restaurants_data.geojson dataset containing restaurant locations in the DC area, we want to create a leaflet app that simply shows the restaurant locations, and since they are many, also create a MarkerCluster version that aggregates the markers based on zoom levels.
The following figure shows these two versions in addition to the simple leaflet app we created in the previous step.

All three web maps are provided by the same express app using three different URLs. This is implemented by the following code structure. Each URL in index.js (which is the default route in app.js) links to a different html/view and Javascript file as follows:
- localhost:3000/ -> index.pug -> webmap.js
- localhost:3000/restaurants -> index2.pug -> webmap2.js
- localhost:3000/restaurants_cluster -> index3.pug -> webmap3.js

What's interesting in this code is how the Restaurants_data.geojson data is served to the client.
In index.js the server provides the JSON data to the client as a string by converting a Javascript JSON object to a string using JSON.stringify.
// index.js excerpt
...
router.get('/restaurants', function(req,res, next){
  res.render('index2', {datastr: JSON.stringify(Restaurants)});
//  res.render('index', {jsonData: Restaurants});
})
...
On the client side this data is captured using the datastr variable. A better approach would be to use some sort of AJAX, fetch/, or even XMLHttpRequest request to fetch the data (left for another tutorial!). Here is a nice tutorial to get started!
// index2.pug
extends layout

block content
  // create a <div> map element to be referenced in webmap.js
  #map

  // https://stackoverflow.com/questions/55311902/how-to-pass-json-data-from-express-to-a-javascript-jquery-script-in-pug
  script(type='text/javascript').
    window.datastr = "#{datastr}";

  // the leaflet javascript code...
  script(src='/javascripts/webmap2.js')
In the corresponding Javascript file webmap2.js the string in datastr is cleaned (has to do with how the string is transmitted, i.e., the type of request and escaped characters) and we create again a Javascript JSON object and the corresponding markers using L.geoJSON(geojsonobj).
// webmap2.js excerpt

... //code from webmap.js
// Adding the GEOJSON DATA
// This takes the JsonData that was sent with the GET request .
var datastr_clean = datastr.replace(/"/g, '\"');
var geojsonobj = JSON.parse(datastr_clean);

console.log(datastr_clean); //debugging

L.geoJSON(geojsonobj).addTo(map);In localhost:3000/restaurants_cluster clustering markers using Leaflet Markerclusters requires very little change to the code. In the following webmap3.js excerpt group is introduced as a L.markerClusterGroup() to hold the markers.
// webmap3.js excerpt

... //code from webmap.js
// Adding the GEOJSON DATA
// This takes the JsonData that was sent with the GET request .

var datastr_clean = datastr.replace(/"/g, '\"');
var geojsonobj = JSON.parse(datastr_clean);

console.log(datastr_clean);

var group = new L.markerClusterGroup().addTo(map);
L.geoJSON(geojsonobj).addTo(group);