This plugin integrates Phrase into Xcode. Current version is 1.1.0.
Please note that plugins are not supported by Xcode 8. The last version to be supported is 7.3. For those that have already upgraded, please use the Phrase CLI tool (Github).
There is a chance to rollout a native Mac App or use Xcode Source Editor Extensions in the future. Keep in mind that this is not scheduled or planned yet.
Download the latest release from
Github and unzip
the file in the ~/Library/Application Support/Developer/Shared/Xcode/Plug-ins
directory (assuming the plugin archive was downloaded to ~/Downloads):
cd ~/Library/Application\ Support/Developer/Shared/Xcode/Plug-ins
unzip ~/Downloads/PhraseAppXcodePlugin.xcplugin.zip
After starting Xcode it will ask, whether "the unsafe bundle should be loaded". It should be. Afterwards you are ready to go. To uninstall, just delete the plugin from the mentioned path (and restart Xcode).
This is tested on OS X 10.10 with Xcode 7.3.
Open the plugin window first. Click the Window > Phrase menu entry. The Phrase plugin window will open. From here you can configure the plugin, select a project, and push and pull locales.
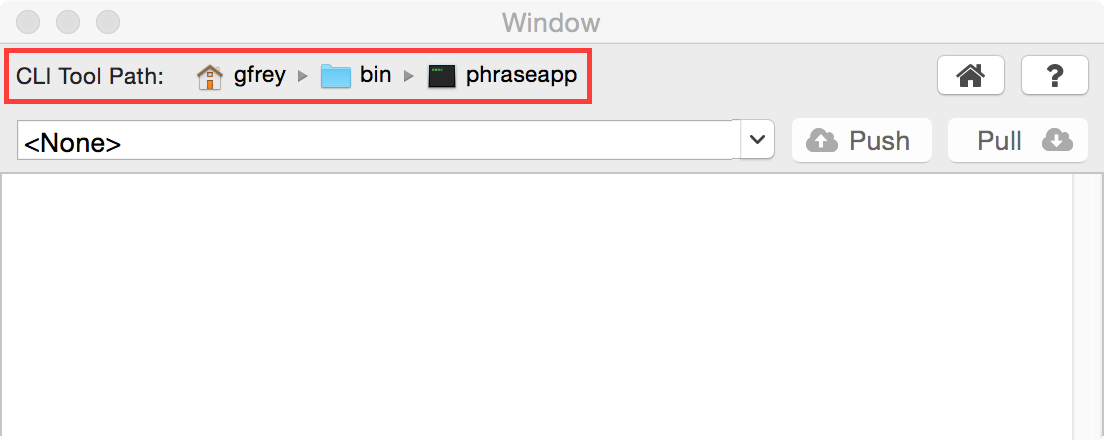
The plugin relies on the Phrase CLI tool to be installed. Point the file selector in the top of the plugin window to this location:
The plugin is going to guess the location, but might fail to do so. If so, manually select the CLI tool path. The file must be executable and the file pointed to must have the "phraseapp" prefix.
The plugin is actually pretty simple. For each workspace opened in Xcode the
combobox in the plugin window will have an entry. The Push and Pull
buttons are active if the CLI tool path was properly configured and the project
has a Phrase configuration file (named .phraseapp.yml) in its root
directory.
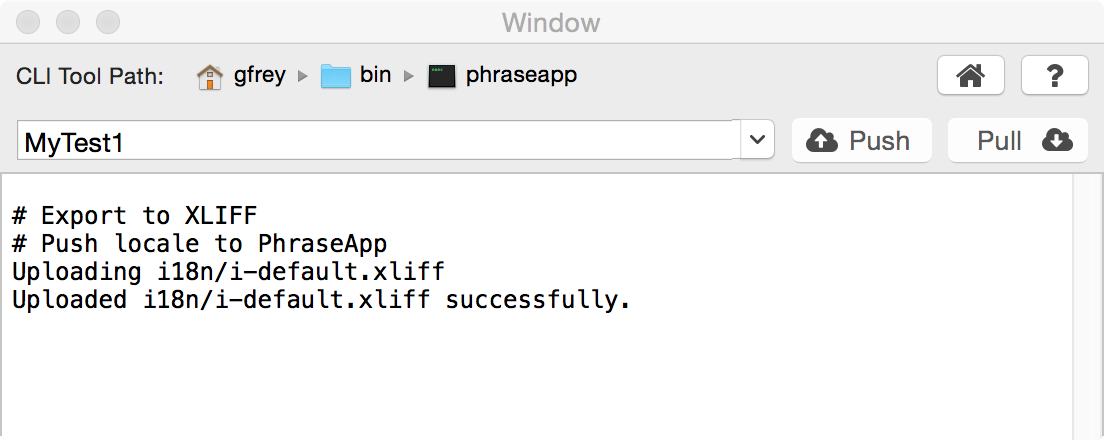
On Push and Pull the respective output will be sent to the text area in the lower part of the window.
In this example the workspace "MyTest1" was selected and pushed. For a description of the output generated see the following section.
The internationalization and localization workflow Apple proposes has made the following steps and assumptions:
- It is assumed that all development is done in one language, English by default (this can be changed and is described below in the "Change Default Locale" subsection). All strings should be in this language and are considered final. It is called the "development language" in the following.
- There is a tool in Editor > Export For Localization that will extract all
strings from user-interface elements (located in storyboards for example) and
usages of the
NSLocalizedStringmacro in code. These strings are collected in aXLIFFfile that can be used to hand over to translators. - There is of course a function to reimport the translators' results
into the source code under the Editor > Import Localizations... menu
item. This will read a
XLIFFfile and extract the configured translations. The resulting translations are kept instringsfiles for each source of strings (storyboards or code that is) and each target locale.
Into this workflow Phrase is integrated. Please note, if you don't want to
follow this workflow for whatever reason, the plugin is still usable for you.
Xcode's export and import actions are only triggered if the Phrase
configuration contains an XLIFF source (and respective targets). So it can be
used with any other configuration too!
The following subsections describe two variants of the XLIFF based workflow.
The simpler workflow comes with the following limitation: The development language is only handled in Xcode, i.e. it is not possible for product managers (or whoever might want to) to change these text fragments directly in Phrase.
There will be a solution for this limitation, but it requires a slightly more complicated setup, so let's start simple.
After creating a project make sure you configure Base Internationalization and all required target languages in your project's Info configuration view.
Additionally some files must be generated for the automatic import to work properly. Use the following command and afterwards add the generated files to the project within Xcode (clicking the Add files to "[project name]"...* point of the projects context menu).
for locale in <locales>; do
	echo '/* No Localized Strings */' > <project_name>/$locale.lproj/Localizable.strings
	echo '/* No Localized Strings */' > <project_name>/$locale.lproj/InfoPlist.strings
done
Next we'll need to configure the Phrase tools to support export and import
of the strings to be translated. The following example will assume the Xcode
export and import will use the i18n directory to place and find the xliff
files. The development language is assumed to be English. Make sure you replace
the placeholders (in square brackets) for access_token, project_id and
locale_id with the respective values of your setup. Put this template into
the .phraseapp.yml file into your project's root directory.
phraseapp:
  access_token: [access_token]
  project_id: [project_id]
  push:
    sources:
    - file: i18n/en.xliff
      params:
        locale_id: [locale_id]
        file_format: xlf
        update_translations: true
  pull:
    targets:
    - file: i18n/<locale_name>.xliff
      params:
        file_format: xlf
    - file: [project_name]/<locale_name>.lproj/Localizable.stringsdict
      params:
        file_format: stringsdict
With this configuration in place the project is ready to use with Phrase, as described in the next subsection.
If you're using Phrase's Xcode plugin the export and import is as easy as opening the Phrase window from Window > Phrase, selecting the respective project from the dropdown, and using the Push or Pull button.
If you want to use the command line for a more manual approach or integration into some build tool use the following steps for export:
xcodebuild -exportLocalizations -localizationPath i18n
phraseapp push
And for import of the given locales (de, es, and fr in this example):
phraseapp pull
for locale in de es fr; do xcodebuild -importLocalizations -localizationPath i18n/$locale.xliff; done
Keep in mind that changing strings in the default locale in Phrase will
result in disaster. It must be convention to never change these values in
Phrase, but only in the code itself. The effect would be that Xcode doesn't
import those strings any more (mismatch between source locale string in
the XLIFF file and the string in the code).
If you want to pluralize a key, this is possible by setting the according flag
on the key and providing the basic translations. The resulting translated
pluralizations are pulled into .stringsdict files. For more complicated
pluralization features it might be necessary to also push the source locale's
.stringsdict file.
This is a more advanced workflow that will allow to change strings from the development language in Phrase.
This requires some additional steps as we must make sure the development language doesn't block the layering of different locales, like keys should be taken from the most specific locale, like en-US first, then general en and last from the development locale. We'll introduce an artificial locale for this.
Close the project in Xcode and open up a terminal window. Go to the projects root folder and edit the following two files:
<project_name>/Info.plist: set theCFBundleDevelopmentRegionvariable toi-default.<project_name>.xcodeproj/project.pbxproj: change theenitem of theknownRegionslist toi-default. Change thedevelopmentRegionvalue fromentoi-default. (see http://eschatologist.net/blog/?p=224 ).
Open the project again.
This configuration will use the new base locale. Everything else is unchanged.
The base locale in Phrase should be named (aka locale_name) "i-default"
and have the locale-code "en". Having multiple locales with the same code is
perfectly fine.
phraseapp:
  access_token: [access_token]
  project_id: [project_id]
  push:
    sources:
    - file: i18n/i-default.xliff
      params:
        locale_id: [locale_id]
        file_format: xlf
        update_translations: true
  pull:
    targets:
    - file: i18n/<locale_name>.xliff
      params:
        file_format: xlf
    - file: [project_name]/<locale_name>.lproj/Localizable.stringsdict
      params:
        file_format: stringsdict
Again everything within the "i-default" locale should be considered fixed in Phrase and never be changed. After pushing the keys to Phrase the product manager needs to approve the translations, by moving them to the "standard" locale (like "en" in the given example). Translators must base their work on this verified locale. Everything else is analogous to the simple workflow.
There are some errors that might appear when importing XLIFF files pulled from Phrase. Let's see an example:
# Pull locales from Phrase
Downloaded de to i18n/de.xliff

# Import from XLIFF: i18n/de.xliff
MyTest1/Base.lproj/Main.storyboard: Incoming development string "Master2" does not match "Master" (Key: "RMx-3f-FxP.title")
global: File not found in the project
This happened when importing the German translations from the de.xliff file.
Two messages appear:
- The
Incoming development string "Master2" does not match "Master"message is serious. This is an indicator for a translation in the development locale being changed in Phrase. To fix go to Phrase and revert changes to the named key. - The
File not found in the projectmessage isn't that serious and happens when keys are added from something different than the development language (like adding keys in Phrase or push different files from other projects).

