Xây dựng hệ thống quản lý định danh phân tán sử dụng dụng uPort - Phần máy chủ
Tổng quan
Nội dung
I. Lý thuyết liên quan:
II. Các chứng năng chính:
- Đăng nhập bằng ứng dụng uPort:
Sử dụng uPort để đăng nhập sẽ tương tự như giải pháp quét mã QR để đăng nhập của Zalo. Chỉ khác là lúc này thay vì là một ứng dụng do dịch vụ ta đăng nhập sử dụng để đăng nhập mà cụ thể là app Zalo để đăng nhập Zalo Web thì ở đây là một giải pháp dạng All-in-one.
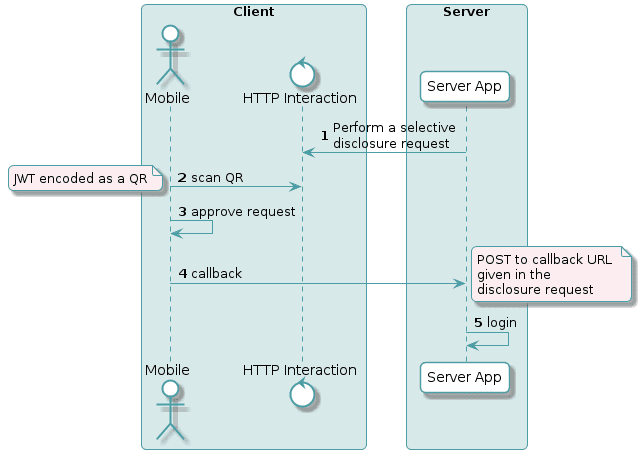
Cách thức hoạt động của công việc này như sau:
Bước 1: Serve sinh ra một
selective disclosure requestvà biểu diễn nó dưới dạng như là QR code.
app.get('/', (req, res) => {
    credentials.createDisclosureRequest({
      requested: ["name"],
      notifications: true,
      callbackUrl: endpoint + '/callback'
    }).then(requestToken => {
      console.log(decodeJWT(requestToken))  //log request token to console
      const uri = message.paramsToQueryString(message.messageToURI(requestToken), {callback_type: 'post'})
      qrcode.generate(uri, {
        small: true
    });
      const qr =  transports.ui.getImageDataURI(uri)
      res.send(`<div><img src="${qr}"/></div>`)
    })
  })
selective disclosure request có thể hiểu là một yêu cầu có chọn lọc, sẽ yêu cầu ứng dụng uPort cung cấp những thông tin nào. Mà cụ thể trong đoạn code demo ở trên thì là tên. Đây là những thông tin mặc định được lưu trữ bởi uPort ngay từ khi chúng ta tạo tài khoản uPort.
Tham khảo thêm tại đây
- Cấp phát chứng chỉ
- Yêu cần chứng chỉ
III. Nhận xét đánh giá
IV. Xây dựng hệ thống trưng cầu ý kiến sử dụng uPort
- Ý tưởng bài toán
- Cấu trúc hệ thống
- Chức năng của hệ thống
- Hướng dẫn triển khai hệ thống.
In a minimal example, data is requested and a uPort client representing the ethereum identity approves the disclosure of the requested information. This is called a selective disclosure request and is the primary means by which to validate the credentials of a user.
After server-side business logic has been satisfied with the disclosed data, a user can be considered authenticated by virtue of the of verified credentials they disclosed.
The intention of this content is to provide a simple solution to bring familiarity to core concepts in uPort's ecosystem.
The following examples utilize the selective disclosure flow and request/response patterns to provide an example of how to use these concepts for a login scenario:
Selective Disclosure flow
Selective Disclosure Request
Selective Disclosure Response
In addition to the above concepts and uport-credentials, also note the following requirements before starting this example:
NodeJS
Create a folder for the example and cd ./example && npm init
Install dependencies npm install --save ngrok express did-jwt uport-transports uport-credentials
This content is best if followed by interacting with a node console.
const { Resolver } =require('did-resolver')
const getResolver = require("ethr-did-resolver").getResolver;
const providerConfig = { rpcUrl: 'https://ropsten.infura.io/v3/be65a290f803479cbc77a0120fa51921' }

const credentials = new Credentials({
  appName: "Login Example",
  did: "did:ethr:0xfBEFa24A40C8D1a8582cE9aD4D9B960aba174BC7",
  privateKey:
    "38D3798C573046D8C549F7FF1EE809EE48B5EFFE7B6013F08386A8D9C380141E",
  resolver: new Resolver(getResolver(providerConfig))
});
console.log(credentials);