A raspberry Pi4 is highly recommended, because only it has a real 1GBit/s ethernet interface, which is needed for high frame rates. In addition, the Pi4 is recommended for local image processing, since only the Pi4 has sufficient CPU resources left.
If you have ROS noetic and are just interested to get started as easy as possible to have the pointcloud in ROS, you can use the branch "noetic-remote". It makes use of the nimbus-server which is really easy to use but has a significant overhead in resources.
The following step (1. Installation) is only required if you want to set it up yourself. Otherwise use our prepared Raspberry Pi OS (buster) images.
Fruthermore here is the official documentation.
- Install the required software packages for nimbus
- Clone this Repository in the src folder of your ROS workspace
mkdir -p ~/catkin_ws/src
cd ~/catkin_ws/src
git clone https://github.com/pieye/nimbus-ros.git
To perform the following installation 4GB memory is required. If this is not available, the swap size must be increased accordingly:
sudo dphys-swapfile swapoff
sudo nano /etc/dphys-swapfile
Change these lines CONF_SWAPSIZE=3000 CONF_MAXSWAP=4096
dphys-swapfile setup
sudo dphys-swapfile swapon
- Install ROS Melodic from Source manually OR run the following install script:
./nimbus-ros/scripts/install.sh
- Build
nimbus_3d_driver
cd ~/catkin_ws
catkin_make
2. Configure ROS to run accros multiple machines
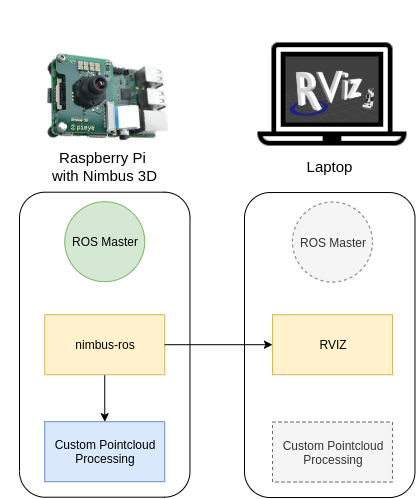
The following diagram shows the possible architectures for using your Nimbus 3D. The ROS driver "nimbus_3d_driver" is running on the Raspberry Pi and publishes the pointcloud. In this guide the ROS master is also running on the Pi, but it could run on any other machine in your local network. The Pointcloud is afterwards visualized on another Computer with a Display connected e.g. Laptop. Your algorithms to process the captured data can run locally on your Raspberry or any other device in the local network.
- We now configure ROS to run the master on the Raspberry and access the data via another machine running ROS Melodic with RVIZ installed
- Add this line to the .bashrc of your other machine (laptop), after adapting the IP to your Raspberry Pi if you are using Linux. You also need to add the IP of your local machine (ROS_IP):
nano ~/.bashrc
export ROS_MASTER_URI=http://192.168.1.1:11311
export ROS_IP=192.168.1.1
If you are using Windows you need to set it up as an enviroment variable:
Name: ROS_MASTER_URI      Value: http://192.168.1.1:11311
Name: ROS_IP      	  Value: 192.168.1.1
- SSH into your Raspberry and run:
roscore
- Start RVIZ on your machine:
rviz
It should start if everything works as expected.
Otherwise try to add a rule to your firewall on your machine. (Change the IP accordingly)
sudo ufw allow from 192.168.1.23/24
- The given launch file starts the nimbus node and a static coordinate transform after executing it on the Raspberry.
    source devel/setup.bash
    roslaunch nimbus_3d_driver nimbus.launch
-
It is possible to adjust the topics where the Pointcloud, Intensity Image, and Range Image are published. Simply set a new topic name in the launch file. This is necessary when using multiple Nimbus cameras in your local network at the same time.
-
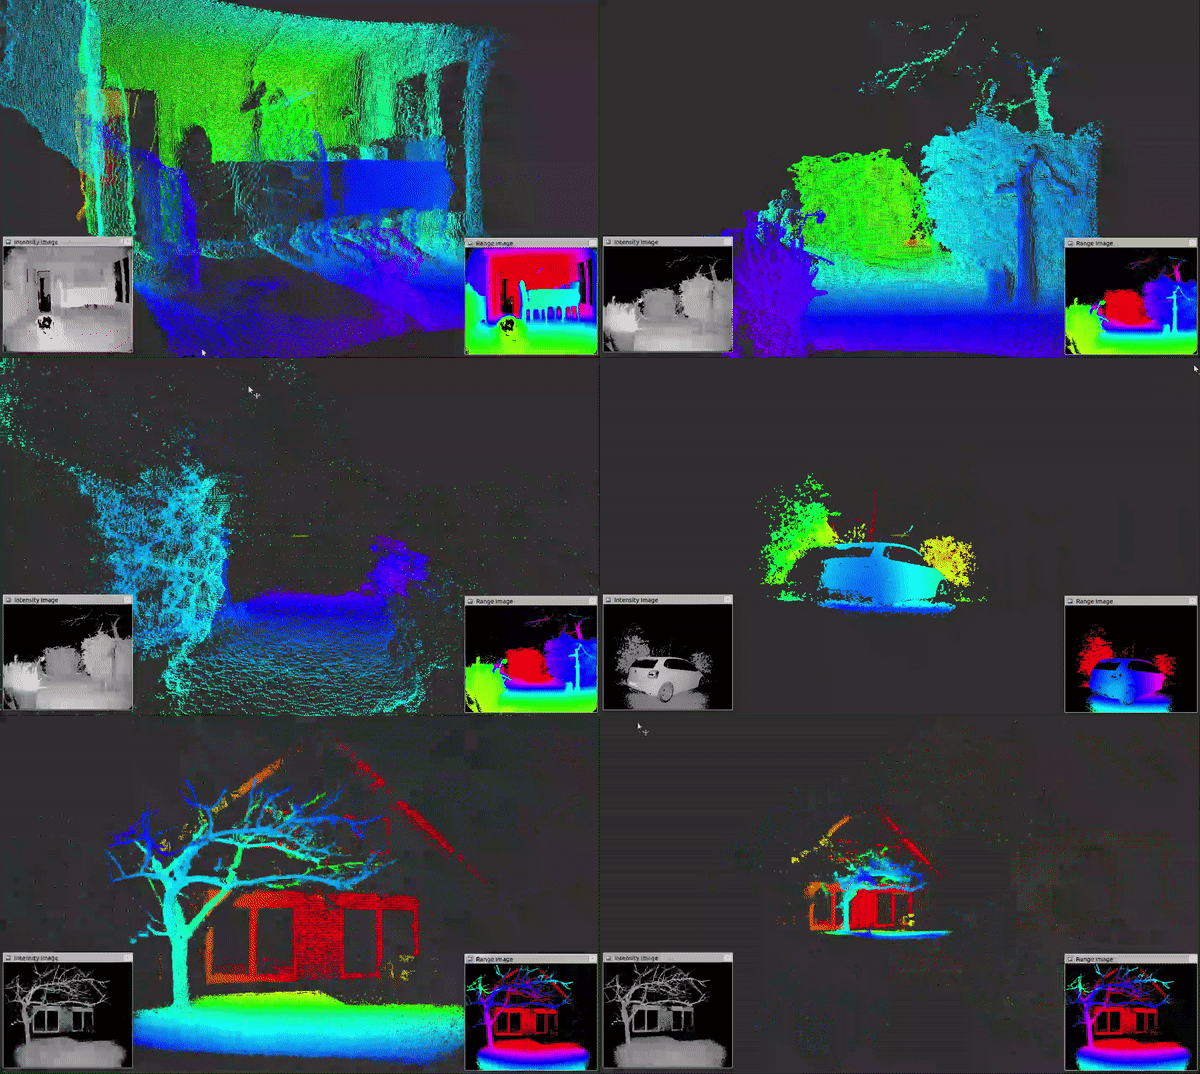
Starting RVIZ on any correcly setup device with a monitor, a poincloud and two images should be visible as shwon here:
it is possible to adjust the parameters that have an impact on the amount of transmitted data.
- A 1GBit/s ethernet connection to the Raspberry Pi is highly recommended. If this is given you can launch the default configuration without making any changes.
- If you only have a 100MBit/s Interface you can load the given preset by changing the default.yaml to fast_ethernet.yaml in the launch file (launch/nimbus.launch). This will reduce the resolution!
- If you need to reduce the bandwitdh even further (e.g. wifi) but still need a reliable point cloud, you can replace the config against the low_bandwitdh.yaml This will heavily reduce the resolution!
- Furthermore it is possible to adjust the parameters to your own needs.
Depending on the given setup it might be useful to adjust the auto exposure. If objects are moving fast or a minimum framerate should be achieved it can help do disable hdr and set a max value for the exposure time. The desired exposure can also be adjusted.
Furthermore it is possible to change the following parameters during runtime:
rosparam set
                /nimbus_3d_driver_node/XYZ_to_m		  	  [0.0 - 1.0]
                /nimbus_3d_driver_node/amplitude		  [0 - 3000]
                /nimbus_3d_driver_node/downsampling		  [true | false]
                /nimbus_3d_driver_node/downsampling_voxel_size    [0.0 - 1.0]
                /nimbus_3d_driver_node/hdr_factor		  [0.0 - 1.0]
                /nimbus_3d_driver_node/exposure_mode		  [-1 (manual), 0 (default), 1 (Auto), 2 (HDR)]
                /nimbus_3d_driver_node/intensity_image	  	  [true | false]
                /nimbus_3d_driver_node/max_exposure		  [0 - 32766]
                /nimbus_3d_driver_node/pointcloud		  [true | false]
                /nimbus_3d_driver_node/range_image                [true | false]
Each pointcloud includes the timestamp of the initial image aquisition. If this is needed across devices, a clock synchronization protocal such as NTP should be used. PTP hardware timestamping is not available on the Raspberry Pi. Chrony is as often used tool for that task.
In addition to the this ROS driver template packages for your future C++ software is included in the package "nimbus_example_c". You can run it by executing:
rosrun nimbus_example_c example
It includes basic ROS functionallity to start your development.
There is a possibility of encountering the bellow error upon running the nimbus node.
FATAL [nimbusRaw.cpp->errno_exit:68]
	*******	 EXIT trigger caused by LOG(FATAL) entry:
	"VIDIOC_S_FMT error 16, Device or resource busy
*******	STACKDUMP *******
This error is due to nimbus camera is currently used by nimbus-server. This service automatically started during the start-up. Follow the following steps to remove this error.
- Run
sudo systemctl status nimbusServer.serviceto check the staute od nimbus server.
● nimbusServer.service - Nimbus streaming server
   Loaded: loaded (/etc/systemd/system/nimbusServer.service; enabled; vendor preset: enabled)
   Active: active (running) since Tue 2020-02-25 15:41:17 GMT; 15h ago
 Main PID: 575 (nimbusServer)
    Tasks: 85 (limit: 4035)
   Memory: 12.4M
   CGroup: /system.slice/nimbusServer.service
           └─575 /usr/local/bin/nimbusServer
- You need to stop the active service to run ROS node. By running
sudo systemctl stop nimbusServer.service - Before running the ROS node check the service status again to confirm
Active: inactive (dead)


