This repository contains files related to the web interface of the Gateway configurator.
For the UI testing, a Gateway simulator can be used.
- python 3.8
To start simulator run:
python ./ruuvi_gw_http_server.py
To test UI, open in web-browser: http://127.0.0.1:8001
You can choose any WiFi from the list, the valid password is 12345678
======================================
To test connection from the Gateway to HTTP-server you need to run an HTTP-server on your PC.
You can use http_server_auth.py script to run HTTP-server.
- python 3.8
To test connection from the Gateway to HTTP-server, use http_server_auth.py
To run HTTP-server without auth:
python http_server_auth.py --bind <IP>
To run HTTP-server with auth:
python http_server_auth.py --bind <IP> -u <username> -p <password>
To run HTTPS-server with auth:
python http_server_auth.py --bind <IP> --ssl_cert=./server.pem -u <username> -p <password>
To generate certificate for HTTPS (server.pem):
openssl req -new -x509 -keyout server.pem -out server.pem -days 365 -nodes
-
Connect your computer to a WiFi network and find out what IP address has been assigned to your computer (we will refer to it as
<IP>in the following). -
Reset the Gateway configuration by pressing the CONFIGURE button for 5 seconds
-
Connect your PC to the Gateway's WiFi access point, the Gateway configuration page will be automatically opened in your web-browser
-
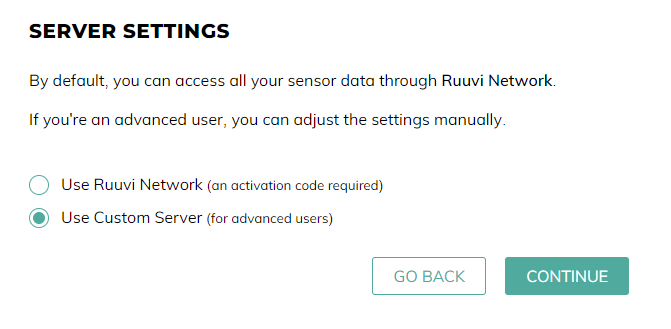
On the "SERVER SETTINGS" page select "Use Custom Server" option:
-
On the next page set URL to
http://<IP>:8000/record, leave the 'User' and 'Pass' fields blank:
-
On the next page select which devices to scan
-
On the next page (
INTERNET CONNECTION) select WiFi -
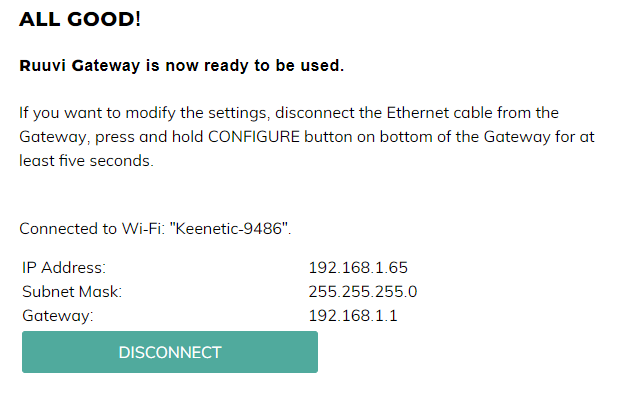
On the next page choose WiFi-network and connect to it, after the connection will be established you should see the following page:
-
Close the Configuration UI in browser
-
Connect your PC to the same WiFi-network as the Gateway is connected
-
Check that your PC can communicate with the Gateway via WiFi - use
ping <gateway-IP> -
Run HTTP-server on your PC:
python http_server_auth.py --port 8000 --bind <IP>in this example:
python http_server_auth.py --port 8000 --bind 192.168.1.38 -
Wait at least 10 seconds until the Gateway to send the accumulated data


-
Connect your computer to a WiFi network and find out what IP address has been assigned to your computer (we will refer to it as
<IP>in the following). -
Reset the Gateway configuration by pressing the CONFIGURE button for 5 seconds
-
Connect your PC to the Gateway's WiFi access point, the Gateway configuration page will be automatically opened in your web-browser
-
On the "SERVER SETTINGS" page select "Use Custom Server" option:
-
On the next page set URL to
https://<IP>:8000/record, fill the 'User' and 'Pass' fields withuserandpassaccordingly: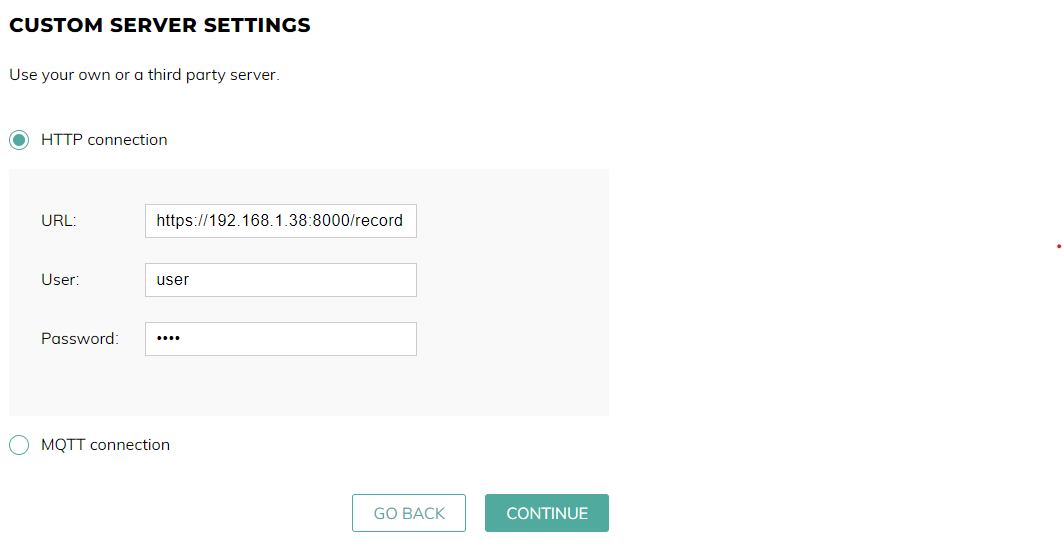
-
On the next page select which devices to scan
-
On the next page (
INTERNET CONNECTION) select WiFi -
On the next page choose WiFi-network and connect to it, after the connection will be established you should see the following page:
-
Close the Configuration UI in browser
-
Connect your PC to the same WiFi-network as the Gateway is connected
-
Check that your PC can communicate with the Gateway via WiFi - use
ping <gateway-IP> -
Run HTTPS-server on your PC:
python http_server_auth.py --port 8000 --bind <IP> --ssl_cert=./server.pem -u user -p passin this example:
python http_server_auth.py --port 8000 --bind 192.168.1.38 -
Wait at least 10 seconds until the Gateway to send the accumulated data
