Multi Widget Azure DevOps Marketplace Extension
Azure DevOps is a great tool, it's feature-rich, it might fits all of your needs to have a code repository, project management tools, sharing facilities, pipelines, etc.
Did I mention it's free?
Still, you may need extra functionality. Luckily, Azure DevOps Marketplace has tons of extensions, I'm sure you can find an extension suits for your needs.
If you need tailored extension for your needs, you're not alone. Microsoft has Extension Framework to help you handcraft your own extension and push it to Azure DevOps Marketplace.
Maybe, others will find, install, benefit and enjoy your extension
Extension development checklist
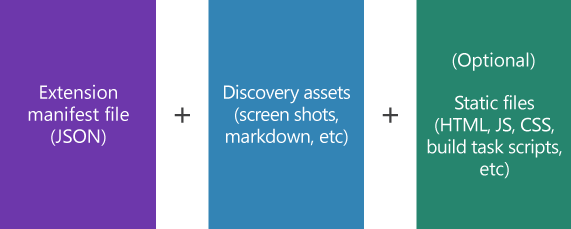
- Extension manifest (JSON file)
- Static files (HTML, Javascript, CSS files)
- Logo (PNG or JPEG file)
- Publisher Account
- TFS Cross Platform Command Line Interface (tfx-cli) tool to package static files and produce .vsix file
Creating a Publisher Account
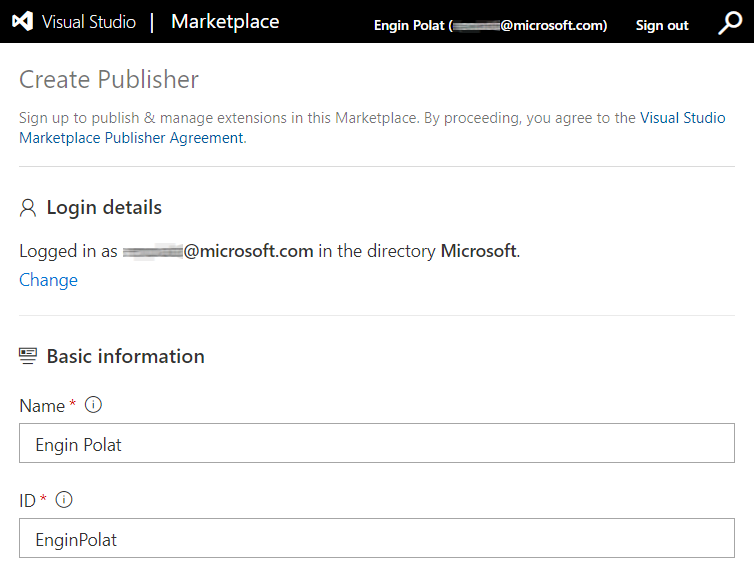
Sign-in to Visual Studio Marketplace Publishing Portal
Fill the form to create publisher
Remember the ID field. It'll needed to set in the manifest file of the extension
Review Marketplace Publisher Agreement
Click Create button
Installing TFS Cross Platform Command Line Interface (tfx-cli)
Since tfx-cli is an NPM package, you need to install Node first
It's good to install the tool globally, because probably you'll need it for many extension projects.
npm i -g tfx-cliCreating Extension Manifest
Start by creating a file named vss-extension.json
This json file will include required attributes, such as, Extension ID, Name, Publisher, etc.
There is a very good Extension Manifest Reference documentation for creating a detailed Extension Manifest. I highly recommend to read it first
Most important part of Extension Manifest for this project is, Contributions
Because a Contribution is, basically a widget, you can drag-and-drop and resize it in an Azure DevOps Dashboard.
{
  "id": "SimpleWidget",
  "type": "ms.vss-dashboards-web.widget",
  "targets": [
    "ms.vss-dashboards-web.widget-catalog"
  ],
  "properties": {
    "name": "SimpleWidget",
    "description": "Lisbon DevOps - Simple Widget",
    "uri": "./simple-widget.html",
    "catalogIconUrl": "./logo.png",
    "previewImageUrl": "./logo.png",
    "supportedSizes": [
      {
        "rowSpan": 1,
        "columnSpan": 2
      }
    ],
    "supportedScopes": ["project_team"]
  }
}
Creating static files
In this project, we grouped static files in widgets folder.
We have, Simple Widget (html, typescript) and Complex Widget (html, typescript, scss)
Simple Widget only has simple elements on screen, but Complex Widget has a dial chart.
I also add a PowerShell and Bash script files, to make it easier to clean, build, serve and deploy the project.
After cloning this repository, you can execute following commands in your favorite Terminal (my favorite is Microsoft Terminal
# remove ./dist folder
./build-serve-deploy.sh --clean

# build project and produce ./dist folder
./build-serve-deploy.sh --build

# run local http server in ./dist folder to debug
./build-serve-deploy.sh --serve

# package everthing in ./dist folder and produce .vsix file
./build-serve-deploy.sh --deploy
References
- Developing extension for Azure DevOps
- Extension Manifest Reference
- Azure DevOps Extension SDK
- Develop a web extension for Azure DevOps Services
- Package, publish, unpublish, and install Azure DevOps Services extensions
- Sample Extensions
- Pure CSS Percentage Circle
I learned creating and publishing an extension to Azure DevOps Marketplace by doing it. I had a chance to work with brilliant people in an internal hack in Microsoft, many kudos to, Todd Venhaus, Oliver Scheer, Ian Chen, Dariusz Porowski. They helped me a lot to understand the steps and fine-tune the code.

