![]()
Pollux is a Message Passing Cloud orchestrator designed to:
- distribute and manage complex algorithms, including NP-Hard and Complete problems, across multiple Cloud-based machines.
- span algorithms on the Cloud, ensuring synchronization and continuous communication among distributed components.
- ensure robustness by offering recover from local crash capabilities.
- take advantage of Cloud cheaper 'Spot' instances by designing Cloud distributed applications where part of the application can be killed while the overall application survives.
- support multiple payload types.
- support multiple payloads using multiple programming languages.
- support multiple payload hardwares: design applications where CPU, GPU, FPGAs, ... are collaborating live.
- offer easy reporting for algorithmic dimensioning and fine tuning.
Following video shows a PSO - Particle Swarm Optimization application example developed using Pollux API. This application is available for testing (see below).

💁 If you have any questions, send us a mail.
⭐ If you find Pollux interesting, and would like to stay up-to-date, consider starring this repo to help spread the word.
❗ Pollux payload API is distributed under Apache 2 license. Additionally, the Pollux orchestrator is made available through binary releases, which can be accessed either as direct binaries or Docker images.
In today's world many computational problems from network routing to semiconductors to AI are becoming more and more complex.
We believe that the next step for optimization of such complex grand scale computation is to leverage the massive parallelization the Cloud can offer.
We believe that this step has not been reached yet, as there is no genuine Cloud suitable framework for this type of computation; most of the frameworks used for similar purposes are actually meant for supercomputers, not the Cloud.
Our goal is to provide such a framework, designed for Cloud architecture while easy enough to use for engineers from any field. Through a clear interface they should be able to parallelize any algorithm without being Cloud experts.
Our goal is not to treat the Cloud as a super computer, it is not. Our goal is to virtualize a super computer on the Cloud and finally open these capabilities to a wider audience.
Pollux's general principle is summarized in the following figure.

Currently, the following Pollux use cases are provided:
- Pollux payload example: a simple test application deploying a configurable number of workers and exchanging random messages between them.
- Pollux PSO - Particle Swarm Optimization: a PSO Pollux implementation (This application has been used to create the upper video).
Pollux is both:
- a distributed Payload API (C++ for the moment, more to come in the future).
- and a Cloud orchestrator.
The overall architecture is summarized in the following picture.
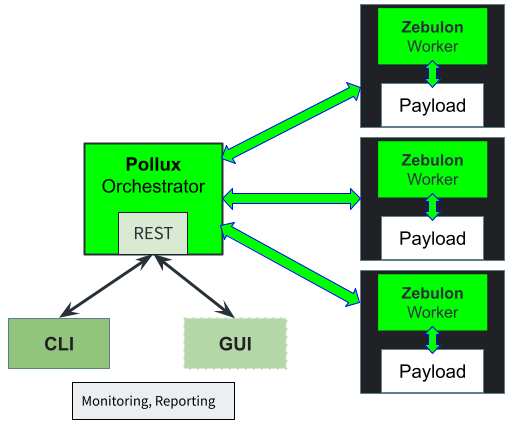

A REST API allowing users live access to the running application is under development.
# First clone the repository
git clone https://github.com/polluxio/pollux-payload
# go inside it and init submodules
cd pollux-payload
git submodule update --init --recursive
If you have access to a Cloud provider (we ony support Qarnot for the moment, more to come soon), at this point, you are good to test pollux, locally if you have docker installed or on the Cloud if you have an account.
Running modes are managed through the Pollux launcher '-m' option. The following modes are supported:
If you have Docker installed on your system, we suggest to directly use the local docker mode.
To use this mode, Pollux binaries need to be installed locally. We provide binaries compiled for Ubuntu in the pollux-payload release.
If you face any compatibility issue or you need binaries for another Linux version,
please contact us.
Once you have downloaded the binaries (pollux and zebulon),
untar the archive in a directory and set a $POLLUX_INSTALL environment variable pointing to that directory.
mkdir pollux_install
cd pollux_install
tar xvzf pollux.tar.gz
export POLLUX_INSTALL pollux_install
Once this is done, run the local mode:
# Following command will launch 4 workers
python3 <pollux_payload_sources>/src/launcher/pollux.py -p <path_to_payload> -m local -n 4This is the easiest mode to use to get started and a good first step to prepare for Cloud deployment.
Use the pollux test image to quickly test Pollux by running the following Pollux launcher command:
# Following command will launch 4 workers
# -c : docker image containing the payload to run as a container.
# -p : path to payload in payload container to run (usually payloads are located in /root)
python3 <pollux-payload-sources>/pollux.py -m local_docker -c polluxio/pollux-payload-examples -p /root/pollux-payload-test -n 4
The following command launches the PSO example with 8 workers:
python3 <pollux-payload-sources>~/pollux.py -m local_docker -c polluxio/pollux-payload-examples -p /root/pollux-payload-pso -n 8 Qarnot is a Cloud provider with a unique approach to Cloud computing in which the wasted heat generated by computer servers is recycled to heat buildings.
Qarnot offers free trial credits accessible in a few clicks. To try deployment on Qarnot, first create an account on this page.
Retrieve your access token, save it locally ('qarnot.conf) and then launch Pollux using the following command:
#Launching on Qarnot with 3 workers
python3 <pollux-payload-sources>/pollux.py -m qarnot -c polluxio/pollux-payload-examples -p /root/pollux-payload-pso -n 3 To launch Pollux applications, a Python script launcher is provided
here.
A convenient way to proceed is to create a Python virtual environment. With Python 3:
apt-get install python3-venv
pip3 install virtualenv
In a project directory, create an environment:
python3 -m venv polluxActivate it:
. pollux/bin/activateNow that the environment has been created and launched, you can install the following Python libraries:
pip install pyyaml
#to use local Docker pollux mode
pip install docker
#To use Qarnot Pollux mode
pip install qarnotCurrently, only C++ is supported. Python support, for instance, could easily be added (some early tests have been done).
First install following dependencies, On Ubuntu for instance:
sudo apt-get install cmake
sudo apt-get install g++
sudo apt-get install protobuf-compiler-grpc
sudo apt-get install libgrpc++-dev
Copy relevant files:
#create a thirdparty dir
mkdir thirdparty
cd thirdparty
git submodule add https://github.com/polluxio/pollux-payloadOnce your Pollux payload is ready to be tested, in order to launch in Local Docker
or on the Cloud, you need to write your own Dockerfile.
This Dockerfile is the best starting point:
FROM ubuntu:latest AS builder

# Update Ubuntu Software repository
# And install needed components for your payload
RUN apt-get update && apt-get -y install \
    cmake \
    make  \
    g++ \
    protobuf-compiler-grpc

WORKDIR /my-pollux-payload
#COPY you application components
COPY cmake cmake
COPY src src
COPY thirdparty thirdparty
COPY CMakeLists.txt .
RUN cmake . && make -j$(nproc)

FROM polluxio/pollux:latest AS my-pollux-payload
#add eventual runtime libraries in below command
RUN apt-get update && apt-get -y install libgrpc++

WORKDIR /root
COPY --from=builder /my-pollux-payload/src/c++/my-payload
#For Pollux Communication
EXPOSE 50000
Once the Dockerfile written, run the folowing commands to create your docker image:
docker build --target my-pollux-payload --file Dockerfile . -t my-pollux-payload
docker tag my-pollux-payload mydockerrepository/my-pollux-payload
docker push mydockerrepository/my-pollux-payload
You should then be able to run your own payload by referencing it with the '-p' switch of the Pollux launcher.