This repository includes an (re-)implementation, using updated Tensorflow APIs, of 3D Unet for isointense infant brain image segmentation. Besides, we implement our proposed global aggregation blocks, which modify self-attention layers for 3D Unet. The user can optionally insert the blocks to the standard 3D Unet.
For users who wants to use the standard 3D Unet, you need to modify network.py by removing line 62-67 and 72-79. Do not use "_att_decoding_block_layer" in "_build_network". Should you have any question, open an issue and I will respond.
Created by Zhengyang Wang and Shuiwang Ji at Texas A&M University.
10/01/2018:
-
The code now works when we have subjects of different spatial sizes.
-
During training, validation and prediction, you only need to change the configures in configure.py. In the old version, you have to change configures correspondingly in several files like main.py, utils/input_fn.py, etc.
Our paper is available at https://arxiv.org/abs/1812.04103.
If using this code , please cite our paper.
@article{wang2018global,
  title={Global Deep Learning Methods for Multimodality Isointense Infant Brain Image Segmentation},
  author={Wang, Zhengyang and Zou, Na and Shen, Dinggang and Ji, Shuiwang},
  journal={arXiv preprint arXiv:1812.04103},
  year={2018}
}
The dataset is from UNC and currently not available to the public. Basically, it is composed of multi-modality isointense infant brain MR images (3D) of 10 subjects. Each subject has two 3D images (modalities), T1WI and T2WI, with a manually created 3D segmentation label.
It is an important step in brain development study to perform automatic segmentation of infant brain magnetic resonance (MR) images into white matter (WM), grey matter (GM) and cerebrospinal fluid (CSF) regions. This task is especially challenging in the isointense stage (approximately 6-8 months of age) when WM and GM exhibit similar levels of intensities in MR images.
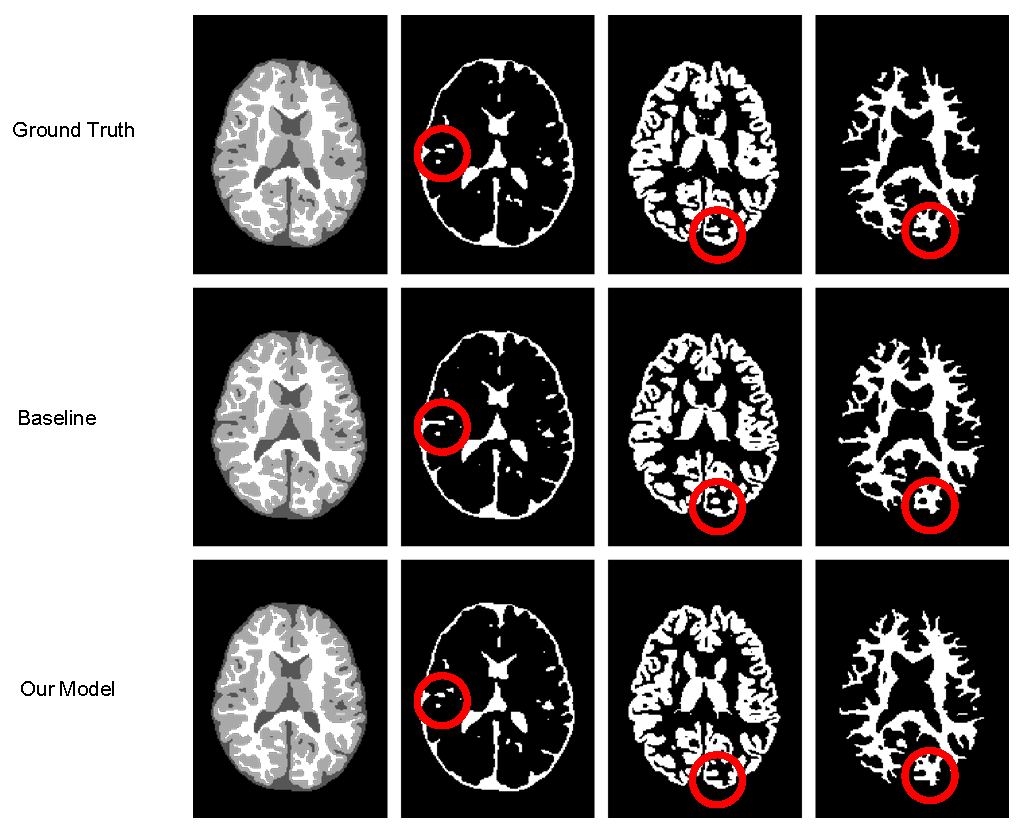
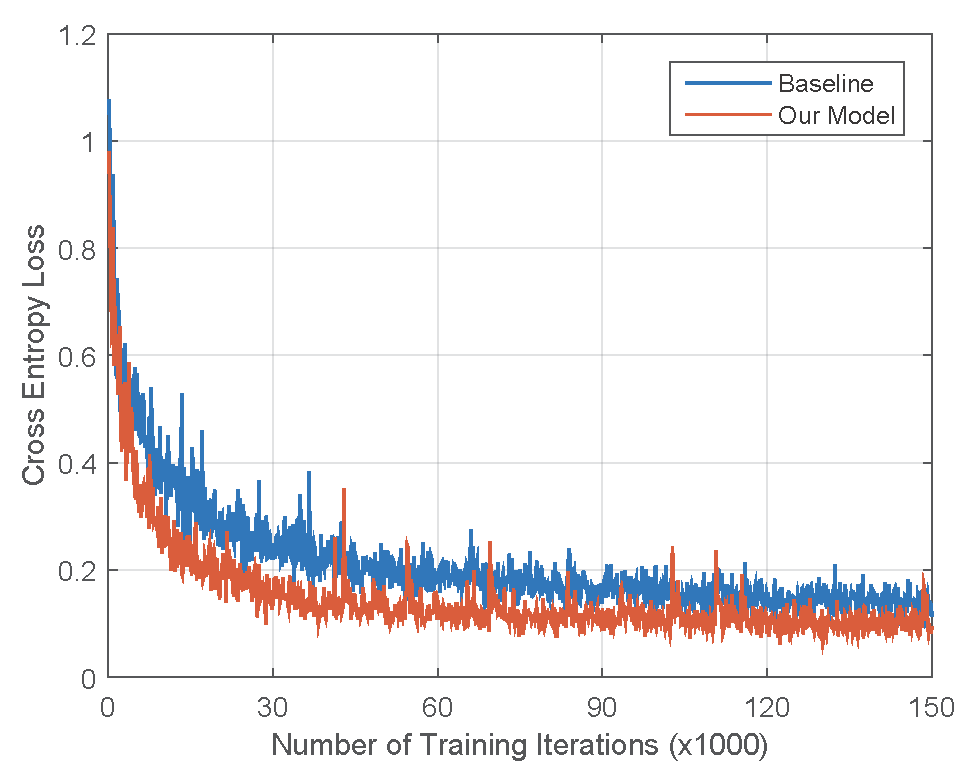
Here provides a glance at the effect of our proposed model. The baseline is 3-D Fully Convolutional Networks for Multimodal Isointense Infant Brain Image Segmentation.
Visualization of the segmentation results on the 10th subject by our proposed model and the baseline model:

Comparison of training processes between our proposed model and the baseline model:

Python 3.5+
tensorflow-gpu 1.7+, numpy, scipy
All network hyperparameters are configured in main.py.
raw_data_dir:the directory where the raw data is stored
data_dir: the directory where the input data is stored
num_training_subs: the number of subjects used for training
train_epochs: the number of epochs to use for training
epochs_per_eval: the number of training epochs to run between evaluations
batch_size: the number of examples processed in each training batch
learning_rate: learning rate
weight_decay: weight decay rate
num_parallel_calls: The number of records that are processed in parallel during input processing. This can be optimized per data set but for generally homogeneous data sets, should be approximately the number of available CPU cores.
model_dir: the directory where the model will be stored
patch_size: spatial size of patches
overlap_step: overlap step size when performing testing
validation_id: 1-10, which subject is used for validation
checkpoint_num: which checkpoint is used for validation
save_dir: the directory where the prediction is stored
raw_data_dir: the directory where the raw data is stored
network_depth: the network depth
num_classes: the number of classes
num_filters: number of filters for initial_conv
Before training, we preprocess data into tfrecords format, which is optimized for Tensorflow. A good example of how to preprocess data and use tfrecords files as inputs can be found in generate_tfrecord.py and input_fn.py.
After configure configure.py, we can start to train by running
python main.py
We employ tensorboard to visualize the training process.
tensorboard --logdir=model_dir/
If you want to do testing, first make predictions by running
python main.py --option='predict'
Then, if you have access to labels, setup evaluation.py and run
python evaluation.py
You may also visualize the results. setup visualize.py and run
python visualize.py