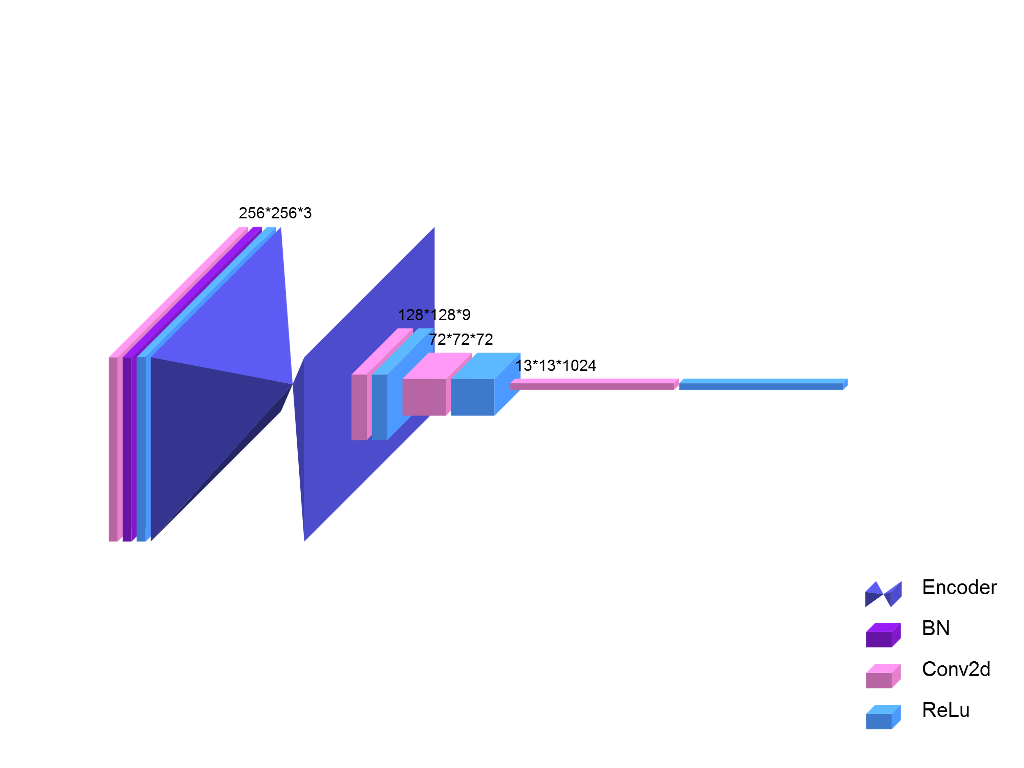
NetPainter is a 2D graphic tool used to show neural network structure, based on python. It's very convenient for you to paint your own neural network schematic diagram within a few lines of code. You will see the simplicity and flexibility of this python-api in the following document. For now, only 'slices' function module is developed, more function modules will be developed in the future.
Before drawing your first network diagram, few preparations should be done. NetPainter is build on pycairo , which is a useful 2D graphic Pypi. So make sure that pycairo is installed in your developing environment. For Linux/MacOS users, use pip to download and install:
pip install pycairoFor windows users, pip directly is not recommended. You'd better find a wheel file which suit your python environment on http://www.lfd.uci.edu/~gohlke/pythonlibs/#pycairo . After downloading the .whl file, use pip to install, for example:
pip install D:\python_packages\pycairo-1.18.1-cp36-cp36m-win_amd64.whlPython3 is recommended to use this api.
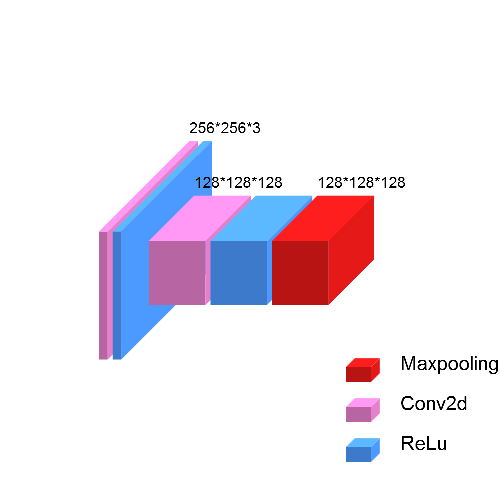
Here you will start with a simple network diagram: two convolution layers with Relu, followed by a Maxpooling layer. Put your main.py and 'NetPainter' in the same directory and run following code:
from NetPainter.slices import *

def main():
    mymodel=Model(1000,1000)
    mymodel.Conv2d(res_x=256, res_y=256, channel=3, has_ReLu=True)
    mymodel.Conv2d(res_x=128, res_y=128, channel=128, has_ReLu=True)
    mymodel.Maxpooling(res_x=128, res_y=128, channel=128)
    mymodel.Draw('first_graph.png')

if __name__ == "__main__":
    main()
You will get a picture like this:
To learn more about NetPainter and draw more complicated diagram, please read following document. You will find more surprising functions.
( Find source code in slices.py )
Model is the base of your net graph, which contains all the information of every layer modules. A layer unit is called 'a module'; eg. a ReLu, a Softmax, a set of convolution layers are modules. We can define a module through a 'module function'.
class Model(self, img_w=1000, img_h=1000, interval=10)Here img_w and img_h are the size of your picture (pixel size). interval is the default set of the distance between layers. You can also change this distance specifically by using blank (It will be introduced in the following doc)
Conv2d is the module function of a 2D convolution layer.
def Conv2d(self, res_x=0, res_y=0, channel=0, kernel=None, slice_num=1, has_ReLu=False, draw_h=None, draw_l=None, draw_w=None, blank=10, notation=True)res_x,res_y: The resolution of your layer. If your input shape is (N, C, H, W), they represent H and W ;channel: The channel number of your layer. If your input shape is (N, C, H, W), it represent C ;kernel: If it is set, a convolution kernel will be shown on the layer; The input can be either an integer or a tuple ;slice_num: The number of slice you want to draw at once ;has_ReLu: If it's set to True, a ReLu layer will be added to the end of the Conv2d ;draw_h,draw_l,draw_w: The size of the layer you draw is automatically set based onres_x,res_yandchannel. However, if you want to set the layer size by yourself, you can set these three parameters.draw_his the height of your layer,draw_lis the length of your layer anddraw_wis the width ( thickness ) ;blank: Distance between this module and the next one ;notation: If it's set to True,res_x,res_y,channelwill be shown on the top of the layer ;
def Residual(self, res_x=0, res_y=0, channel=0, slice_num=1, draw_h=None, draw_l=None, draw_w=None, blank=10, notation=True)

def Maxpooling(self, res_x=0, res_y=0, channel=0, slice_num=1, draw_h=None, draw_l=None, draw_w=None, blank=10, notation=True)

def Softmax(self, res_x=0, res_y=0, channel=0, draw_h=None, draw_l=None, draw_w=None, blank=10, notation=True)

def ReLu(self, res_x=0, res_y=0, channel=0, draw_h=None, draw_l=None, draw_w=None, blank=10)

def BN(self, res_x=0, res_y=0, channel=0, draw_h=None, draw_l=None, draw_w=None, blank=10)
These module functions are similar, basically, you can regard them as the simplified version of Conv2d. Please see 'Conv2d' to learn the definition of res_x, res_y, channel, slice_num, draw_h, draw_l, draw_w, blank and notation.
You should notice that ReLu and BN don't have notation; Softmax, ReLu and BN don't have slice_num.
To be general, users can design their own layer by using customize. It is very similar to Conv2d but with a few more self-defining terms.
def customize(self, name='mylayer', res_x=0, res_y=0, channel=0, slice_num=1, draw_h=None, draw_l=None, draw_w=None, r=0.3, g=0.3, b=0.3, blank=10, notation=True)name: The name of your own layer ;res_x,res_y,channel,slice_num,draw_h,draw_l,draw_w,blank,notation: See the definition in 'Conv2d' ;r,g,b: The color of your layer (r, g, b value) ;
Encoder is the module function of a general encoder. The shape of an encoder is greatly different from a normal layer, and I recommend you to have a try.
def Encoder(self, draw_h=300, draw_l=300, draw_w=400, blank=10)Since the parameter of an encoder is hard to define, here you should design the size of your encoder by setting draw_h, draw_l, draw_w.
draw_w is the total width (thickness) of your encoder.
This is the last step of drawing your diagram. You will get nothing without it.
def Draw(self, output_filename='network.png', add_note=True, add_para=True)output_filename: Name of the result. You can set the directory you want to put your result ;add_note: If it set to True, you can add annotation of the layers you use at right-bottom corner of the picture ;add_para: If it set to False, all the notations will disappear. (seenotationin 'Conv2d')
This is a function used to set font.
def set_font(self, font='arial', font_size=30, trans_x=0, trans_y=0)font: The font you want to set. Make sure that this font is in your machine.font_size: The font size you want to set. This is the font size of notations(seenotationin 'Conv2d').trans_x,trans_y: Set them if you want to move the notations(seenotationin 'Conv2d') on layers.
This is a function used to set color of a particular layer.
def set_color(self, layer_name, r, g, b)layer_name: The name of the layer whose color you want to change. Make sure you spell the name right.r,g,b: The color you want to change to.
You can use len(Model) to get the number of module you have in model. Try Model[i] to get the i'th module's information (as a dict).
Please read these following tips in order to get better using experience:
- Although
draw_h,draw_l,draw_wcan be set automatically refer tores_x,res_y,channel, I still strongly recommend you to set these parameters by yourself. - When you find your picture cannot contain the whole network, try to make
img_h,img_winModelbigger. Of course you can set them smaller if you find the picture is too big for the network. - It is easy and convenient for you to do the secondary processing on other software like PS and PPT. For example you can show the relations between layers using arrows.
- You may set
blankbigger to see howkernel(seekernelin 'Conv2d') works.
- Software License Agreement (MIT License)
- Copyright (C) 2019 Chuanyu Pan (pancy17@mails.tsinghua.edu.cn)
- All rights reserved.
If you have any question or advice, please send e-mail to pancy17@mails.tsinghua.edu.cn
Enjoy your use!


