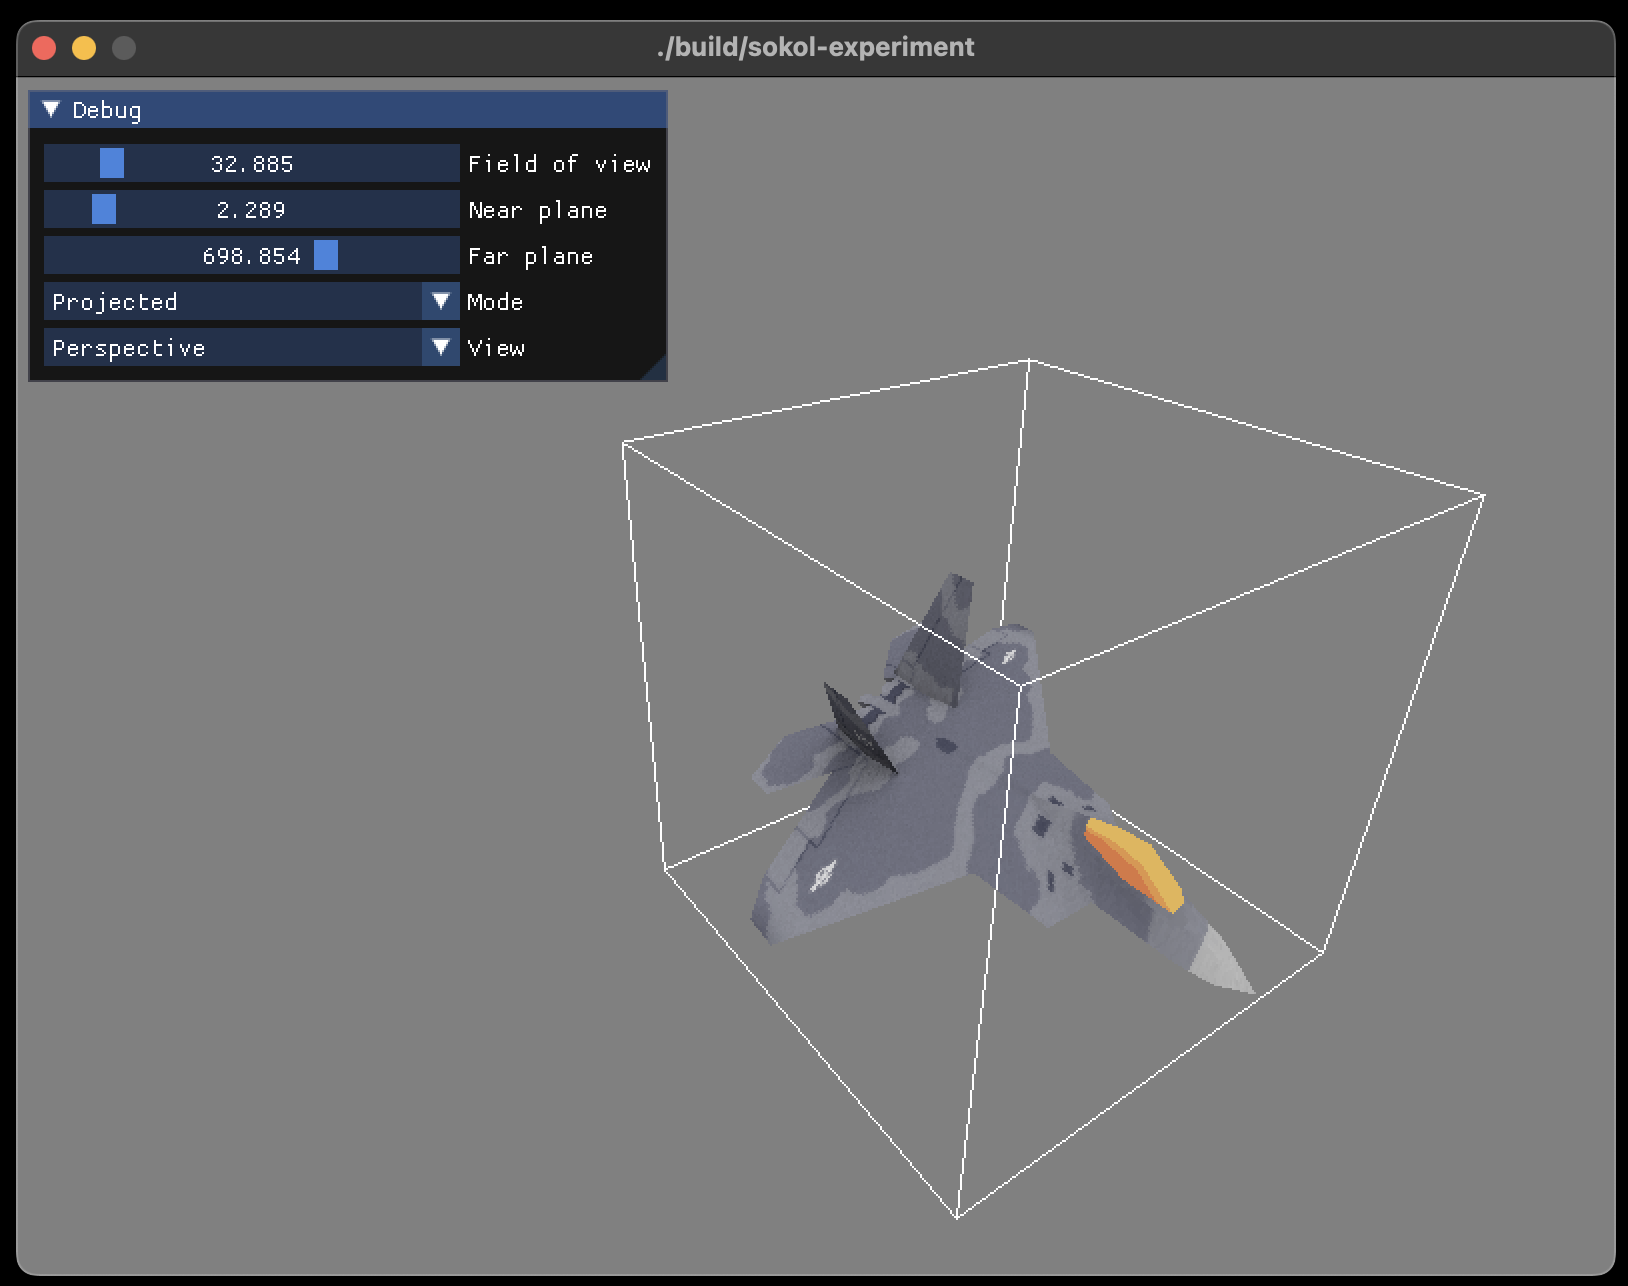
An experimental project to learn more about sokol by Andre Weissflog (floooh).
The demo uses SDL2 and supports both OpenGL and DirectX backends (these are selected at configure time by passing either -DSOKOL_EXPERIMENT_GL or -DSOKOL_EXPERIMENT_D3D).
The skeleton of the application is based on the sokol_gfx sample. DirectX backends are based on examples from sokol-samples (see d3d11entry.c) and the Dear ImGui SDL2 DirectX 11 sample (see example_sdl2_directx11).
This project has grown into a mini prototype to help visualize perspective projection. Still very much WIP and hacky/experimental but already useful to visualize the effect.
Note: The fantastic F22 model is from 3D Graphics Programming from Scratch, a course on Pikuma. Thanks to Gustavo Pezzi for kindly letting me use it in this project.
- Left/right mouse button + mouse move - Free look
- W A S D - Move forward, back, left and right
- E Q - Move up and down
- Field of view, near plan, far plane - Adjust perspective projection matrix of
standardprojection (visualized in bothstandardandprojectedmode).- Note: While camera is pinned, changes will not affect pinned camera (the camera state at time of pinning).
- Mode - Switch between
standardandprojectedmode (visualize projection). Default isstandard. - View - Switch between
perspectiveandorthographicprojections while inprojectedmode. Default isorthographic. - Pin camera - Pin the current camera to move and visualize the view frustum in
standardmode. - Draw axes - Draw the world space coordinate axes (X/Y/Z) for reference.
- Affine texture mapping - Disable perspective correct texture mapping when in
projectedmode.
You'll need the normal stuff like CMake, a compiler (e.g. Visual Studio/MSVC, GCC, Clang etc...) to really get started, below are the additional things you might bump into.
When trying to configure the repo initially (is using OpenGL), you may hit this error:
CMake Error at C:/Program Files/CMake/share/cmake-3.25/Modules/FindPackageHandleStandardArgs.cmake:230 (message):
  Could NOT find PythonInterp (missing: PYTHON_EXECUTABLE)
Call Stack (most recent call first):
  C:/Program Files/CMake/share/cmake-3.25/Modules/FindPackageHandleStandardArgs.cmake:600 (_FPHSA_FAILURE_MESSAGE)
  C:/Program Files/CMake/share/cmake-3.25/Modules/FindPythonInterp.cmake:169 (FIND_PACKAGE_HANDLE_STANDARD_ARGS)
  build/_deps/glad-src/cmake/CMakeLists.txt:44 (find_package)
This is most likely because Python (a dependency of Glad) can't be found on your system. You'll need to go ahead and download it first.
If you configure again, you should then hopefully see something that looks like this...
Found PythonInterp: C:/Users/hultonha/AppData/Local/Programs/Python/Python311/python.exe (found version "3.11")
-- Glad Library 'glad_gl_core_33'
Configuring should now be complete, but when attempting to build it's possible you'll hit an error with a missing dependency (a Python one which is required by Glad), Jinja2.
To install this find wherever pip (Python's package manager) is on your system (it will have been installed with your previous Python installation, most likely in your AppData folder on Windows).
Then run pip install jinja2 to have Python install that dependency for you (you might want to add pip to your Path environment variable too for easy access).
Once that's installed, building the project should work as expected.
To ensure the MSVC compiler (and programs such as Ninja) are found correctly, it's best to run the Visual Studio Developer Command Prompt (you can find this in All Programs usually). If you'd rather use a different terminal such as cmder or Microsoft Terminal then ensure you run VsDevCmd.bat which sets the Visual Studio related environment variables (essentially what happens when launching the Visual Studio Developer Command Prompt).
It is located here:
C:\Program Files\Microsoft Visual Studio\Version\Common7\Tools
or here:
C:\Program Files (x86)\Microsoft Visual Studio\Version\Common7\Tools
Next from the project root run either:
cmake -B build -DSOKOL_EXPERIMENT_GL=ON
or
cmake -B build -DSOKOL_EXPERIMENT_D3D=ON
Depending on which backend you'd like to try. (If you've done the above steps also specifying -G Ninja isn't a bad idea).
Then enter:
cmake --build build
...to compile, and finally...
build\Debug\sokol-experiment.exe(if using Visual Studio)build\sokol-experiment.exe(if using Ninja)
...to run.
cmake -B build -G Ninja -DSOKOL_EXPERIMENT_GL=ON(-G Ninjais optional but will make things much faster).cmake --build build
then...
./build/sokol-experiment
...to run.
Untested, but should be roughly the same as what is listed for macOS above.

