Welcome to the 2024-Playground repository! This document will guide you through the setup process and understanding the contribution guidelines, which are essential for participating in this project.
- Setting Up SSH Keys
- Setting Up Your Own Copy of the Repository (Forked Repository)
- Organizing Your Work
- Adding Changes
- Opening a Pull Request on GitHub
- Understanding Git History
- What to Do While Your Pull Request is Pending Review
Setting up SSH keys allows you to securely connect to GitHub without needing to enter your username and password every time you interact with your repository from the command line. For more details, refer to the GitHub guide on SSH.
-
Open a terminal and paste the following command with your email address:
ssh-keygen -t rsa -b 4096 -C "sudogajendra@gmail.com"This creates a new SSH key, using the provided email as a label. See more.
-
When prompted to "Enter a file in which to save the key," press Enter. This accepts the default file location.
> Enter file in which to save the key (/home/gajen/.ssh/id_rsa): [Press enter]
That's it! Now your system has its own SSH keys ready to go.

-
Start the ssh-agent in the background.
eval "$(ssh-agent -s)"
-
Add your SSH private key to the ssh-agent. GitHub guide about it.
ssh-add ~/.ssh/id_rsa
-
Copy the SSH key to your clipboard.
sudo apt-get install xclip -y
xclip -sel clip < ~/.ssh/id_rsa.pub
Or, if
xclipis not available:cat ~/.ssh/id_rsa.pubAnd then manually copy the output.
-
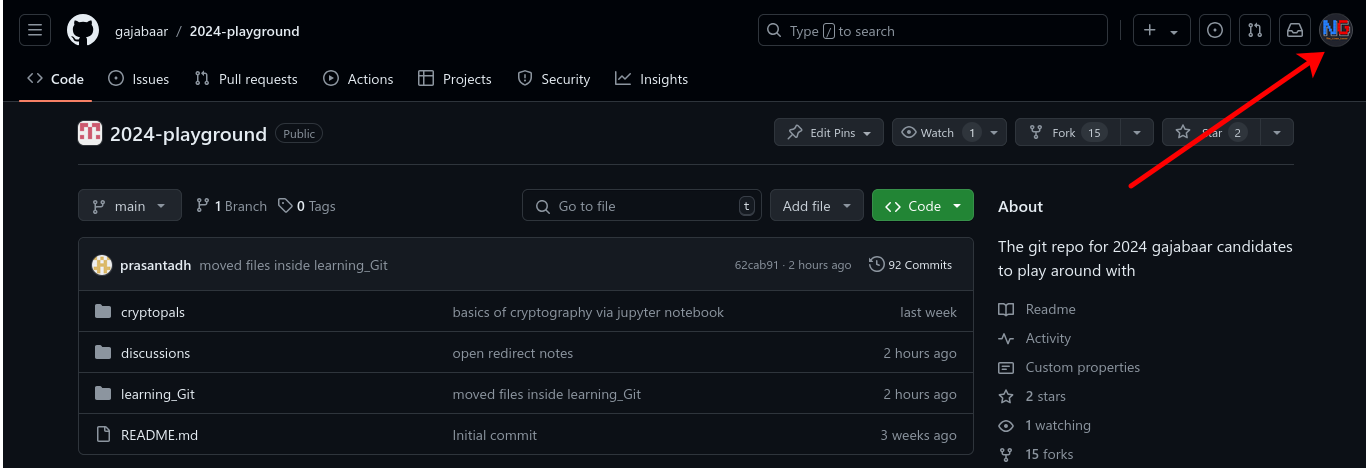
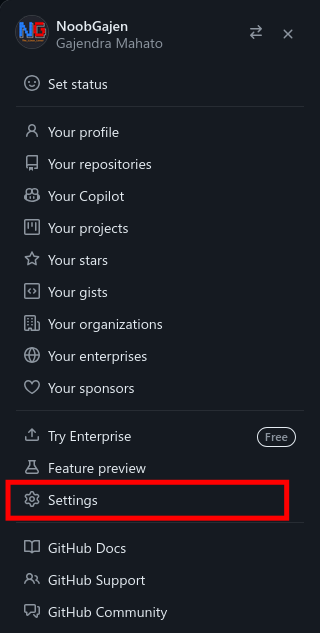
In the upper-right corner of any page, click your profile photo,
-
Then, click on Settings.
-
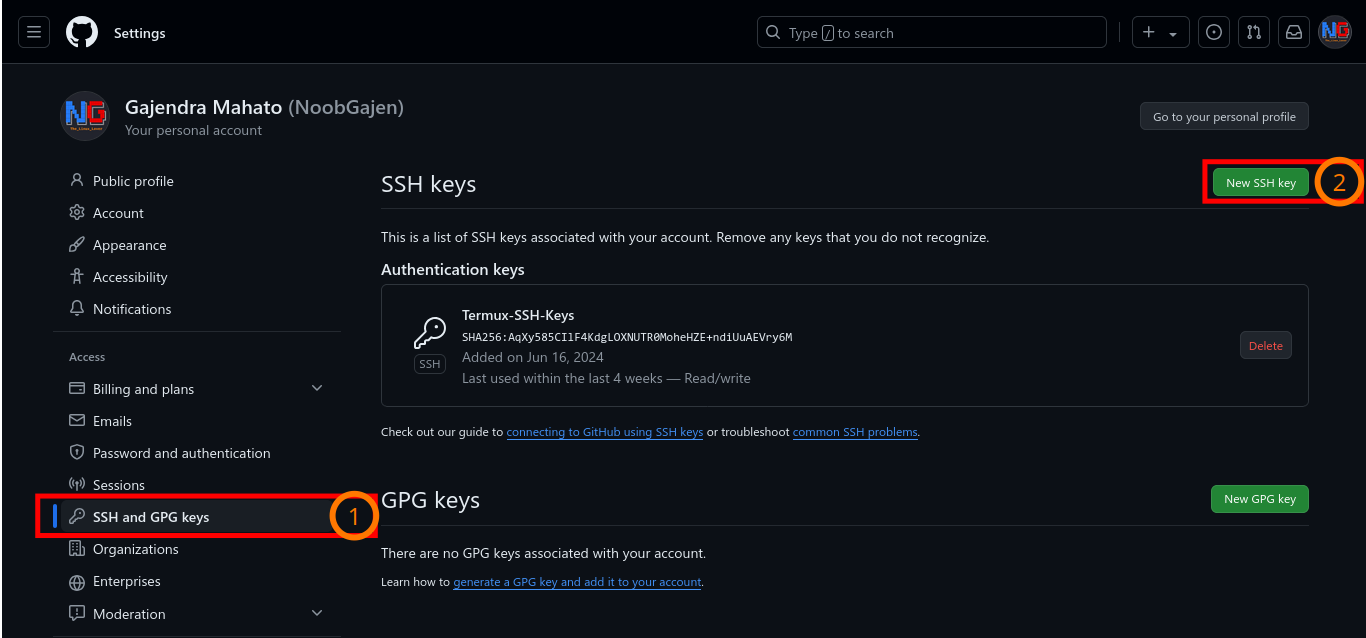
In the user settings sidebar, click SSH and GPG keys, then click on "New SSH key"
-
In the "Title" field, add a descriptive label for the new key. For example, if you're using a Linux on Virtual Machine, you might call this key "Linux on Virtual Machine". Then, Paste your public key into the "Key" field.
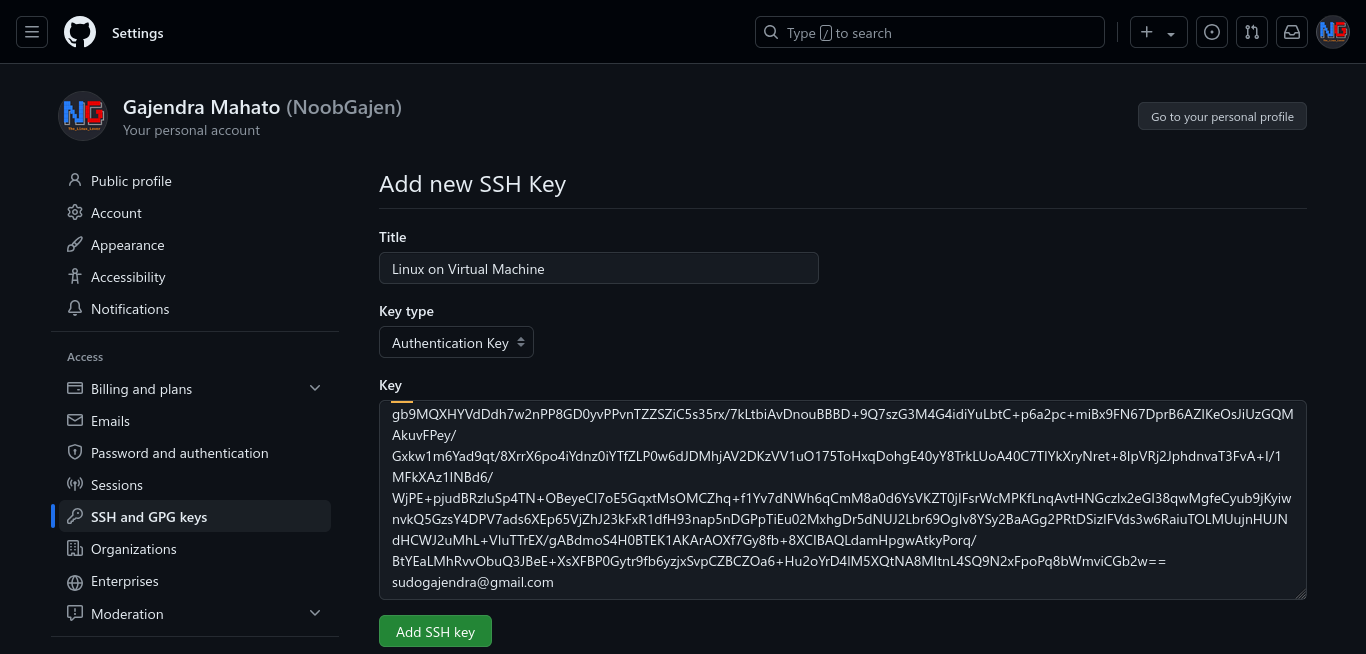


After inserting all the details, click 'Add SSH key' button. If it prompted for the password, confirm it by using your GitHub password. You will then receive a successful message, something like You have successfully added the key 'Linux on Virtual Machine'.

For more detailed steps, refer to the GitHub guide.
-
Fork the repo on GitHub to your personal account. Click the
Forkbutton on thegajabaar/2024-playgroundPublic page. (This needs to be done only once.)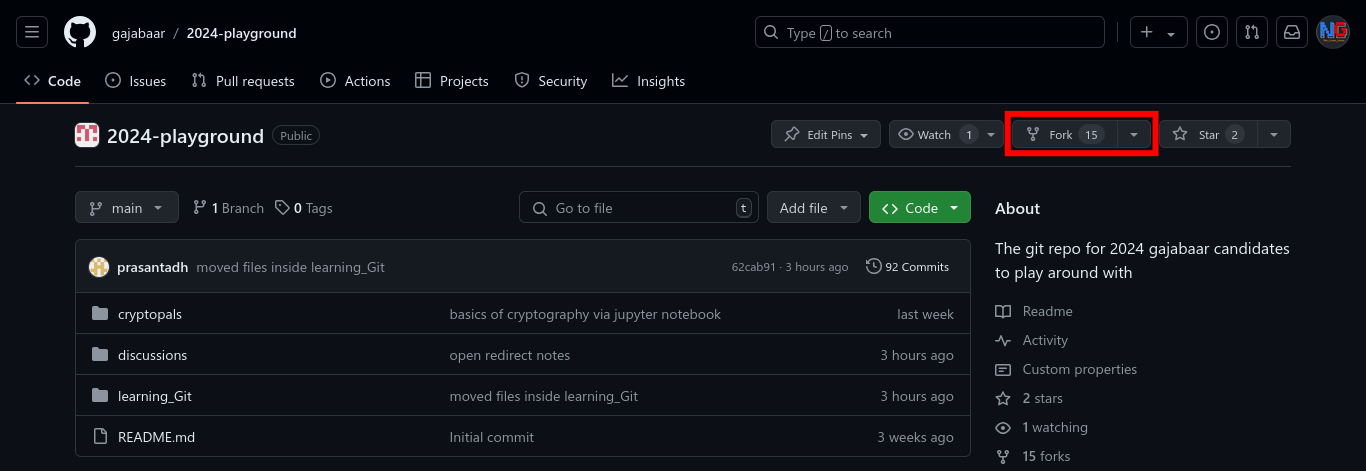
-
After clicking the Fork button, we will be redirected to a page where we can customize our forked repository. Here, we don't need to make any changes, as everything looks fine. So, we processed by clicking on
Create forkbutton.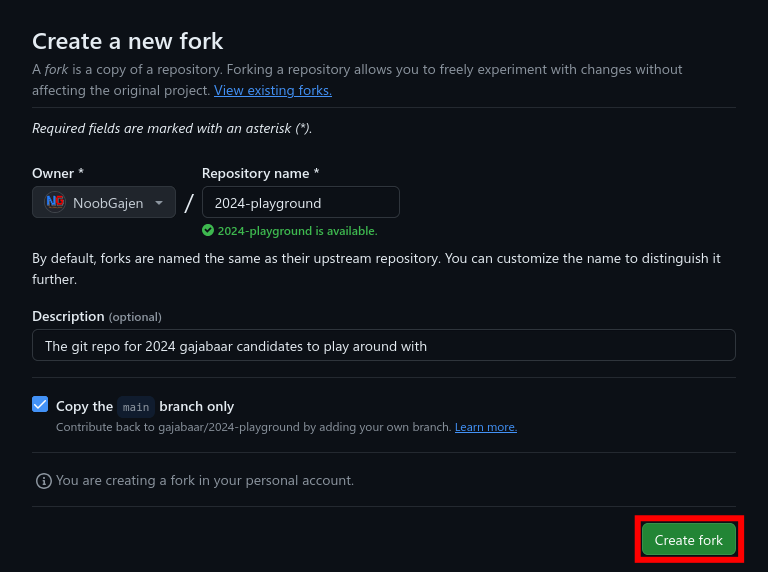
-
Clone the repository: Click on the green
Codebutton. It will open a small window. Then click onSSHand copy the repository's URL using the copy button or by manually selecting the URL. This URL will be copied to your clipboard. You can use this URL to clone the repository onto your local machine.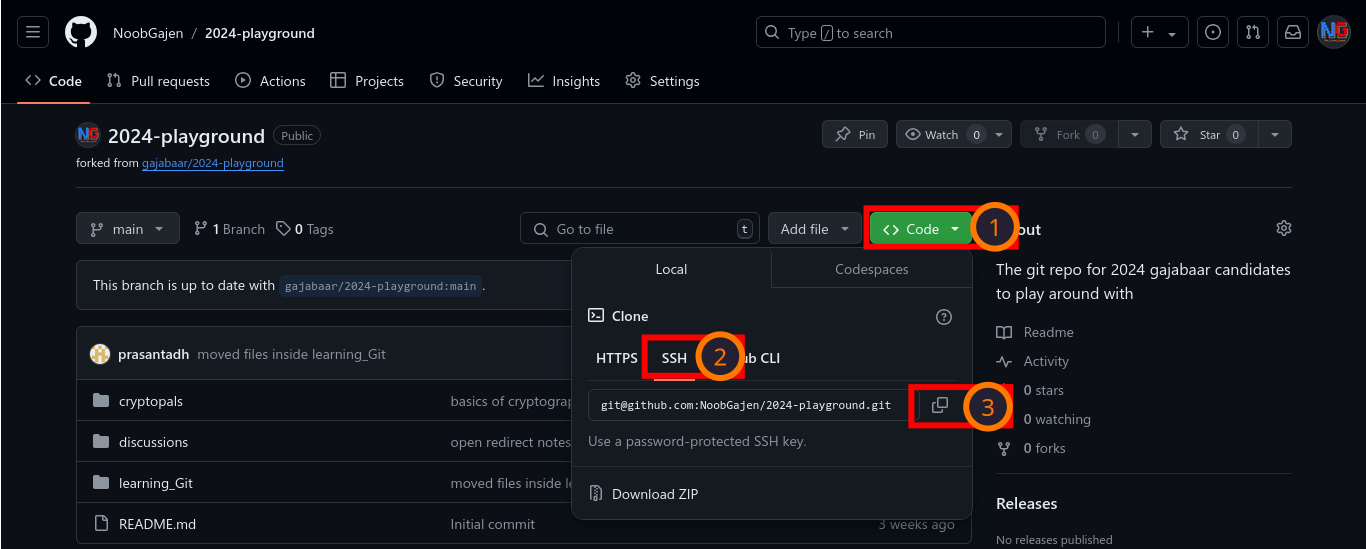
Now, with the SSH URL of your forked repository, you can use it to clone your forked repo onto your local machine using the command
git clone <repo URL>.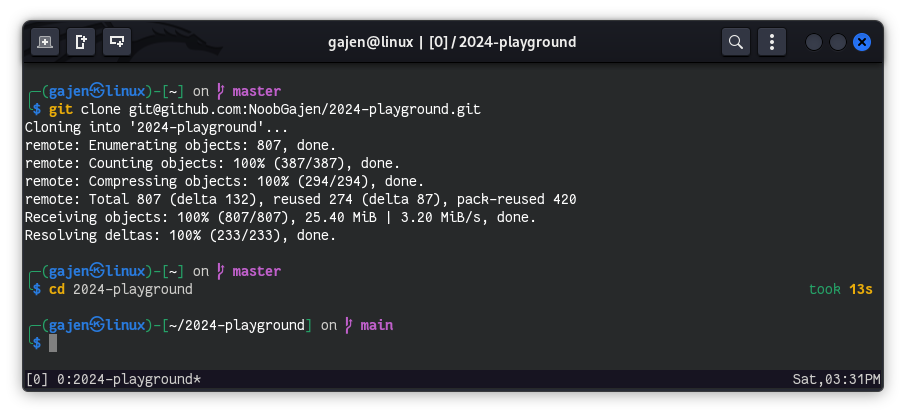
For more details, see the GitHub guide.


When working on a specific challenge, ensure your contributions are organized as follows:
- Create a directory similar to challenge name (e.g.,
learning_Gitfor learngitbranching,cryptopalsfor cryptopals ), etc., for their write-ups if directory is not present. - Within the challenge directory, create a subdirectory from your Name or username.
- Place all your work for that challenge within your subdirectory.
Example structure:
/learning_Git/your_username/your_files_and_folders_here
# Example:
# /learning_Git/GajendraMahato/1.1.introduction-sequence-write-up.md
# /learning_Git/GajendraMahato/1.2.ramping-up-write-up.md-
Navigate to Your Repository Directory:
-
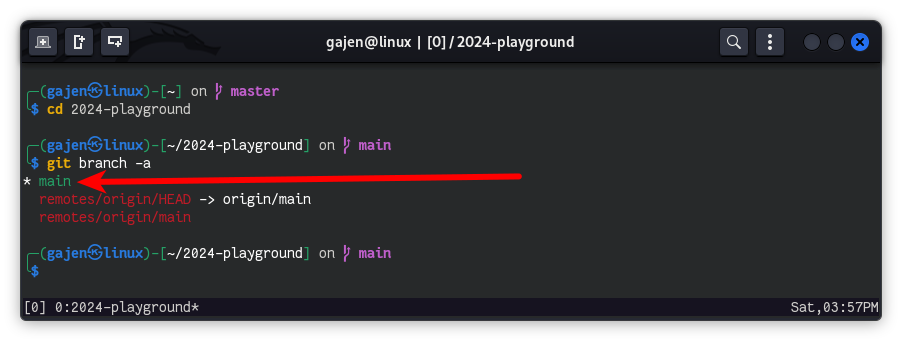
Before making any changes, ensure you are in your local repository directory using the following command:
cd 2024-playground
-
-
List Existing Branches:
-
To view all existing branches in your local repository, use the command:
git branch -a
-
-
Create and Switch to a New Branch:
- After cloning the repository, create a new branch for your changes and switch to it:
git branch your_branch_name
git checkout your_branch_name
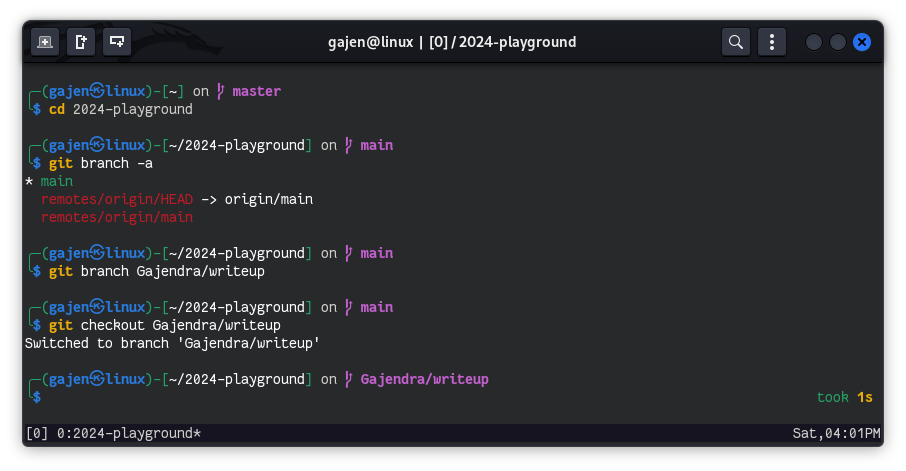
This step ensures that your changes are independent of the main branch until they are ready for integration, avoiding conflicts with other branches.
-
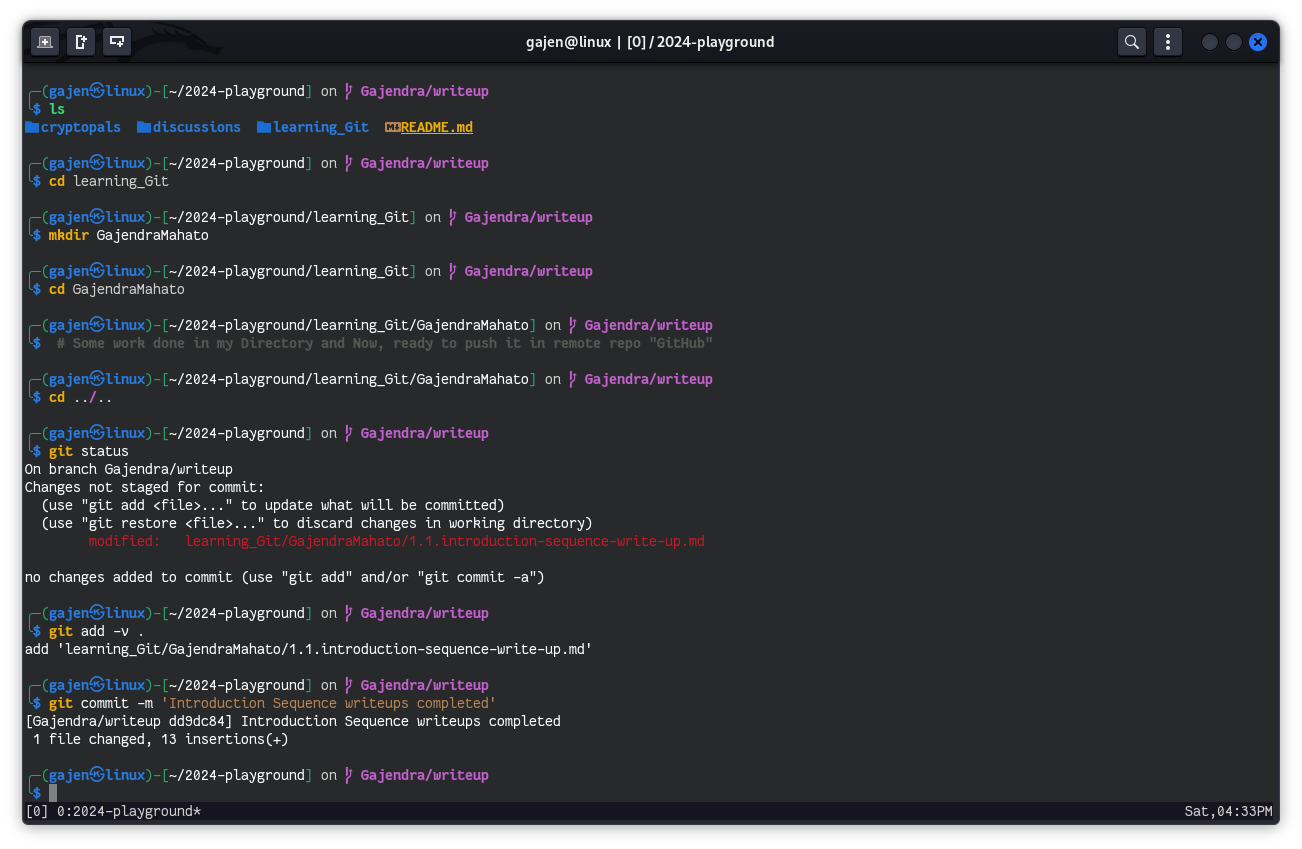
Make Changes and Commit:
-
Once you have switched to your branch, make your desired changes to the codebase:
git add .
git commit -m "Descriptive message of what you did"
-
The
git add .command stages all changes in your working directory for commit, whilegit commitrecords the changes with a descriptive message explaining the purpose of the commit.
-
-
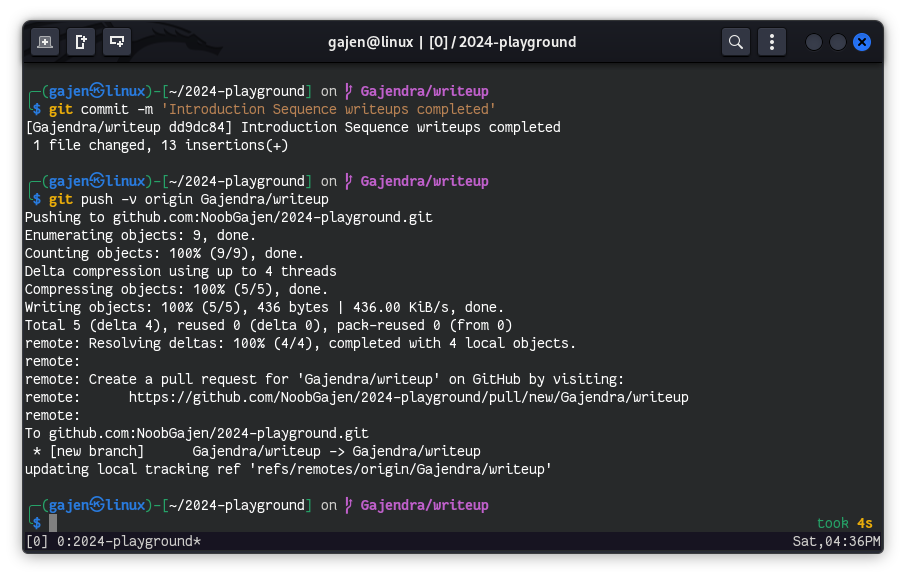
Push Your Changes:
-
Finally, push your committed changes to your forked repository on GitHub:
git push origin your_branch_name
-
This command sends your local branch and commits to the remote repository, making them accessible for collaboration and review.
-


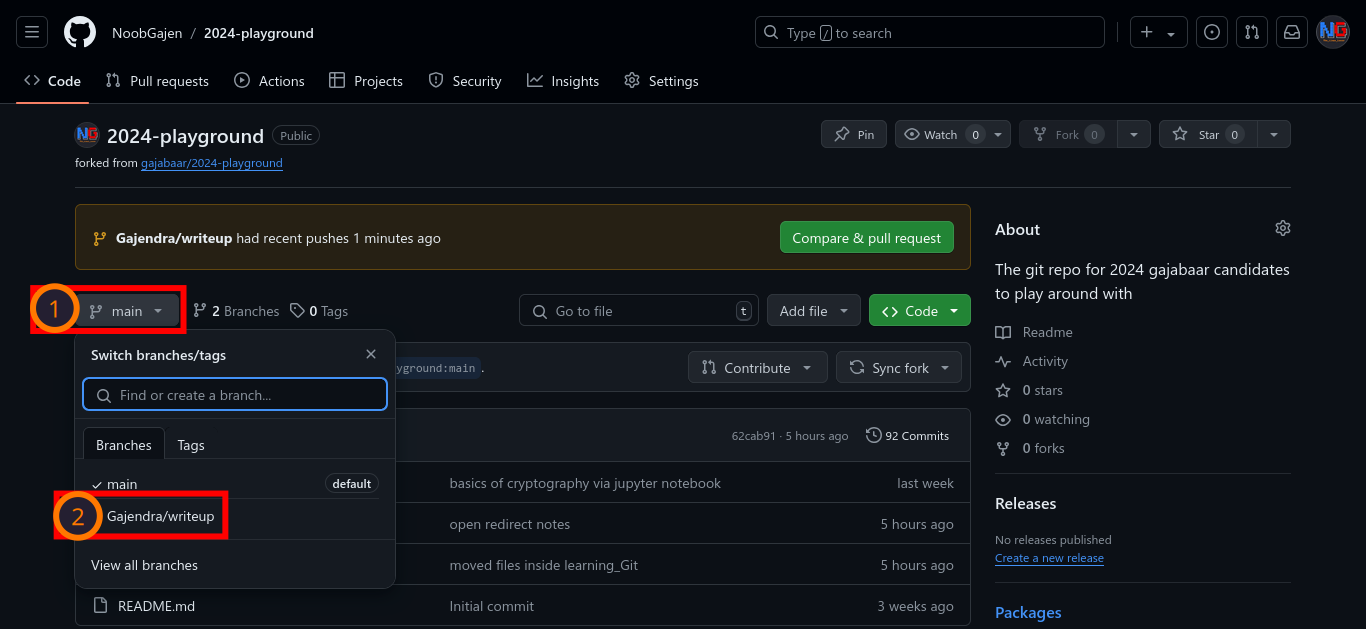
- Switch to Your Branch on GitHub:
-
Navigate to your forked repository on GitHub. Make sure you switch to the branch where you made your changes.
-
- Initiate a Pull Request:
-
Click on the green
Compare & pull requestbutton. If this button is not available, click on theContributebutton, then selectOpen a pull request.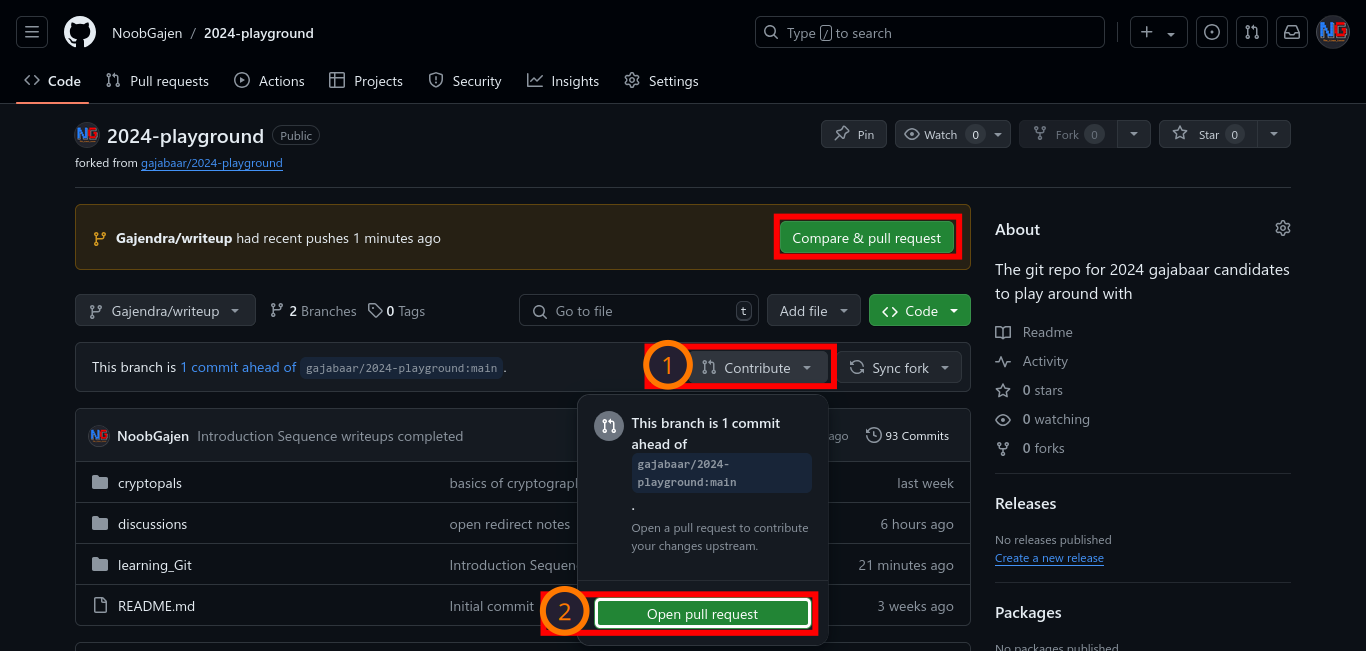
-
- Describe Your Changes:
- You will be taken to a new page where you can describe the changes you made. Provide a clear and concise description of your changes in the provided text box. This helps the repository maintainers understand the purpose and context of your modifications.
- Open the Pull Request:
-
After describing your changes, click on the
Create pull requestbutton to open your pull request.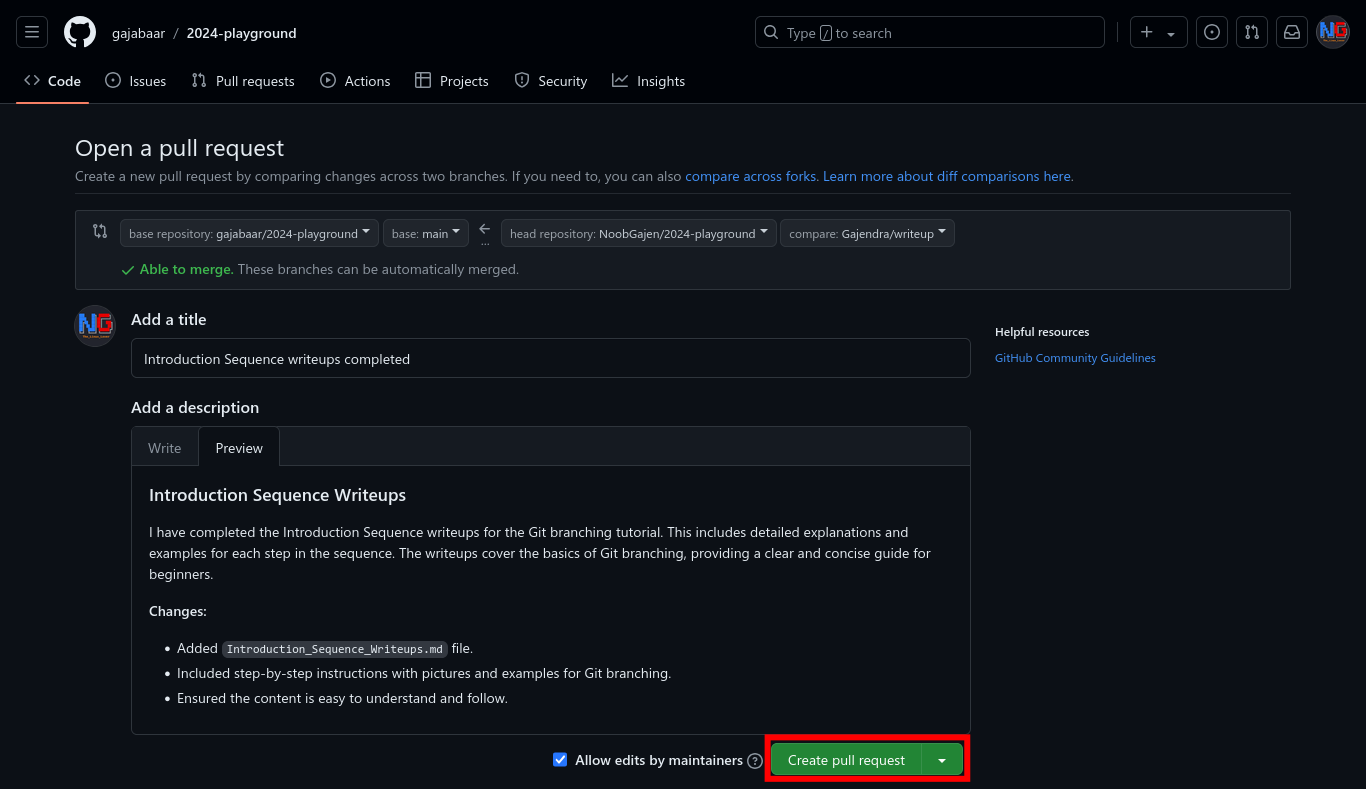
-
- Review and Feedback:
- Once your pull request is open, the repository's maintainers will review it. They will check the changes and decide whether to merge them into the main branch. If they find any issues or have suggestions, they will provide feedback. Be ready to make additional changes if requested.


To understand your Git history and key terms:
- origin: Your forked remote repository.
- upstream: The original repository you forked from.
To view a clear, graphical representation of your branches and commits, use:
git log --oneline --decorate --graph --allFor more detailed information, refer to the Git documentation.
When your pull request is under review, you have two common strategies for managing ongoing work:
-
Keep Working on Your Branch:
- Continue making changes and improvements on your existing branch while awaiting review.
-
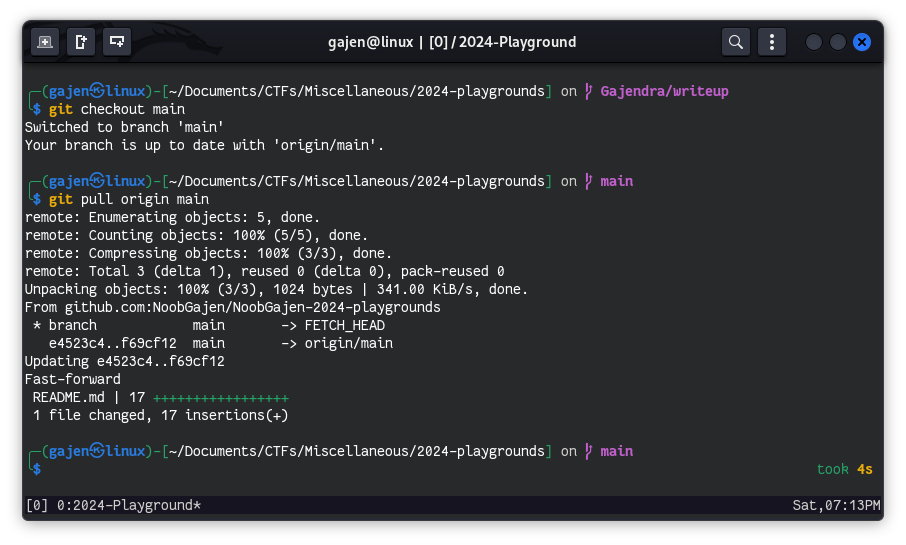
After Your Pull Request is Accepted:
-
Ensure your local
mainbranch is up-to-date:git checkout main git pull origin main
-
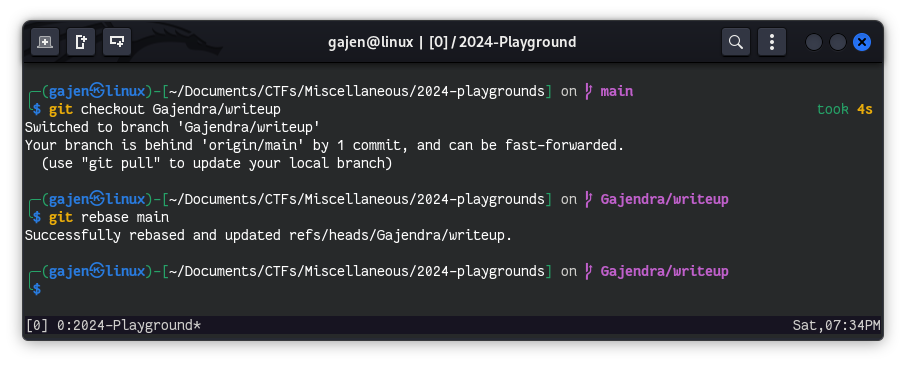
Rebase your branch on
mainto incorporate any new changes:git checkout your_branch_name git rebase main
-
Push your changes to update your pull request:
git push origin your_branch_name
This approach maintains a single separate branch for ongoing work, ensuring all changes are synchronized before finalizing the pull request.
-


-
Create a New Branch:
-
If you prefer a cleaner history in your pull request, leave the branch you used to open the pull request (
Gajendra/writeup) as it is and create a new branch such asGajendra/writeup_v1.2for further modifications:git checkout -b Gajendra/writeup_v1.2
-
-
Once the Pull Request is Accepted:
-
Sync your
mainbranch to include the latest modifications and updates:git checkout main git pull origin main
-
Rebase your new branch on
mainto incorporate the latest changes:git checkout Gajendra/writeup_v1.2 git rebase main
-
Push the changes to update your new branch:
git push origin Gajendra/writeup_v1.2
This approach requires maintaining multiple branches for ongoing work, ensuring all changes are synchronized, and maintaining a cleaner history in your pull request. So, here is some important command to maintaining branches
-
-
Delete a Branch: To delete a branch once it's merged and no longer needed:
git branch -d Gajendra/writeup
This command deletes the local branch
Gajendra/writeup. Use-Dinstead of-dto force delete a branch that hasn't been merged. -
Move/Rename a Branch: To rename the current branch you're on:
git branch -m Gajendra/writeup_v1.2 Gajendra/writeup_v1.3
This command renames the current branch from
Gajendra/writeup_v1.2toGajendra/writeup_v1.3.
By following these steps, you can contribute to the 2024-Playground repository and collaborate effectively with other contributors. Happy learning!