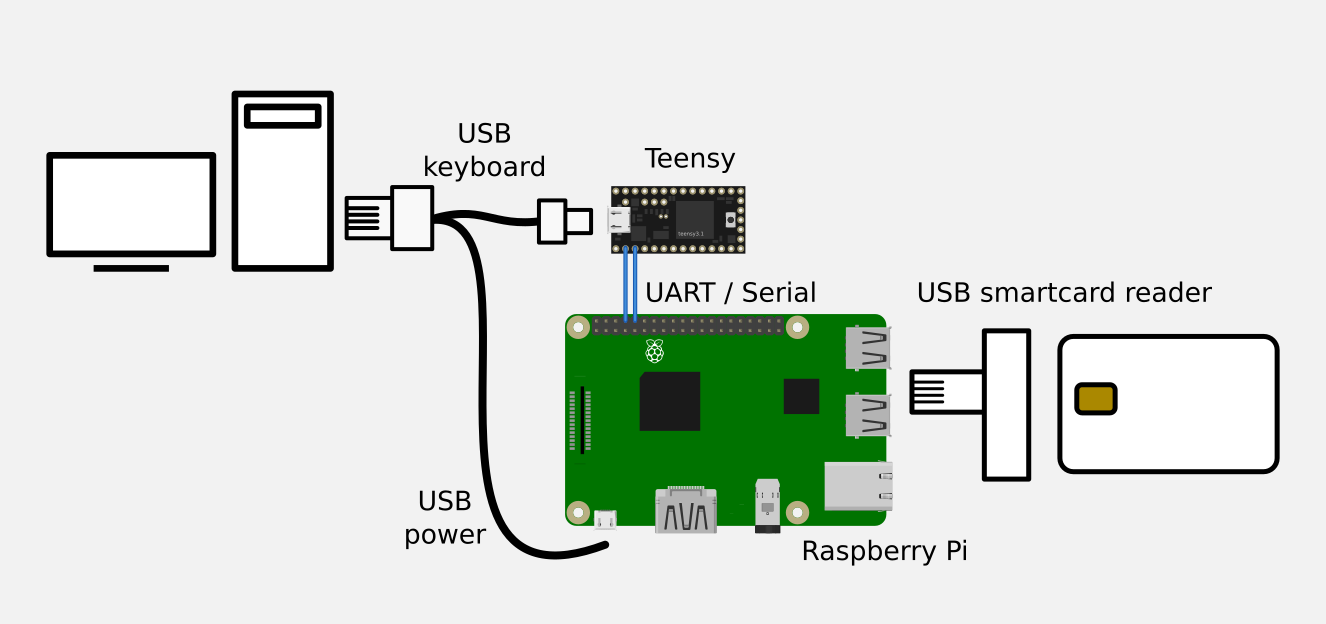
A simple java app that runs on raspberry pi and uses https://github.com/ParalelniPolis/obcanka-public to read Czech ID smartcards. It outputs JSON formatted data from the card which are then parsed and sent to a PC as keystrokes using Teensy USB board.
git clone git@github.com:ParalelniPolis/obcanka-public.gitgit clone git@github.com:premek/obcanka-reader.gitcd obcanka-publicln -s ../obcanka-reader/raspberry/obcanka-reader/ obcanka-reader- edit
settings.gradle- delete
android_app,android_liblines so you don't have to install android sdk - add
include ':obcanka-reader'
- delete
./gradlew clean build shadowJar
And copy obcanka-reader/build/libs/obcanka-reader-all.jar to Raspberry.
Tested with Teensy 3.0 and Raspberry Pi 3 Model B.
Teensy emulates the keyboard and is connected to the user PC via micro USB.
Raspberry Pi is connected to Teensy via UART / Serial line pins:
- Teensy pin 0 (RX1) to Raspberry GPIO pin 8 (UART0 TX)
- Teensy pin 1 (TX1) to Raspberry GPIO pin 10 (UART0 RX)
Raspberry GPIO and Teensy's Serial are both on the same voltage so no level conversion is needed.
Raspberry uses USB only for power.
Install Arduino IDE and Teensyduino, see https://www.pjrc.com/teensy/teensyduino.html and upload the teensy/serial-to-keyboard/serial-to-keyboard.ino sketch into your Teensy.
- download and install Raspbian image (Lite version is enough), configure user/ssh access etc
- disable serial console using
raspi-config sudo aptitude install openjdk-8-jre-headless pcscd jq- copy the following files to
/home/pion Raspberry Piobcanka-reader-all.jarobcanka-reader-run.shobcanka-reader-template.txtobcanka-reader.service
sudo mv obcanka-reader.service /lib/systemd/system/sudo chmod 644 /lib/systemd/system/obcanka-reader.servicesudo systemctl daemon-reloadsudo systemctl enable obcanka-reader.service- reboot
Emulated keyboard's output can be configured by editinag a file on Raspberry's SD card. This can be done on raspberry Pi directly or by using a SD card reader on your computer.
Edit (or create) the file named obcanka-reader-template.txt in the /boot partition.
Example:
$givenName → $surname↵
You can use any characters that would be typed directly (e.g. tab or spaces to separate fields) or the following variables that are read from the ID card.
- $serialNumber
- $cardID
- $documentNumber
- $givenName
- $surname
- $marriageStatus
- $sex
- $street
- $city
- $locality
- $countryName
- $countryCode
- $birthNumber
- $birthDate
- $birthCity
- $organization
- $dokState
- $dokTryLimit
- $dokMaxTryLimit
- $iokState
- $iokMaxTryLimit
- $iokTryLimit
- 3D printed box
- Currently only ASCII characters are typed by the emulated keyboard
- Power both boards from the same USB


