Implementation of MobileNets: Efficient Convolutional Neural Networks for Mobile Vision Applications. Give us a star if you like this repo.
This library is part of our project: Building an AI library with ProtonX. This paper describes a very small, low latency and efficient network architecture called MobileNet for mobile and embedded vision applications.
Slide about my project :
- Vietnamese version : review paper
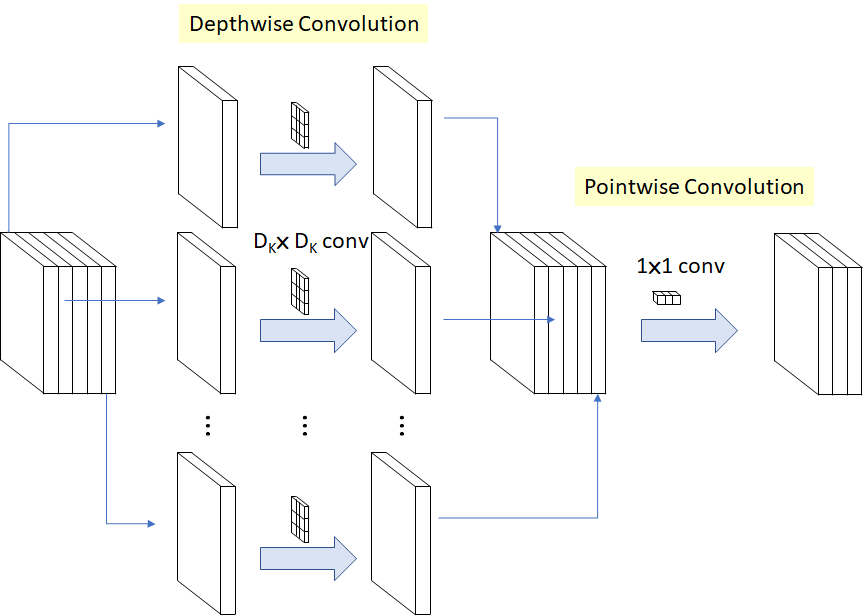
In this paper, the author used Depthwise Separable Convolution to reduce the model size and complexity.
Depthwise separable convolution is a depthwise convolution followed by a pointwise convolution as follows:
You can read more on page 2 or here
MobileNet Architecture :
To implement this paper, we use tensorflow libary with:
- Depthwise_Layer: DepthwiseConv2D >> BatchNormalization >> Relu
- Pointwise_Layer: Conv2D with 1x1 filter >> BatchNormalization >> Relu
Authors:
- Github: https://github.com/quynhtl
- Email: tranlequynh.uet@gmail.com
- Github: https://github.com/NKNK-vn
- Email: khoi.nkn12@gmail.com
- Github: https://github.com/TrungBui-Purdue-5913
- Email: buitranchitrung2002@gmail.com
Advisors:
- Github: https://github.com/bangoc123
- Email: protonxai@gmail.com
-
Step 1: Make sure you have installed Miniconda. If not yet, see the setup document here
-
Step 2:
cdintoMobileNetand use command line
conda env create -f environment.yml
- Step 3: Run conda environment using the command
conda activate mobile_net
- Download the data:
- Download dataset here
- Extract file and put folder
trainandvalidationto./data
- train folder was used for the training process
- validation folder was used for validating training result after each epoch
This library use ImageDataGenerator API from Tensorflow 2.0 to load images. Make sure you have some understanding of how it works via its document
Structure of these folders in ./data
train/
...cats/
......cat.0.jpg
......cat.1.jpg
...dogs/
......dog.0.jpg
......dog.1.jpg
validation/
...cats/
......cat.2000.jpg
......cat.2001.jpg
...dogs/
......dog.2000.jpg
......dog.2001.jpg
Review training on colab:
Training script:
python train.py --epochs ${epochs} --num-classes ${num_classes} You want to train a model in 10 epochs for binary classification problems (with 2 classes)
Example:
python train.py --epochs 10 --num-classes 2 There are some important arguments for the script you should consider when running it:
train-folder: The folder of training datavalid-folder: The folder of validation datamodel-folder: Where the model after training savednum-classes: The number of your problem classes.batch-size: The batch size of the datasetimage-size: The image size of the datasetalpha: Width Multiplier. It was mentioned in the paper on page 4rho: Resolution Multiplier, It was mentioned in the paper on page 4
If you want to test your single image, please run this code:
python predict.py --test-file-path ${link_to_test_data}If you want to evaluate your model, please run this code:
python model/tests/model_test.py --test-folder ${link_to_test_folder}My implementation
Epoch 66/70
125/125 [==============================] - 39s 309ms/step - loss: 0.1861 - acc: 0.9280 - val_loss: 0.3813 - val_acc: 0.8500
Epoch 67/70
125/125 [==============================] - 39s 309ms/step - loss: 0.1812 - acc: 0.9305 - val_loss: 0.3837 - val_acc: 0.8590
Epoch 68/70
125/125 [==============================] - 39s 309ms/step - loss: 0.1721 - acc: 0.9320 - val_loss: 0.3816 - val_acc: 0.8600
Epoch 69/70
125/125 [==============================] - 39s 309ms/step - loss: 0.1841 - acc: 0.9285 - val_loss: 0.3826 - val_acc: 0.8610
If you meet any issues when using this library, please let us know via the issues submission tab.


