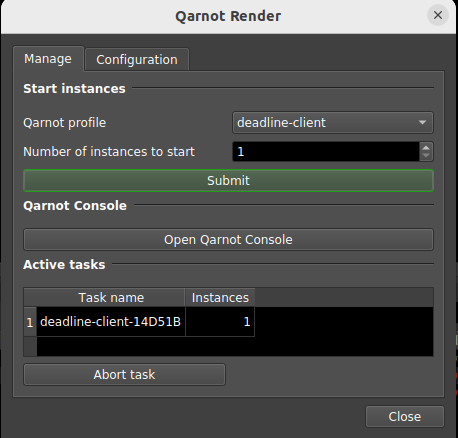
The Qarnot integration for Deadline, based on a python module + a Deadline Monitor UI script:
-
The Deadline Monitor UI script
QarnotRendercan be found in theScriptsmenu: -
The python module
qarnot_render_deadlinecan be used this way:import qarnot_render_deadline q_render_deadline = qarnot_render_deadline.QarnotRenderDeadline( client_token="YOUR_API_TOKEN", cluster_url="https://api.qarnot.com" ) q_render_deadline.create_instances("deadline-client-10.1-blender-2.91", 2) # Deadline workers will appear in Deadline Monitor once the task is fully # dispatched. You can then launch Deadline jobs against those machines # and, once you're done, shut the workers down with: q_render_deadline.stop_instances()
It has been tested with Deadline v10.1.3.6 but should work with any Deadline version.
-
python module and dependencies
The file qarnot_render_deadline.py must be manually copied on the machine running the Deadline Monitor to:
- on Linux:
/opt/Thinkbox/Deadline10/lib/python2.7/site-packages/qarnot_render_deadline.py- on Windows (Warning: if you download the RAW file from github, make sure that the extension ".txt" was not added to the python file and remove it if needed):
C:\Program Files\Thinkbox\Deadline10\bin\Lib\site-packages\qarnot_render_deadline.pyThe
qarnotmodule also has to be installed with:- on Linux:
# Update Qarnot Python SDK to the python 2.7 version (used by Deadline)
# If git is not installed, use "https://github.com/qarnot/qarnot-sdk-python-27/archive/refs/heads/master.zip"
# instead, like on Windows (see below)
pip install -U --target /opt/Thinkbox/Deadline10/lib/python2.7/site-packages git+https://github.com/qarnot/qarnot-sdk-python-27.git
- on Windows:
# Update Qarnot Python SDK to the python 2.7 version (used by Deadline)
py -m pip install -U --target "C:\Program Files\Thinkbox\Deadline10\bin\Lib\site-packages" "https://github.com/qarnot/qarnot-sdk-python-27/archive/refs/heads/master.zip"
-
Deadline Monitor UI script
The file custom/scripts/General/QarnotRender.py must be copied in the Deadline repository's
customdirectory:<repo_path>/custom/scripts/General/QarnotRender.py
The qarnot_render_deadline.py module has a CONFIGURATION section at the beginning of the file that needs to be filled:
######## CONFIGURATION #########################################################
self.license_server = ""
self.license_mode = "Standard"
# Your Deadline Remote Connection Server (RCS) in the form "hostname:port"
self.repository = ""
# Path to your "Deadline10RemoteClient.pfx" file
self.proxy_crt = r""
# The optional certificate password
self.proxy_crt_pwd = ""
self.proxy_ssl = "True"
######## CONFIGURATION #########################################################
Please note that qarnot_render_deadline.py is only read at startup so you need to relaunch Deadline Monitor after modifying the configuration.
The configuration is done manually in qdeadline.py for now but all those options will eventually be exposed in the Deadline Monitor UI.
The task's data are available in the environement variable TASK_PATH (which equals /job by default).
If your renderer/DCC supports environment variables, it is better to use TASK_PATH directly. Though, most of the time this is not the case, so you can also use /job directly. And if you need this path to be renamed to a custom value (like /work or /prod, etc) to match your on-premise setup, please contact the support team through the chat present in the Qarnot Console).
Data written to TASK_PATH are uploaded to the output bucket every 5 minutes and when the task is aborted.
