Rig Builder is a flexible UI maker for python scripts. Mostly used in Maya rigging but can be adapted for any other purposes.
Add rigBuilder folder to your script path and run the following:
import rigBuilder
rigBuilder.mainWindow.show() | Name | Description |
|---|---|
| modules | All modules in xml |
| qss | Dark style |
| utils | Utilities such as yapf for python formatting |
| widgets | Attribute widgets |
| classes.py | Definition of the two main classes: Attribute and Module |
| editor.py | Python code editor |
| templateWidgets.py | Widgets set up here |
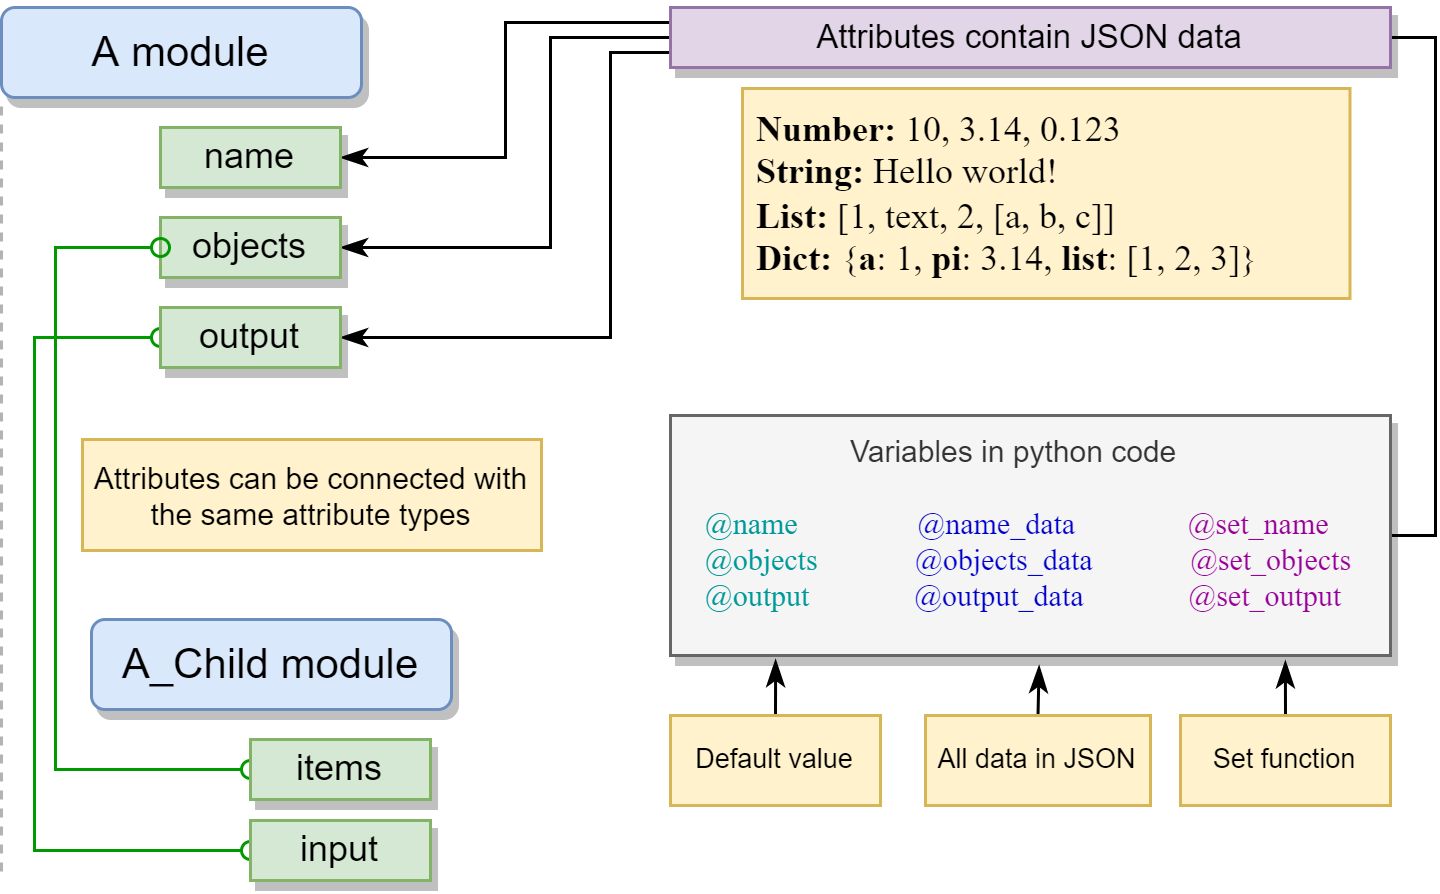
The main working element is a module. The module is a container with attributes and executable Python code. Modules can be hierarchically linked. Data is stored in attributes. Attribute is a field that contains json-compatible data:
- Numbers - 12, 3.14, -0.123
- Strings - Hello world!
- Lists - [This, list, [1,2,3]]
- Dictionaries - {a: 1, b: 2, list:[1,2,3]}
The attributes store all the information about the corresponding widget. By transmitting such information, connections are implemented.
Modules are launched sequentially from top to bottom in the hierarchy, starting from the current module. In the module code, its own attributes are available as variables with the @ prefix.
There are three kinds of variables for each attribute:
- Default value (@).
Attribute name prefixed with @:@input,@curve.
This is the value that the widget represents. - All attribute data (@_data).
@input_data,@curve_data.
By changing this data, you can edit the behavior of the widget. - Attribute value setting function (@set)
@set_input(3),@set_list([1,2,3,4])
This sets the default value of the attribute.
When saved, the module contains all its children recursively, so it's safe to transfer the topmost module only. Each saved module has its own unique id (uuid), which is used in reference resolving when the module is loading. By default, when a module with uuid is loading, it tries to update its own data by finding the reference module in the following sequence:
- Search module with the same uuid in local path.
- If not found, search in server path.
- If not found, load from the current file.
You can change the loading behavior in the Module Selector (when TAB pressed).
This approach allows you to work on modules (locally) and at the same time not have problems with existing modules on server.
Module attributes can be connected to each other. You can connect either to parent attributes or to adjacent ones in any nesting. Thus, any parent module can always be considered completely independent (since no child can communicate with attributes above the parent). Only attributes with the same widget type can be connected. Connections are bidirectional - you can change either end of the connection.
In general, the code is written in the usual way, except that you can use attribute variables using @ like @set_output(@input * 2)
In addition, several predefined variables and functions are available:
| Variable | Description |
|---|---|
| MODULE_NAME | Current module name |
| MODULE_TYPE | Current module type |
| SHOULD_RUN_CHILDREN | If False then don’t run children |
| SELF | Current module as Module class |
| Channel | Attributes accessor. See below |
| copyJson (function) | Fast copy json-compatible data |
| error/warning (function) | Error/warning in log |
| evaluateBezierCurve (function) | For curve widget. Evaluate point on bezier f(@curve, param) => [x, y] |
| evaluateBezierCurveFromX (function) | For curve widget. Find such point P(x, y), that P.x = param, f(@curve, param) => [x, y] |
Modules can access parent and neibour attributes using Channel approach. Channels have get and set methods.
input = Channel(SELF.parent, "/input") # access 'input' attribute of the parent module
input.set("hello world")
Actually channels can be used to find and obtain any attribute handle for reading/writing.
someAttr = Channel(SELF, "/someChild/someAttr").get() # get current module's 'someChild' child module and its 'someAttr' attributeCurrently a lot of widgets available for your attributes.
If you want to create new attribute widget, you need to define a class derived from TemplateWidget (defined in widgets/base.py).
For this class, you need to implement two functions:
-
getJsonData()
The function should return the state of the widget in json format, where the key "default" must point to another key, which will be the default value for the attribute.
For example, {"text": "hello world", "default": "text"} -
setJsonData(data)
The function should set the widget to match data. By executing setJsonData(getJsonData ()) the widget must guarantee that the state will not change.
Any changes in the state of the widget must be recorded by emitting somethingChanged slot of the base class. For example, stateChanged, textChanged, and other slots must emit self.somethingChanged.emit() directly or indirectly. Thus, working with the interface, the program receives all registered changes to the widget and saves the json state to the corresponding attribute of the module.
After writing the class, you need to add the loading of the widget to widgets/__init__.py.
And finally, in templateWidgets.py you need to register the name of the created widget in the TemplateWidgets variable.
Below is an example of a custom checkBox widget. Notice the class name and the implementation of the two main methods getJsonData and setJsonData.
from .base import *

class CheckBoxTemplateWidget(TemplateWidget):
    def __init__(self, **kwargs):
        super(CheckBoxTemplateWidget, self).__init__(**kwargs)

        layout = QVBoxLayout()
        self.setLayout(layout)
        layout.setContentsMargins(0, 0, 0, 0)

        self.checkBox = QCheckBox()
        self.checkBox.stateChanged.connect(self.somethingChanged)
        layout.addWidget(self.checkBox)

    def getJsonData(self):
        return {"checked": self.checkBox.isChecked(), "default": "checked"}

    def setJsonData(self, value):
self.checkBox.setChecked(True if value["checked"] else False)Each module can be run in Maya in a separate window.
import rigBuilder
rigBuilder.RigBuilderTool("Tools/ExportBindPose.xml", x=500, y=200, width=400, height=200).show() # path can be relative or absolute