vwifi implements a minimal interface to achieve basic functionalities,
such as scanning dummy Wi-Fi network, connecting, and disconnecting from it.
vwifi is based on cfg80211 subsystem,
which works together with FullMAC drivers. At present, it supports station mode and Host AP mode.
The following packages must be installed before building vwifi.
In order to compile the kernel driver successfully, package versions of currently used kernel, kernel-devel and kernel-headers need to be matched.
$ sudo apt install linux-headers-$(uname -r)Since vwifi relies on the Linux wireless (IEEE-802.11) subsystem, iw is necessary for retrieving more information and configuring:
sudo apt install iwIf you're going to run the test script(scripts/verify.sh), python3, hostapd and some packages
are necessary:
sudo apt install python3 python3-pip hostapd
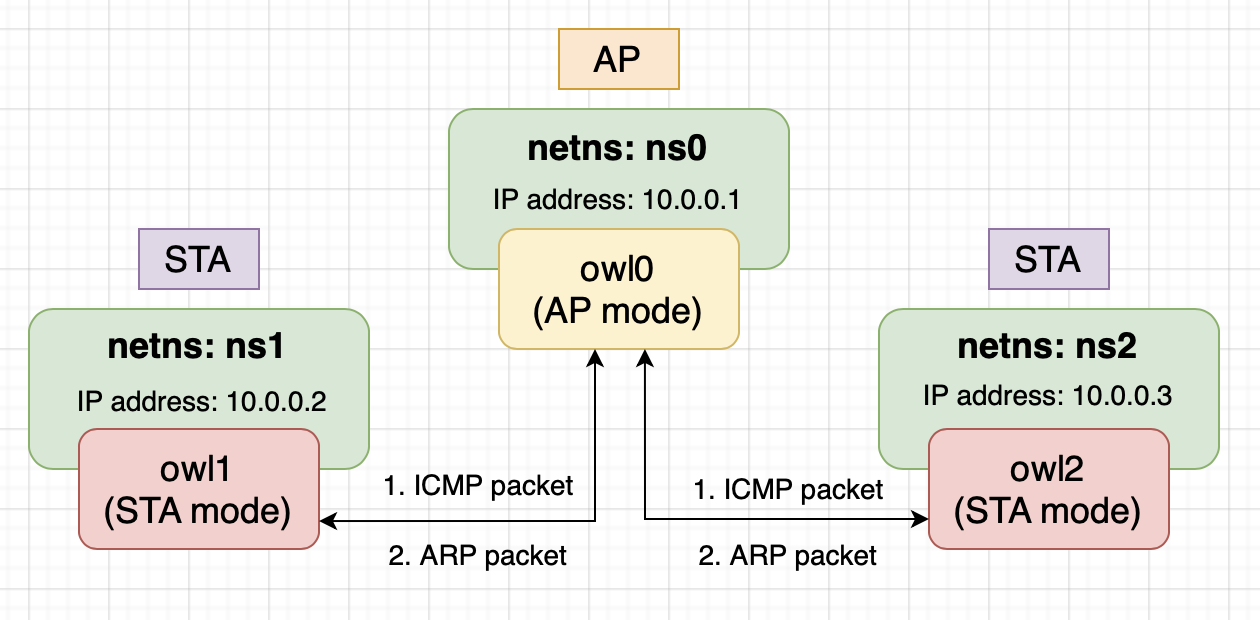
pip3 install numpy matplotlibIn our testing environment, we have one AP and two STA.
The testing environment is running in IEEE 802.11 infrastructure BSS, so it comes to a constraint: STA cannot talk to other STAs directly. Once a STA want to communicate to others, it must pass the packets to AP, and then AP will do the following stuff based on the packet type: 1. unicast: if the packet is for another STA, then pass it to the STA and do not pass to protocol stack, otherwise (packet is for AP itself) pass it to protocol stack. 2. broadcast: pass packet to another STA except the source STA, then pass it to protocol stack. 3. multicast: do the same thing as broadcast.
In order to test the network enviroment, we can make use of the Linux network namespace. Linux network namespace can isolate a network environment from the host, i.e., with its own routes, firewall rules, and network devices. In fact, it's logically another copy of the network stack.
Without network namespace, once we create virtual interfaces (shares the same network namesapce) and we start to transmit/receive packets between them, kernel will use loopback device for packet transmission/reception because kernel found that the sender and receiver is on the same host.
In conclusion, all the interfaces created by vwifi in our testing environment will be added to a isolated network naemspace.
Run make to build the kernel module:
makeLoad cfg80211 kernel module:
sudo modprobe cfg80211Insert vwifi driver. In this case, vwifi will create three interfaces for us:
(you can change the parameter "station" on your favor)
sudo insmod vwifi.ko station=3We can only create interfaces in station mode in the initilization phase, but don't worry, they can be turned to Host AP mode by hostapd afterward.
Check network interfaces:
ip linkThere should be an entry starting with owl0, owl1 and owl2, which are exactly the interfaces created by vwifi.
Show available wireless interfaces:
sudo iw devYou should get something like the following:
phy#13
	Interface owl2
		ifindex 16
		wdev 0xd00000001
		addr 00:6f:77:6c:32:00
		type managed
phy#12
	Interface owl1
		ifindex 15
		wdev 0xc00000001
		addr 00:6f:77:6c:31:00
		type managed
phy#11
	Interface owl0
		ifindex 14
		wdev 0xb00000001
		addr 00:6f:77:6c:30:00
		type managed
As you can see, all interfaces own its phy (struct wiphy), which means
they can be put into the separate network namespaces.
Dump wireless information:
sudo iw listReference output:
Wiphy phy13
	max # scan SSIDs: 69
	max scan IEs length: 0 bytes
	max # sched scan SSIDs: 0
	max # match sets: 0
	Retry short limit: 7
	Retry long limit: 4
	Coverage class: 0 (up to 0m)
	Available Antennas: TX 0 RX 0
	Supported interface modes:
		 * managed
		 * AP
	Band 1:
		Bitrates (non-HT):
			* 1.0 Mbps
			* 2.0 Mbps
			* 5.5 Mbps
			* 11.0 Mbps
		Frequencies:
			* 2437 MHz [6] (20.0 dBm)
	Supported commands:
		 * set_interface
		 * start_ap
		 * set_wiphy_netns
		 * set_channel
		 * connect
		 * disconnect
	software interface modes (can always be added):
	interface combinations are not supported
	Device supports scan flush.
	max # scan plans: 1
	max scan plan interval: -1
	max scan plan iterations: 0
	Supported extended features:
Wiphy phy14
	... (omit)
Wiphy phy15
	... (omit)
The "managed mode" in Supported interface modes is identical to station mode.
Get station informations of owl0:
sudo iw dev owl0 station get 00:6f:77:6c:30:00You should get something as following:
Station 00:6f:77:6c:30:00 (on owl0)
	inactive time:	600260 ms
	rx bytes:	0
	rx packets:	0
	tx bytes:	0
	tx packets:	0
	tx failed:	0
	signal:  	-33 dBm
	current time:	1655310275763 ms
Then, create three network namespaces:
sudo ip netns add ns0
sudo ip netns add ns1
sudo ip netns add ns2
Put the three interfaces into separate network namespaces:
(actually, we put the wiphy into network namespace, and the
interface on top of the wiphy will be in there.)
sudo iw phy phy11 set netns name ns0
sudo iw phy phy12 set netns name ns1
sudo iw phy phy13 set netns name ns2
Then, bring up the three interfaces:
sudo ip netns exec ns0 ip link set owl0 up
sudo ip netns exec ns1 ip link set owl1 up
sudo ip netns exec ns2 ip link set owl2 up
Running hostapd based on the script scripts/hostapd.conf:
interface=owl0
driver=nl80211
ssid=TestAP
channel=6
Make sure running hostapd in the network namespace that owl0 is in:
sudo ip netns exec ns0 hostapd -B scripts/hostapd.confNow, that's assign IP address for each interface:
sudo ip netns exec ns0 ip addr add 10.0.0.1/24 dev owl0
sudo ip netns exec ns1 ip addr add 10.0.0.2/24 dev owl1
sudo ip netns exec ns2 ip addr add 10.0.0.3/24 dev owl2
Then ping owl2 (10.0.0.3) by owl1 (10.0.0.2):
sudo ip netns exec ns1 ping -c 1 10.0.0.3You should fail to ping owl2 by owl1, it's normal.
Because they haven't connected to AP owl0 (SSID: TestAP),
and STA are not allowed to communicate with others without
the intervention of AP.
Then, perform scanning on owl1:
sudo ip netns exec ns1 iw dev owl1 scanYou should get the following:
BSS 00:6f:77:6c:30:00(on owl1)
	TSF: 1859697982 usec (0d, 00:30:59)
	freq: 2437
	beacon interval: 100 TUs
	capability: ESS (0x0001)
	signal: -43.00 dBm
	last seen: 0 ms ago
	SSID: TestAP
Do the same thing to owl2.
Then connect owl1 and owl2 to AP owl0 (SSID: TestAP):
sudo ip netns exec ns1 iw dev owl1 connect TestAP
sudo ip netns exec ns2 iw dev owl2 connect TestAP
Validate the connection:
sudo ip netns exec ns1 iw dev owl1 linkReference output:
Connected to 00:6f:77:6c:30:00 (on owl1)
	SSID: TestAP
	freq: 2437
	RX: 0 bytes (0 packets)
	TX: 0 bytes (0 packets)
	signal: -31 dBm
Finally, we can do the ping test:
- ping between two STA (
owl1,owl2)
sudo ip netns exec ns1 ping -c 4 10.0.0.3You should get something like the following:
PING 10.0.0.3 (10.0.0.3) 56(84) bytes of data.
64 bytes from 10.0.0.3: icmp_seq=1 ttl=64 time=0.188 ms
64 bytes from 10.0.0.3: icmp_seq=2 ttl=64 time=0.147 ms
64 bytes from 10.0.0.3: icmp_seq=3 ttl=64 time=0.082 ms
64 bytes from 10.0.0.3: icmp_seq=4 ttl=64 time=0.136 ms

--- 10.0.0.3 ping statistics ---
4 packets transmitted, 4 received, 0% packet loss, time 3036ms
rtt min/avg/max/mdev = 0.082/0.138/0.188/0.037 ms- ping between AP (
owl0) and STA (owl2)
sudo ip netns exec ns2 ping -c 4 10.0.0.1You should get something like the following.
PING 10.0.0.1 (10.0.0.1) 56(84) bytes of data.
64 bytes from 10.0.0.1: icmp_seq=1 ttl=64 time=0.342 ms
64 bytes from 10.0.0.1: icmp_seq=2 ttl=64 time=0.054 ms
64 bytes from 10.0.0.1: icmp_seq=3 ttl=64 time=0.106 ms
64 bytes from 10.0.0.1: icmp_seq=4 ttl=64 time=0.063 ms

--- 10.0.0.1 ping statistics ---
4 packets transmitted, 4 received, 0% packet loss, time 3058ms
rtt min/avg/max/mdev = 0.054/0.141/0.342/0.117 ms
We can simply run the test script scripts/verify.sh for doing all the operations above.
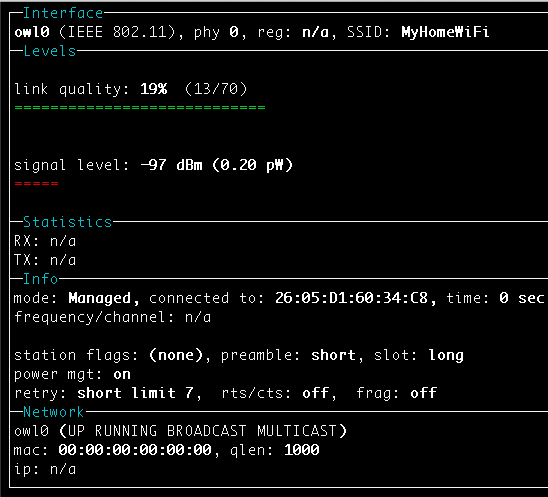
Optional, you can use wireless device monitoring applications such as wavemon to
watch signal and noise levels, packet statistics, device configuration and network parameters of vwifi.
sudo apt install wavemonvwifi is released under the MIT license. Use of this source code is governed
by a MIT-style license that can be found in the LICENSE file.
- mac80211_hwsim: software simulator of 802.11 radio(s) for mac80211
- Emulating WLAN in Linux - part I: the 802.11 stack
- Emulating WLAN in Linux - part II: mac80211_hwsim
- virt_wifi: a completet virtual wireless driver that can be used as a wrapper around Ethernet.
- vwifi: simulate Wi-Fi (802.11) between Linux Virtual Machines.

