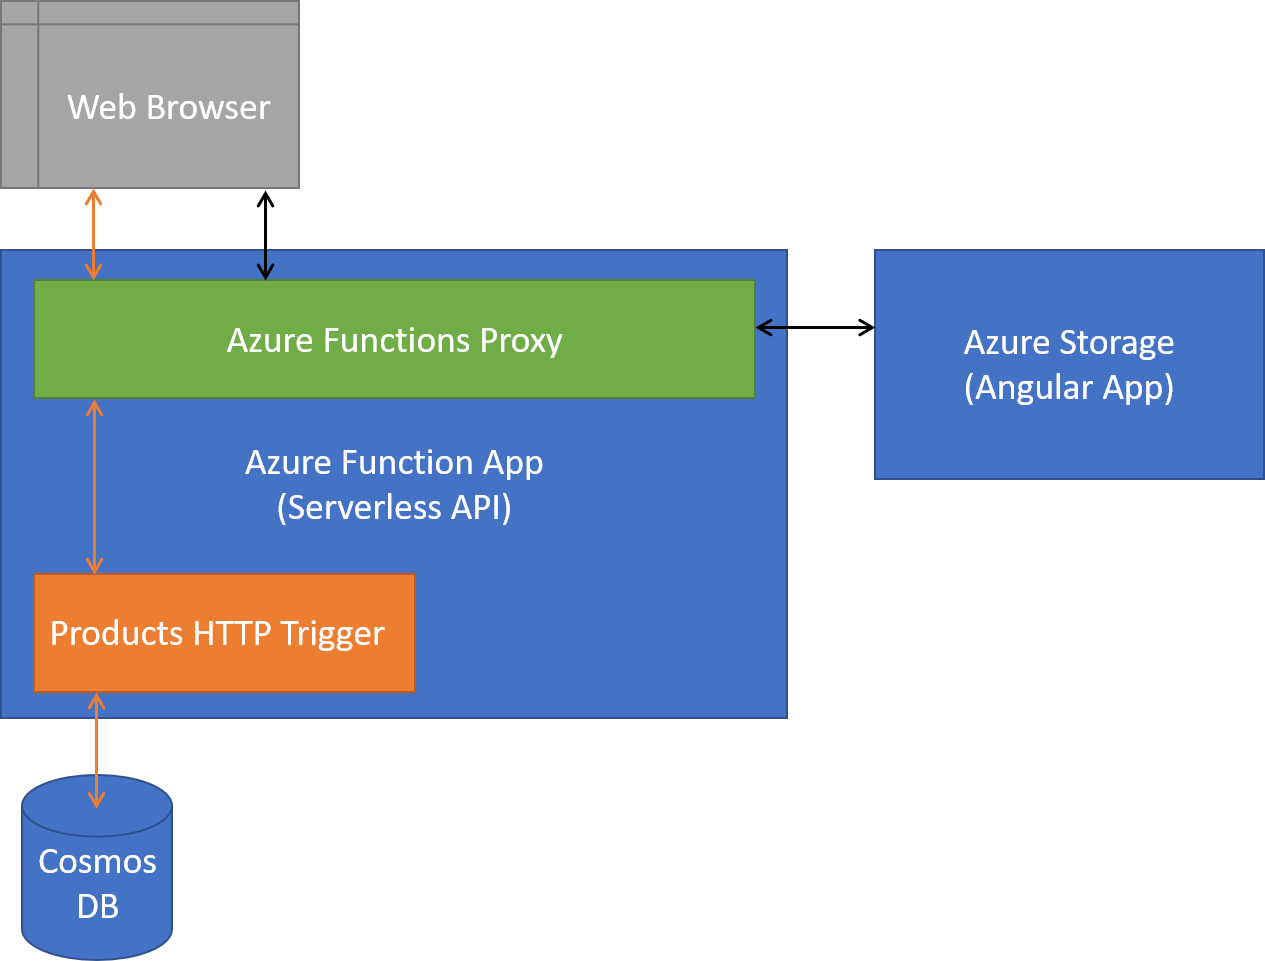
This app is built using Angular on the front end and Azure Functions on the back end with data coming from Azure Cosmos DB.
You'll need the following installed to run this application locally.
- Node.js and npm
- Azure Functions Core Tools
This app uses both Angular and Azure Functions and some configuration is required to connect the two together when running locally.
Once cloned, run npm install then open in VS Code and install the recommended
extensions. Rename functions/example.local.settings.json to
functions/local.settings.json and update the database connection settings with
the endpoint and master key from your Cosmos DB database (using the native SQL
API).
Open the app in VS Code and hit F5 (from the menu: Debug > Start Debugging).
When running the app locally, the Angular app runs using the development server
like you're used to (live reload continues to work). An Angular Proxy routes
requests to localhost:4200/api to the Azure Function app that's running
locally.
The Azure Functions runtime is installed as part of the Azure Functions Core Tools and hosts the Serverless Functions locally on your machine to simulate exactly how the app will run when deployed.
The compound launch configuration makes it possible to hit breakpoints for both the Angular app and the Azure Functions app.
This example requires a Cosmos DB SQL database. To connect to the database, use
functions/local.settings.json to configure the connection to the database.
You also need to enable CORS for local development, which is also done in local settings as seen below.
{
  "IsEncrypted": false,
  "Values": {
    "FUNCTIONS_WORKER_RUNTIME": "node",
    "AZURE_COSMOS_ENDPOINT": "https://<databasename>.documents.azure.com:443/",
    "AZURE_COSMOS_MASTER_KEY": "<masterkey>",
    "AZURE_COSMOS_DATABASE_ID": "Product"
  },
  "Host": {
    "CORS": "*"
  }
}
You'll need to populate the database with the JSON found in
src/api/products/products.json.
You'll also need to update the following files once you have you Function App and Azure Storage account created.
functions/proxies.json
Update the backendUri value with the URL copied from the Storage Account you
created to deploy the client code.
src/environments/environment.prod.ts
Update productUrl value with the URL copied from the Azure Function you
deployed from the functions directory.
The client and server code are deployed to different Azure services. The client code is deployed to Azure Storage with static website hosting enabled to serve the content. The backend code is deployed to Azure Functions, which is also used as the entry point to the application (requests are proxied to the correct location).
First, install the Azure Functions extension for VS Code and sign into your Azure account. Click on the Azure Icon on the left (in the Activity Bar) then click the deploy button in the Azure Functions explorer (the blue up arrow) and follow the prompts.
- Select the Azure Subscription to create the Function App under
- Choose Create New Function App in Azure
- Give the app a unique name
This will create everything you need on Azure then deploy the app. Once the deployment is complete, click the Upload Settings in the notification
In the Azure Functions explorer, expand your app then expand the Functions node. Right click on the function that you just deployed and choose Copy function URL. You'll need that in the next step. :)
Before deploying, you need to update ./src/environments/environment.prod.json
and paste the URL from your Function app that's deployed to Azure.
First, install the Azure Storage extension for VS Code and sign into your Azure account. Click on the Azure Icon on the left (in the Activity Bar) then click the deploy button in the Azure Storage explorer (the blue up arrow) and follow the prompts.
- Select the Azure Subscription to create the Storage Account under
- Choose Create new Storage Account and give it a unique name
- Choose Create new resource group, accept the name and choose a location
At this point the storage account will be created in the background. This will
take a minute or so. When prompted choose "Enable static website hosting" and
enter index.html for both the index document and the
404 error document path.
Once created and configured, you're prompted to choose the directory to deploy.
Choose the ./dist directory from the list and you're all will be built (in
production mode) then deployed to storage.
Shout out to Deborah Kurata who wrote the original APM app that this example is built on.
