This is an implementation of Single Shot MultiBox Detector (SSD) paper for pedestrian detection.
*This is still very much a work in progress! Presently the model is strongly overfitting. *
After seeing many implementations which required you to specify very long command line arguments, I realized that running out of a configuration file was a better way to go.
Here all meta-data and hyper-parameters are stored in a yaml configuration file. On every run a new output directory is created containig the new model and the configuration file that was used to create it.
Thus you could automate hyper-parameter search and/or tweak it by hand at any time and you can always go and find what were the exact hyper-parameters values used for a particular model. I.e. you can focus on experimenting and forget about keeping track of long command lines.
The code supports the VOC2012 dataset and the Caltech Pedestrian dataset. It has been written so you can add support for your own datasets as well and mix & match as necessary.
Just implement a class with 2 callbacks to return a traint/test split in a particular form and the string-label to numeric-label mapping.
- OpenCV 3.0+ (with Python binding)
- Python 3.4+, 3.5+
- NumPy 1.10+
- SciPy 0.16+
$ mkdir voc_vgg16_1000
Create a yaml file containing all hyper-parameters and meta-data for the experiment you want to run. Use the template yaml file given in the home directory. You can specify nets, datasets and hyper-parameters (size of default boxes, feature_map sizes etc).
$ cp ssd_config.tmpl.yaml voc_vgg16_1000/
And then edit the file as necessary.
The core hyperparameter of SSD is the size of the feature maps used. To figure out feature map sizes do the following:
python train.py <directory-containing-configuration-yaml-file>
for example:
$ python train.py /Users/vivek/work/ssd-code/tiny_voc
Make sure you change the feature maps in the configuration file. (TODO: automate this!) Once this is done, all other hyperparameters derived from this are automatically calculated.
You can choose from the Pascal VOC2012 dataset or the Stanford Pedestrian detection dataset. Change the yaml file accordingly and run:
$ python pre_process.py
Usage:
pre_process.py <directory-containing-configuration-yaml-file> <dataset-name> <dataset-directory> <number-of-images>
Example:
pre_process.py ./tiny_voc voc2012 voc-data/VOC2012 10
This will create a sample dataset of whatever size you choose and pre_process all images and put them into the project directory. (eg: voc_vgg16_1000)
After configuring the correct directory name run python train.py dirname
Usage:
train.py <directory-containing-configuration-yaml-file>
Example:
train.py /Users/vivek/work/ssd-code/tiny_voc
This command will use all the meta-data and hyper-parameters in <your_directory>/ssd_config.yaml and it will create a new directory containing loss and accuracy data every epoch and save the model every 5 epochs.
During training a new directory will be created inside your main directory containing a copy of the configuration file. The model is timestamped every 5 EPOCHS.
To run inference using any of the models saved do the following:
Usage:
inference.py <directory-containing-configuration-yaml-file> <model-name-relative-to-directory>
Example:
inference.py /Users/vivek/work/ssd-code/tiny_voc Jul_05_161614_O3K2T/final-model
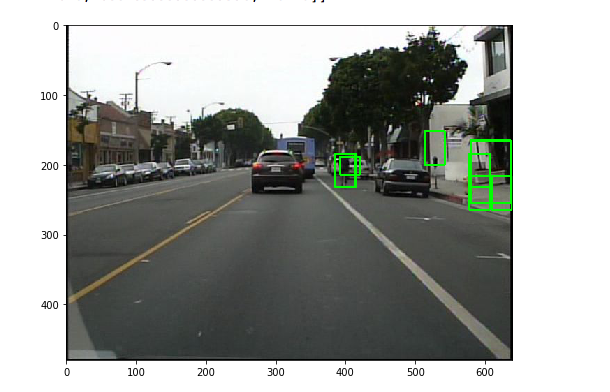
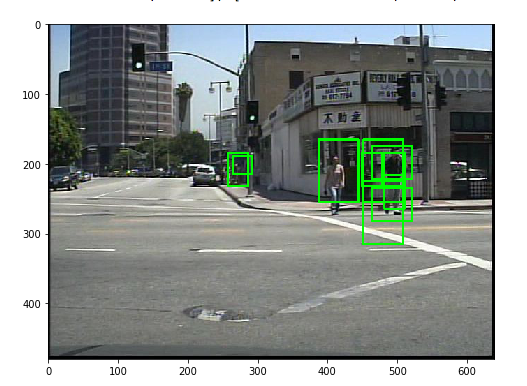
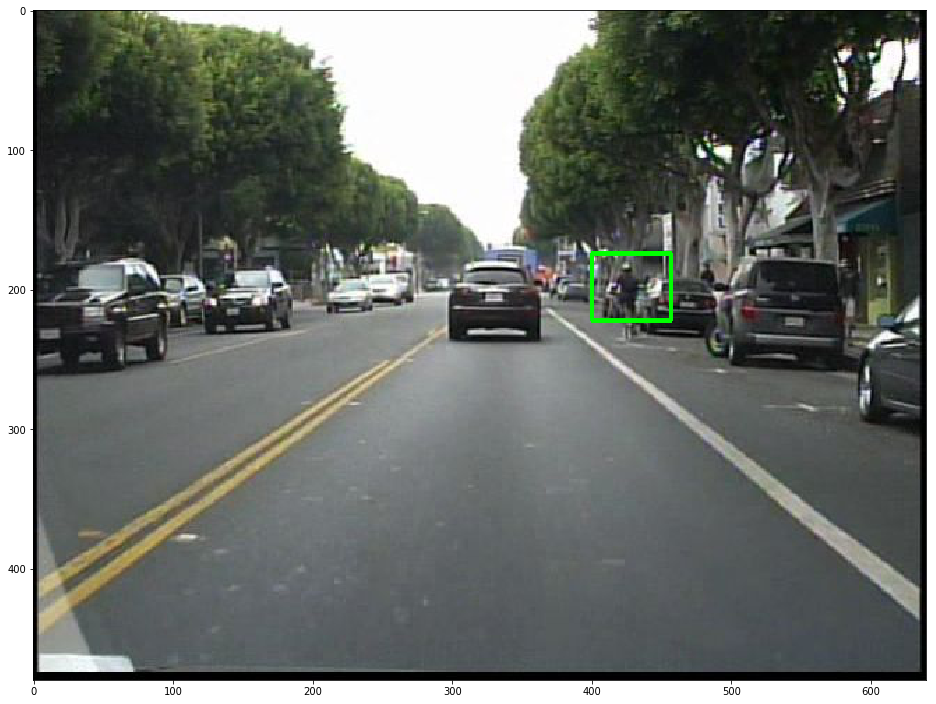
The inference class will pull an image from your test set and show you a prediction.
I've trained the system with VGG16 using 3000 images from the Caltech Pedestrian Detection dataset. This took 2 days of running on AWS gpu.large instance. There are still a lot of false positives being created by the system.
After adding batch_normalization and adding a multiplication factor to the localization loss (as its much smaller than the the confindence loss) the weights seem to be much smaller. Waiting for a pause in my job search to rebuild the model.
- Further train the VGG16 model with the Stanford Pedestrian dataset for 100 more epochs.
- Add accuracy plots for test set.
- Add image augmentation. Based on empirical results this should increase the accuracy of the model substantially.
- Find out the best default box sizes over both datasets.
- Run forward net in real time.
$ bash shells/download.sh
$ python scripts/convert_annotations.py
$ python scripts/convert_seqs.py
Each .seq movie is separated into .png images. Each image's filename is consisted of {set**}_{V***}_{frame_num}.png. According to the official site, set06~set10 are for test dataset, while the rest are for training dataset.
(Number of objects: 346621)
$ python tests/test_plot_annotations.py
The following gives you an idea on how to configure and run the system. The nice thing about doing it this way is that you don't have to keep passing in parameters through a command line argument. And also you have a record of your hyper-parameters with your data + model all in one place.
# Dataset vars
dataset_name: "stanford"
image_width: 640
image_height: 480
num_classes: 2
n_channels: 3
images_path: "/home/ubuntu/tensorflow_ssd/data/images/"

# SSD config vars
net: "vgg16"
default_box_scales:
  -
    - 0.0
    - 0.0
    - 0.9
    - 1.5
  -
    - 0.2
    - -0.2
    - 0.9
    - 0.8
feature_maps:
  -
    - 5
    - 4
  -
    - 10
    - 8
  -
    - 20
    - 15
  -
    - 40
    - 30
neg_pos_ratio: 4
pred_conf_threshold: 0.8
num_epochs: 110
batch_size: 16
adam_learning_rate: 0.001
- [DONE] Pre Process the data
- [DONE] Create the base network.
- [DONE] Create the base network.
- [DONE] Base network should send out to final predctions a class predction (1-hot encoded) and a location prediction (a,b,c,d) relative sizes.
- [DONE] Figure out which layers will output detections to prediction array.
- [DONE] Figure out the size of the feature maps in each case above.
- [DONE ] Figure out number of outputs in final array
- Preprocess
- [DONE] Create a function to pull a image and its data
- [DONE] create a hash of Ground truth image -> bounding box, class
- [DONE] Create the default box sizes.
- [DONE] For each feature map square, create the different default boxes.
- For each default box
- See if it matches with the ground truth.
- YES - then set class value to 1 (pedestrian)
- NO - set class value to 0 (background)
- Calculate how much negative boxes are created. If too many ( greater than 2/3 ratio) then drop from training set.
- Create a list of [y_box_coords, y_confidence (1-hot encoded class),]
- See if it matches with the ground truth.
- For each default box
- [DONE] Create one prediction through the network.
- [DONE] Loss should be cross-entropy for the class predictions and mse for the coordinates.
- [DONE] Change input size of the image to match Pedestrian dataset.
- [DONE] Train the system on pedestrian dataset.
- [DONE] Add Alex Net
- [DONE] Add support for PASCAL VOC person dataset.
- [DONE] Add batch normalization
- [1/2 DONE] Move logging to tensorboard.
- [DONE] Add weighting to localization loss as its much smaller than prediction loss.
- Add agumentation
- Experiment with different feature map sizes (skinny is better I think.)
- [DONE] Run predictions from test set to show system is working.
- Experiment with different sizes to see if it varies the accuracy. Randomized grid search?
- Can I load the imagenet weights into the system ?
- Realtime predictions
- Data Augmenation
- Use the entire orignal input image
- Sample a patch so that the mininmum jaccard overlap with the object is 0.1,0.3,0.5,0.7,0.9
- Randomly Sample a patch.
- This new image needs to be run through the same pipeline.