Drowsiness and atention monitor for driving or handling heavy machinery. Also detects objects at the blind spot via CV and the Jetson Nano. And has a crash detection feature.
- Introduction
- Materials
- Connection Diagram
- Laptop Test
- Jetson Setup
- Drowsiness Monitor
- Blind Spot Monitor
- The Final Product
- Commentary
- References
We will be tackling the problem of drowsiness when handling or performing tasks such as driving or handling heavy machinery and the blind spot when driving.
The Center for Disease Control and Prevention (CDC) says that 35% of American drivers sleep less than the recommended minimum of seven hours a day. It mainly affects attention when performing any task and in the long term, it can affect health permanently.

According to a report by the WHO (World Health Organization) (2), falling asleep while driving is one of the leading causes of traffic accidents. Up to 24% of accidents are caused by falling asleep, and according to the DMV USA (Department of Motor Vehicles) (3) and NHTSA (National Highway traffic safety administration) (4), 20% of accidents are related to drowsiness, being at the same level as accidents due to alcohol consumption with sometimes even worse consequences than those.
We will create a system that will be able to detect a person's drowsiness level, this with the aim of notifying the user about his state and if he is able to drive.
At the same time it will measure the driver’s attention or capacity to garner attention and if he is falling asleep while driving. If it positively detects that state (that he is getting drowsy), a powerful alarm will sound with the objective of waking the driver.
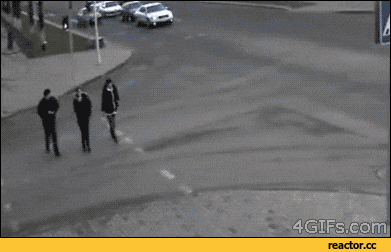
Additionally it will detect small vehicles and motorcycles in the automobile’s blind spots.

In turn, the system will have an accelerometer to generate a call to the emergency services if the car had an accident to be able to attend the emergency quickly.
Current Solutions:
-
Mercedes-Benz Attention Assist uses the car's engine control unit to monitor changes in steering and other driving habits and alerts the driver accordingly.
-
Lexus placed a camera in the dashboard that tracks the driver's face, rather than the vehicle's behavior, and alerts the driver if his or her movements seem to indicate sleep.
-
Volvo's Driver Alert Control is a lane-departure system that monitors and corrects the vehicle's position on the road, then alerts the driver if it detects any drifting between lanes.
-
Saab uses two cameras in the cockpit to monitor the driver's eye movement and alerts the driver with a text message in the dash, followed by a stern audio message if he or she still seems sleepy.
As you can see these are all premium brands and there is not a single plug and play system that can work for every car. This, is our opportunity as most cars in the road are not on that price range and do not have these systems.
Hardware:
- NVIDIA Jetson Nano. x1. https://www.nvidia.com/en-us/autonomous-machines/embedded-systems/jetson-nano/
- Power Inverter for car. https://www.amazon.com/s?k=power+inverter+truper&ref=nb_sb_noss_2
- ESP32. https://www.adafruit.com/product/3405
- OLED display. https://www.amazon.com/dp/B072Q2X2LL/ref=cm_sw_em_r_mt_dp_U_TMGqEb9YAGJ5Q
- Any Bluetooth Speaker or Bluetooth Audio Car System. x1. https://www.amazon.com/s?k=speaker&s=price-asc-rank&page=2&qid=1581202023&ref=sr_pg_2
- USB TP-Link USB Wifi Adapter TL-WN725N. x1. https://www.amazon.com/dp/B008IFXQFU/ref=cm_sw_em_r_mt_dp_U_jNukEbCWXT0E4
- UGREEN USB Bluetooth 4.0 Adapter x1. https://www.amazon.com/dp/B01LX6HISL/ref=cm_sw_em_r_mt_dp_U_iK-BEbFBQ76BW
- HD webcam . x1. https://canyon.eu/product/cne-cwc2/
- 32 GB MicroSD Card. x1. https://www.amazon.com/dp/B06XWN9Q99/ref=cm_sw_em_r_mt_dp_U_XTllEbK0VKMAZ
- 5V-4A AC/DC Adapter Power Supply Jack Connector. x1. https://www.amazon.com/dp/B0194B80NY/ref=cm_sw_em_r_mt_dp_U_ISukEbJN7ABK3
- VMA204. x1. https://www.velleman.eu/products/view?id=435512
Software:
- Pytorch: https://pytorch.org/
- JetPack 4.3: https://developer.nvidia.com/jetson-nano-sd-card-image-r3231
- YOLOv3: https://pjreddie.com/darknet/yolo/
- OpenCV: https://opencv.org/
- Twilio: https://www.twilio.com/
- Arduino IDE: https://www.arduino.cc/en/Main/Software
- Mosquitto MQTT: https://mosquitto.org/
This is the connection diagram of the system:

To test the code on a computer, the first step will be to have a python environments manager, such as Python Anaconda.
https://www.anaconda.com/distribution/
First we will create a suitable enviroment for pytorch.
conda create --name pytorch
To activate the enviroment run the following command:
activate pytorch
In the case of Anaconda the PyTorch page has a small widget that allows you to customize the PyTorch installation code according to the operating system and the python environment manager, in my case the configuration is as follows.

conda install pytorch torchvision spyder cudatoolkit=10.1 -c pytorch
In addition to the aforementioned command, it is necessary to install the following libraries so that the codes can be executed without problem.
- OpenCV
- pillow
- requests
- twilio
- pygame
- matplotlib
- paho-mqtt
Code to install all the libraries:
pip install opencv-python Pillow requests twilio pygame matplotlib paho-mqtt
Inside the "https://github.com/altaga/Torch-Drowsiness-Monitor/tree/master/Drowsiness/Model" folder our model called "BlinkModel.t7" already exists, which is the one I use for all tests, however the model can be trained by yourself with the code called "train.py" in the folder "https://github.com/altaga/Torch-Drowsiness-Monitor/tree/master/Drowsiness".
The database that was used, is a database with 4846 images of left and right eyes, open and closed, where approximately half are open and closed so that the network was able to identify the state of the eyes, the database is in the following folder:
The training has the following parameters as input.
- input image shape: (24, 24)
- validation_ratio: 0.1
- batch_size: 64
- epochs: 40
- learning rate: 0.001
- loss function: cross entropy loss
- optimizer: Adam
In the first part of the code you can modify the parameters, according to your training criteria.
Drowsiness Monitor:
Video: Click on the image
The codes to run on the laptop have the following modifications:
- The code segments that involve reading the accelerometer sensor are commented.
- The MQTT section is commented, instead the MQTT messages are displayed in the python console.
- The crash notification section is commented because it depends on the Twilio configuration and the use of the accelerometer.
The codes that are executed in the computer are the following and a video of how they are executed in real time with Anaconda Spyder (package that we previously installed):
To open the Spyder IDE write in the anaconda command console: spyder
Drowsiness Monitor:
Video: Click on the image
YoloV3:
Video: Click on the image
Since we could check that all the codes work, we can go to the configuration of our hardware to make our product.
To download the operating system of the Jetson Nano enter the following link:
https://developer.nvidia.com/jetson-nano-sd-card-image
Format the SD card with SD Card Formatter and Flash the operating system in the SD with Etcher.
Because we will be using several hardware components such as cameras, an accelerometer, speakers and more, I highly recommend a power supply of at least 5V - 4A.
The only hardware device that is not plug and play is the accelerometer because this one uses a I2C protocol (TWI if you speak Atmel). That's why we have to check if the Jetson Nano has these pins available.

In this case we will use the Bus 1 because of its proximity to the 5V and GND pins. This will allow us to create a soldered circuit like an Arduino shield, but this time for the Jetson Nano.

After soldering our circuit looks like so:


This next video show us how to setup our hardware:
Video: Click on the image
Curious Fact: The Nvidia Jetson Nano has the same IO pin distribution as a Raspberry Pi, so every shield for the Pi is backwards compatible with the Nano!
The device has to be first set up with a WiFi connection, because of the fact that there are a ton of libraries we have to install. During the boot portion of the OS installation, we will connect the Jetson to your private WiFi and next we will set up the WiFi from our mobile phone (For this project as we need a Cellular connection). The advantage of doing this is that the Nano will connect to the one available so we can easily control this from the outside. TLDR: Connect both your private WiFi and your Mobile phone during the first setup, you the system can recognize both automatically.
Boot WiFi:

Home WiFi IP:
IP: 192.168.0.23

Mobile WiFi:
IP: 192.168.43.246

We need to access our jetson from any command terminal via SSH, in the case of MAC and Linux just open the terminal and type the following command.
ssh youruser@yourip
The command that I use in MY case is:
ssh alex@192.168.0.23
In Window's case you can access it from any SSH connection assistant such as Putty.
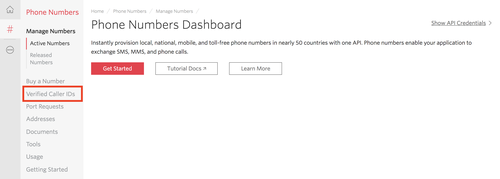
Open a twilio account to be able to notify via SMS in case of a crash.
https://www.twilio.com/try-twilio
The credentials for the Python code appear immediately upon entering, save the SID and the token, we will configure them later.

When you signed up for your trial account, you verified your personal phone number. You can see your list of verified phone numbers on the Verified Caller IDs page.
Go to your Verified Caller IDs page in the console.

Click on the red plus (+) icon to add a new number.
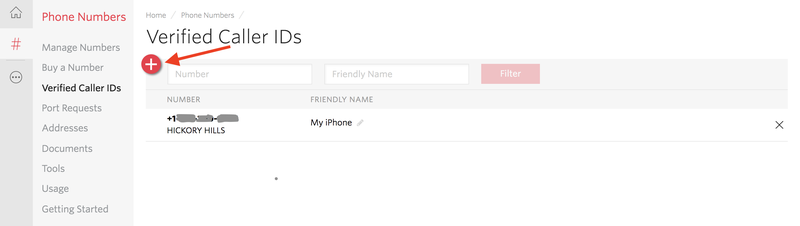
Enter the phone number you wish to receive the notification from Twilio.

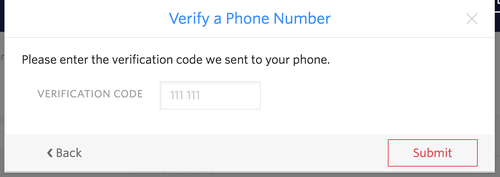
Note: You will need access to this device to receive the call or text with your verification code
Enter the verification code. You’re now ready to text or call this number with your trial Twilio account.
Go to Phone Numbers page in the console.
Go to Getting Started page in the console and click on "Get your first Twilio phone number".

A number will be automatically offered, save this number for later and press "Choose this number" to finish setting up your number.

Create your own Mosquitto MQTT.

Una vez instalado el mqtt server este iniciara en el boot de la board.
- OpenCV
- pillow
- torchvision
- requests
- twilio
- pygame
- matplotlib
- paho-mqtt
Code to install all the libraries:
pip install opencv-python Pillow torchvision requests twilio pygame matplotlib paho-mqtt smbus
In order for both files to run at the same time on the device's boot, we must run the following commands to create an rc.local file and give it the permission to run both scripts.
sudo apt-get update
sudo apt-get install nano
sudo mv "Torch-Drowsiness-Monitor/Config File/rc.local" /etc/rc.local
sudo chmod u+x /etc/rc.local
The rc.local content is:
#!/bin/bash

sleep 10

sudo python3 "Torch-Drowsiness-Monitor/YoloV3/detect.py" &
sudo python3 "Torch-Drowsiness-Monitor/Drowsiness/check.py" &
Schematics of the OLED (128x32) and the ESP32.

I grabbed a case and fit everything inside and this is how it looks:


These are the images it will show according to the CV detection, whether it sees a bike or a dog or anything else:


If you want to add more images to the display, you have to use the following image2cpp converter, which will convert pixels into a code that Arduino IDE can use:
https://javl.github.io/image2cpp/
The web application gives us the code to copy and paste in our arduino project.
The device code is in the "Arduino" folder and all we have to do is configure the WiFi and MQTT credentials.

Let's go through a revision of the algorithms and procedures of both CV systems (Drowsiness and alert on one side and Blind spot detection on the other). The installation is remarkably easy as I have already provided an image for the project.
ALL the code is well explained in the respective Github file: https://github.com/altaga/Torch-Drowsiness-Monitor
Look for the two Python files: Drowsiness and Yolo:
https://github.com/altaga/Torch-Drowsiness-Monitor/blob/master/Drowsiness/check.py
https://github.com/altaga/Torch-Drowsiness-Monitor/blob/master/YoloV3/detect.py
Those are the two that make all the magic happen.
Please take a look at it for extensive explanation and documentation.
The sleep monitor uses the following libraries:
- OpenCV:
- Image processing.
- (OpenCV) Haarcascades implementation.
- (OpenCV) Blink eye speed detection.
- (Pytorch) Eye Status (Open / Close)
- Pygame:
- Player sound alert.
- Smbus:
- Accelerometer reading.
- Twilio:
- Emergency notification delivery.
- Requests:
- Geolocation
The flicker detection algorithm is as follows:
- Detection that there is a face of a person behind the wheel:

- If a face is detected, perform eye search.

- Once we have detected the eyes, we cut them out of the image so that we can use them as input for our convolutional PyTorch network.

-
The model is designed to detect the state of the eyes, therefore it is necessary that at least one of the eyes is detected as open so that the algorithm does not start generating alerts, if it detects that both eyes are closed for at least 2 seconds , the alert will be activated, since the security of the system is the main thing, the algorithm has a second layer of security explained below.
-
Because a blink lasts approximately 350 milliseconds then a single blink will not cause problems, however once the person keeps blinking for more than 2 or 3 seconds (according to our criteria) it will mean for the system that the person is falling asleep. Not separating the eyes from the road being one of the most important rules of driving.


- Also during the development I found a incredible use case, when one turns to look at his cell phone, the system also detects that you are not seeing the road. This being a new aspect that we will be exploring in future versions of the system to improve detection when a driver is not looking at the road and is distracted. But, for now it is one of those unintended great finds.


Whether it's because of the pytorch convolutional network model or the Haarcascades, the monitor will not allow you to take your eyes off the road, as it is extremely dangerous to do that while driving.

The blind Spot monitor uses the following libraries:
- OpenCV:
- Image processing
- CDNN implementation.
- The weights of the CDNN were obtained from YoloV3 and imported by PyTorch.
- MQTT with Mosquitto:
- Communication with the ESP32.
In this algorithm we use the detection of objects using PyTorch, YoloV3 and OpenCV which allows the use of CDNN.

In this case, I created an algorithm to calculate the approximate distance at which an object is located using YOLOV3, the algorithm is as follows.
We calculate the aperture and distance of our camera, in my case it is 19 centimeters in aperture at a distance of 16 cm.
It means that an object 19 cm wide can be at least 16 cm away from the camera so that it can fully capture it, in this case the calculation of the distance of any object becomes a problem of similar triangles.

In this case, since our model creates boxes where it encloses our detected objects, we will use that data to obtain the apparent width of the object, in this case the approximate width will be stored in a variable during the calculation.

If we combine both terms we get the following equation.

In this case for the objects that we are going to detect, we approximate the following widths in centimeters.
{
    person:70,
    car:220,
    motorcycle:120,
    dogs:50
}
Here is an example of its operation with the same image.

Testing the algorithm with the camera.


Once having this distance, we will filter all distances that are greater than 2 meters, this being a safe distance to the car at the blind spot.

In turn, we will determine in which of the 2 blind spots the object is, right or left. Depending on the object and the side, the information will be sent via Mosquitto MQTT to the display. For example a car on the left side:
Product:


Product installed inside the car:


Notifications:

Video: Click on the image
Sorry github does not allow embed videos.
I would consider the product finished as we only need a little of additional touches in the industrial engineering side of things for it to be a commercial product. Well and also a bit on the Electrical engineering perhaps to use only the components we need. That being said this functions as an upgrade from a project that a couple friends and myself are developing and It was ideal for me to use as a springboard and develop the idea much more. This one has the potential of becoming a commercially available option regarding Smart cities as the transition to autonomous or even smart vehicles will take a while in most cities.
That middle ground between the Analog, primarily mechanical-based private transports to a more "Smart" vehicle is a huge opportunity as the transition will take several years and most people are not able to afford it. Thank you for reading.
Links:
(1) https://medlineplus.gov/healthysleep.html
(2) http://www.euro.who.int/__data/assets/pdf_file/0008/114101/E84683.pdf
(3) https://dmv.ny.gov/press-release/press-release-03-09-2018