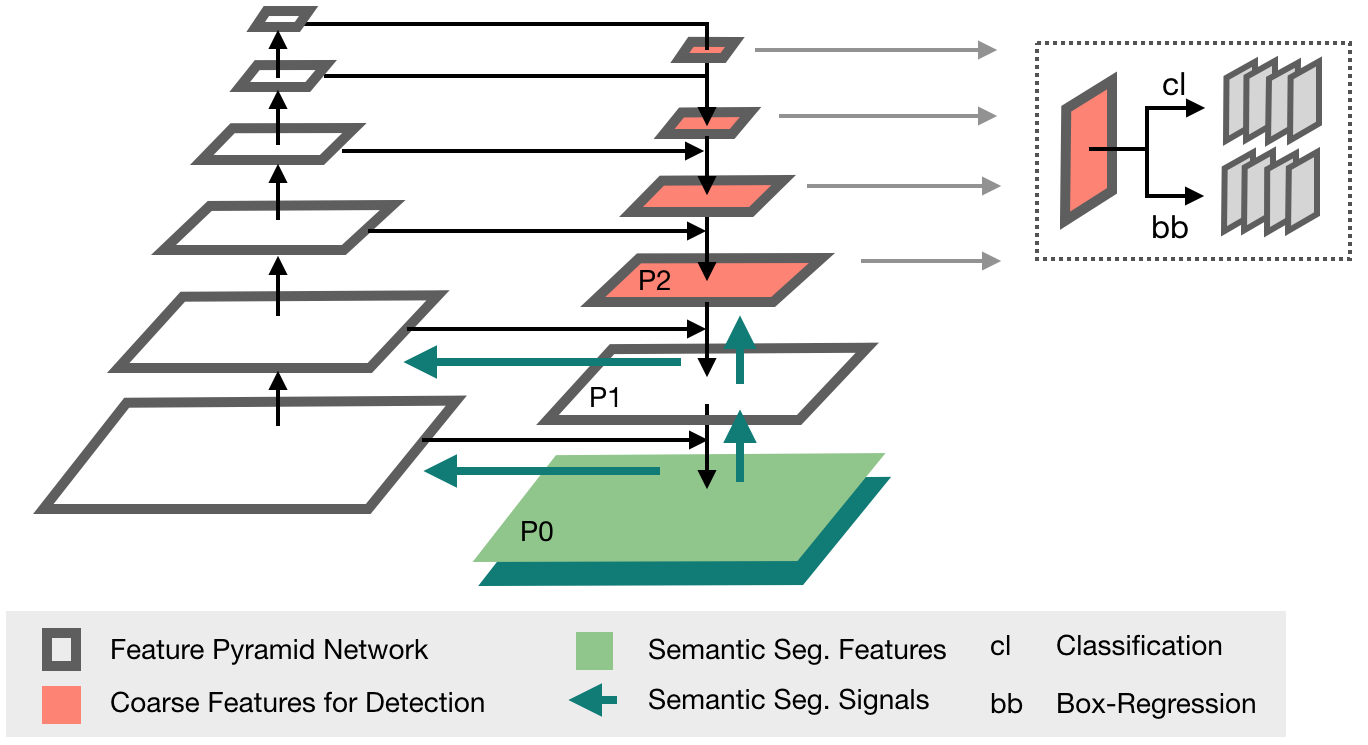
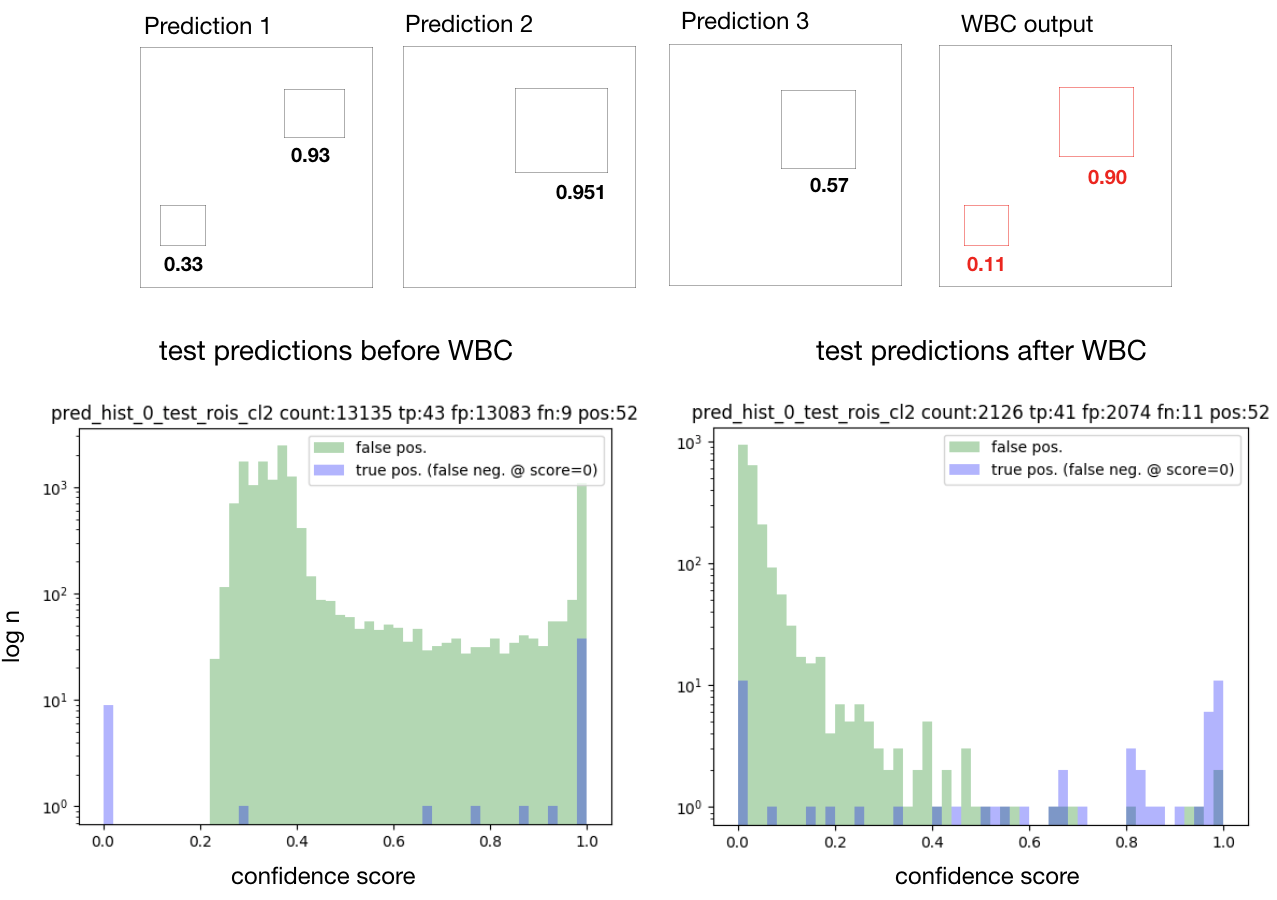
This is a comprehensive framework for object detection featuring:
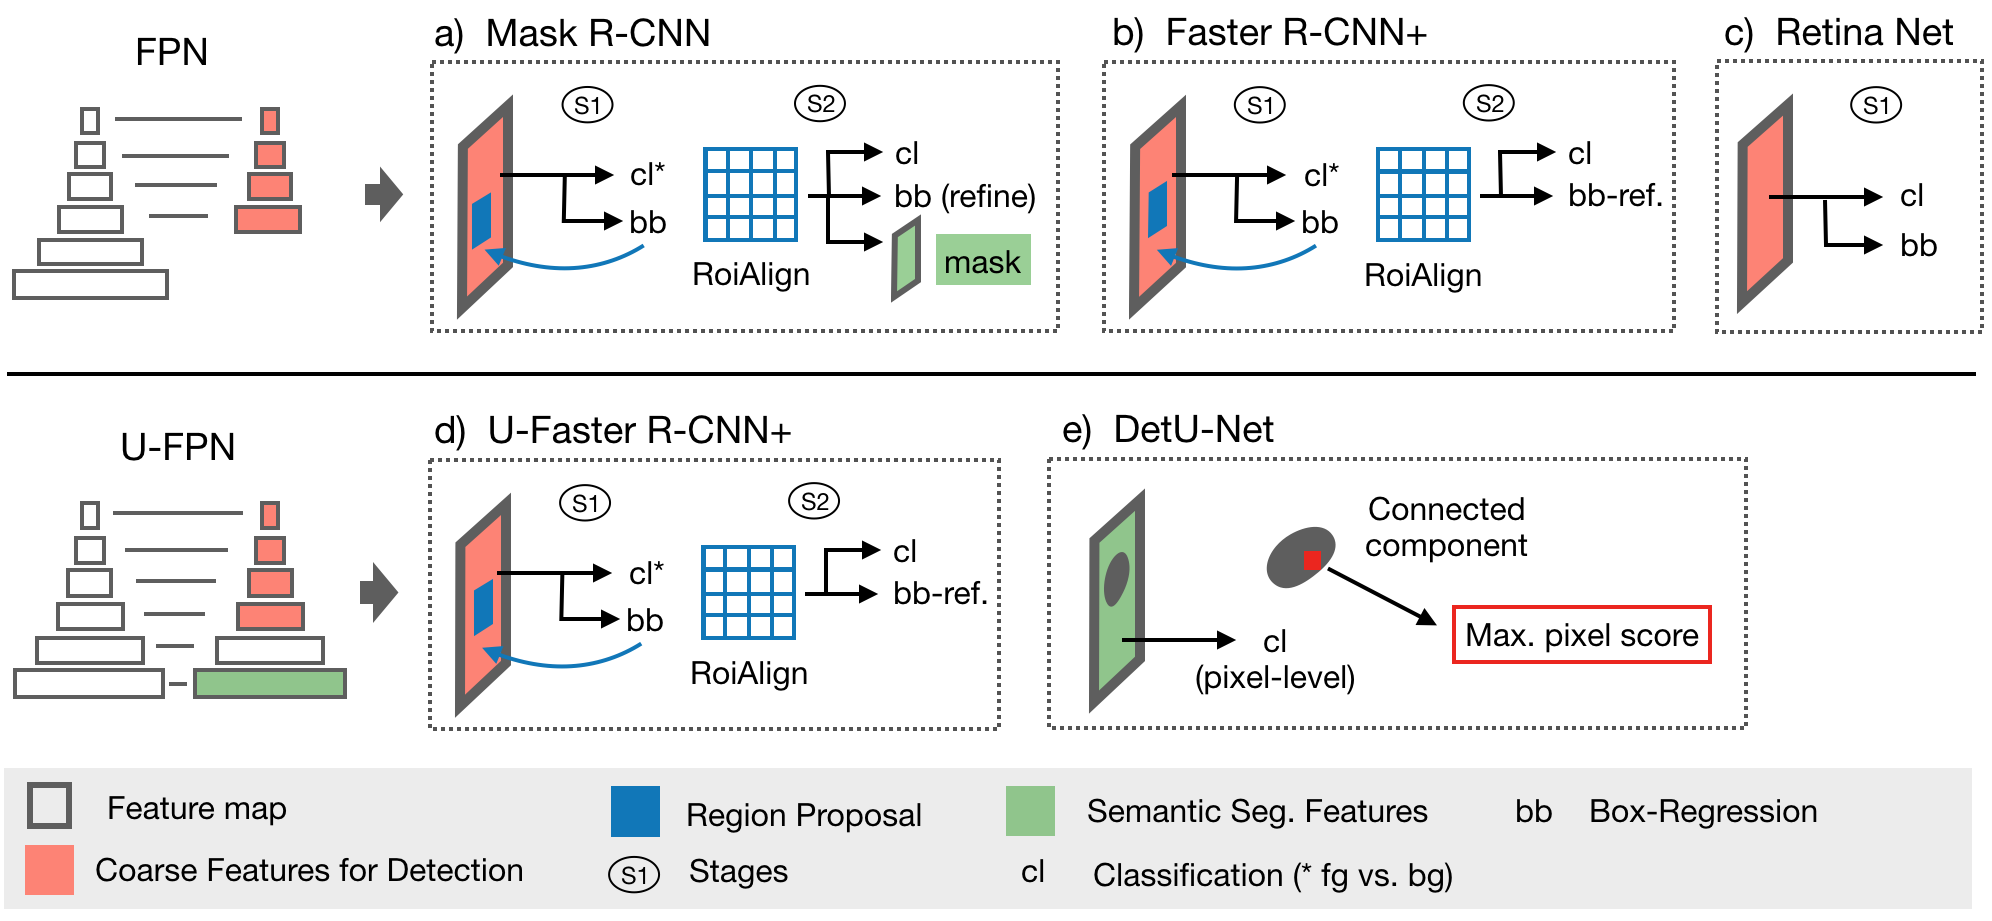
- 2D + 3D implementations of prevalent object detectors: e.g. Mask R-CNN [1], Retina Net [2], Retina U-Net [3].
- Modular and light-weight structure ensuring sharing of all processing steps (incl. backbone architecture) for comparability of models.
- training with bounding box and/or pixel-wise annotations.
- dynamic patching and tiling of 2D + 3D images (for training and inference).
- weighted consolidation of box predictions across patch-overlaps, ensembles, and dimensions [3].
- monitoring + evaluation simultaneously on object and patient level.
- 2D + 3D output visualizations.
- integration of COCO mean average precision metric [5].
- integration of MIC-DKFZ batch generators for extensive data augmentation [6].
- easy modification to evaluation of instance segmentation and/or semantic segmentation.
[1] He, Kaiming, et al. "Mask R-CNN" ICCV, 2017
[2] Lin, Tsung-Yi, et al. "Focal Loss for Dense Object Detection" TPAMI, 2018.
[3] Jaeger, Paul et al. "Retina U-Net: Embarrassingly Simple Exploitation of Segmentation Supervision for Medical Object Detection" , 2018
[5] https://github.com/cocodataset/cocoapi/blob/master/PythonAPI/pycocotools/cocoeval.py
[6] https://github.com/MIC-DKFZ/batchgenerators
Please cite the original publication [3].
Setup package in virtual environment
git clone https://github.com/pfjaeger/medicaldetectiontoolkit.git .
cd medicaldetectiontoolkit
virtualenv -p python3 venv
source venv/bin/activate
pip3 install -e .
Install MIC-DKFZ batch-generators
cd ..
git clone https://github.com/MIC-DKFZ/batchgenerators
cd batchgenerators
pip3 install -e .
cd ../medicaldetectiontoolkit
We use two cuda functions: Non-Maximum Suppression (taken from pytorch-faster-rcnn and added adaption for 3D) and RoiAlign (taken from RoiAlign, fixed according to this bug report, and added adaption for 3D). In this framework, they come pre-compile for TitanX. If you have a different GPU you need to re-compile these functions:
| GPU | arch |
|---|---|
| TitanX | sm_52 |
| GTX 960M | sm_50 |
| GTX 1070 | sm_61 |
| GTX 1080 (Ti) | sm_61 |
cd cuda_functions/nms_xD/src/cuda/
nvcc -c -o nms_kernel.cu.o nms_kernel.cu -x cu -Xcompiler -fPIC -arch=[arch]
cd ../../
python build.py
cd ../

cd cuda_functions/roi_align_xD/roi_align/src/cuda/
nvcc -c -o crop_and_resize_kernel.cu.o crop_and_resize_kernel.cu -x cu -Xcompiler -fPIC -arch=[arch]
cd ../../
python build.py
cd ../../
This framework is meant for you to be able to train models on your own data sets. Two example data loaders are provided in medicaldetectiontoolkit/experiments including thorough documentation to ensure a quick start for your own project. The way I load Data is to have a preprocessing script, which after preprocessing saves the Data of whatever data type into numpy arrays (this is just run once). During training / testing, the data loader then loads these numpy arrays dynamically. (Please note the Data Input side is meant to be customized by you according to your own needs and the provided Data loaders are merely examples: LIDC has a powerful Dataloader that handles 2D/3D inputs and is optimized for patch-based training and inference. Toy-Experiments have a lightweight Dataloader, only handling 2D without patching. The latter makes sense if you want to get familiar with the framework.).
-
Set I/O paths, model and training specifics in the configs file: medicaldetectiontoolkit/experiments/your_experiment/configs.py
-
Train the model:
python exec.py --mode train --exp_source experiments/my_experiment --exp_dir path/to/experiment/directoryThis copies snapshots of configs and model to the specified exp_dir, where all outputs will be saved. By default, the data is split into 60% training and 20% validation and 20% testing data to perform a 5-fold cross validation (can be changed to hold-out test set in configs) and all folds will be trained iteratively. In order to train a single fold, specify it using the folds arg:
python exec.py --folds 0 1 2 .... # specify any combination of folds [0-4] -
Run inference:
python exec.py --mode test --exp_dir path/to/experiment/directoryThis runs the prediction pipeline and saves all results to exp_dir.
This framework features all models explored in [3] (implemented in 2D + 3D): The proposed Retina U-Net, a simple but effective Architecture fusing state-of-the-art semantic segmentation with object detection,
also implementations of prevalent object detectors, such as Mask R-CNN, Faster R-CNN+ (Faster R-CNN w\ RoIAlign), Retina Net, U-Faster R-CNN+ (the two stage counterpart of Retina U-Net: Faster R-CNN with auxiliary semantic segmentation), DetU-Net (a U-Net like segmentation architecture with heuristics for object detection.)
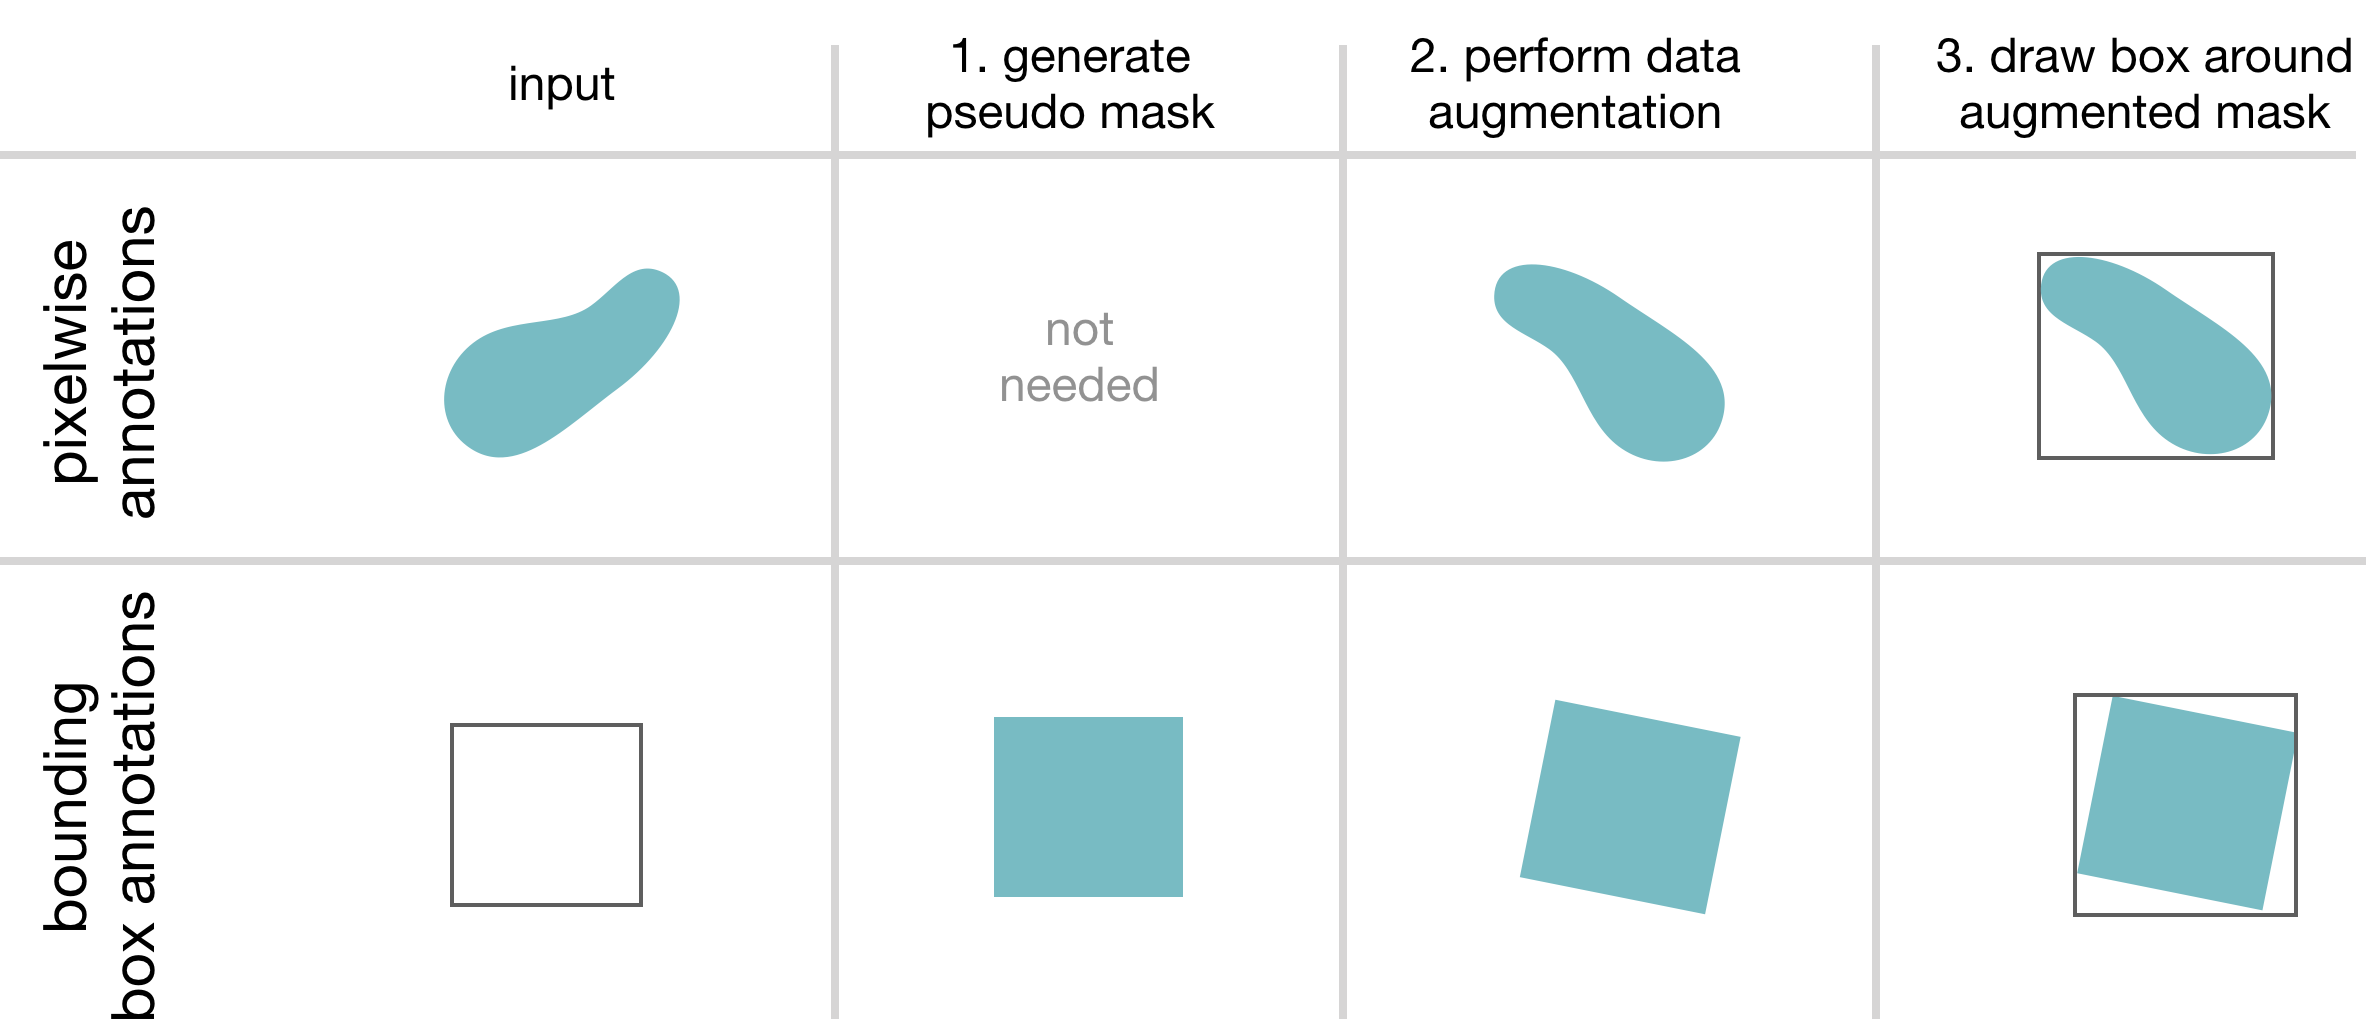
This framework features training with pixelwise and/or bounding box annotations. To overcome the issue of box coordinates in
data augmentation, we feed the annotation masks through data augmentation (create a pseudo mask, if only bounding box annotations provided) and draw the boxes afterwards.
The framework further handles two types of pixel-wise annotations:
- A label map with individual ROIs identified by increasing label values, accompanied by a vector containing in each position the class target for the lesion with the corresponding label (for this mode set get_rois_from_seg_flag = False when calling ConvertSegToBoundingBoxCoordinates in your Data Loader).
- A binary label map. There is only one foreground class and single lesions are not identified. All lesions have the same class target (foreground). In this case the Dataloader runs a Connected Component Labelling algorithm to create processable lesion - class target pairs on the fly (for this mode set get_rois_from_seg_flag = True when calling ConvertSegToBoundingBoxCoordinates in your Data Loader).
This framework provides an inference module, which automatically handles patching of inputs, and tiling, ensembling, and weighted consolidation of output predictions:
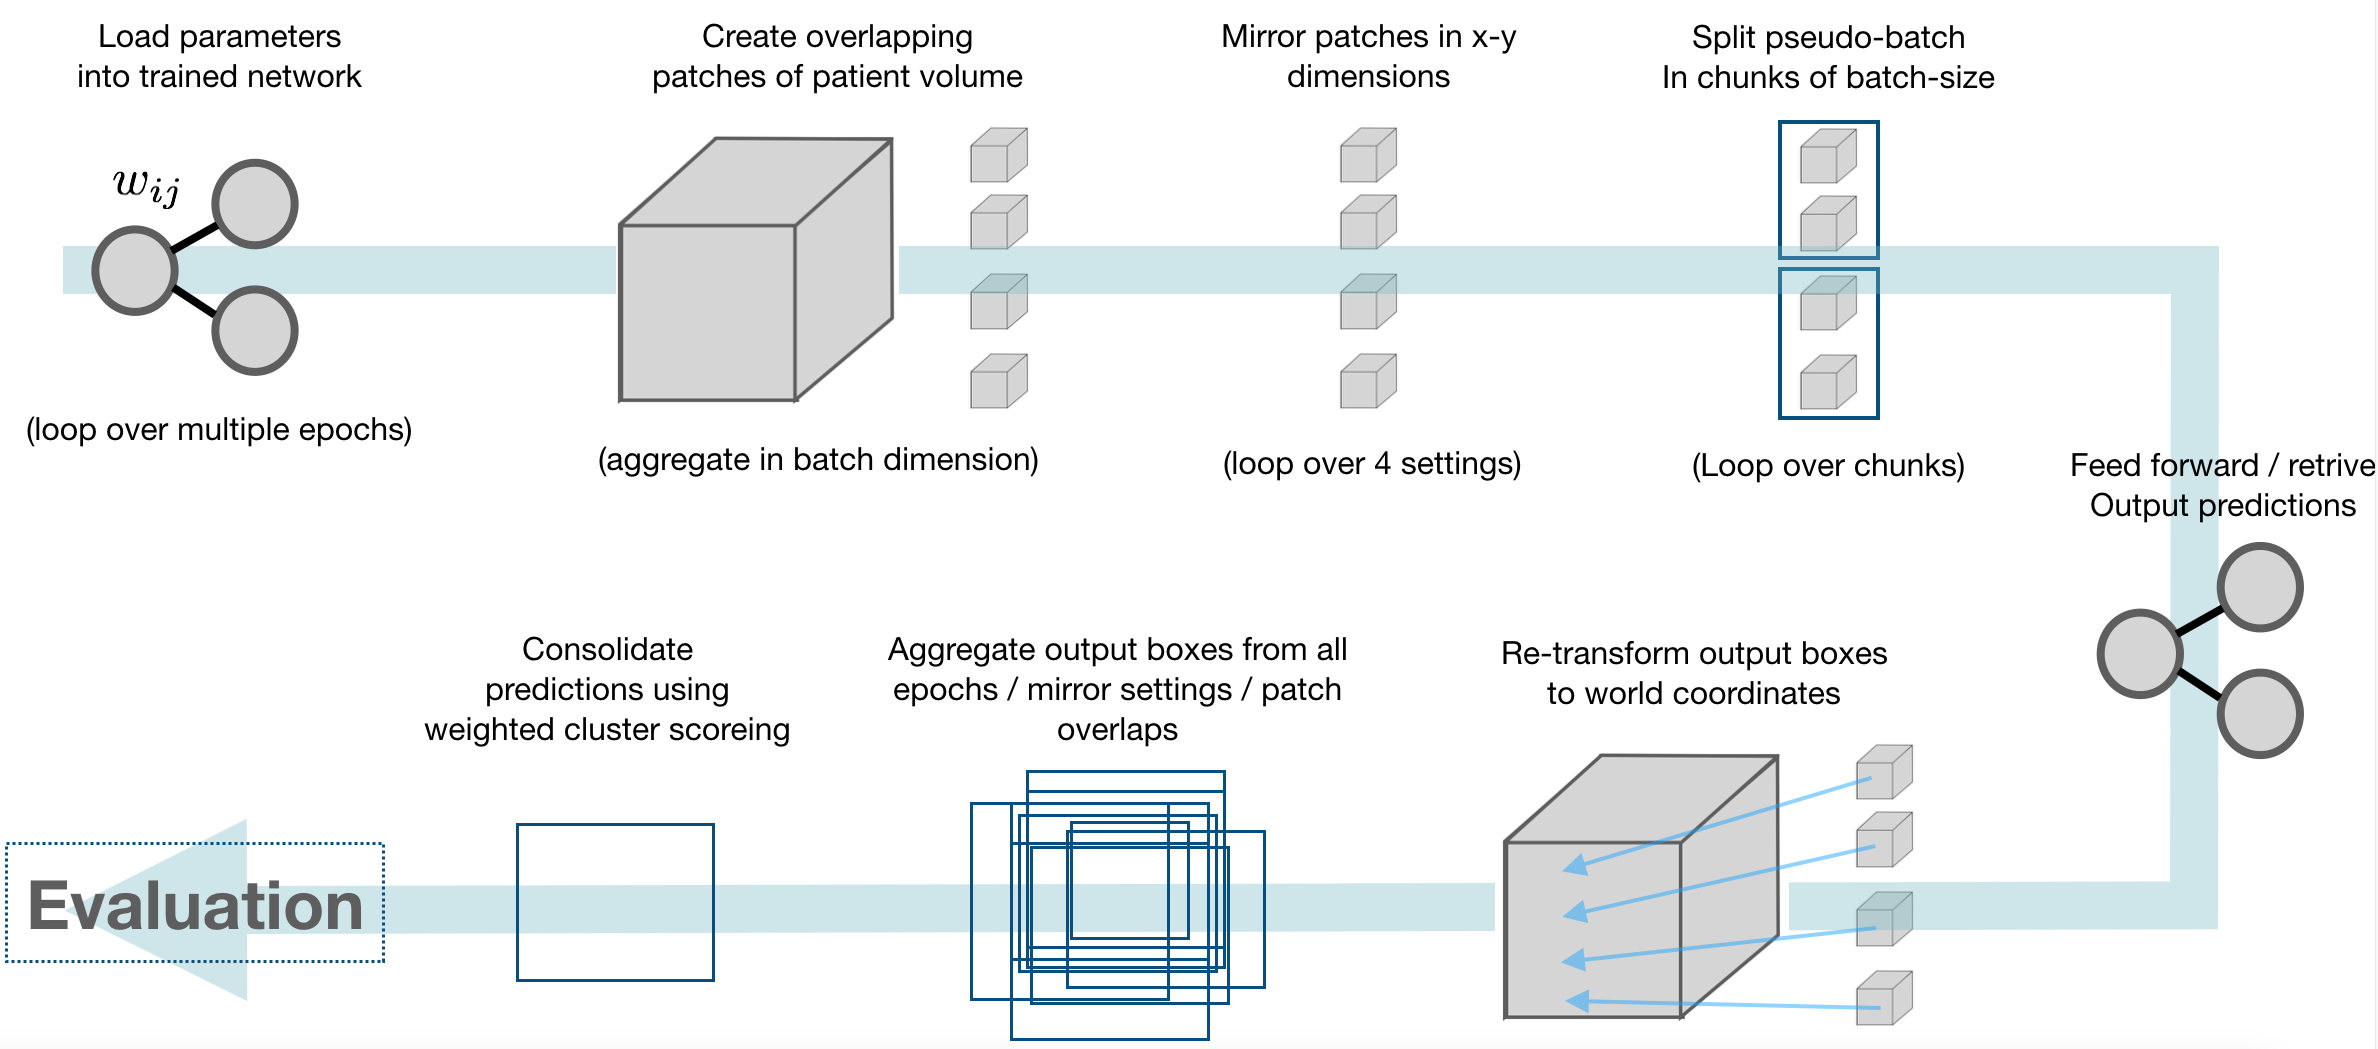
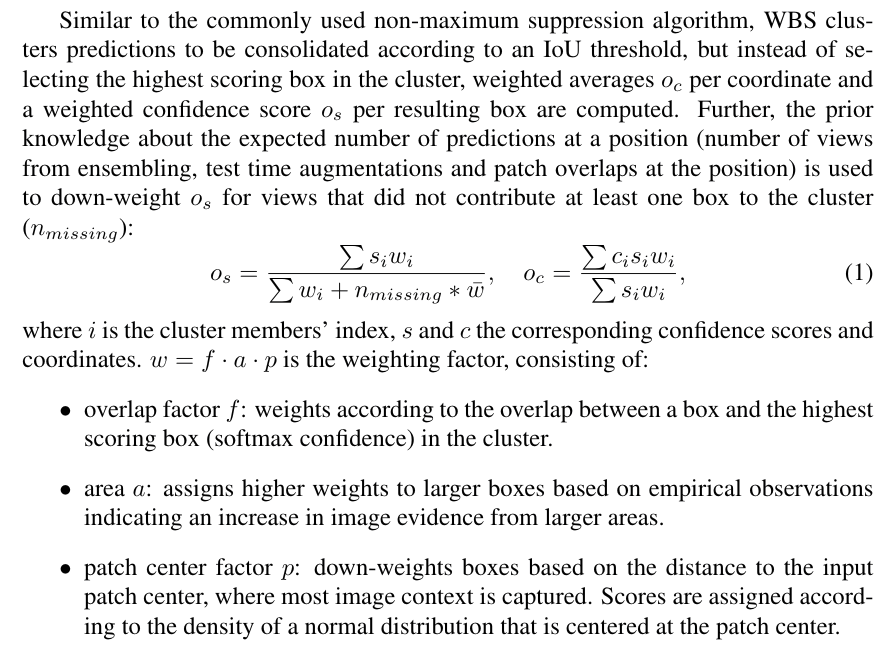
Multiple predictions of the same image (from test time augmentations, tested epochs and overlapping patches), result in a high amount of boxes (or cubes), which need to be consolidated. In semantic segmentation, the final output would typically be obtained by averaging every pixel over all predictions. As described in [3], weighted box clustering (WBC) does this for box predictions:
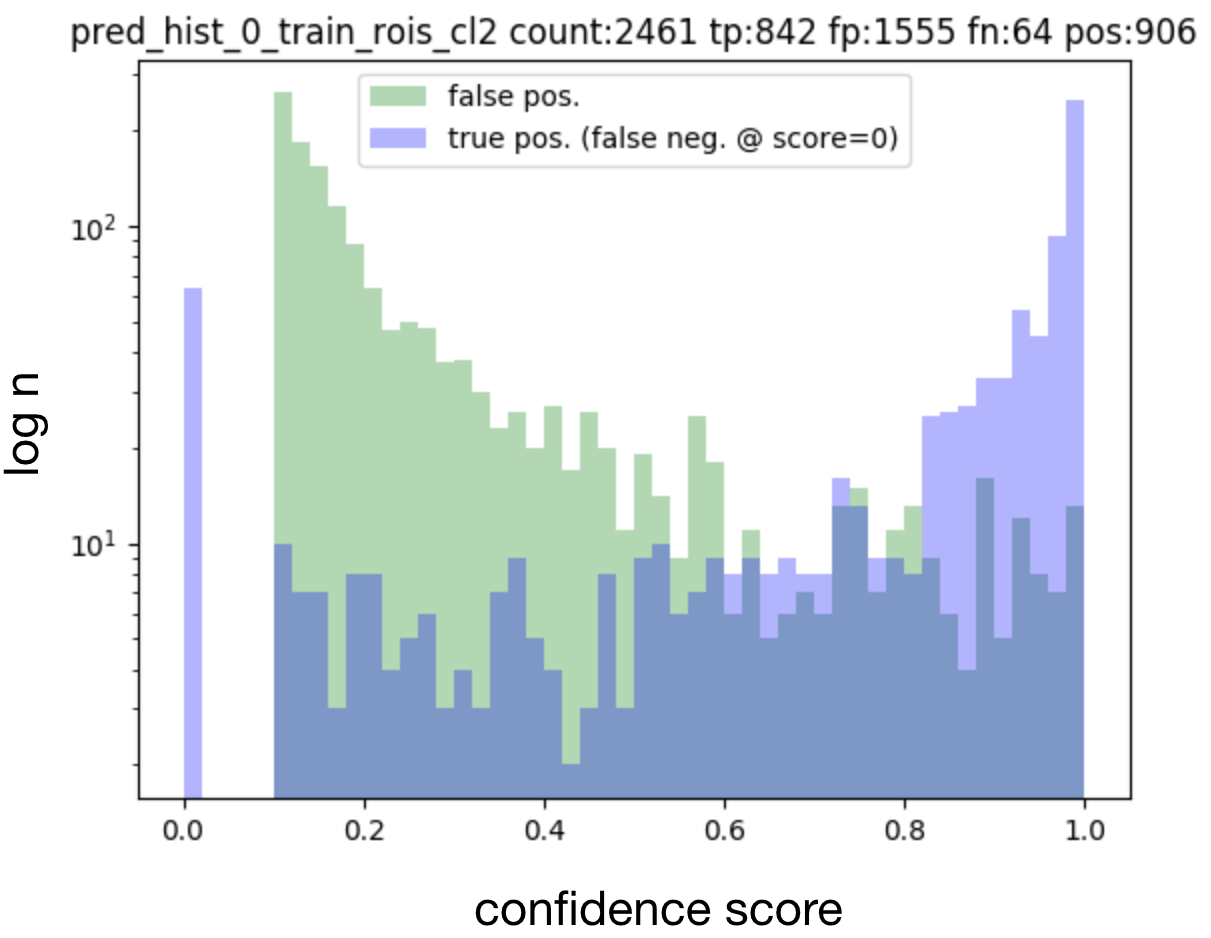
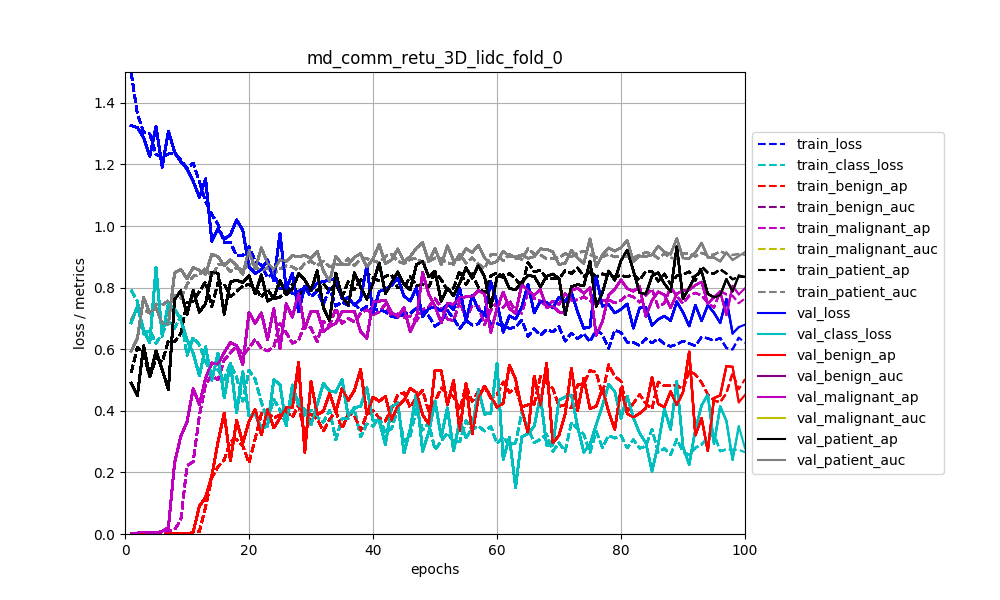
By default, loss functions and performance metrics are monitored:
Histograms of matched output predictions for training/validation/testing are plotted per foreground class:
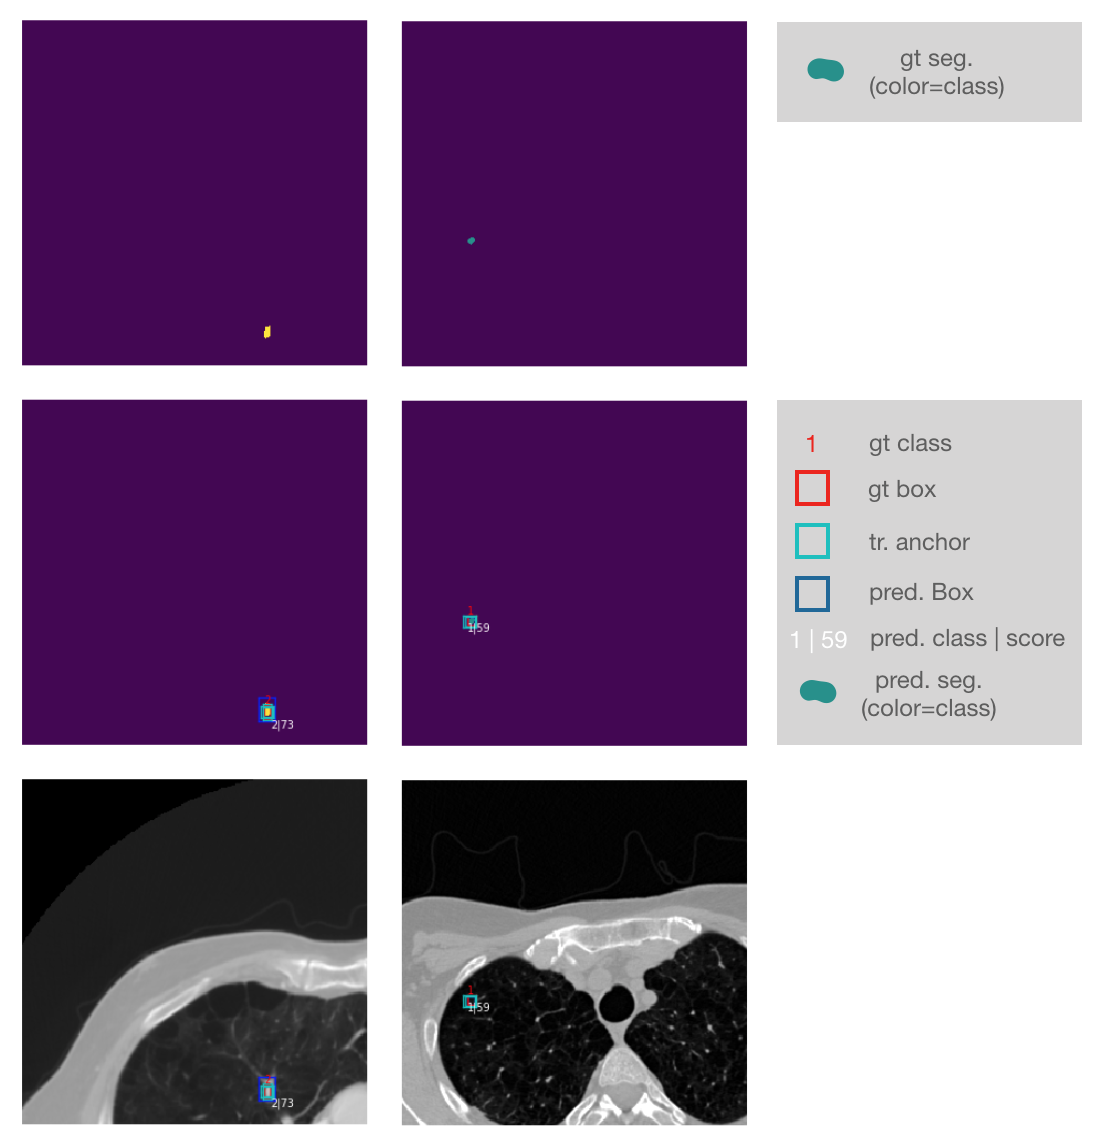
Input images + ground truth annotations + output predictions of a sampled validation abtch are plotted after each epoch (here 2D sampled slice with +-3 neighbouring context slices in channels):
Zoomed into the last two lines of the plot:
The code is published under the Apache License Version 2.0.

