- Clone the project
- Import it on Android Studio
- Run it
- The web page dashboard.html is in the Dashboard folder
- We commented the code with Apache lincense Version 2.0 in the code file
- We present the MIT license of the code from @sekilab in the license file
- You can check other details in the license file
System architecture and instruction to revise the system.
Android: Because the code is developed based on a tensorflow example. It is divided into three parts:
- CameraActivity.java: Asks for permission to access the camera, GPS, storage and so on. Tracks the camera activity.
- DetectorActivity.java: Loads model, makes prediction, uploads image data to cloud database and saves detected images in local storage. If you want to obtain any other information about the results, write code here.
- MainPage.java(with mainpage.xml): The entrance of the application.
- Contact.java(with contact.xml): If a user has any suggestion, they can submit it here.
- Privacy.java(with privacy.xml): Privacy policy(copied from Google Map).
- Purpose.java(with purpose.xml): Description for the purpose of this application.
- viewImages.java(with activity_usage_example_gridview.xml): Present the detected images in grid view.
- LoginActivity.java(with login.xml): Temporarily unused. Users can login into their account.
- RegisterActivity.java(with register.xml): Temporarily unused. Users can register one account.
- The remaining java files are written by the tensorflow team and they are not modified. Besides, the ssd model and label json file are located in the assets folder.
- dashboard.html: Implements the dashboard webpage.
Where to get the codebase?
- Android & Dashboard: https://github.com/LONGLAB-projects/mobile-pavement-monitoring.
- Firebase: https://console.firebase.google.com/u/0/project/dot-project-2fc5f/database.
What is needed to compile the code base? Import the whole project into Android Studio and run it.
How to deploy the system? Generate an apk file from Android Studio and install it on an Android phone.
- (from https://github.com/sekilab/RoadDamageDetector/).
- (from https://mycityreport.s3-ap-northeast-1.amazonaws.com/02_RoadDamageDataset/public_data/Japan/CACAIE2018/trainedModels.tar.gz).
- Note: Prior to April 21st, the above link was broken, and the models were initially obtained by decompiling (unzip APK > model is located in assets folder) the APK package of RoadDamageDetector.
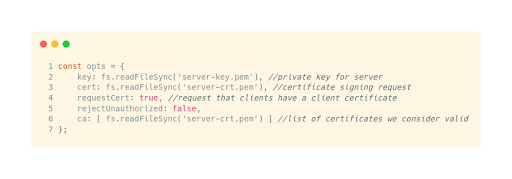
- Example Server Configuration variables:
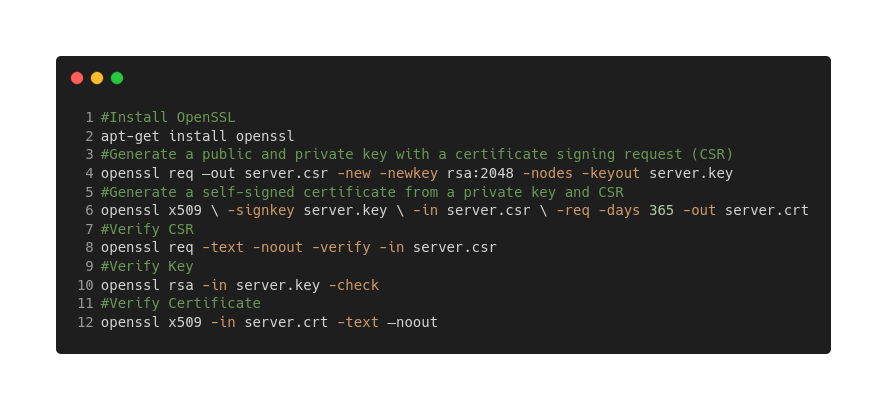
- Generating Certificates:


Step 1:
Create a new firebase project via this link: https://console.firebase.google.com/u/0/
Step 2:
- Register this application in the created firebase project.
- Go to your created firebase console.
- In the center of the project overview page, go to project setting and click the Android icon or Add app to launch the setup workflow.
- Enter the app’s package name (org.tensorflow.dot) in the Android package name field.
- Enter the App nickname and Debug signing certificate SHA-1.
- Click Register App.
- image
How to get the SHA-1
Step 3: Add the Firebase configuration file.
Step 4: Add Firebase SDKs to your app.
Step 5:
Sync this app in Android Studio to ensure that all dependencies have the necessary versions.
Step 1:
Add a web app in the project overview page.
Step 2:
You can get your Firebase SDKs and add them in the dashboard code. Find the following part of code and replace it with your new firebase SDKs.
var firebaseConfig = {
  apiKey: "API_KEY",
  authDomain: "PROJECT_ID.firebaseapp.com",
  databaseURL: "https://PROJECT_ID.firebaseio.com",
  projectId: "PROJECT_ID",
  storageBucket: "PROJECT_ID.appspot.com",
  messagingSenderId: "SENDER_ID",
  };