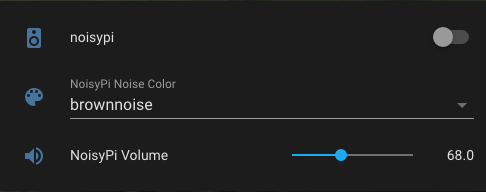
Raspberry Pi noise generator integration with Home Assistant using MQTT.
- Raspberry Pi
- Speaker (connected to Raspberry Pi)
- Python3 >= v3.7.3 (https://www.python.org/)
- SoX - Sound eXchange (http://sox.sourceforge.net/)
- paho-mqtt >= v1.5.1 (https://pypi.org/project/paho-mqtt/)
- start ~/mqtt/noisypi.py on boot via /etc/rc.local
- Home Assistant (https://www.home-assistant.io/)
- MQTT Broker (Mosquitto)
- MQTT account (to authenticate with NoisyPi)
- NoisyPi entities in configuration.yaml file
- switch.noisypi - turn on/off
- input_value.noisypi - set volume
- input_select.noisypi - select noise color [whitenoise, pinknoise, brownnoise]
- Automations
- volume publish & subscribe MQTT
- noise color publish & subscribe MQTT
- Install Python3
- Install SoX - Sound eXchange
- Install paho-mqtt
- Edit /etc/rc.local
- Clone noisyPi.py
- Setup Home Assistant
- Add noisyPi card to Home Assistant
- Reboot Your Raspberry Pi
From the Raspberry Pi:
  sudo apt update
sudo apt install python3From the Raspberry Pi:
apt-get install soxFrom the Raspberry Pi:
pip install paho-mqttFrom the Raspberry Pi:
Using nano or vi edit /etc/rc.local.
nano example:
sudo nano /etc/rc.localPaste the following lines to the end of the file.
CTRL+X to exit, y to save, and ENTER to accept file.
  # Run noisyPi setup
  amixer sset 'Headphone' 95%
  python3 /home/pi/noisyPi/noisyPi.py
exit 0From the Raspberry Pi:
  mkdir ~/noisyPi
  cd ~/noisyPi
wget https://raw.githubusercontent.com/ras434/noisyPi/main/noisyPi.pyFrom Home Assistant configuration.yaml file, add the following entries:
  input_number:
    noisypi_volume:
      name: NoisyPi volume
      initital: 80
      min: 50
      max: 95
      step: 1
      icon: mdi:volume-high

  input_select:
    noisypi_noise_color:
      name: NoisyPi Noise Color
      options:
        - whitenoise
        - pinknoise
        - brownnoise
      initial: brownnoise
      icon: mdi:palette

  switch:
    - platform: mqtt
      name: "noisyPi"
      icon: mdi:speaker
      state_topic: "stat/noisypi/NOISE"
      command_topic: "cmnd/noisypi/NOISE"
      availability_topic: "tele/noisypi/LWT"
      payload_on: "on"
      payload_off: "off"
      state_on: "on"
      state_off: "off"
      qos: q
      retain: false
From Configuration > Automations, add the following 4 new automations:
NoisyPi Color (pub):
alias: NoisyPi Color (pub)
description: NoisyPi Color Selection Changed
trigger:
  - platform: state
    entity_id: input_select.noisypi_noise_color
condition: []
action:
  - service: mqtt.publish
    data:
      topic: cmnd/noisypi/COLOR
      retain: true
      qos: '1'
      payload: '{{ states(''input_select.noisypi_noise_color'') }}'
mode: single
NoisyPi Color (sub):
alias: NoisyPi Color (sub)
description: Set NoisyPi Color Value
trigger:
  - platform: mqtt
    topic: stat/noisypi/COLOR
condition: []
action:
  - service: input_select.set_value
    target:
      entity_id: input_select.noisypi_color
    data:
      value: '{{ trigger.payload }}'
mode: single
NoisyPi Volume (pub):
alias: NoisyPi Volume (pub)
description: NoisyPi Volume Slider Moved
trigger:
  - platform: state
    entity_id: input_number.noisypi_volume
condition: []
action:
  - service: mqtt.publish
    data:
      topic: cmnd/noisypi/VOLUME
      retain: true
      qos: '1'
      payload: '{{ states(''input_number.noisypi_volume'') | int }}'
mode: single
NoisyPi Volume (sub):
alias: NoisyPi Volume (sub)
description: Set NoisyPi Volume Slider
trigger:
  - platform: mqtt
    topic: stat/noisypi/VOLUME
condition: []
action:
  - service: input_number.set_value
    target:
      entity_id: input_number.noisypi_volume
    data:
      value: '{{ trigger.payload }}'
mode: singleFrom Home Assistant:
In your Lovelace UI, edit your preferred dashboard and add the noisyPi elements:

From Raspberry Pi:
sudo rebootOnce your Pi completes the reboot it should automatically start noisypi.py.


