Once settled in your groups decide who will be the Git Czar.
- Duplicate the original repo
1.1. Clone down the original repo, without forking it.
1.2. Create a new repository on your GitHub account.
1.3. Set(or change) the remote of the cloned repo to your new repo.
git remote set-url https://github.com/your-username/name-of-the-new-repo
1.4. Add, commit and push to master
-
Add a develop branch on your remote repository
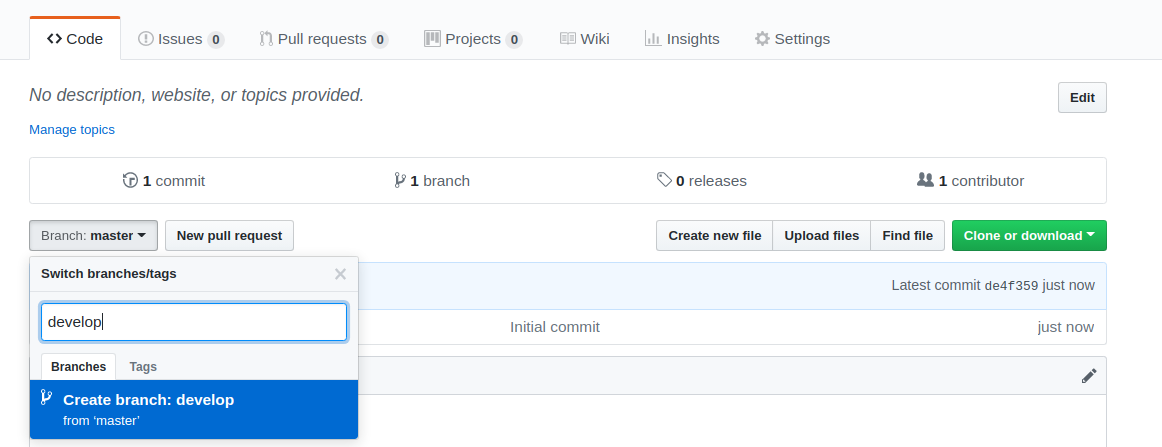
-
Now that you have a remote
devbranch let's go ahead and set it as the default branch of our repository. -
Your default branch is named
master. If you have admin rights over a repository on GitHub, you can change the default branch on the repository. Setting the default branch -
In Settings, in the left menu, click Branches.

Update the dev to be the default branch.

- Create branch protection rules
- Click on settings and then branches
- Under Branch name pattern enter the name of your branch - dev
- Check Require pull request reviews before merging
- Check Require view from Code Owners
- Save Changes

-
In Settings, under Manage Access, add your team members.
-
Create a group chat in Slack and and share the link of your fork with your team.
-
Your team members should have received an invitation to collaborate via email.
-
Clone the repo to your local machine and
cdinto it. -
Create a branch as yourname-dev
git checkout -b <your-name-dev>- Proceed to client/App.js and delete all the boilerplate provided. Replace it with:
import React, { Component } from 'react'

export default class App extends Component {
  render() {
    return (
      <div>
        <h1>Practice</h1>
      </div>
    )
  }
}
- Add, commit and push to yourname-dev.
- Create a pull request and wait for the Git Czar to approve it and merge it.
- Since you are the first person to push changes to the source code, there will be no merge conflict.
-
Create a branch as yourname-dev
git checkout -b yourname-dev.(i.e., git checkout -b svetla-dev).
-
cdintoclientand make changes to different files - maybe include a<p>/<a>/<img>tag inside in the render() in App.js, create new component and/or add few lines of CSS to App.css -
cd ..or just..ofclientdirectory and add,commit and push the changes to your branch. -
git add .andgit commit -m <your-message-here> -
git pull origin devto get the latest changes fromdevbranch and possibly resolve a merge conflict inside your code editor -
Create a pull request on GitHub. Inform the Git Tzar that you did a pull request and there are no merge conflicts.
- Merge the changes from
devtomaster
git checkout mastergit pull origin devgit push origin master- to update the remote branchmaster
OR
git checkout devgit pull origin dev- update the local branchdevgit checkout mastergit merge devgit push origin master- to update the remote branchmaster
- Delete the remote branches
git push origin --delete remote-branch
- Checkout to
devor to a new branch of yours and delete your old local branch
git branch -d yourname-branch
If you want to see your commit history:
git log --oneline --decorate --graph --all
- Undoing
git add .
- checkout to a new branch
- make a change on any file
- Stage your changes with
git add . git status- confirm the changes have been stagedgit resetgit status- confirm the changes have been unstaged
If you staged files for commit but you weren't ready to commit them, simply git reset .This will undo git add . Super useful when you forgot to include your .gitignore file.
- If you added and committed your changes but you realize you made a mistake/have a bug/don't want it, don't panic and don't push.
➜  git-group-fullstack git:(dev) ✗ git commit -m "new.js"
[dev b7c053d] new.js
 1 file changed, 1 insertion(+)
 create mode 100644 new.js
Instead:
git revert <unwanted commit hash>
In this case, the commit hash is b7c053d. So, git revert b7c053d will undo/revert that commit by creating a new commit. This will bring the VIM interface which looks like that:
Revert "new.js"

This reverts commit 58ceee04a7fe86064037efe4d709a619387d89bf.

# Please enter the commit message for your changes. Lines starting
# with '#' will be ignored, and an empty message aborts the commit.
#
# On branch dev
# Changes to be committed:
#       modified:   new.js
"~/GeneralAssembly/work/git-group-fullstack/.git/COMMIT_EDITMSG" 11L, 283C
- press
i, go to a line without a#and type your commit message - press Esc and type
:qa!
Type git status to verify what you just did. As you can see on the code below, we successfuly reverted the commit and new.js file is not being staged or committed.
Untracked files:
  (use "git add <file>..." to include in what will be committed)

        new.js

nothing added to commit but untracked files present (use "git add" to track)
You can also see all commits of all branches and get the commit hash from there by typing:
git log --oneline or simply git log
You can read more about git revert here - how-to-revert-commit
Be careful with this command.
In order to reproduce this scenario make a change to a file, add and commit and then try and revert the commit.
- You are on your branch, you did some changes locally. Let's say you want to switch branches, but you don’t want to commit what you’ve been working on yet, instead you’ll stash the changes. You may find this command useful if you forgot to pull the latest changes from
dev.
To push a new stash onto your stack, run:
git add .
git stash
Now you have a clean working directory and you can git pull origin dev.
Once you see the changes applied locally from the dev branch go ahead and apply your stash by running git stash apply.
In order to reproduce this scenario:(switching between branches and applying stash to a new branch)
- Checkout to a new local branch -
git checkout -b yourname-dev-test - Make a change to a file
git add .git stash- Checkout to a different local branch -
git checkout -b new-yourname-dev-test - Apply the stash -
git stash apply
Be careful with this one too! You can have more than one stash, git stash list to see all your stashes and select which stash you want. In this case you had only one, so it automatically applied it.