50 minutes, Intermediate, Start Building
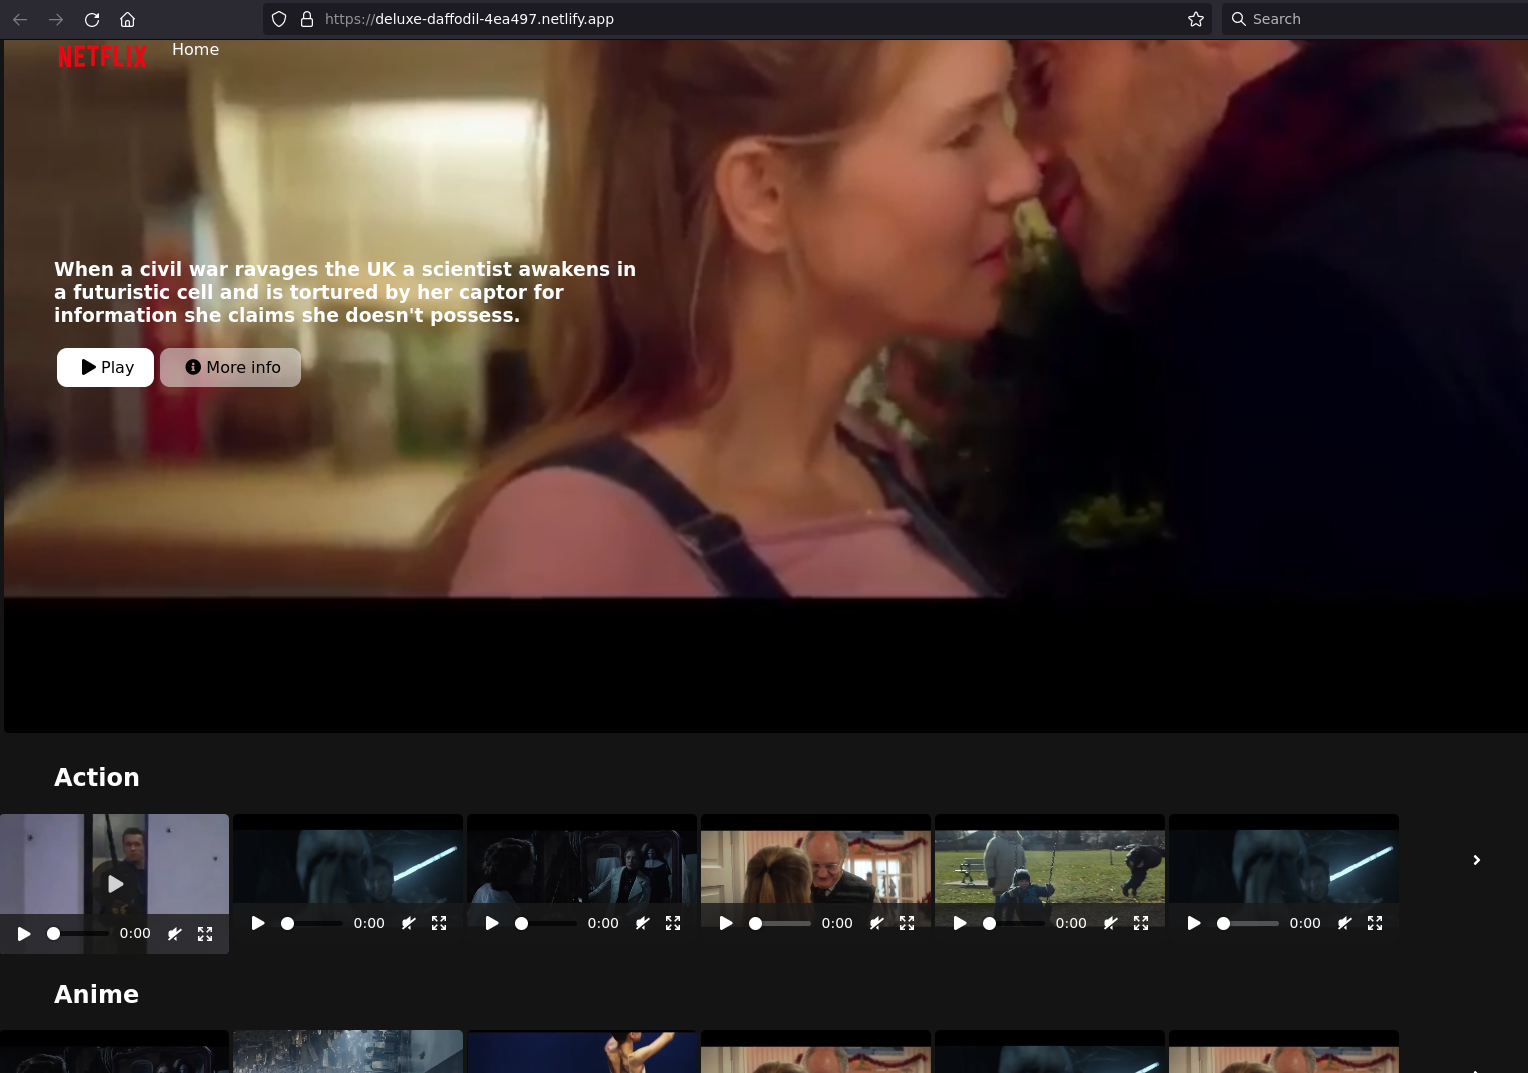
A simple ReactJS Netflix homepage clone running on Astra DB that leverages the GraphQL API with paging and infinite scrolling. This application is the result of the collaboration between Ania Kubow and the Datastax Developer Advocate team.
See the Video Walkthrough of what you will build!
- Build and run a Netflix clone.
- Learn GraphQL API and how to use it with a database to create the tables and navigate the data.
- Learn about pagination and infinite scrolling in a Web UI.
- Leverage Netlify and DataStax Astra DB.
- Deploy the Netflix clone to production with Netlify.
Can I run the workshop on my computer?
There is nothing preventing you from running the workshop on your own machine. If you do so, you will need
- git installed on your local system
- node 15 and npm 7 or later
You will have to adapt commands and paths based on your environment and install the dependencies by yourself. We won't provide support to keep on track with schedule. However, we will do our best to give you the info you need to be successful.
What other prerequisites are there?
- You will need a github account
- You will also need Netlify and Astra DB accounts, but we'll work through that in the exercises
- Use Chrome or Firefox for the best experience. Other browsers are great, but don't work well with the GitPod integration we use a bit later.
Do I need to pay for anything for this workshop?
No. All tools and services we provide here are FREE.
Will I get a certificate if I attend this workshop?
Attending the session is not enough. You need to complete the homeworks detailed below and you will get a nice badge.
It doesn't matter if you join our workshop live or you prefer to do at your own pace, we have you covered. In this repository, you'll find everything you need for this workshop:
- Create Astra DB Instance
- Create a security token
- Create table for genres with GraphQL
- Insert genre data with GraphQL
- Retrieve genres with GraphQL
- Create a table for movies
- Insert a few movies
- Retrieve movies: Pagination
- Deploy skeletal GUI to Netlify
- Launch Gitpod from YOUR Github repo
- Set up and use
astra-cli - Serverless Functions
- Fetching from the Front-End
- Install the Netlify CLI
- Provide DB connection parameters
- Run the app in dev mode
- Connect to your Netlify site
- Deploy in production!
🎓 Complete the assignment, receive your Badge!
- Intro to GraphQL Workshop
- React starter using NPX
- React ToDo app
- What is JamStack?
- Video tutorial with Ania Kubow
🎁 When creating your instance, use the promotion code ANIA200 to get 200$ of additional free credit!
ASTRA DB is the simplest way to run Cassandra with zero operations at all - just push the button and get your cluster. No credit card required, 40M read/write operations and about 80GB storage monthly for free - sufficient to run small production workloads. If you use up your credits the databases will pause, no charge, and you will be given the option to upgrade to a higher tier.
Leveraging Database creation guide create a database. Right-Click the following button and Open in a new TAB.
| Field | Value |
|---|---|
| Database Name | workshops |
| Keyspace Name | netflix |
| Regions | Select GOOGLE CLOUD, then an Area close to you, then a region with no LOCK 🔒 icons: the LOCKed regions are the region not accessible to the Free Tier. |
ℹ️ Note: If you already have a database
workshops, simply add a keyspacenetflixusing theAdd Keyspacebutton on the bottom right hand corner of the DB Dashboard page. You may have to "Resume" the database first in case it is in "hibernated" state.
While the database is being created, you will also get a Security token (needed to authenticate with your database and start using it): please IGNORE THIS ONE, as we will be soon creating a new, more powerful token for today.
The status will change from Pending to Active when the database is ready, this usually only takes 2-3 minutes.
Note: this step is very important, as the token generated automatically for you with the database lacks some permissions we'll use in the workshop.
Create a token for your app, using the "Database Administrator" role.
Keep it handy for later use (best to download it in CSV format, as the values
will not be visible afterward).
This will provide authentication later when interacting with the database.
Today, in particular, you'll need the string labeled "token" (the one starting with AstraCS:...).
⚠️ ImportantThe instructor will show the token creation on screen, but will then destroy it immediately for security reasons.
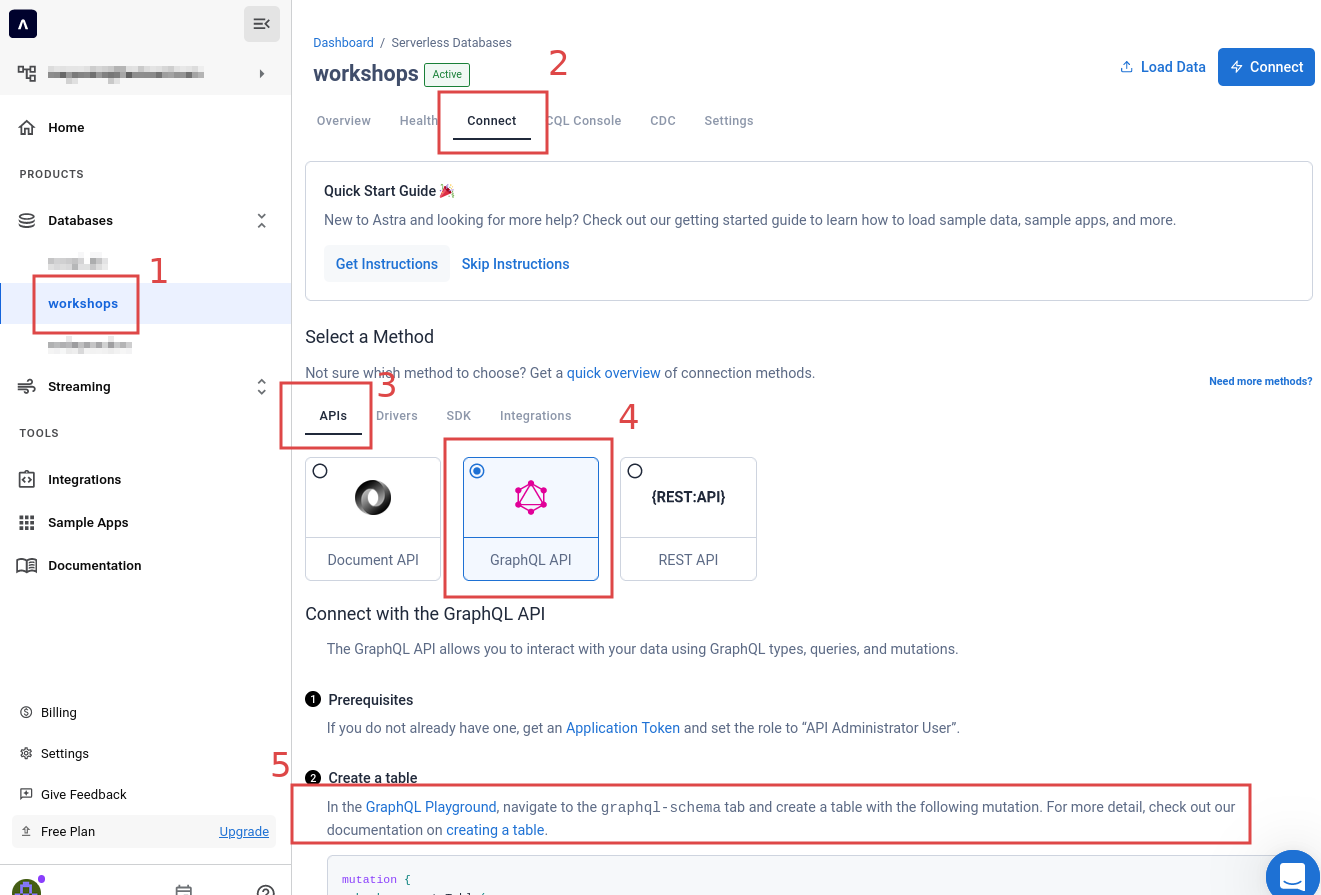
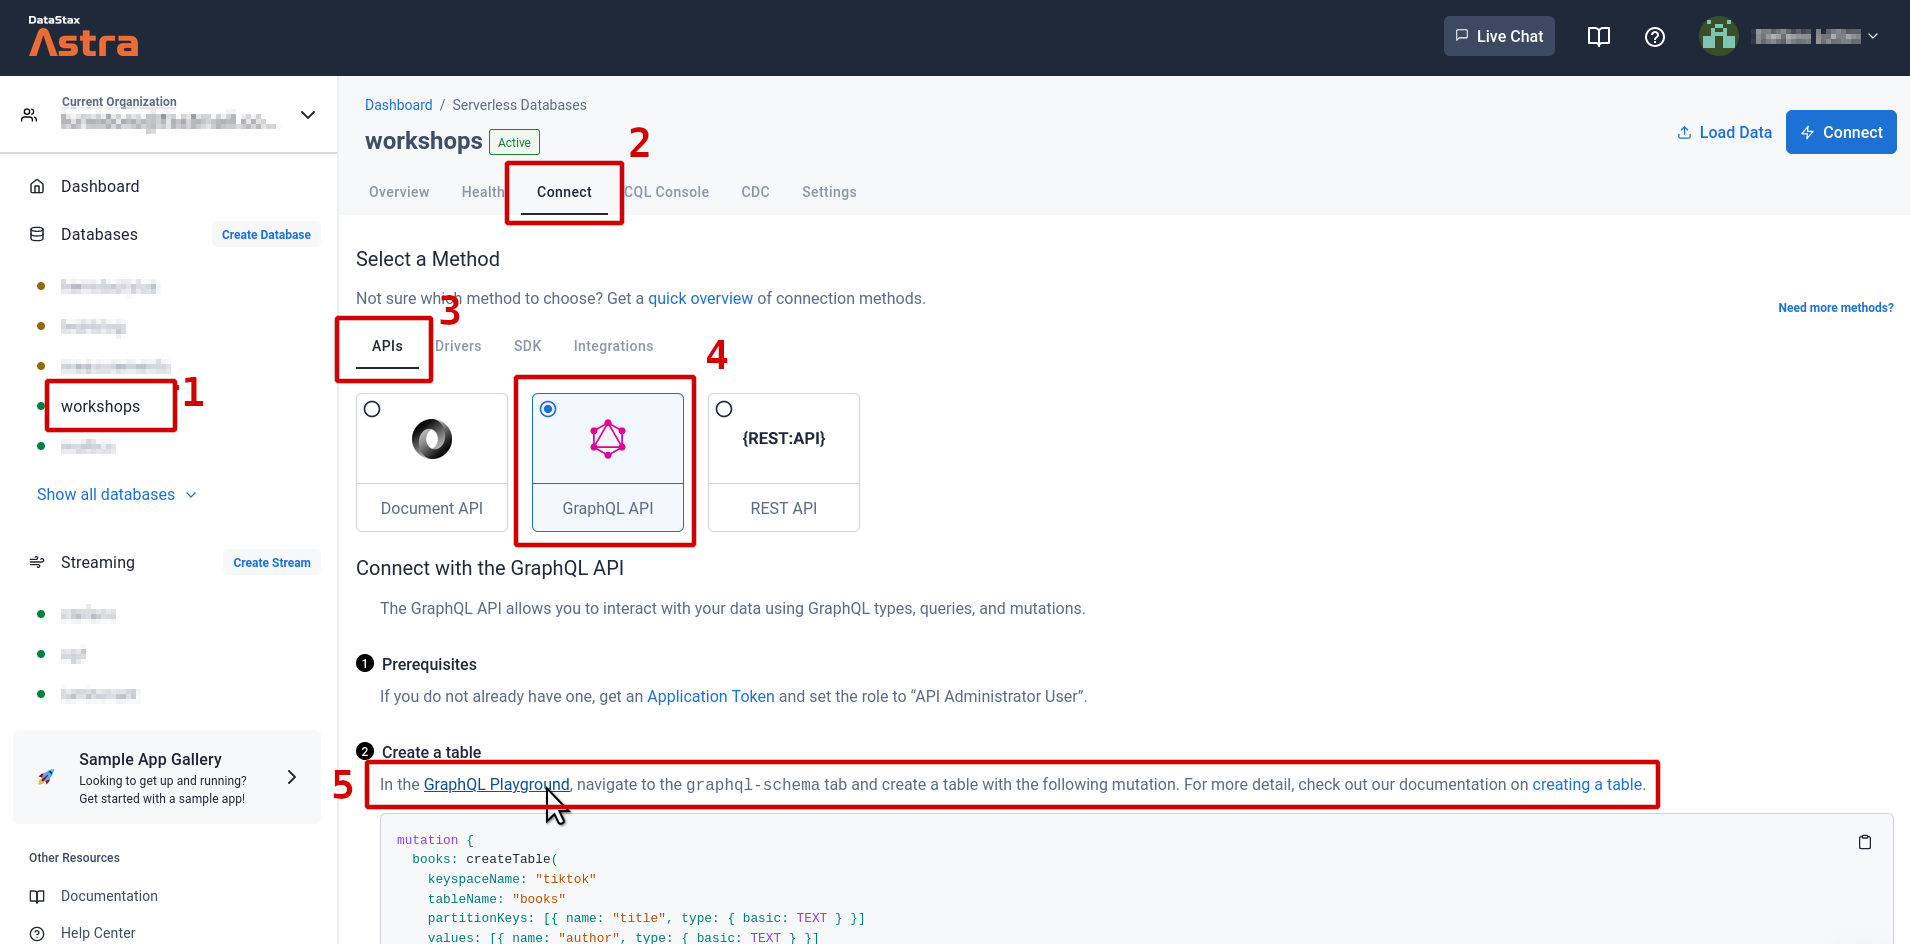
✅ Step 3a: Open GraphQL Playground:
- Ensure you are logged on to your Astra account
- Click on the "workshops" database on the left (expanding the list if needed)
- Click
ConnectTAB - Click the
APIsconnection method - Make sure
GraphQL APIis selected - Locate the link to your GraphQL Playground in the text
Note: in the following, we will refer to "playground tabs". These are not the tabs in your browser, rather they are tabs within the Playground application, to switch between the (logically distinct) realms of "managing schema" and "managing data in the tables" (more on that later).
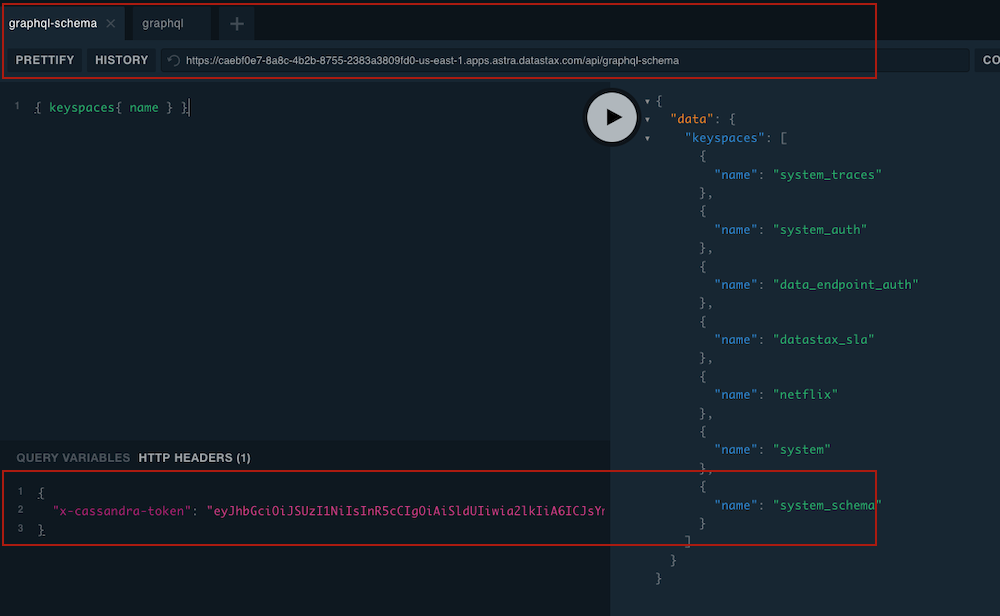
✅ Step 3b: Provide the database token as header
In the GraphQL Playground, Populate HTTP HEADER variable x-cassandra-token on the bottom of the page with your token (including the AstraCS: part).
This is the "Database Administrator" token you created earlier on the Astra DB dashboard (Step 2 above).
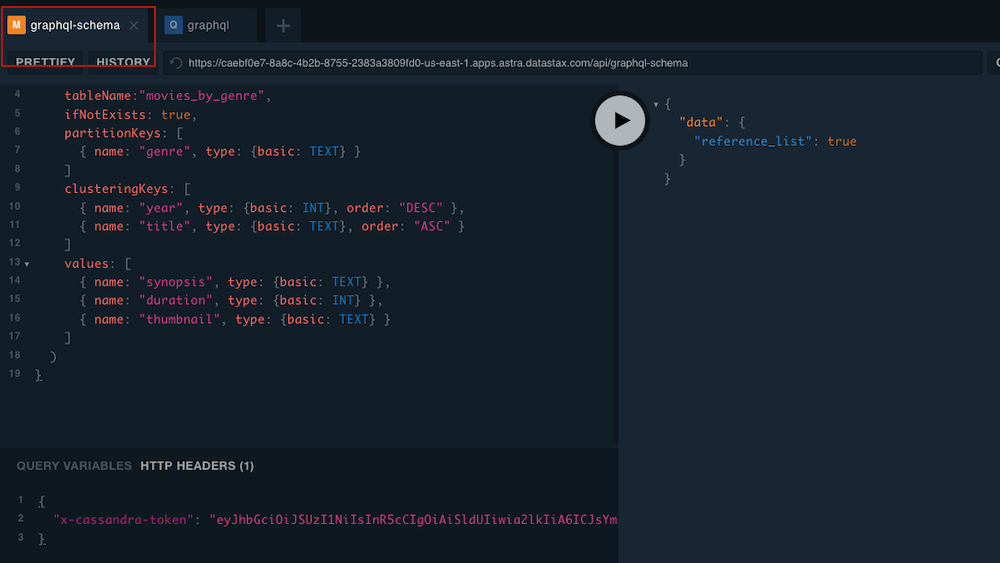
Note: make sure you are on the graphql-schema playground tab in this step. Click here to show image.
Note: the GraphQL Playground starts with a ready-to-use temporary token as the
x-cassandra-tokenheader. But you want the queries run in the Playground to be identical to those that the Netlify functions will run from code, so please replace the token with your DB token as instructed.
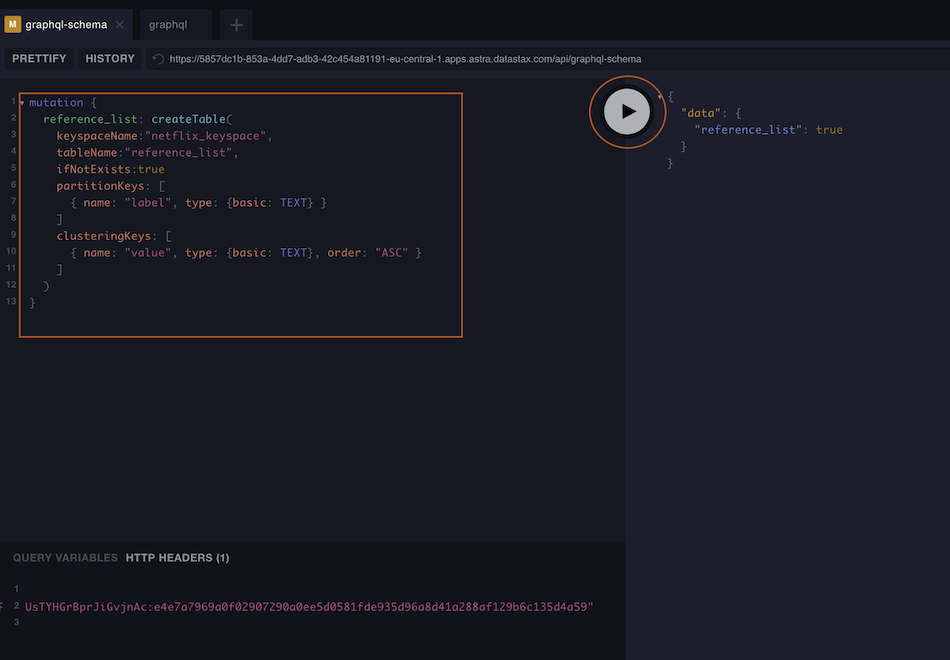
✅ Step 3c: In GraphQL Playground, create the reference_list table:
Copy the following mutation to the left panel
mutation createReferenceList {
  reference_list: createTable(
    keyspaceName:"netflix",
    tableName:"reference_list",
    ifNotExists:true
    partitionKeys: [
      { name: "label", type: {basic: TEXT} }
    ]
    clusteringKeys: [
      { name: "value", type: {basic: TEXT}, order: "ASC" }
    ]
  )
}GraphQL Playground troubleshooting (covers this whole section)
| Trouble | Shooting |
|---|---|
| Server cannot be reached | Add Astra token to headers (including AstraCS:...; check quotes) |
| Server cannot be reached (second playground tab) | Check playground target URL ends with netflix |
| Response not successful: Received status code 401 | Same as "server cannot be reached" |
| Response not successful: Received status code 404 | Check spelling of keyspace in target URL |
| "Play" button does nothing | Ensure query is syntactically correct |
| "Validation error of type FieldUndefined" | Most likely query in the wrong playground tab, or writing to table not created yet |
✅ Step 4a: Get to the API URL for your keyspace
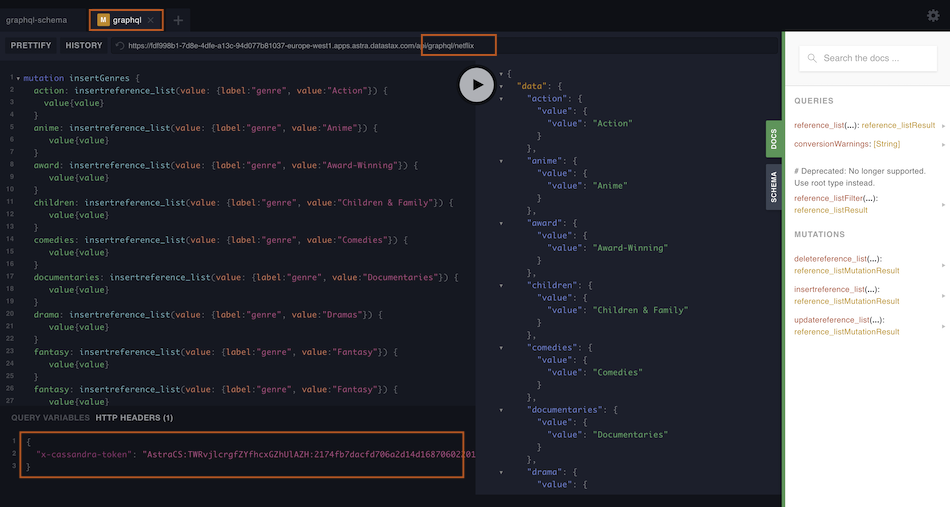
In graphQL playground, change playground tab to now use graphql. The Playground has its own address bar
(note: it's not the address bar of your browser). Edit the ending of the URL shown there, from system to the
name of the keyspace: netflix
✅ Step 4b: Repeat the insertion of the x-cassandra-token header for this playground tab (as you did for the first one):
✅ Step 4c: In the GraphQL Playground, run the mutation that writes genre data:
Copy the following mutation on the left panel:
mutation insertGenres {
  action: insertreference_list(value: {label:"genre", value:"Action"}) {
    value{value}
  }
  anime: insertreference_list(value: {label:"genre", value:"Anime"}) {
     value{value}
  }
  award: insertreference_list(value: {label:"genre", value:"Award-Winning"}) {
     value{value}
  }
  children: insertreference_list(value: {label:"genre", value:"Children & Family"}) {
     value{value}
  }
  classic: insertreference_list(value: {label:"genre", value:"Classic"}) {
     value{value}
  }
  comedies: insertreference_list(value: {label:"genre", value:"Comedies"}) {
     value{value}
  }
  crime: insertreference_list(value: {label:"genre", value:"Crime"}) {
     value{value}
  }
  cult: insertreference_list(value: {label:"genre", value:"Cult"}) {
     value{value}
  }
  documentaries: insertreference_list(value: {label:"genre", value:"Documentaries"}) {
     value{value}
  }
  drama: insertreference_list(value: {label:"genre", value:"Dramas"}) {
     value{value}
  }
  fantasy: insertreference_list(value: {label:"genre", value:"Fantasy"}) {
     value{value}
  }
  french: insertreference_list(value: {label:"genre", value:"French"}) {
     value{value}
  }
  horror: insertreference_list(value: {label:"genre", value:"Horror"}) {
     value{value}
  }
  independent: insertreference_list(value: {label:"genre", value:"Independent"}) {
     value{value}
  }
  international: insertreference_list(value: {label:"genre", value:"International"}) {
     value{value}
  }
  italian: insertreference_list(value: {label:"genre", value:"Italian"}) {
     value{value}
  }
  musicmusicals: insertreference_list(value: {label:"genre", value:"Music & Musicals"}) {
     value{value}
  }
  realitytv: insertreference_list(value: {label:"genre", value:"Reality TV"}) {
     value{value}
  }
  romance: insertreference_list(value: {label:"genre", value:"Romance"}) {
     value{value}
  }
  scifi: insertreference_list(value: {label:"genre", value:"Sci-Fi"}) {
     value{value}
  }
  thriller: insertreference_list(value: {label:"genre", value:"Thriller"}) {
     value{value}
  }
  tvshow: insertreference_list(value: {label:"genre", value:"TV Show"}) {
     value{value}
  }
}
then click on the big "play button" arrow in the center to execute the mutation
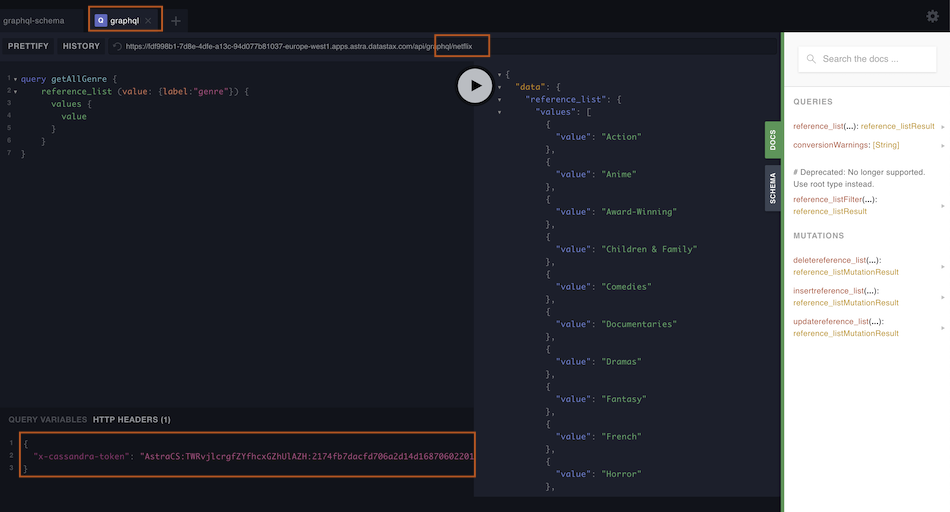
✅ Step 5a: In GraphQL Playground, not changing playground tab (stay on the second: "graphql", yeah) run the following query to read the value column of all table rows:
query getAllGenres {
    reference_list (value: {label:"genre"}) {
      values {
      	value
      }
    }
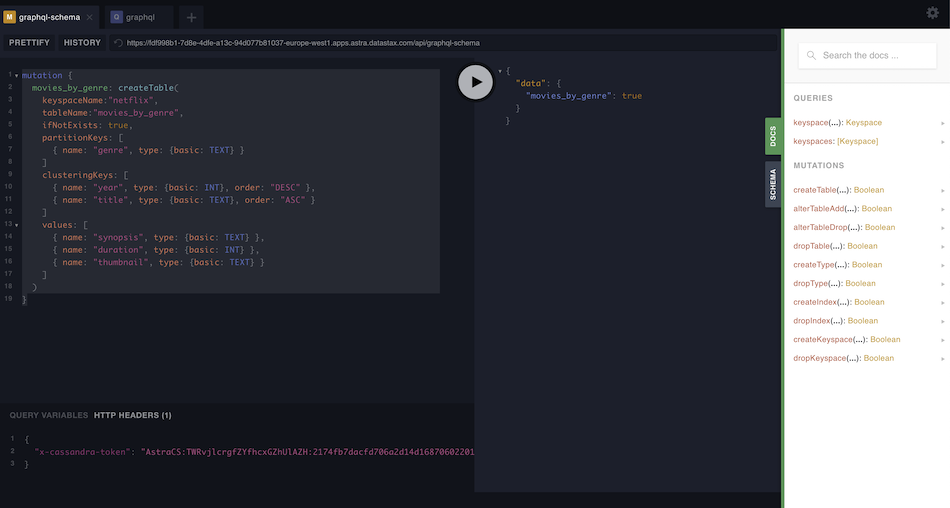
}✅ Step 6a: Switch back to first playground tab ("graphql-schema"; the token header will be already set).
Use the following mutation to create a new table:
mutation createMoviesTable {
  movies_by_genre: createTable(
    keyspaceName:"netflix",
    tableName:"movies_by_genre",
    ifNotExists: true,
    partitionKeys: [
      { name: "genre", type: {basic: TEXT} }
    ]
    clusteringKeys: [
      { name: "year", type: {basic: INT}, order: "DESC" },
      { name: "title", type: {basic: TEXT}, order: "ASC" }
    ]
    values: [
      { name: "synopsis", type: {basic: TEXT} },
      { name: "duration", type: {basic: INT} },
      { name: "thumbnail", type: {basic: TEXT} }
    ]
  )
}✅ Step 7a: Go to playground tab "graphql" again.
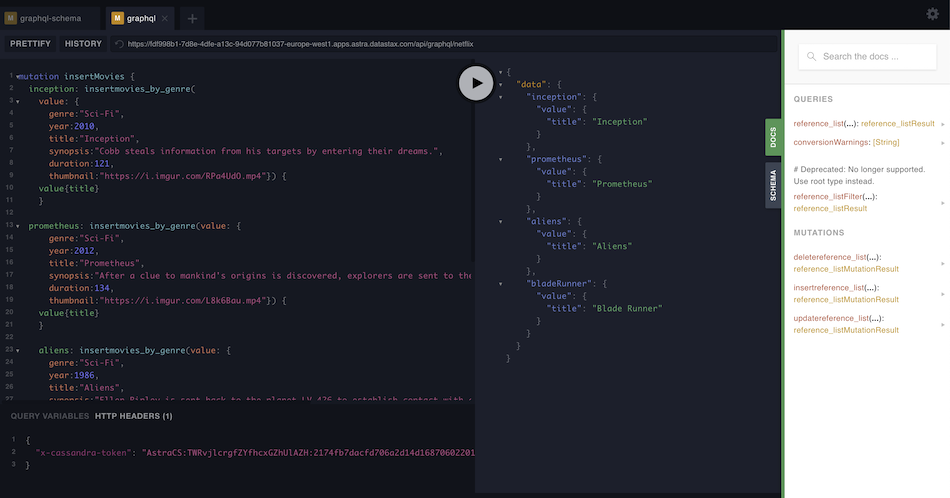
Use the following mutation to populate the movies_by_genre table with four movies:
mutation insertMovies {
  inception: insertmovies_by_genre(
    value: {
      genre:"Sci-Fi",
      year:2010,
      title:"Inception",
      synopsis:"Cobb steals information from his targets by entering their dreams.",
      duration:121,
      thumbnail:"https://i.imgur.com/RPa4UdO.mp4"}) {
        value{title}
    }

  prometheus: insertmovies_by_genre(value: {
      genre:"Sci-Fi",
      year:2012,
      title:"Prometheus",
      synopsis:"After a clue to mankind's origins is discovered, explorers are sent to the darkest corner of the universe.",
      duration:134,
      thumbnail:"https://i.imgur.com/L8k6Bau.mp4"}) {
        value{title}
    }

  	aliens: insertmovies_by_genre(value: {
      genre:"Sci-Fi",
      year:1986,
      title:"Aliens",
      synopsis:"Ellen Ripley is sent back to the planet LV-426 to establish contact with a terraforming colony.",
      duration:134,
      thumbnail:"https://i.imgur.com/QvkrnyZ.mp4"}) {
        value{title}
    }

    bladeRunner: insertmovies_by_genre(value: {
      genre:"Sci-Fi",
      year:1982,
      title:"Blade Runner",
      synopsis:"Young Blade Runner K's discovery of a long-buried secret leads him to track down former Blade Runner Rick Deckard.",
      duration:145,
      thumbnail:"https://i.imgur.com/xhhvmj1.mp4"}) {
        value{title}
    }
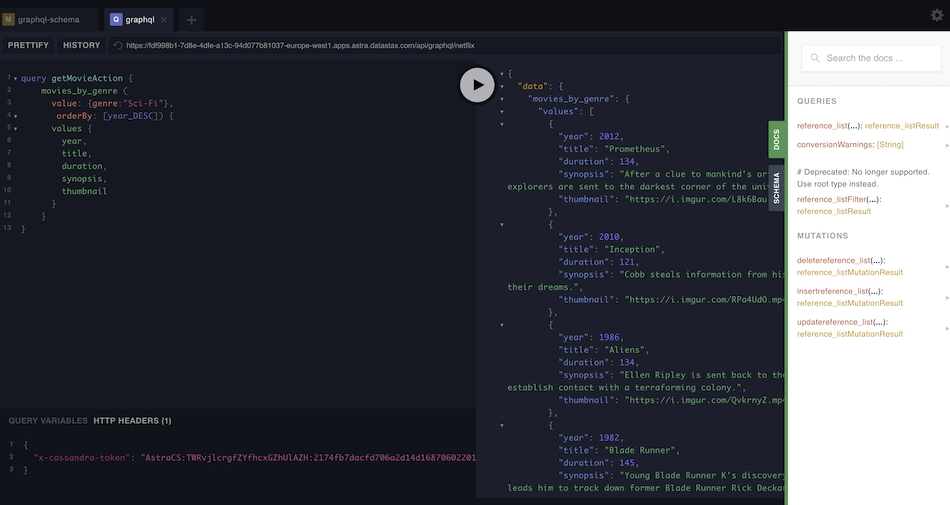
}✅ Step 8a: In GraphQL Playground, not changing playground tab (stay on the second tab, "graphql", yeah) list values from the table with the following command:
query getMovieAction {
  movies_by_genre (
      value: {genre:"Sci-Fi"},
      orderBy: [year_DESC]
  ) {
    values {
      year,
      title,
      duration,
      synopsis,
      thumbnail
    }
  }
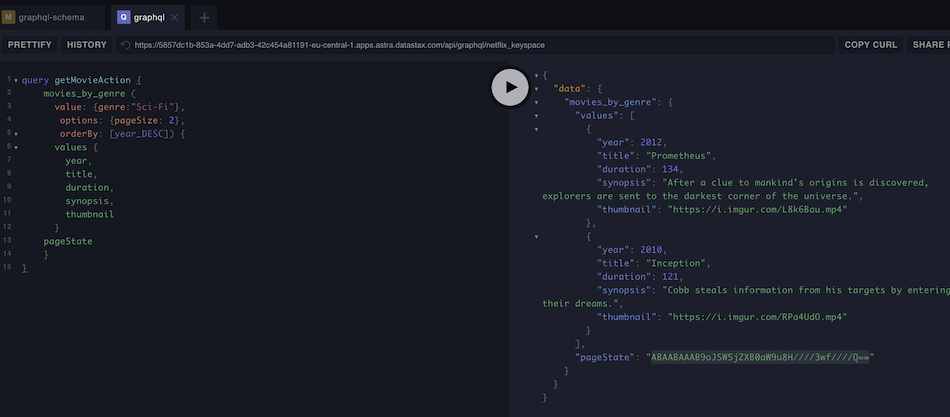
}✅ Step 8b: Enable pagination: On a small dataset, you can retrieve all values in the table at once; but in general, for performance or network reasons, you'll need pagination. Run a similar query as before, but this time asking for a page size of 2:
query getMovieActionPag1 {
    movies_by_genre (
        value: {genre:"Sci-Fi"},
        options: {pageSize: 2},
        orderBy: [year_DESC]
    ) {
      values {
        year,
        title,
        duration,
        synopsis,
        thumbnail
      }
    pageState
    }
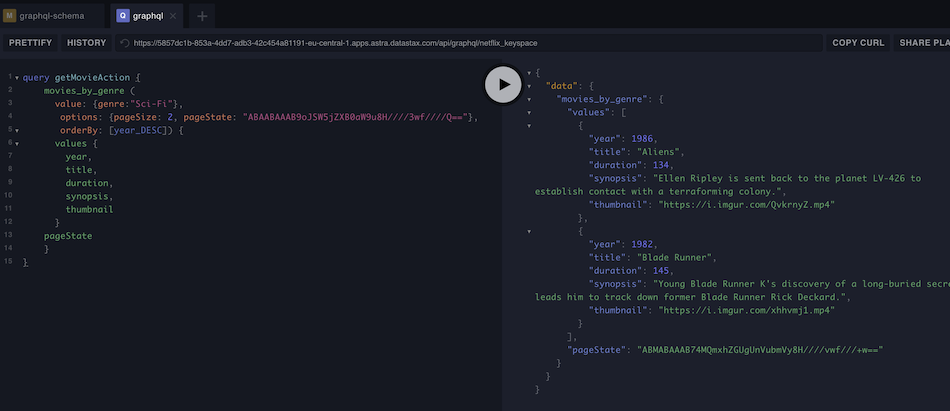
}✅ Step 8c: Fetch the next page:
Notice that pageState now is also returned. Use it to fetch the next 2 items (next page):
edit the next query to replace YOUR_PAGE_STATE with your own string value:
query getMovieActionNextPage {
    movies_by_genre (
        value: {genre:"Sci-Fi"},
        options: {pageSize: 2, pageState: "YOUR_PAGE_STATE"},
        orderBy: [year_DESC]
    ) {
      values {
        year,
        title,
        duration,
        synopsis,
        thumbnail
      }
    pageState
    }
}If you try to paste the newly-obtained value for pageState and re-run the query, you get an empty list and a null pageState in return. D'oh! You had scrolled through all rows already:
this is how pagination signals the end of the full results list.
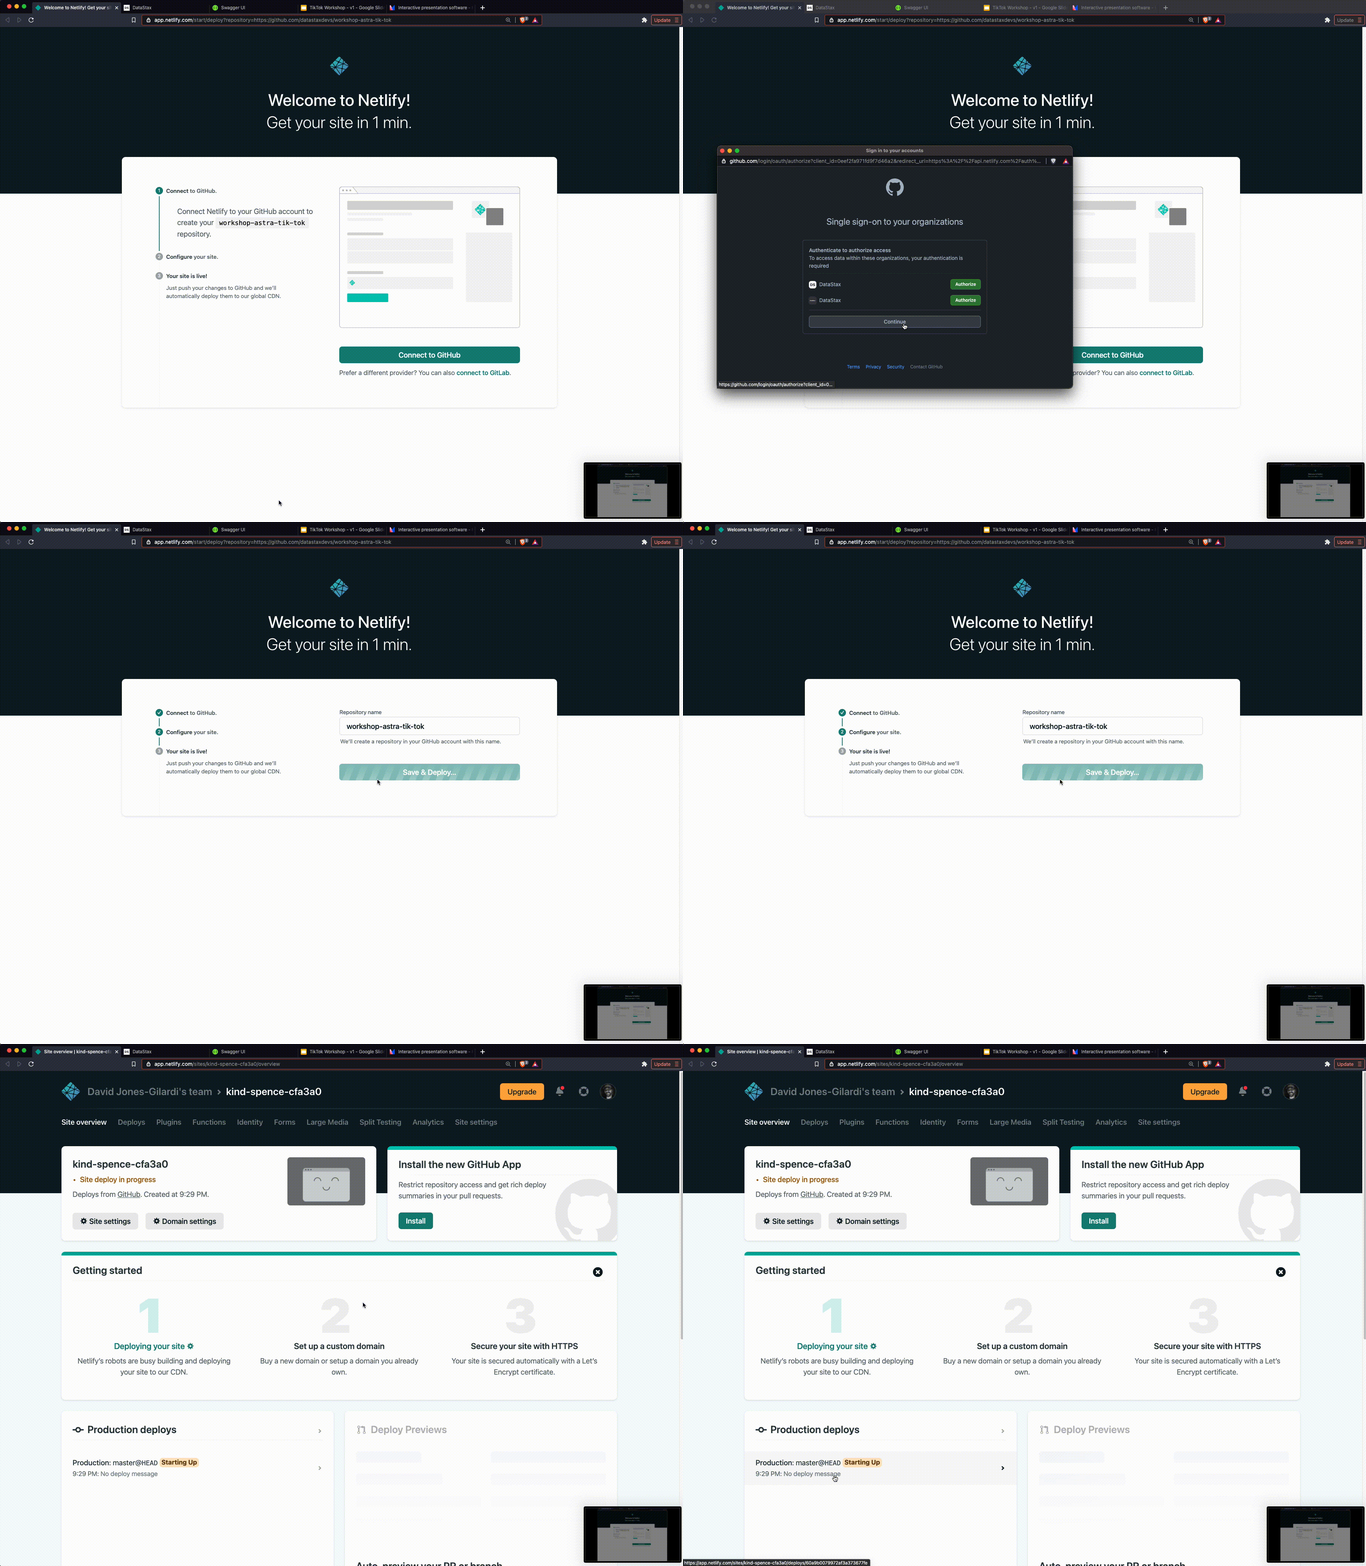
✅ Step 1a: Netlify Button: Click the following button to deploy the skeletal GUI to Netlify. There is no data since there is no database connected to the app (yet); we will connect the database to the app shortly.
Note: preferrably Ctrl-click for a new tab.
What does the Netlify deploy button do?
The Netlify deploy button will:
- Create a new repository for you on Github (Note: it's an unrelated copy, not a fork)
- Create a site on Netlify (and deploy a nonworking build of the app, which lacks the DB connection parameters still)
- Link the two together.
This will take a few minutes:
- you may have to authenticate through Github in the process;
- confirm the repo name and "Save & Deploy" when asked.
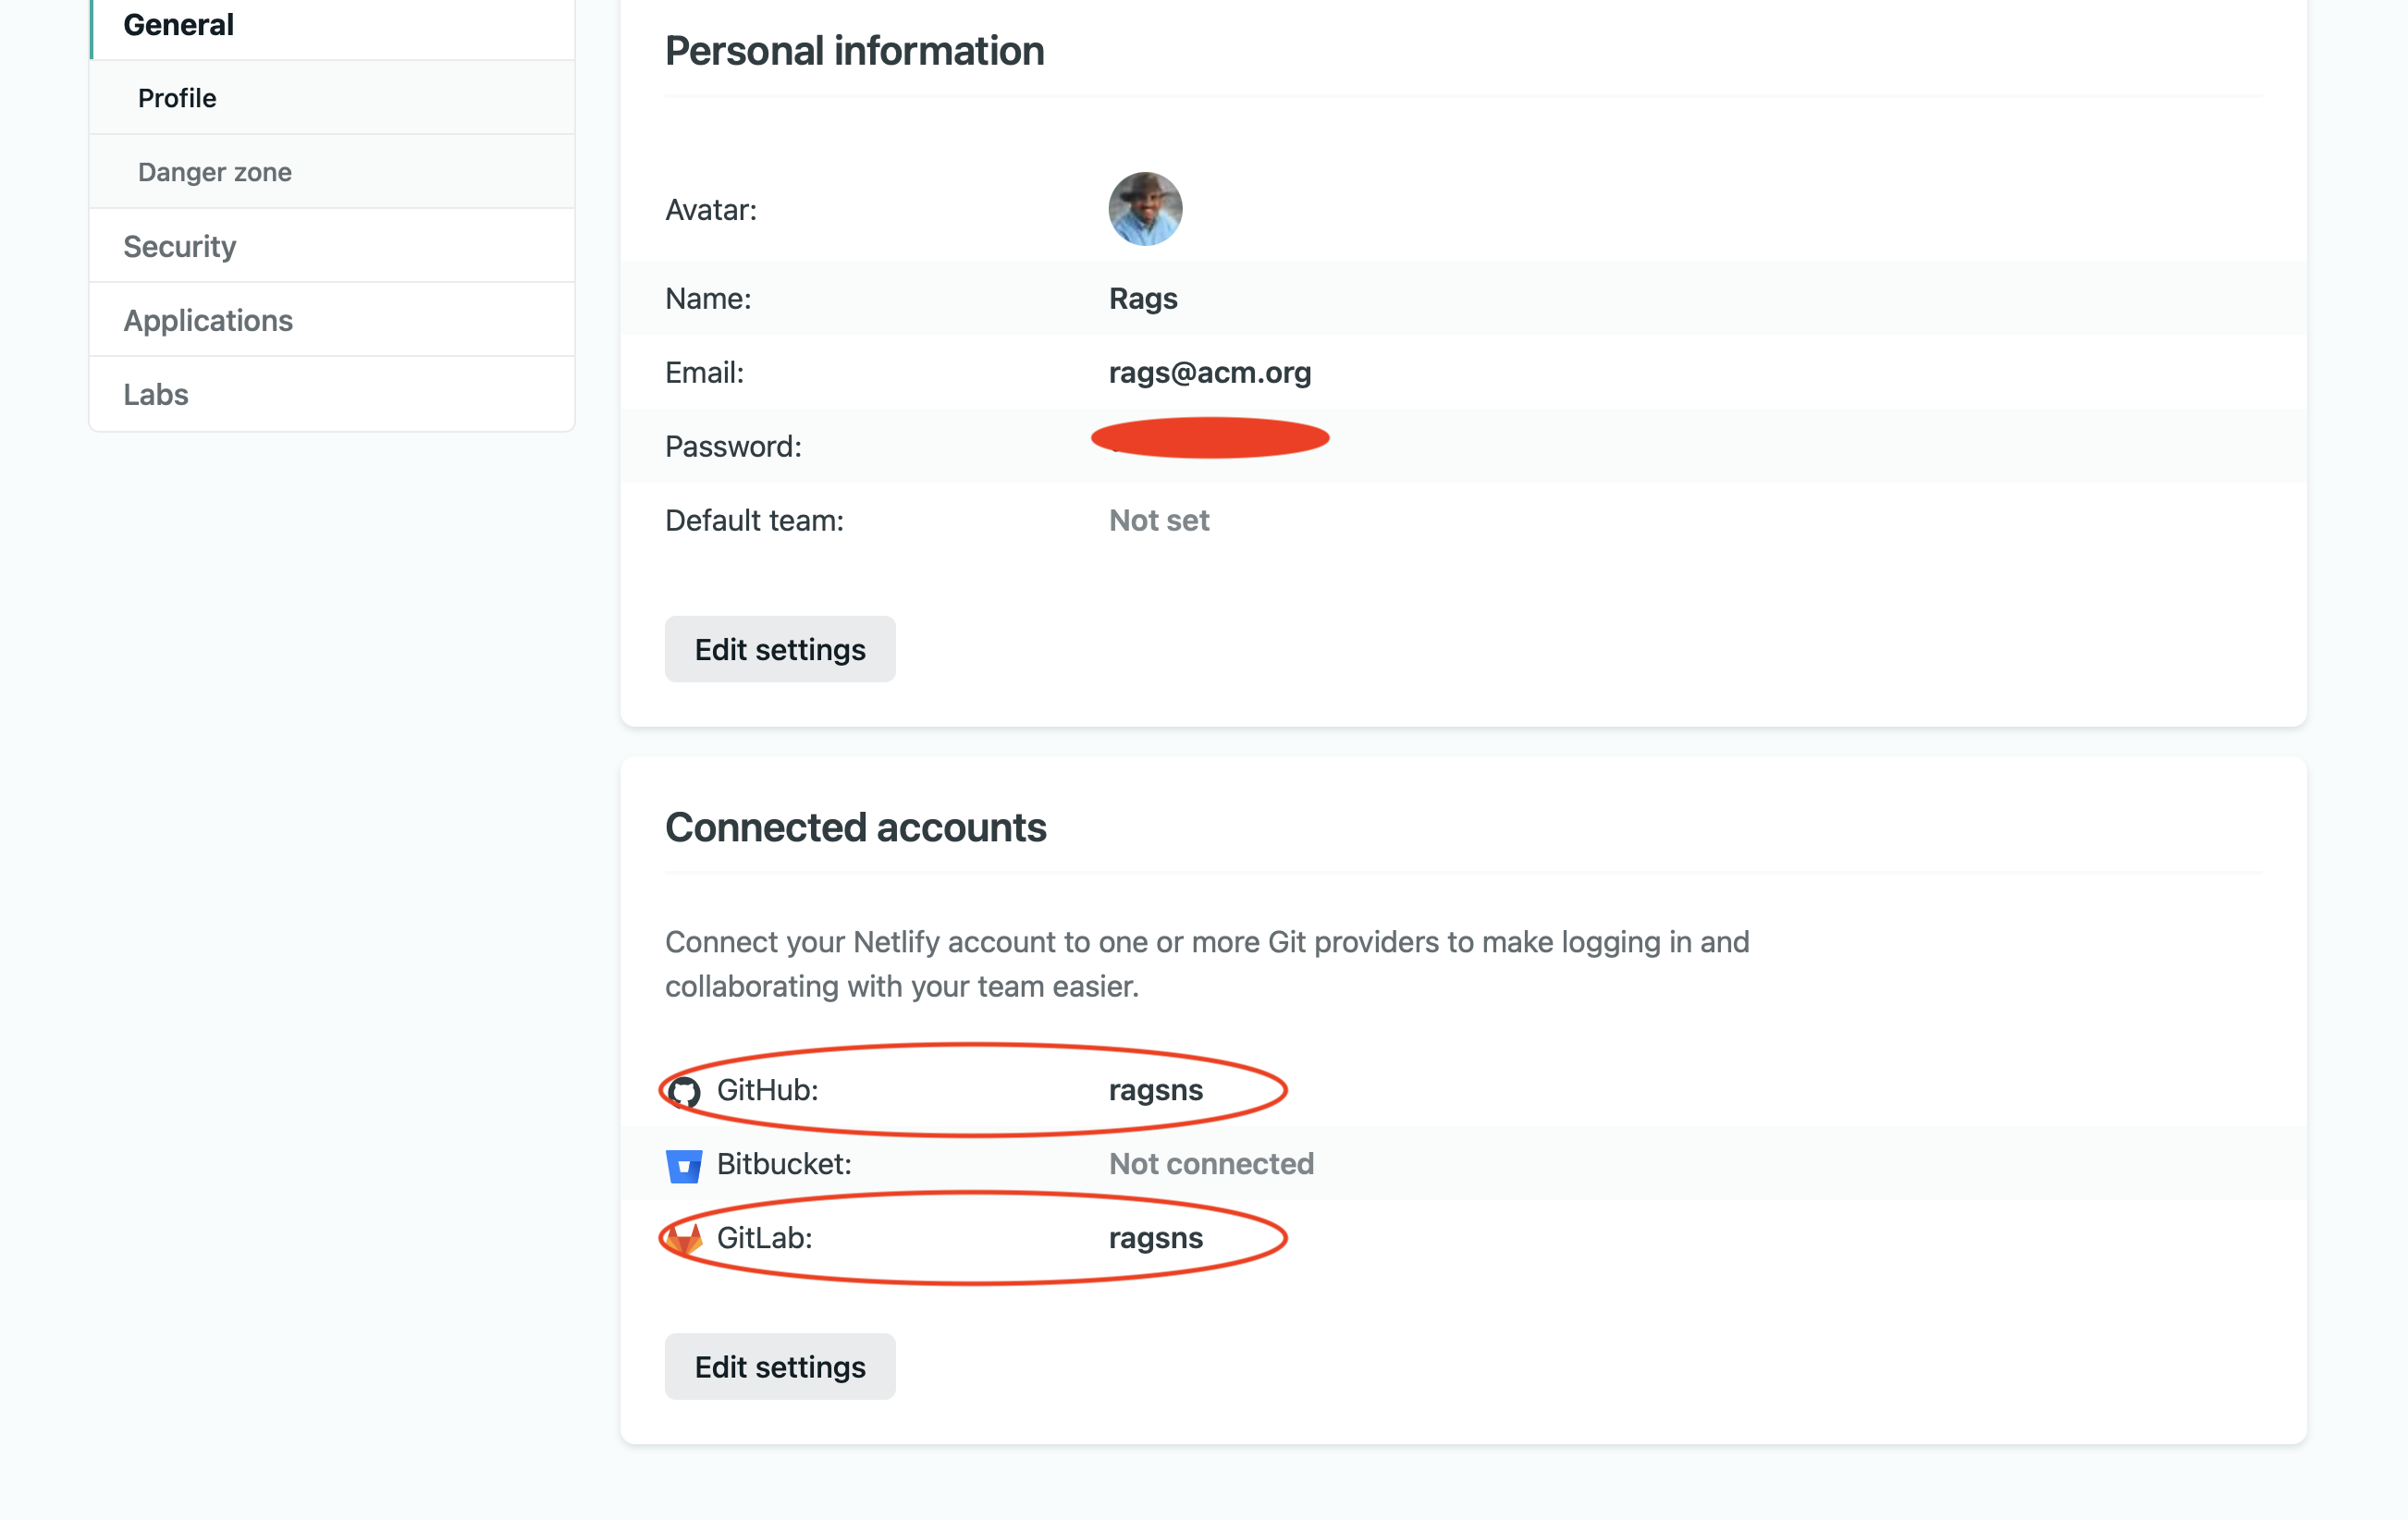
Note: if there is an existing account in Netlify, check the settings to make sure the Netlify account is connected to your Github account.
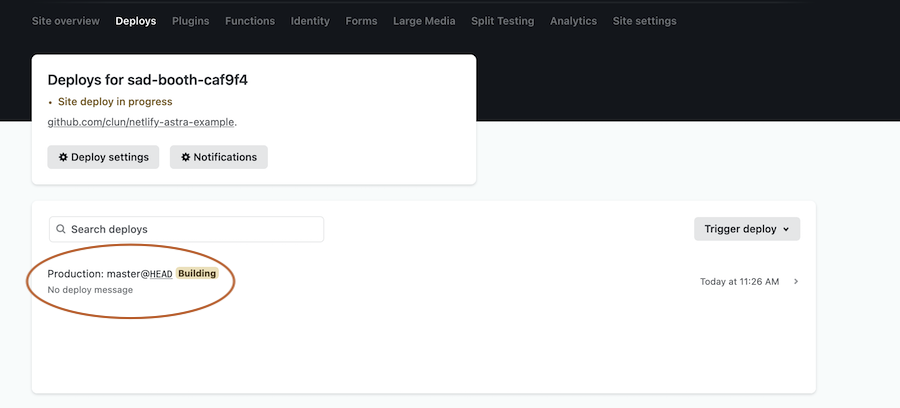
✅ Step 1b: Check the deploy logs: Click on Site deploy in progress within the Netlify UI.
Then click the top deploy link to see the build process.
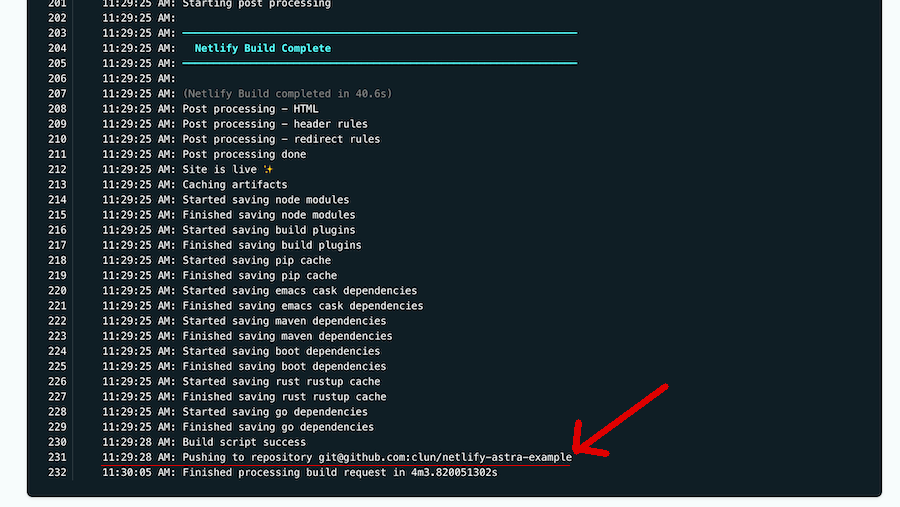
✅ Step 1c: Complete the build: Wait until the build shows Netlify Build Complete, When you see "Pushing to repository..." you're ready to move on.
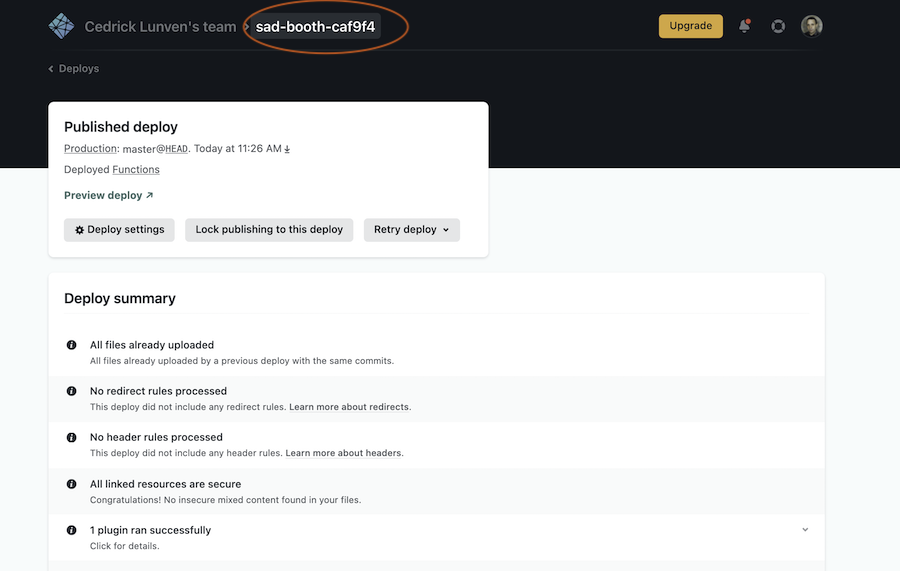
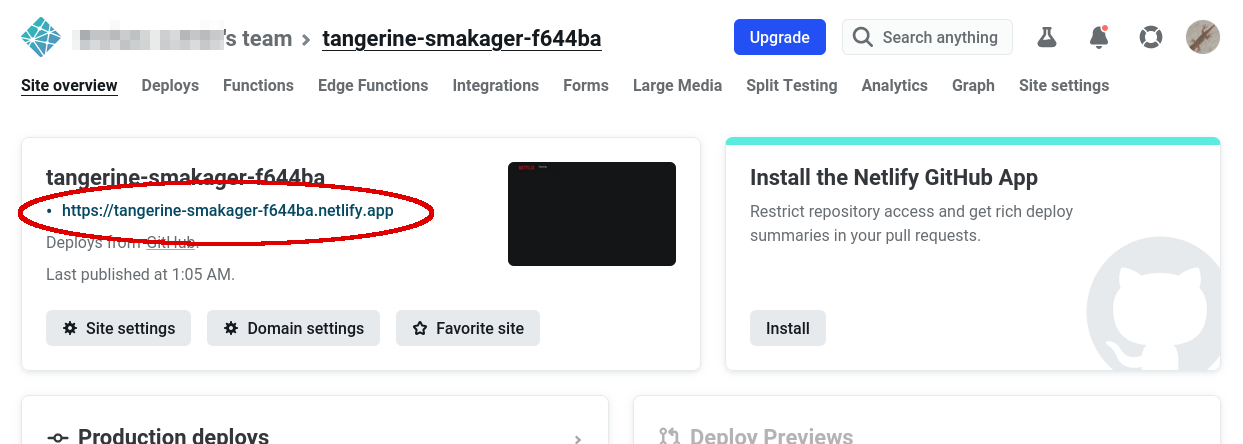
✅ Step 1d: Get back to your new site: Scroll up to the top and click on the site name (it'll be after "[your login]'s Team" next to the Netlify button). Then locate your app's full URL and click to open it.
Show me!
Clicking on the full URL (something like https://YOUR-SITE-NAME.netlify.app) you will see the skeletal GUI (without the data from the database) in a new tab. Here is where to click:
and here, finally, your skeletal GUI in its full splendour:
✅ Step 2a: Jump to YOUR repo: Click on the GitHub in Deploys from GitHub to get to your new repository on Github.
Scroll to where you were in the README.
Note At this point, you MUST be reading this README from YOUR Github repository. That is, if the address bar still says
https://github.com/datastaxdevs/...please head over to YOUR copy of the repo before going the Gitpod route!
✅ Step 2b: Launch Gitpod:
Use this link to open Gitpod from YOUR repository! (Tip: Ctrl-click on the button to open in new tab.)
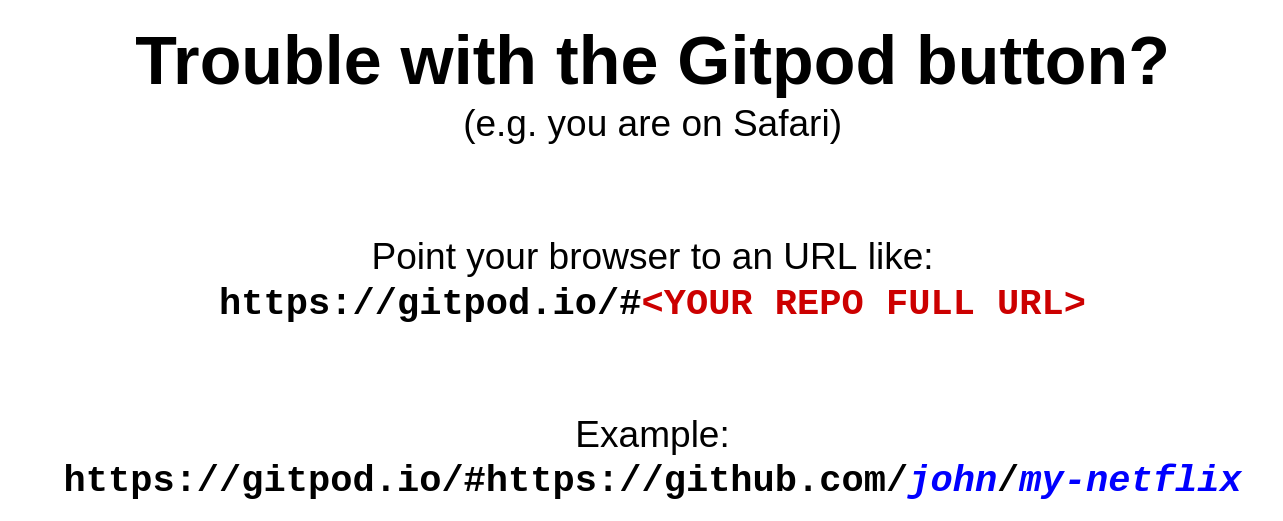
Note: the button works on Chrome and
Firefox.
ℹ️ It may take a few minutes (approx. 3-5) for GitPod to fully initialize. Please wait until the console in the lower half of Gitpod is responsive.
You may see a dialog about "opening this workspace in VS Code Desktop": you can safely dismiss it.
Gitpod will be your IDE from now on. If you are familiar with VSCode, you can probably just use it. Otherwise, take a moment to review a separate page "Know your Gitpod" and then come back here.
You are going to use a CLI tool to simplify operations with Astra DB. The tool is preinstalled on your Gitpod.
✅ Step 3a: Set up the CLI:
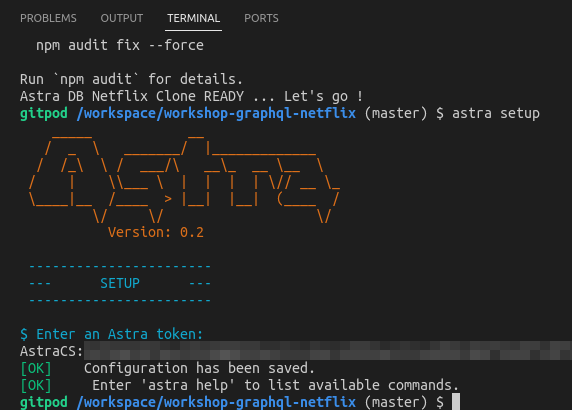
Run the following in the Gitpod terminal and,
when prompted, enter the AstraCS:... you obtained at the beginning.
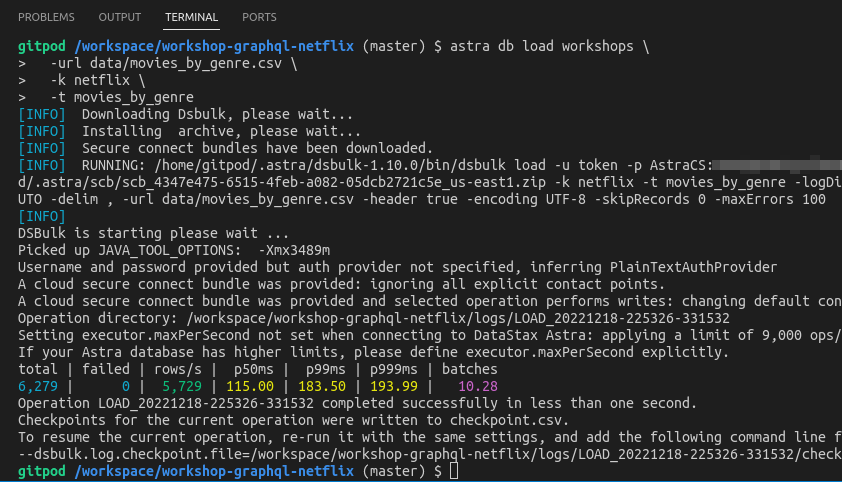
astra setup✅ Step 3b: Bulk data load: Load a large movie dataset in the database.
This command installs and properly launches the DSBulk tool (docs):
astra db load workshops \
  -url data/movies_by_genre.csv \
  -k netflix \
  -t movies_by_genre
Show the syntax for old versions of astra-cli (click here)
Note: you should not need this.
astra db dsbulk workshops load \
  -url data/movies_by_genre.csv \
  -k netflix \
-t movies_by_genreNote: we mock the trailers for these thousands of movies by using a handful of them over and over. Don't be surprised if you'll see the wrong trailers for your favorite movie!
That's it! All 6000+ movies are now loaded and ready to go!
Note: this section and the next one ("Fetching from the Front-End") are not steps to "perform", rather suggestions to dive in the app code and figure out how the various parts (React components, Netlify functions and finally the GraphQL server in Astra DB) fit together. You can skip these and jump to the next practical step if you are in a hurry, but please come back to these for reference if you want to dissect the code!
Show me this section
Take a look at functions/getGenres.js
const fetch = require('node-fetch')

exports.handler = async function (event) {

  const body = JSON.parse(event.body)
  const url = process.env.ASTRA_DB_GRAPHQL_URL
  const query = `
    query getAllGenres {
      reference_list (
        value: { label: "genre"},
        options: {
          pageSize: ${JSON.stringify(body.pageSize)},
          pageState: ${JSON.stringify(body.pageState)}
        }
      ) {
        values {
          value
        }
        pageState
      }
    }
  `

  const response = await fetch(url, {
    method: 'POST',
    headers: {
      "Content-Type": "application/json",
      "x-cassandra-token": process.env.ASTRA_DB_APPLICATION_TOKEN
    },
    body: JSON.stringify({ query })
  })

  try {
    const responseBody = await response.json()
    return {
      statusCode: 200,
      body: JSON.stringify(responseBody)
    }
  } catch (e) {
    console.log(e)
    return {
      statusCode: 500,
      body: JSON.stringify(e)
    }
  }
}
You'll notice the familiar GraphQL query "getAllGenres" you used previously in the playground. It's been modified a bit to utilize pagination. When building the GraphQL query, you pass the desired page size and state to the GraphQL API:
options: {
  pageSize: ${JSON.stringify(body.pageSize)},
  pageState: ${JSON.stringify(body.pageState)}
}
You ask the API server to give us back the table column "value" (containing the genre name), but also the page state for when you'll need the next page:
{
  values {
    value
  }
  pageState
}
The serverless function functions/getMovies.js works in much the same way, but you provide the specific genre you want and the page size is hardcoded:
query {
  movies_by_genre (
    value: { genre: ${JSON.stringify(genre)}},
    orderBy: [year_DESC],
    options: { pageSize: 6, pageState: ${JSON.stringify(pageState)} }
  ) {
    values {
      year,
      title,
      duration,
      synopsis,
      thumbnail
    }
    pageState
  }
}Show me this section
Take a look at how you fetch from these serverless functions from the front-end. Start in src/App.js
There is a fetch method defined, that will retrieve a page of genres by calling the getGenres serverless function.
const fetchData = async () => {
  if (! isFetching)  {
    setIsFetching(true)
    const response = await fetch("/.netlify/functions/getGenres", {
      method: "POST",
      body: JSON.stringify({pageState, pageSize}),
    })
    const responseBody = await response.json()
    setPageState(responseBody.data.reference_list.pageState)
    setGenres(gs => (gs || []).concat(responseBody.data.reference_list.values))
    setIsFetching(false)
  }
}
You pass in the current pageState and pageSize state variables and receive a response from the serverless function. You then set the pageState var to the new pagestate, and set the genres state variable to the received data. (Note that you are concatenating the new data to the var, since you want to keep all previously fetched data, not replace).
When rendering the page, you generate a <Section> component for each genre, plus a <div> at the bottom, which will detect a mouseEnter event and trigger the loading of a new pageful of genres:
<>
  <NavBar />
  <HeroSection />
  {genres && (
    <div className="container">
      {Object.values(genres).map((genre) => (
        <Section key={genre.value} genre={genre.value} />
      ))}
    </div>
  )}
  <div
    className="page-end"
    onMouseEnter={() => {
      setRequestedPage( np => np + 1 )
    }}
  />
</>
The <Section> component works in the same way, but you will fully replace the data in the movies variable this time.
const fetchData = async () => {
  const response = await fetch("/.netlify/functions/getMovies", {
    method: "POST",
    body: JSON.stringify({ genre: genre, pageState: pageState }),
  })
  const responseBody = await response.json()
  setMovies(responseBody.data.movies_by_genre.values)
  setPageState(responseBody.data.movies_by_genre.pageState)
}
Now that you know how the front-end works, launch the app!
In the workshop-graphql-netflix directory, run the following:
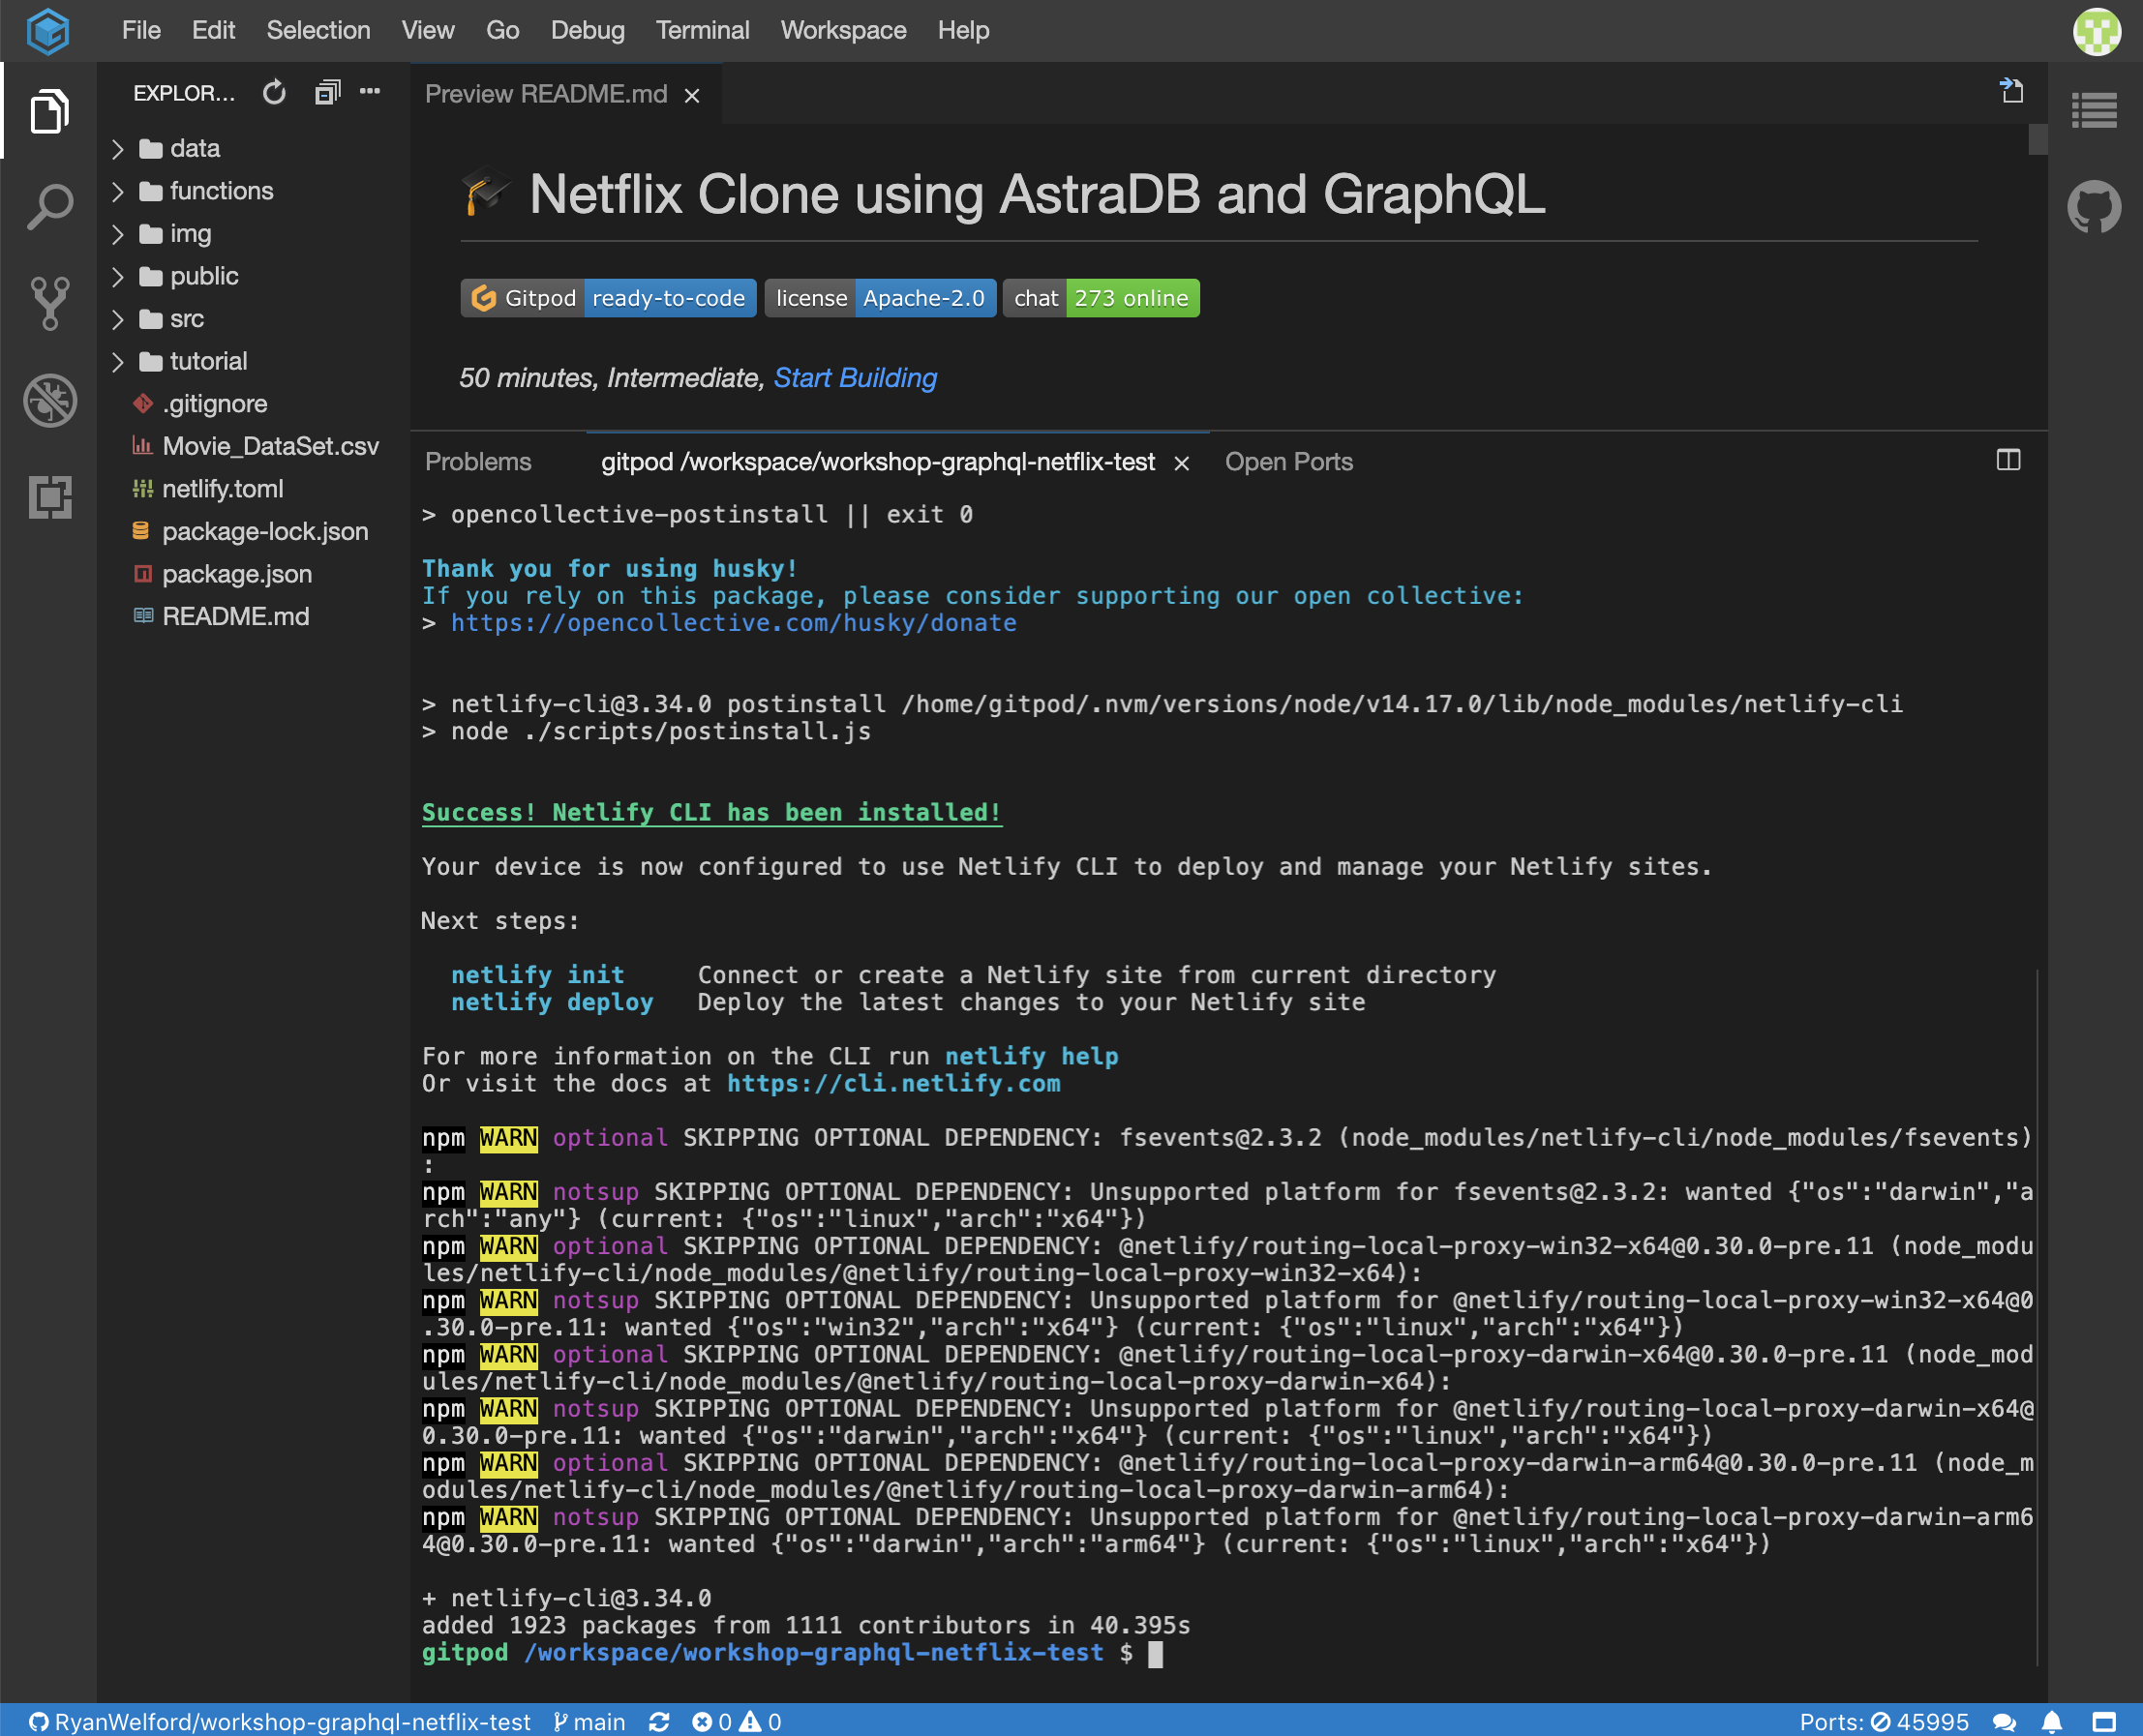
npm install -g netlify-cli
With the Netlify command-line interface you will build and deploy the application directly from the Gitpod terminal.
The "serverless functions" part of your app, in order to speak to
your DB through GraphQL, needs two important pieces of information:
the API endpoint and the token. You will now create a .env file which
defines them as environment variables.
The quickest way is to have astra-cli generate one for you:
astra db create-dotenv -k netflix workshops
I want to do it manually
If for some reason you don't use astra-cli, follow these steps:
- copy
cp .env.sample .envand open it:gp open .env; .envis now open in the IDE editor and has two placeholders to replace:- insert the
AstraCS:...database token (keep the quotes); - insert the GraphQL API address (it will look something like
https://b2f[...]/graphql/netflix).
You can generate a new database token if you want. The GraphQL address
can be found in the playground: it is the URL you have edited to end in netflix
in the second playground tab (Part 1, step 4a).
✅ Step 8a: Install dependencies:
npm install✅ Step 8b: Start the app: With the command
netlify dev
the application should automatically be displayed in GitPod's "simple browser". Note that in this dev-mode run everything is local to your Gitpod instance: the "serverless functions", in particular, are actually running there, alongside the rest of the application!
You can copy the URL found in Gitpod's simple browser and open in a new tab (of your real browser, that is) for a better experience. But now it's time to move to the actual deploy phase.
✅ Step 9a: Stop the dev run with Ctrl-C.
✅ Step 9b: Authenticate with Netlify: run
netlify login
then grab the URL printed on the console
(something like https://app.netlify.com/authorize?response[...])
and manually open it in a new tab (Gitpod blocks it for security).
You will be asked to authorize "netlify-cli" to access your Netlify account
in the process.
Once you complete the login, you will see a console output like this:
✅ Step 9c: Associate to your Netlify site: run
netlify link
and make sure you confirm the choice of associating to "current git remote origin".
✅ Step 10a: Inject secrets to the Netlify site
netlify env:import .env
Now the (actually) serverless functions in Netlify have the connection parameters they need.
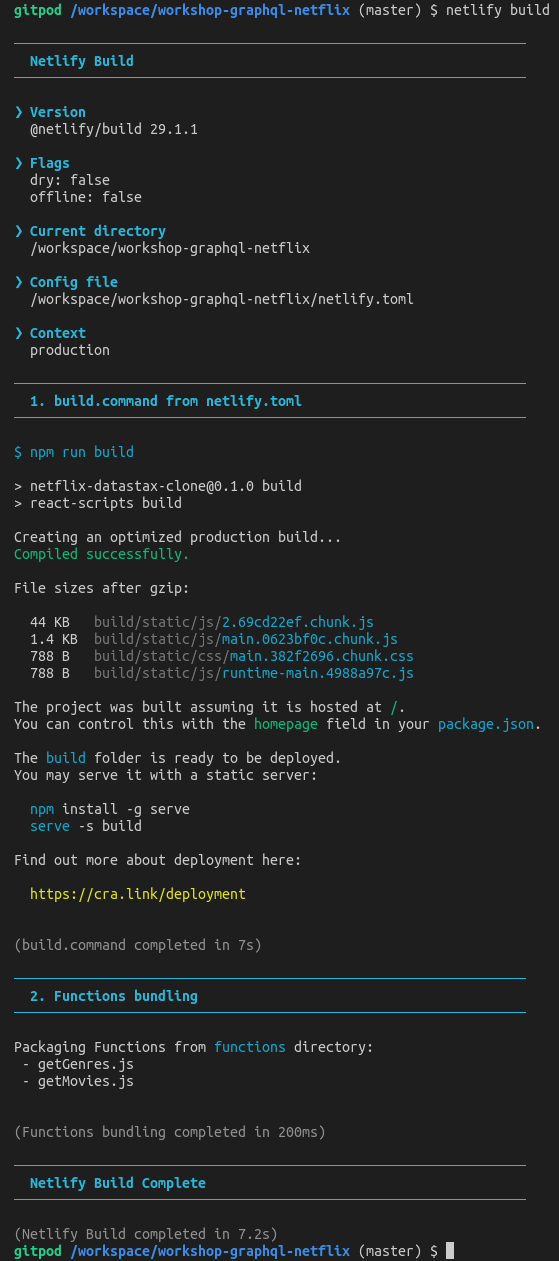
✅ Step 10b: Build the app
Run
netlify build
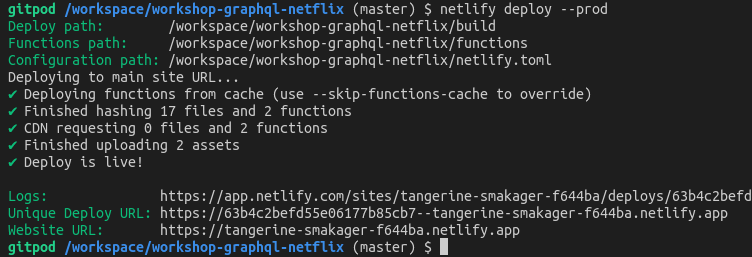
✅ Step 10c: Deploy!
netlify deploy --prod
✅ Step 10d: Visit your site.
netlify open:site
If needed, manually copy-paste your site URL in a new browser tab... and enjoy your work!
Congratulations, you made it!
Now don't forget to complete your assignment and submit it to get your badge of completion!
       ██╗    ██╗███████╗██╗     ██╗
       ██║    ██║██╔════╝██║     ██║
       ██║ █╗ ██║█████╗  ██║     ██║
       ██║███╗██║██╔══╝  ██║     ██║
       ╚███╔███╔╝███████╗███████╗███████╗
        ╚══╝╚══╝ ╚══════╝╚══════╝╚══════╝

       ██████╗  ██████╗ ███╗   ██╗███████╗██╗
       ██╔══██╗██╔═══██╗████╗  ██║██╔════╝██║
       ██║  ██║██║   ██║██╔██╗ ██║█████╗  ██║
       ██║  ██║██║   ██║██║╚██╗██║██╔══╝  ╚═╝
       ██████╔╝╚██████╔╝██║ ╚████║███████╗██╗
       ╚═════╝  ╚═════╝ ╚═╝  ╚═══╝╚══════╝╚═╝
🎓 Complete your upgrade and get your verified skill badge! Do the assignment and submit your homework!
- Complete the practice steps from this repository as described below.
- Insert a movie OR genre of your choice in the database (It's OK to re-use the trailer file URL from another movie! Just make the title recognizable as yours).
- Take a screenshot of your Netflix clone running either from your Gitpod or (better) deployed to production in Netlify (in this case, you could also give us the Netlify URL).
- The screenshot should clearly show the movie/genre you added (make sure you tell us its name when submitting).
- (Optional for extra wisdom) Watch the 2-hour video by Ania HERE, build the app yourself, and show us the running final result.
- Submit your homework here.
That's it, you are done: expect an email in the next days!
Thank you to our wonderful friend Ania Kubow for producing the Netflix clone. If you are not aware of Ania and love learning about coding you should absolutely check out her YouTube channel listed below.
While we focused on getting you up and running to production with Astra DB and Netlify, Ania's video will dig into more details on the app itself. Check it out to dig in more.


