This repository contains a Lovelace card to display and interact with Alert2 alerts. It also enhances the information shown in the "more-info" dialog when viewing Alert2 entities in entity cards. We recommend first installing Alert2.
HACS install (recommended)
-
If HACS is not installed, follow HACS installation and configuration instructions at https://hacs.xyz/.
-
Click the button below
or visit the HACS pane and add
https://github.com/redstone99/hass-alert2-ui.gitas a custom repository of type "Dashboard" by following these instructions. -
The UI should now show the "Alert2 UI" doc page in HACS. Click the "Download" button (bottom right of screen) to download the UI module.
If for some reason adding the repository did not take you to the "Alert2 UI" doc page, you may need to click again on the HACS pane, search for "Alert2 UI" and click on it to get to the page.
-
Click "Reload" when it prompts you to reload your browser.
Manual install
-
Download the
Source code (zip)link from the repository release section under "Assets" and unzip it.We do not recommend downloading directly from the
mainbranch. -
Create the directory
wwwin your Home Assistant configuration directory if it doesn't already exist.Your configuration directory is the directory with
configuration.yaml. It is commonly/config, or may be something like~/.home-assistant/for Linux installations. -
Copy
alert2.jsfrom unzipped file into the directorywwwin your config.Your config directory should look similar to this after copying:
 <config dir>/configuration.yaml
 <config dir>/www/alert2.js
 <config dir>/custom_components/alert2/__init__.py
 <config dir>/custom_components/alert2/sensor.py
  ... etc...
Upgrading
After upgrading Alert2 UI, it can take time for the browser or HA companion app to update alert2.js. To speed that up:
-
On the web, try reloading the page a few times and also "Clear cookies & site data".
-
On the Android HA companion app, try going to System Settings -> Apps -> Home Assistant -> Storage & cache and clicking "Clear cache". Then in the HA app, click on the vertical dots at the top and click on "Reload resources". You may need to wait a few seconds and click "Reload resources" twice.
The install process above downloaded a js module, alert2.js.
Next:
-
If you installed Alert2 UI through HACS and configure dashboards via the UI (i.e., Lovelace in
storagemode), thenalert2.jsshould be loaded into HA automatically.Otherwise:
If you configure dashboards via yaml (Lovelace in
yamlmode), you need to add an entry foralert2.jsin the resources subsection of the lovelace section of yourconfiguration.yaml. If you installed via HACS, this will look like (in bold):lovelace: mode: yaml resources: - url: /hacsfiles/hass-alert2-ui/alert2.js type: module ...or if you installed manually directly into the
wwwdirectory, it will look like:lovelace: mode: yaml resources: - url: /local/alert2.js type: module ...Lastly, if you installed Alert2 UI manually and configure dashboards via the UI, then enable "Advanced mode" in your user profile, then click on Settings -> Dashboards -> Resources. "Resources" may appear only in the triple vertical dots on the upper right of the dashboards page. Click on "Add Resource" to add
alert2.js. -
alert2.jsdefines a custom UI card calledcustom:alert2-overview. If you configure dashboards via the UI, start editing a dashboard, then click on "Add Card" (or the "+" icon), then manually add a card of typecustom:alert2-overview.If you're using yaml to specify a dashboard, you can add the Alert2 overview card to your dashboard by adding it to the list of cards in a view, like (in bold):
views: - title: Monitoring name: Example cards: - type: "custom:alert2-overview" - type: entities ... -
Restart HomeAssistant and reload the UI
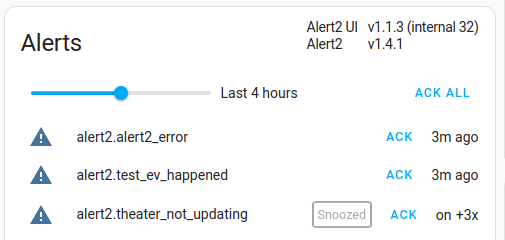
The alert2-overview Lovelace card lists recently active Alert2 alerts, as well as snoozed or disabled alerts. A slider at the top of the card controls the time window covered. Each line shows the status of the alert, including when it last fired, how many times it fired since the last notification, and whether it has been ack'ed, snoozed or disabled. Each alert will show an "ACK" button if it hasn't been acked already. The button "ACK ALL" will ack all alerts, not just the ones displayed.
Note - alert2-overview will show currently firing old Alert-1 alerts, but it will not show recent activity for the old alerts.
The order of displayed alerts is:
- Alerts currently on and unacked, most recent first
- Alerts currently off and unacked, most recent first. This includes event alerts.
- Alerts currently on and acked, most recent first
- Alerts currently off and acked, most recent first. This includes event alerts.
For the purpose of ordering, alerts that are snoozed or disabled are treated as if acked.
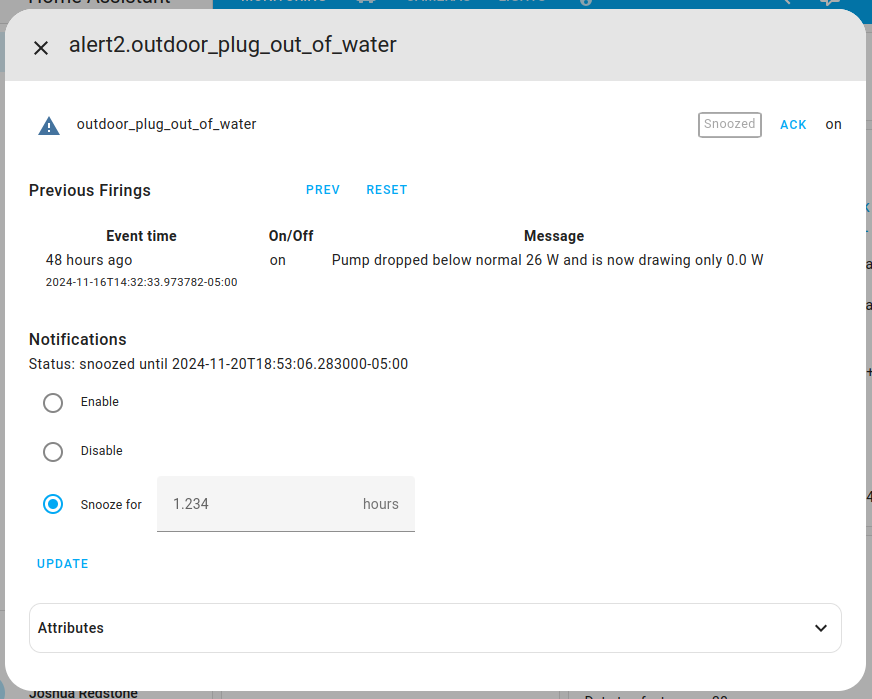
If you click on a specific alert listed in the alert overview, a dialog pops up with detailed info on the alert and notification controls. Example:
The first line is a repeat of the alert status.
The second "Previous Firings" section lists each firing over the previous 24 hours, limited to the most recent 20 events. The time when the alert turned on or off is listed as well as the message template text rendered when the alert fired. The "PREV" button lets you go back further in time and "RESET" returns the listing to the firings over the past 24 hours and refreshes the listing. You may see events listed that have time unknown. This are extra events inserted due to either HomeAssistant restarting or the first time an alert is created (TODO - filter these spurious events out).
The "Notifications" section lets you snooze or disable notifications. Select an option and click "Update". The "Status" line will update dynamically.
Snoozing an alert implicitly acks it once and prevents notifications during the snooze interval. When the interval ends you can opt to get a summary notification of any alert activity during the period. See summary_notifier in the Alert2 docs.
Times are displayed in the browser local time zone.
You may also add alert2 entities to entities cards and other cards that support entities. If you click on an alert shown in such a situation, you'll see a popup (called a "more-info dialog") similar to the one shown above. However, since Alert2 isn't integrated into the core HomeAssistant, that dialog will include some extra default sections like "history", but will also include the sections described above.
Finally, you can also view alert information by going to Settings -> Devices & Services -> Entities, typing "alert2." in the search box and browsing the list. Clicking on one will popup the "more-info dialog".


