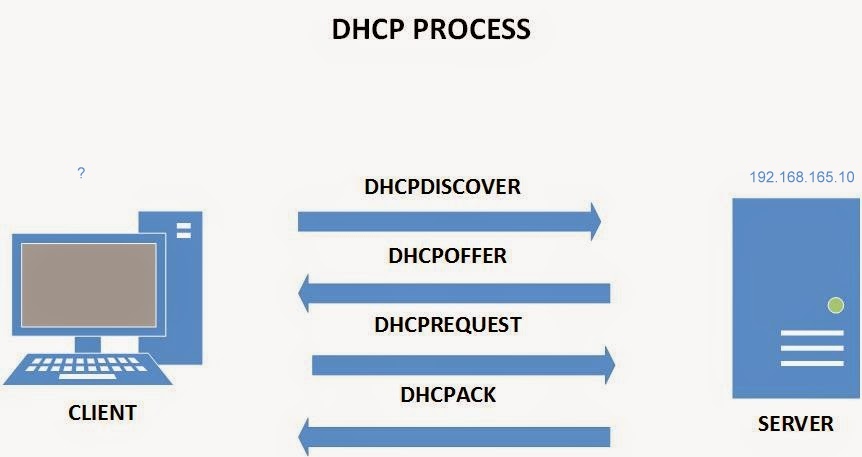
The four steps we described are often called DORA: Discovery, Offer, Request, and Acknowledge:
(C->S)DHCP Discover(Broadcast)-I realy need an IP!:
Source Address: 0.0.0.0
Dest Address:   255.255.255.255
MAC Address :   4H-D5-6Y-7D-8L
(C<-S)DHCP Offer(Unicast or Broadcast):
Source Address: 192.168.165.10 (DHCP server IO)
Dest Address:   255.255.255.255
MAC Address :   4H-D5-6Y-7D-8L
Offered IP:     192.168.165.151
(C->S)DHCP Request(Broadcast):
Source Address: 0.0.0.0
Dest Address:   255.255.255.255
MAC Address :   4H-D5-6Y-7D-8L
Server IP:      192.168.165.10
Requested IP:   192.168.165.151
(C<-S)DHCP Ack:
Source Address: 192.168.165.10
Dest Address:   255.255.255.255
MAC Address :   4H-D5-6Y-7D-8L
Yay,Your IP:    192.168.165.151
An address that ends in ". 255" is a so-called broadcast address.
On Debian base:
apt install isc-dhcp-serverOn RedHat base:
yum install dhcpMy machine (DHCP Server)Detail:
Assigned static IP: 192.168.165.10
Distributor ID: Ubuntu
Description:    Ubuntu 22.04.1 LTS
Release:        22.04
Codename:       jammy
After installation complete lets watch the service status:
root@ubuntuserver-10:~# systemctl status isc-dhcp-serverand the service:
root@ubuntuserver-10:~# cat  /lib/systemd/system/isc-dhcp-server.service
[Unit]
Description=ISC DHCP IPv4 server
Documentation=man:dhcpd(8)
Wants=network-online.target
After=network-online.target
After=time-sync.target
ConditionPathExists=/etc/default/isc-dhcp-server
ConditionPathExists=|/etc/ltsp/dhcpd.conf
ConditionPathExists=|/etc/dhcp/dhcpd.conf

[Service]
EnvironmentFile=/etc/default/isc-dhcp-server
RuntimeDirectory=dhcp-server
# The leases files need to be root:dhcpd even when dropping privileges
ExecStart=/bin/sh -ec '\
    CONFIG_FILE=/etc/dhcp/dhcpd.conf; \
    if [ -f /etc/ltsp/dhcpd.conf ]; then CONFIG_FILE=/etc/ltsp/dhcpd.conf; fi; \
    [ -e /var/lib/dhcp/dhcpd.leases ] || touch /var/lib/dhcp/dhcpd.leases; \
    chown root:dhcpd /var/lib/dhcp /var/lib/dhcp/dhcpd.leases; \
    chmod 775 /var/lib/dhcp ; chmod 664 /var/lib/dhcp/dhcpd.leases; \
    exec dhcpd -user dhcpd -group dhcpd -f -4 -pf /run/dhcp-server/dhcpd.pid -cf $CONFIG_FILE $INTERFACESv4'

[Install]
WantedBy=multi-user.target
DHCP default port is 67. If you have other interfaces to listen to requests, you should modify the defaults in the DHCP default config:
cat /etc/default/isc-dhcp-server
# Defaults for isc-dhcp-server (sourced by /etc/init.d/isc-dhcp-server)

# Path to dhcpd's config file (default: /etc/dhcp/dhcpd.conf).
#DHCPDv4_CONF=/etc/dhcp/dhcpd.conf
#DHCPDv6_CONF=/etc/dhcp/dhcpd6.conf

# Path to dhcpd's PID file (default: /var/run/dhcpd.pid).
#DHCPDv4_PID=/var/run/dhcpd.pid
#DHCPDv6_PID=/var/run/dhcpd6.pid

# Additional options to start dhcpd with.
#       Don't use options -cf or -pf here; use DHCPD_CONF/ DHCPD_PID instead
#OPTIONS=""

# On what interfaces should the DHCP server (dhcpd) serve DHCP requests?
#       Separate multiple interfaces with spaces, e.g. "eth0 eth1".
INTERFACESv4="enp0s3"
INTERFACESv6=""
INTERFACESv4="" means all Intefaces. in my case I added my Interface.
INTERFACESv4="enp0s3 enp0s8" means listen on these Interface.
DHCP database(assigned IPs)is stored in /var/lib/dhcp/dhcpd.lease.
The DHCP config file is located at /etc/dhcp/dhcpd.conf. You can modify it as needed.
subnet 192.168.165.0 netmask 255.255.255.0 {
  range 192.168.165.151 192.168.165.160;
  option routers 192.168.165.1;
  option domain-name-servers 4.2.2.4;
}
in this config:
Define your network Address: subnet 192.168.165.0 netmask 255.255.255.0
Our selected range for our pool: range 192.168.165.151 192.168.165.160;
Option 1: routers 192.168.165.1; refers to a gateway or router on a particular network.
Option 2: domain-name-servers 4.2.2.4; It means DNS
Other Options: smtp-server , pop-server , nntp-server , time-server , routers , broadcast-address
After modifying config files based on your needs, restart the service:
systemctl restart isc-dhcp-serverBased on DORA you can follow the DHCP logs to see what happened(it will be filled after clients request an IP):
grep -i dhcpdiscover /var/log/syslog
grep -i dhcpoffer /var/log/syslog
grep -i dhcprequest /var/log/syslog
grep -i dhcpack /var/log/syslog
Its empty now, Let's configure CLIENTS interfaces:
On CentOS:
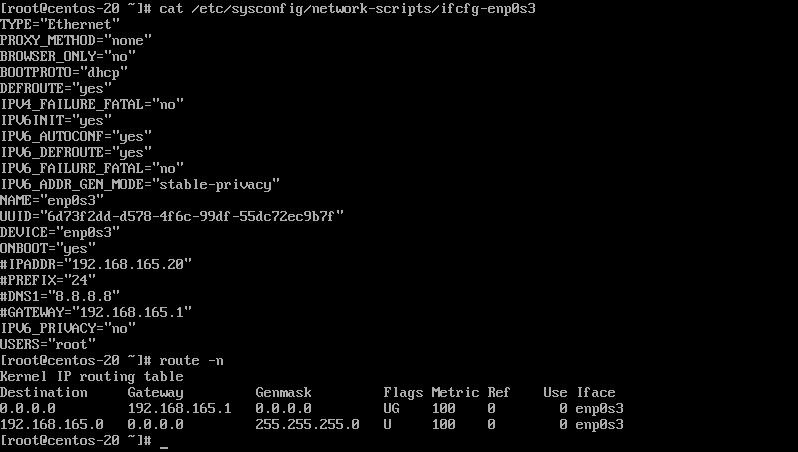
[root@centos-20 ~]# cat /etc/sysconfig/network-scripts/ifcfg-enp0s3
TYPE="Ethernet"
PROXY_METHOD="none"
BROWSER_ONLY="no"
BOOTPROTO="dhcp"
DEFROUTE="yes"
IPV4_FAILURE_FATAL="no"
IPV6INIT="yes"
IPV6_AUTOCONF="yes"
IPV6_DEFROUTE="yes"
IPV6_FAILURE_FATAL="no"
IPV6_ADDR_GEN_MODE="stable-privacy"
NAME="enp0s3"
UUID="6d73f2dd-d578-4f6c-99df-55dc72ec9b7f"
DEVICE="enp0s3"
ONBOOT="yes"
IPV6_PRIVACY="no"
USERS="root"
Change BOOTPROTO="none" (default) to BOOTPROTO="dhcp" and restart network(or ifdown then ifup):
systemctl restart networkAfter that, take a look at your IP and interface file:
Check the DORA log again:
grep -i dhcpdiscover /var/log/syslog OutPut:
Mar 28 16:24:38 ubuntuserver-10 dhcpd[2317]: DHCPDISCOVER from 08:00:67:38:06:42 via enp0s3
NOTICE: 08:00:67:38:06:42 is my CentOS MAC Address (changed for document). grep -i dhcpoffer /var/log/syslogOutPut:
Mar 28 16:24:39 ubuntuserver-10 dhcpd[2317]: DHCPOFFER on 192.168.165.151 to 08:00:67:38:06:42 (centos-20) via enp0s3grep -i dhcprequest /var/log/syslogOutPuts:
         Mar 28 16:24:39 ubuntuserver-10 dhcpd[2317]: DHCPREQUEST for 192.168.165.151 (192.168.165.10) from 08:00:67:38:06:42 (centos-20) via enp0s3
         Mar 28 16:29:30 ubuntuserver-10 dhcpd[2317]: DHCPREQUEST for 192.168.165.151 from 08:00:67:38:06:42 (centos-20) via enp0s3
Mar 28 16:33:56 ubuntuserver-10 dhcpd[2317]: DHCPREQUEST for 192.168.165.151 from 08:00:67:38:06:42 (centos-20) via enp0s3grep -i dhcpack /var/log/syslogOutPuts:
         Mar 28 16:24:39 ubuntuserver-10 dhcpd[2317]: DHCPACK on 192.168.165.151 to 08:00:67:38:06:42 (centos-20) via enp0s3
         Mar 28 16:29:30 ubuntuserver-10 dhcpd[2317]: DHCPACK on 192.168.165.151 to 08:00:67:38:06:42 (centos-20) via enp0s3
         Mar 28 16:33:56 ubuntuserver-10 dhcpd[2317]: DHCPACK on 192.168.165.151 to 08:00:67:38:06:42 (centos-20) via enp0s3
         Mar 28 16:38:18 ubuntuserver-10 dhcpd[2317]: DHCPACK on 192.168.165.151 to 08:00:67:38:06:42 (centos-20) via enp0s3
DHCP database has been updated:
root@ubuntuserver-10:/etc/dhcp# cat /var/lib/dhcp/dhcpd.leases

lease 192.168.165.152 {
  starts 4 2024/03/28 16:42:18;
  ends 4 2024/03/28 16:52:18;
  cltt 4 2024/03/28 16:42:18;
  binding state active;
  next binding state free;
  rewind binding state free;
  hardware ethernet 08:00:67:38:06:42;
  client-hostname "centos-20";
}
If you want to reserve an IP for a specific machine, you can add it in the DHCP config (/etc/dhcp/dhcpd.conf):
subnet 192.168.165.0 netmask 255.255.255.0 {
  range 192.168.165.151 192.168.165.160;
  option routers 192.168.165.1;
  option domain-name-servers 4.2.2.4;\

host samplename {
  hardware ethernet 19:11:78:49:07:43;
  fixed-address 192.168.165.159;
#Add other options...
}
If you have many static host entries for a single subnet, you can use the group statement to create a group of static IP address assignments that share the same default router, broadcast address, and subnet mask.
group {
  option routers 10.1.0.1;
  option broadcast-address 10.1.255.255;
  netmask 255.255.0.0;
  host shadrach {
       hardware ethernet 00:51:12:FE:DC:BA
       fixed-address 10.1.0.5;
       option host-name "shadrach";
 }
 host meshach {
     hardware ethernet 02:11:02:AB:CD:EF
     fixed-address 10.1.0.6;
     option host-name "meshach";
 }
}
In the context of DHCP (Dynamic Host Configuration Protocol), a "shared-network" declaration in the DHCP configuration file refers to a configuration construct used to define multiple subnets that share the same physical network infrastructure.
When you have multiple subnets within the same physical network segment, you may want to configure DHCP to manage IP address allocation for devices on each of these subnets. However, since they share the same physical network infrastructure, there might be some configurations that are common to all subnets, such as:
Common DHCP server settings
DHCP options shared among all subnets
Configuration for DHCP failover or load balancing
Using a shared-network declaration allows you to group these common configurations together, making the DHCP configuration more organized and manageable.
Here's a basic example of how a shared-network declaration might be used in a DHCP configuration file:
shared-network my_network {
    subnet 192.168.1.0 netmask 255.255.255.0 {
        range 192.168.1.10 192.168.1.50;
        option routers 192.168.1.1;
        option subnet-mask 255.255.255.0;
    }
    subnet 10.0.0.0 netmask 255.255.255.0 {
        range 10.0.0.10 10.0.0.50;
        option routers 10.0.0.1;
        option subnet-mask 255.255.255.0;
    }
}
In this example:
- Both subnets 192.168.1.0/24 and 10.0.0.0/24 are part of the same shared network, my_network.
- Each subnet has its own range of IP addresses and specific configuration options like routers and subnet masks.
- By grouping them within a shared-network declaration, you can manage common settings for both subnets more efficiently.
Using shared-network declarations helps in maintaining a clear and organized DHCP configuration, especially in scenarios where there are multiple subnets on the same physical network.

