Explore and Troubleshoot your WebGL scenes (All engines and Vanilla script support) with ease.
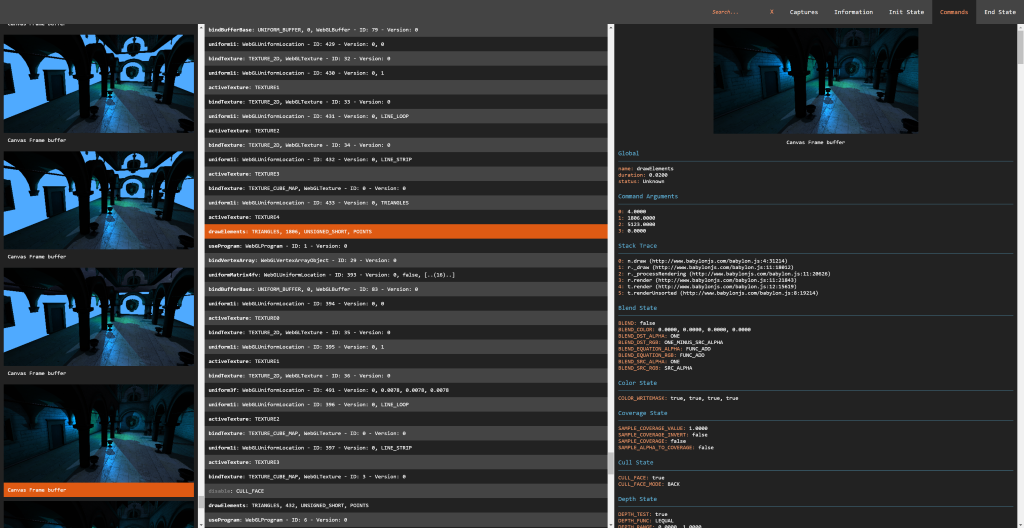
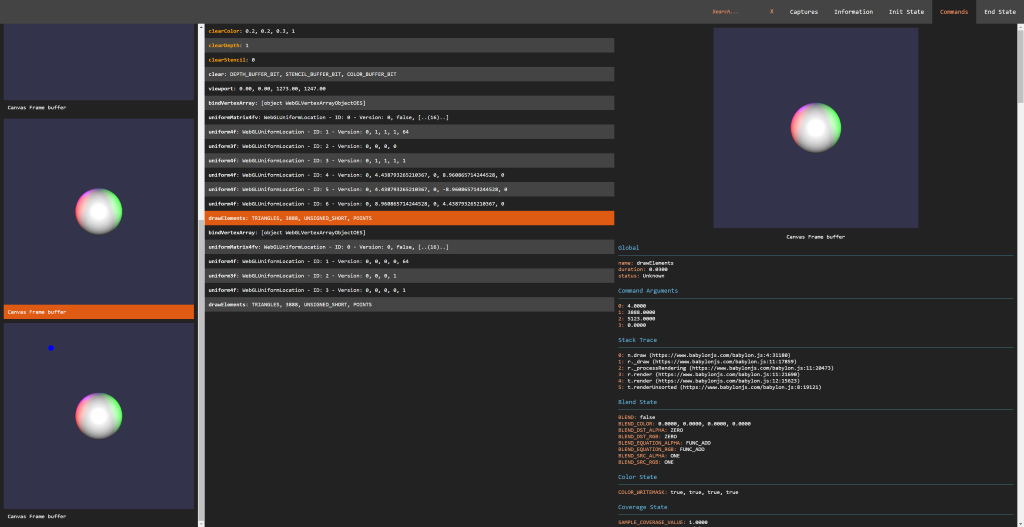
Spector is a tool aim to WebGl developers willing to know what happens on their context. It enables capturing all the available information from a frame. You will be empowered to look at your entire commands list with their asoociated visual states and context information.


This can be used either as a browser extension or directly from your page a a Standalone Version.
As a core member of the BabylonJS team I often found the need of debugging what is happening to my webgl context. I was a huge fan of webgl inspector until we introduced WebGl2 in Babylon. As the WebGL community as a whole is our focus, I thought it would be great to share an extension compatible with all the Webgl/Webgl2 engines available.
You can use the library inside of your own application easily. As it is transpiled as a UMD module, this will either work as a script reference or relying on you favorite bundling tools like webpack.
If you are willing to use the browser extension instead, you can refer to the following documentation: Browser Extension.
Or you can direclty install it from the store:
In order to install the library in your application directory, please type the following commands on a command line prompt open on the application directory:
npm install spectorjs
From this point you are all set to use it in your app.
As a quick demo, here is a simple way to use the spector module with webpack.
Please follow the instrctions below which are creating a new directory and installing the required tools:
mkdir sample
cd sample
npm init
npm install webpack --save-dev
npm install spectorjs --save-dev
Following the HelloWorld example from Webpack, you can now create in the sample folder:
A js file named entry.js containing the following code:
var SPECTOR = require("spectorjs");

var spector = new SPECTOR.Spector();
spector.displayUI();
And an html file named index.js containing the following code:
<html>
    <head>
    </head>
    <body>
        <script type="text/javascript" src="bundle.js" charset="utf-8"></script>
    </body>
</html>
Now your application is ready, go back to your command line and bundle the javascript file:
webpack entry.js bundle.js
You are all set, you can open your index.html file and see the inspector running. It will obviously won't be that usefull on an empty page but at least you get the integration idea.
Feel free to leverage the CDN to use the library from your own projets: https://spectorcdn.babylonjs.com/2-5/spector.bundle.js
If you prefer to host your own version, the library is available in the dist folder of the repo.
If you used npm to install the library you can find the spector.bundle.js file in the node_module/spectorjs/dist folder.
Simply add the following tag in your html page header:
<script type="text/javascript" src="spector.bundle.js"></script>Once available in your app, you can instantiate an inspector by inserting the following command in your script:
var spector = new SPECTOR.Spector();You can then display the embedded UI directly in your page:
spector.displayUI();Or launch a capture and reuse its JSON result at your will:
spector.onCapture.add((capture) => {
    // Do something with capture.
    var myEvent = new CustomEvent("SpectorOnCaptureEvent", { detail: { captureString: JSON.stringify(capture) } });
    document.dispatchEvent(myEvent);
});

var canvas = document.getElementById("renderCanvas");
spector.captureCanvas(canvas);As the project is pretty new, the exhaustive list of APIs will not be detailed, only the most usefull and less subject to changes will.
The first thing to notice is the fact that the entire availables classes are living in a namespace called SPECTOR which is helpfull with the script referenced version.
All the the events discussed below can be attached to with the following code (example on an event named onEvent using a string event argument):
foo.onEvent.add(function(s) { console.log(s); };
// or for a context specific version to ensure console.log(s) will have "this" set to context;
foo.onEvent.add(function(s) { console.log(s); }, context);
This is the main entry point of the library and contains the following methods:
constructor(): creates a new instance.displayUI(): displays the embedded ui and begins to track the pages available canvas elements.getFps(): to get the current fps of the selected canvas.captureCanvas(canvas: HTMLCanvasElement): to start a capture on a specific canvas.
And the following list of events:
onCaptureStarted: IEvent<any>: triggered when a capture starts.onCapture: IEvent<ICapture>: triggered when a new capture is available (this is a JSON only object containing alll the information).onError: IEvent<string>: triggered when an error occured and return the error message.
As you notice you could usse the capture without displying the UI (this is the orientation we chosed in the browser extension).
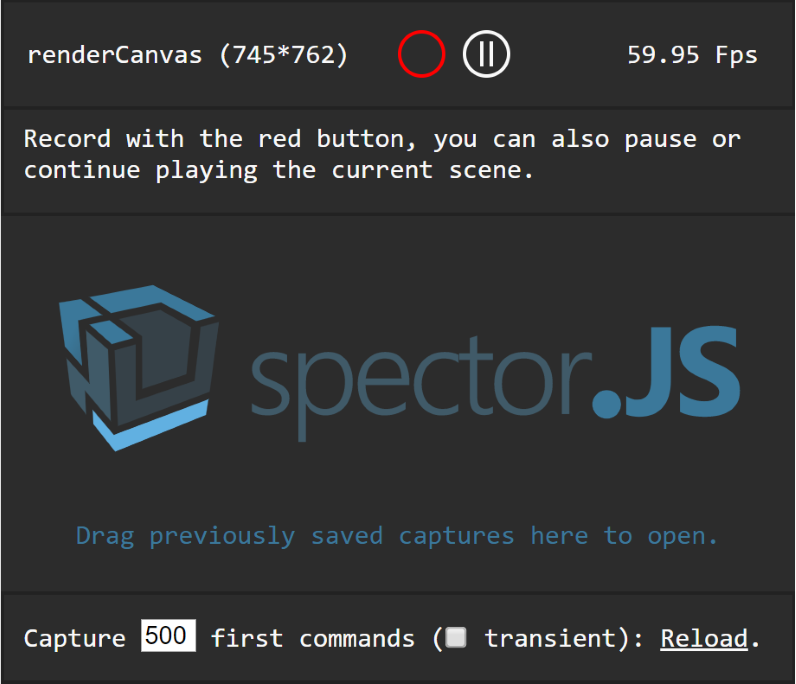
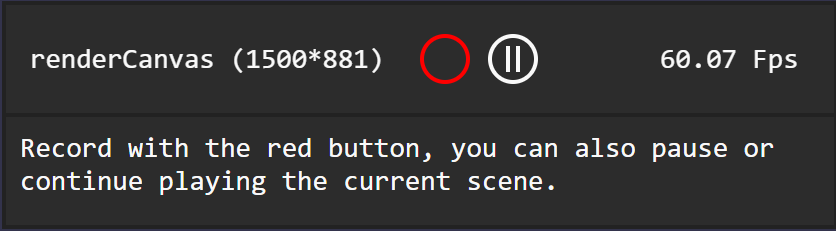
This is the embedded capture menu you can see in the page helping selecting a canvas, capturing or playing/pausing the rendering. This can be use as a standalone component as it is done in the browser extension.
The prototype is subject to change but feel free to take a look at the available entry points here: Spector.CaptureMenu
This is the embedded result view panel which displays the result of the different captured scenes. This can be use as a standalone component as it is done in the browser extension.
The prototype is subject to change but feel free to take a look at the available entry points here: Spector.ResultView
Like any simple typescript repository everything start with.
git clone https://github.com/BabylonJS/Spector.js.git
cd spector
npm install
Then you can use the following npm commands to speed your development:
npm startWill compile and run a local server with a watch command so that you can directly try your changes (TS or scss). Navigate to the the embedded sample to start playing with the dev tools.npm run buildWill create and build a new version of the dist folder files.npm run cleanWill clean all the generated files from the repo.
If you are looking for the temporary generated .js or .map files, they are all available in the built folder which is not under source control.
I would recommend developping on VsCode as the entire setup is present so that if you install the chrome debugger extension you can directly debug from your typescript files by pressing f5.
Any bugs are welcomed as Github issues. And if you are willing to help, do not hesitate to make a Pull Request.
I would advise you to check out and start with the Awesome BabylonJS the community there will be more than happy to welcome anybody willing to learn Web 3d.