Use GitHub Actions to publish your project to a Docker image.
Now things are running! ✨
Whoa, now things are running! This may take a few minutes. This might take a tiny amount of time, so grab your popcorn 🍿 and wait for the build to finish before moving on.
🧑🍳 While we wait for the build to finish, let's take care of a few prerequisites.
For ease of use and cross-platform compatibility (Windows, Mac, and Linux), we'll focus on Docker Desktop. Not to be confused, Docker Engine is the foundation for running containers while Docker Desktop bundles Docker Engine, a GUI, and a Virtual Machine in a single installation.
- Install Docker Desktop for Windows.
- If you're using Mac or Linux, locate the correct install steps at the previous link via the lefthand tree menu.
- Open Docker Desktop and briefly explore.
- For running
dockercommands, access the command-line terminal either via Bash, Git Bash, Windows Command Prompt or PowerShell.
📥 To pull the Docker image, we need to log into Docker first.
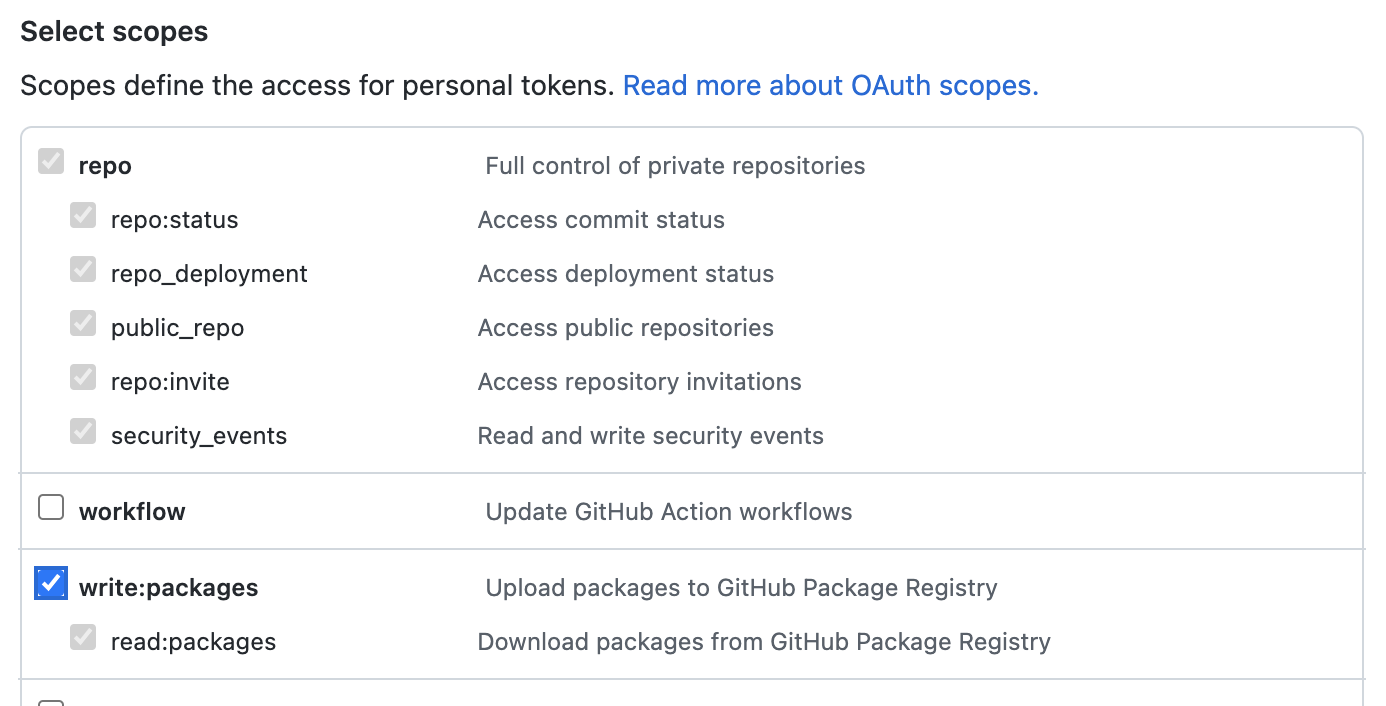
Before we can use this Docker image, you will need to generate a personal access token (classic) that contains the following permissions:
Scopes for Personal Access Token (classic) 🪙
- repo (all)
- write:packages
- read:packages
We will use this token to log in to Docker, and authenticate with the package.
- Open your terminal (Bash or Git Bash recommended).
- Use the following command to log in:
docker login ghcr.io -u USERNAME
- Replace
USERNAMEwith your GitHub username. - Enter your new Personal Access Token as the password.
- Press Enter.
If everything went well, 🤞 you should see Login Succeeded in your terminal.
- Copy the
pullcommand from the package instructions.- 🔥 Tip: To reach this page, click the Code tab at the top of your repository. Then, find the navigation bar below the repository description, and click the Packages heading link

- Or alternatively, in the following URL replace
YOURNAME,REPONAME, and browse tohttps://github.com/users/YOURNAME/packages?repo_name=REPONAMEand click on the package name
- 🔥 Tip: To reach this page, click the Code tab at the top of your repository. Then, find the navigation bar below the repository description, and click the Packages heading link
- Replace
YOURNAMEwith your GitHub username. - Replace
TAGwith the image tag. - Paste the
pullcommand into your terminal. It should look something like this:docker pull ghcr.io/YOURNAME/publish-packages/game:TAG
- Press Enter.
- You should see output indicating that the pull was successful, like
Status: Downloaded newer image for ghcr.io/YOURNAME/publish-packages/game:TAG.
- We can't automatically verify this step for you, so please continue on to the next step below!
Nicely done grabbing your Docker image!
Let's trying running it.
- Find your image information by typing
docker image ls. - Use the following command to run a container from your image:
docker run -dp 8080:80 --rm <YOUR_IMAGE_NAME:TAG>
- Replace
YOUR_IMAGE_NAMEwith your image name under theREPOSITORYcolumn. - Replace
TAGwith the image tag under theTAGcolumn. - Press Enter.
- If everything went well, you will see hash value as output on your screen.
- Optionally, you can open localhost:8080 to see the page you just created.
- We can't automatically verify this step for you, so please continue on to the next step below!
Congratulations friend, you've completed this course!
Here's a recap of all the tasks you've accomplished in your repository:
- You wrote a workflow that sends a code through a continuous delivery pipeline.
- You built a fully deployable artifact.
- You did so using GitHub Actions and GitHub Packages!
- Publish your own packages from your projects.
- We'd love to hear what you thought of this course in our discussion board.
- Take another GitHub Skills course.
- Read the GitHub Getting Started docs.
- To find projects to contribute to, check out GitHub Explore.
Get help: Post in our discussion board • Review the GitHub status page
© 2023 GitHub • Code of Conduct • MIT License


