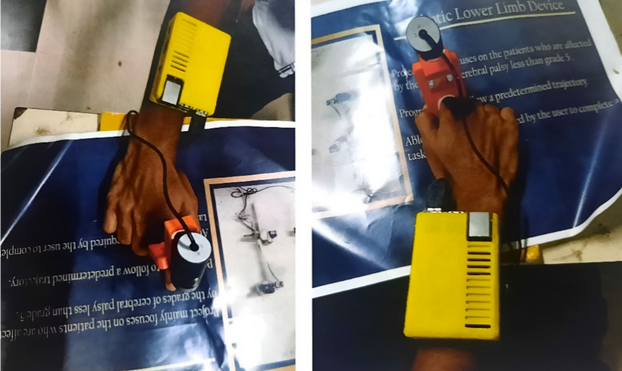
Designed and implemented a portable, finger-worn device to assist children and individuals with dyslexia in reading. Assists the user by reading out the words to which the user points. Also has an added mode to to detect objects to which the used points. The following work is presented is this project:
- Designing and implementing the hardware of the device.
- Developing the Python codes for reading assistance, utilizing the
OpenCVlibrary for image processing and theTesseract OCR engineto extract text from images. - Developing the Python codes for object recognition using the
YOLO algorithm.
- Raspberry Pi (3 B+ model)
- Raspberry Pi Camera Module v2
- Camera mount (3D printed)
- Wrist casing for Raspberry Pi (3D printed)
- Speaker
Code: reader.py
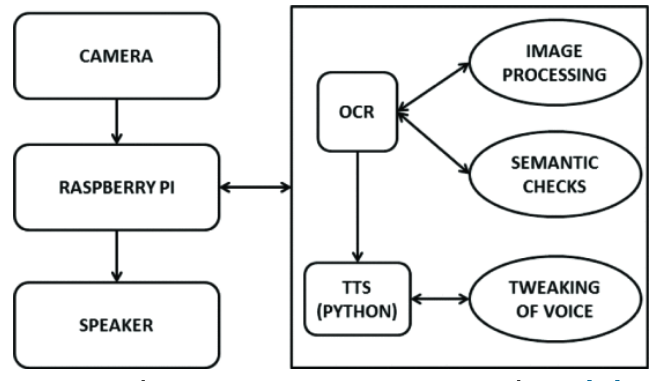
The Python source code is run on the Raspberry Pi. OpenCV library is used to enhance the text in the image and the Pytesseract library (OCR engine wrapper) extracts text from images. The text is converted to speech by the gTTS library (Google Text-to-Speech). Represented pictorially as:
Code: deskew.py
To install OpenCV and numpy, run:
pip install opencv-pythonpip install numpyCertain image processing techniques need to be done, to obtain good results from OCR. Deskewing is the process of correcting the twists (skew) of the text in an image, rotating the image such that text is vertically aligned. It includes the following process.
- Image Loading & Grayscale Conversion: The image is loaded and converted to grayscale, simplifying processing by reducing it to a single channel.
- Inversion & Thresholding: The grayscale image is inverted to enhance contrast, and Otsu's thresholding is applied to create a binary image, clearly separating the foreground from the background.
- Contour Extraction & Rectangle Calculation: Coordinates of the foreground pixels are extracted, and the minimum area rectangle that encloses these points is determined, providing information about the image's tilt.
- Angle Adjustment & Rotation: The angle of the rectangle is adjusted for manageable rotation, and a rotation matrix is created to deskew the image back to its straight position.
Code: sound.py
The text output by the OCR engine is converted to speech by the gTTS library (Google Text-to-Speech). Install packages,
pip install gtts
pip install playsoundCode: reader.py
-
Color Detection: Converts each frame to the HSV color space and creates a mask to isolate a specific color range using cv2.inRange(). This mask helps in filtering the image to highlight the finger or other objects of interest.
-
Contour Detection: After thresholding the mask to create a binary image, the code identifies contours using cv2.findContours(). This helps in detecting the finger in the image.
-
Finding the Tip of the Finger: The code calculates the lowest point of the largest contour, which represents the tip of the finger. It iterates through the contour points to determine the point with the minimum y-coordinate.
-
Tesseract OCR engine: Code: ocr.py
It is used to extract the text from th image. Pytesseract or Python-tesseract is an OCR tool for python that also serves as a wrapper for the Tesseract-OCR Engine. The distance between each of the word and finger tip is measured, and the one closest is read.
To install Tesseract OCR Engine:
For Windows: Download the Tesseract installer from the Github Link
For macOS:
brew install tesseract
For Ubuntu/Debian:
sudo apt-get update
sudo apt-get install tesseract-ocr
To install the python packages to use OCR engine, run:
pip install pytesseractCode: Object_recognition.py & Object_detection.py
- The device has an added mode that helps the user in object recognition. Assists the user by identifying and playing the sound of the object's name.
- The object detection is done using the
Yolo algorithm. To understand more about the Yolo algorithm refer: AlexeyAB/darknet
To use the codes Object_recognition.py & Object_detection.py implemented using the Yolo algorithm download the coco.names, yolov4-tiny.cfg and the yolov4-tiny.weights files from AlexeyAB/darknet
The code Object_detection.py detects all the objects in the image. But for assisting the user, the object to which the user points must be read. This is done in the code Object_recognition.py.
- Initialization and Model Setup: The code initializes the YOLOv4 model using the yolov4.weights and yolov4.cfg files. It reads class names from coco.names and sets up the webcam to capture live video frames.
- Object Detection and Preprocessing: Each frame from the webcam is preprocessed using cv2.dnn.blobFromImage(). The model performs a forward pass, generating bounding box coordinates, confidence scores, and class IDs for detected objects.
- Finding the Closest Object: The code calculates the distance from the center of the frame (at (width // 2, height // 2)) to the centers of all detected objects. It identifies the closest object by tracking the index with the minimum distance.
- Displaying Results and Triggering Sound: If a close object is detected, a bounding box is drawn around it, its label is displayed and the corresponding label sound is played.

