- This repo is about switching from GPU to the future of ML the TPU https://cloud.google.com/tpu/
- Google colab https://colab.research.google.com/ gives you free
Tesla K80 GPU 1.5 TFLOPS 12GB memoryand8 cores TPU 180 TFLOPS 64GB memoryas well choose whichever you want and get your hands into the world of machine learning for free - Sample notebooks by Google to get you started https://cloud.google.com/tpu/docs/colabs
from google.colab import drive
drive.mount('/content/drive', force_remount=True)
import os
os.chdir("/content/drive/My Drive/<YOUR FOLDER NAME>")
- Mount your google drive folder in colab
- Create a GCS bucket https://console.cloud.google.com/storage/browser
- Create a service account https://console.cloud.google.com/iam-admin/serviceaccounts
- Add role to service account so it can access GCS bucket
- Navigate to the bucket whose ACL you want to modify.
- On that bucket, select Edit Bucket Permissions.
- If you are reading from this bucket, you must authorize the service account to read from the resource. Do this by granting the service account the Storage Legacy > Storage Legacy Bucket Reader role.
- If you are writing to this bucket, you must authorize the service account to write to the resource. Do this by granting the service account the Storage Legacy > Storage Legacy Bucket Writer role.
- Add permission to Colab TPUs to access your private GCS Buckets https://cloud.google.com/tpu/docs/storage-buckets
import tensorflow as tf
import json
# Auth on Colab (little wrinkle: without auth, Colab will be extremely slow in accessing data from a GCS bucket, even public).
IS_COLAB_BACKEND = 'COLAB_GPU' in os.environ  # this is always set on Colab, the value is 0 or 1 depending on GPU presence
if IS_COLAB_BACKEND:
  from google.colab import auth
  auth.authenticate_user()  # Starts an Auth prompt
  if 'COLAB_TPU_ADDR' in os.environ:  # if using a TPU backend
    with tf.Session('grpc://{}'.format(os.environ['COLAB_TPU_ADDR'])) as sess:
      with open('<YOUR SERVICE ACCOUNT FILE FROM ABOVE STEP>.json', 'r') as auth_info:
        # Propagate the Colab Auth so that the TPU can access your GCS buckets. This is not necessary for
        # the public bucket used in this sample but it will be once you work with your own non-public data.
        tf.contrib.cloud.configure_gcs(sess, credentials=json.load(auth_info))  # Upload the credentials to TPU
- Download dataset and split it into proper folders
wget http://download.tensorflow.org/example_images/flower_photos.tgz
tar -xzf flower_photos.tgz
pip install split-folders
import split_folders
split_folders.ratio("flower_photos", output="data")
This will split data into default train 80%, test 10% and validation 10% or you can change the ratio if needed as per configs in https://pypi.org/project/split-folders/
-
The dataset used is flowers dataset http://download.tensorflow.org/example_images/flower_photos.tgz with 5 categories of flowers and is expected to be formatted in TFRecord format, as generated by [this script] which is then uploaded to GCS Bucket on google cloud.
-
If you do not have ImageNet dataset prepared, you can use a randomly generated fake dataset to test the model. It is located at
gs://cloud-tpu-test-datasets/fake_imagenet.
!python2 tpu/tools/datasets/imagenet_to_gcs.py \
  --project="<YOUR GCS PROJECT NAME>" \
  --gcs_output_path="gs://<YOUR BUCKET NAME>/data" \
  --raw_data_dir="data" \
  --local_scratch_dir="tf-records"
-
Please read what params do from the docs inside the
imagenet_to_gcs.pyfile -
After running above cmd
gs://<YOUR BUCKET NAME>/datalocation is expected to contain files with the prefixestrain-*,validation-*andtest-*. -
Each file is a series of
TFExamplerecords. In the case of ResNet-50, theTFExamplerecords have a specific format, as follows:
keys_to_features = {
    'image/encoded': tf.FixedLenFeature((), tf.string, ''),
    'image/format': tf.FixedLenFeature((), tf.string, 'jpeg'),
    'image/class/label': tf.FixedLenFeature([], tf.int64, -1),
    'image/class/text': tf.FixedLenFeature([], tf.string, ''),
    'image/object/bbox/xmin': tf.VarLenFeature(dtype=tf.float32),
    'image/object/bbox/ymin': tf.VarLenFeature(dtype=tf.float32),
    'image/object/bbox/xmax': tf.VarLenFeature(dtype=tf.float32),
    'image/object/bbox/ymax': tf.VarLenFeature(dtype=tf.float32),
    'image/object/class/label': tf.VarLenFeature(dtype=tf.int64),
}- Change dir and set envs
cd tpu/models/official/resnet
%set_env PYTHONPATH=/env/python:/content/drive/My Drive/<YOUR FOLDER NAME>/tpu/models
- Start training from checkpoint for 15 epochs
TPU = 'grpc://' + os.environ['COLAB_TPU_ADDR']
!python2 resnet_main.py \
  --tpu=$TPU \
  --data_dir="gs://<YOUR BUCKET NAME>/data" \
  --param_overrides=train_steps=42,iterations_per_loop=6,num_parallel_calls=64,train_batch_size=1024 \
  --model_dir="gs://<YOUR BUCKET NAME>/resnet-tpu-model" \
  --resnet_checkpoint="gs://cloud-tpu-artifacts/resnet/resnet-nhwc-2018-02-07" \
  --mode=train_and_eval \
  --steps_per_eval=42 \
  --profile_every_n_steps=1 \
  --tpu_profile_duration=15000 \
  --export_dir="gs://resnet-tpu-colab/exported-model"
- The formula to calculate train_steps is int((NUM_EPOCHS * NUM_TRAIN_IMAGES)/TRAIN_BATCH_SIZE) so in this case its int(15 * 2934/1024) = 42
- The iterations_per_loop parameter to TPUConfig controls how many batches of data are sent to the TPU in a single "training loop." Each training loop requires significant communication between the local machine and the TPU server, so if iterations_per_loop is too small, can substantially slow down training. https://cloud.google.com/tpu/docs/troubleshooting
- Regarding params checkout the resnet_params.py file which contains all the params used, they can be overrided from cmd line as above arg named "param_overrides" or can be specified by a yaml file, read the resnet_params.py file to learn more as well as checkout the resnet_main.py file to see how those params are used across the code.
- To see how your input pipeline and model performs in a much more depth checkout the profile tab in tensorboard dashboard https://cloud.google.com/tpu/docs/cloud-tpu-tools
tpu_profile_durationparam in the cmd above specifies how long in ms to capture tpu profile information andprofile_every_n_stepsspecifies how often to catpure information, it can be either every few steps or secs too https://github.com/tensorflow/tpu/blob/master/models/common/tpu_profiler_hook.py- I have also included my tpu profiler zipped data under these 3 Google drive links containing below required folders so you can run this cmd directly and visualize all of them side by side without having to run the training yourselves
- tensorboard-trained-tpu-model-basic-pipeline: https://drive.google.com/file/d/165zQHl54UXKyEW4GHXrrX3Y-b-iIS7Jr/view?usp=sharing
- tensorboard-trained-tpu-model-optimized-pipeline: https://drive.google.com/file/d/17Ex-lhZj0cg2vb-OxBhPUl-EKCpV_Slb/view?usp=sharing
- tensorboard-TPU-Resnet-1million-Images-At-Scale: https://drive.google.com/file/d/1Xs8PcbOpdW44xbSFQW1bLRUOnWhBb6A1/view?usp=sharing
tensorboard --logdir tensorboard-trained-tpu-model-basic-pipeline
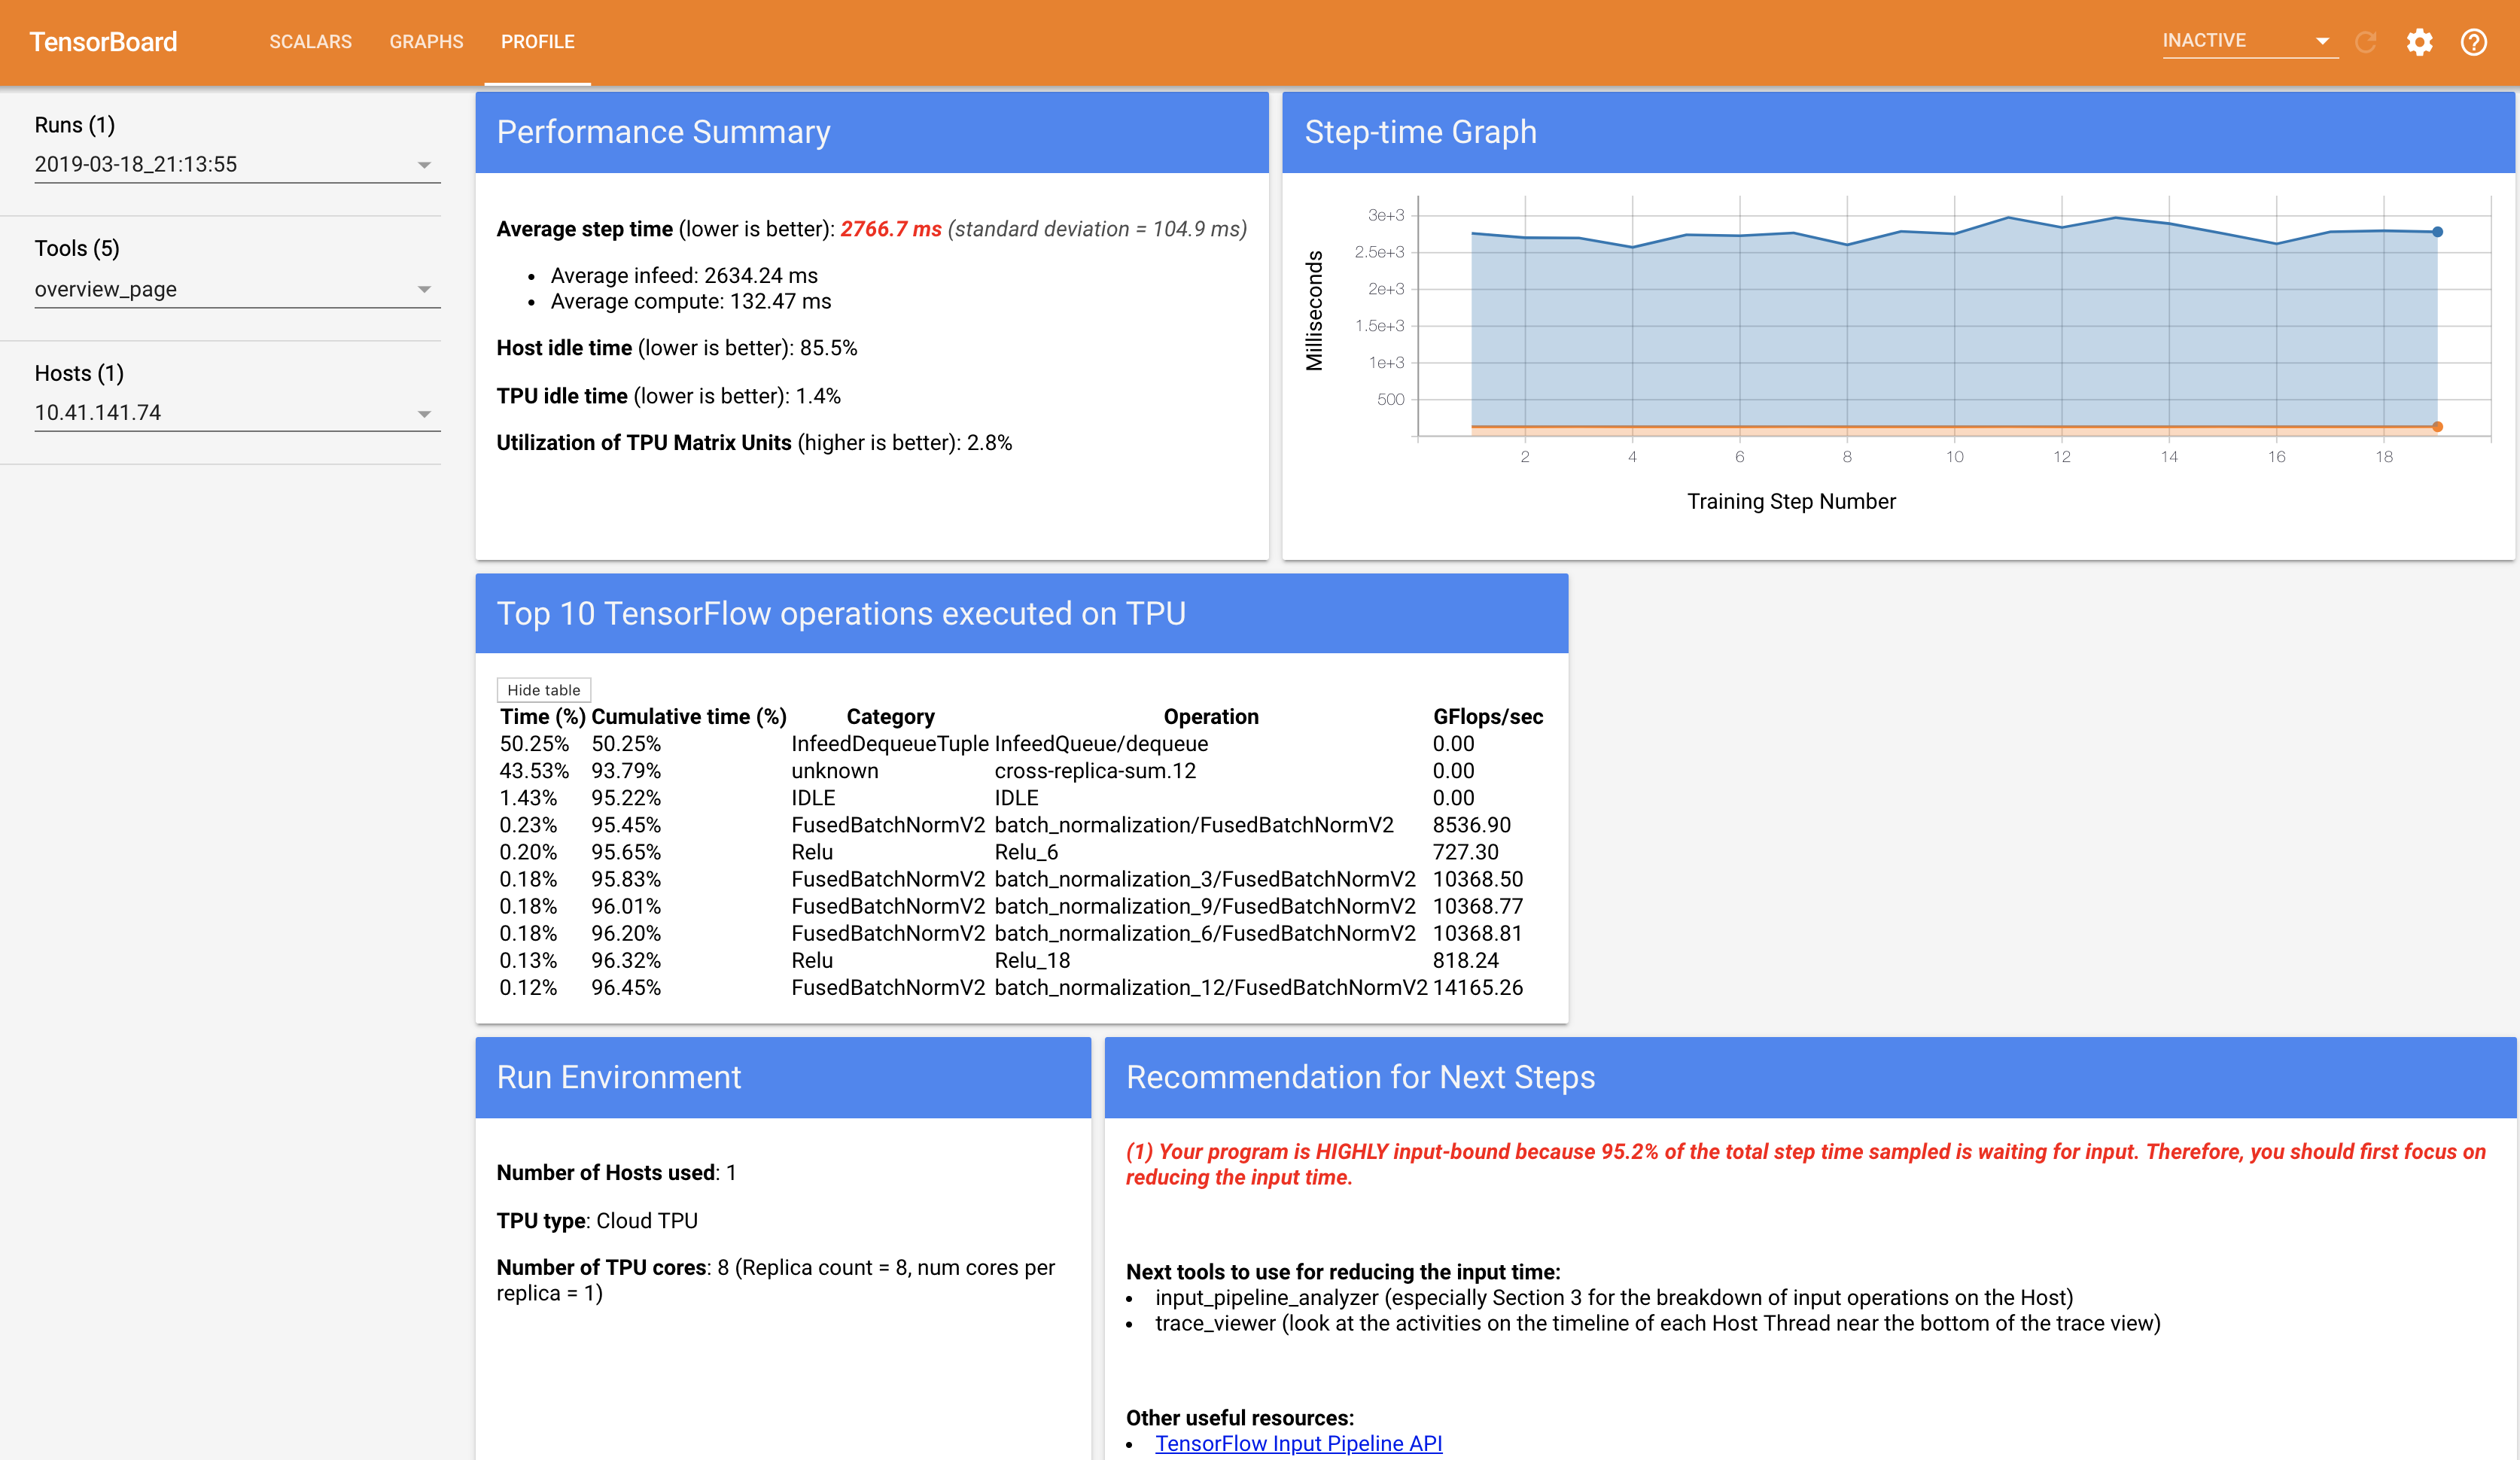
- Jump on to http://localhost:6006 to see effects of bad input pipeline resulting in lower TPU MXU utilization and have the TPU waiting for data from CPU as CPU is busy for
95%of the time preparing data for the TPU
- The bad input pipeline file which does not use multiple threads and some of the much advanced (https://www.tensorflow.org/guide/performance/datasets) recommended tf data pipeline
parallel_map_and_batchoperations on CPU is present in the fileimagenet_input_basic.py, try replacing contents ofimagenet_input.pyunder official git clonedtpu > official > resnet > imagenet_input.pywithimagenet_input_basic.pyand run the training for few epochs and see the same effect yourselves in tensorboard tpu profiler tab.
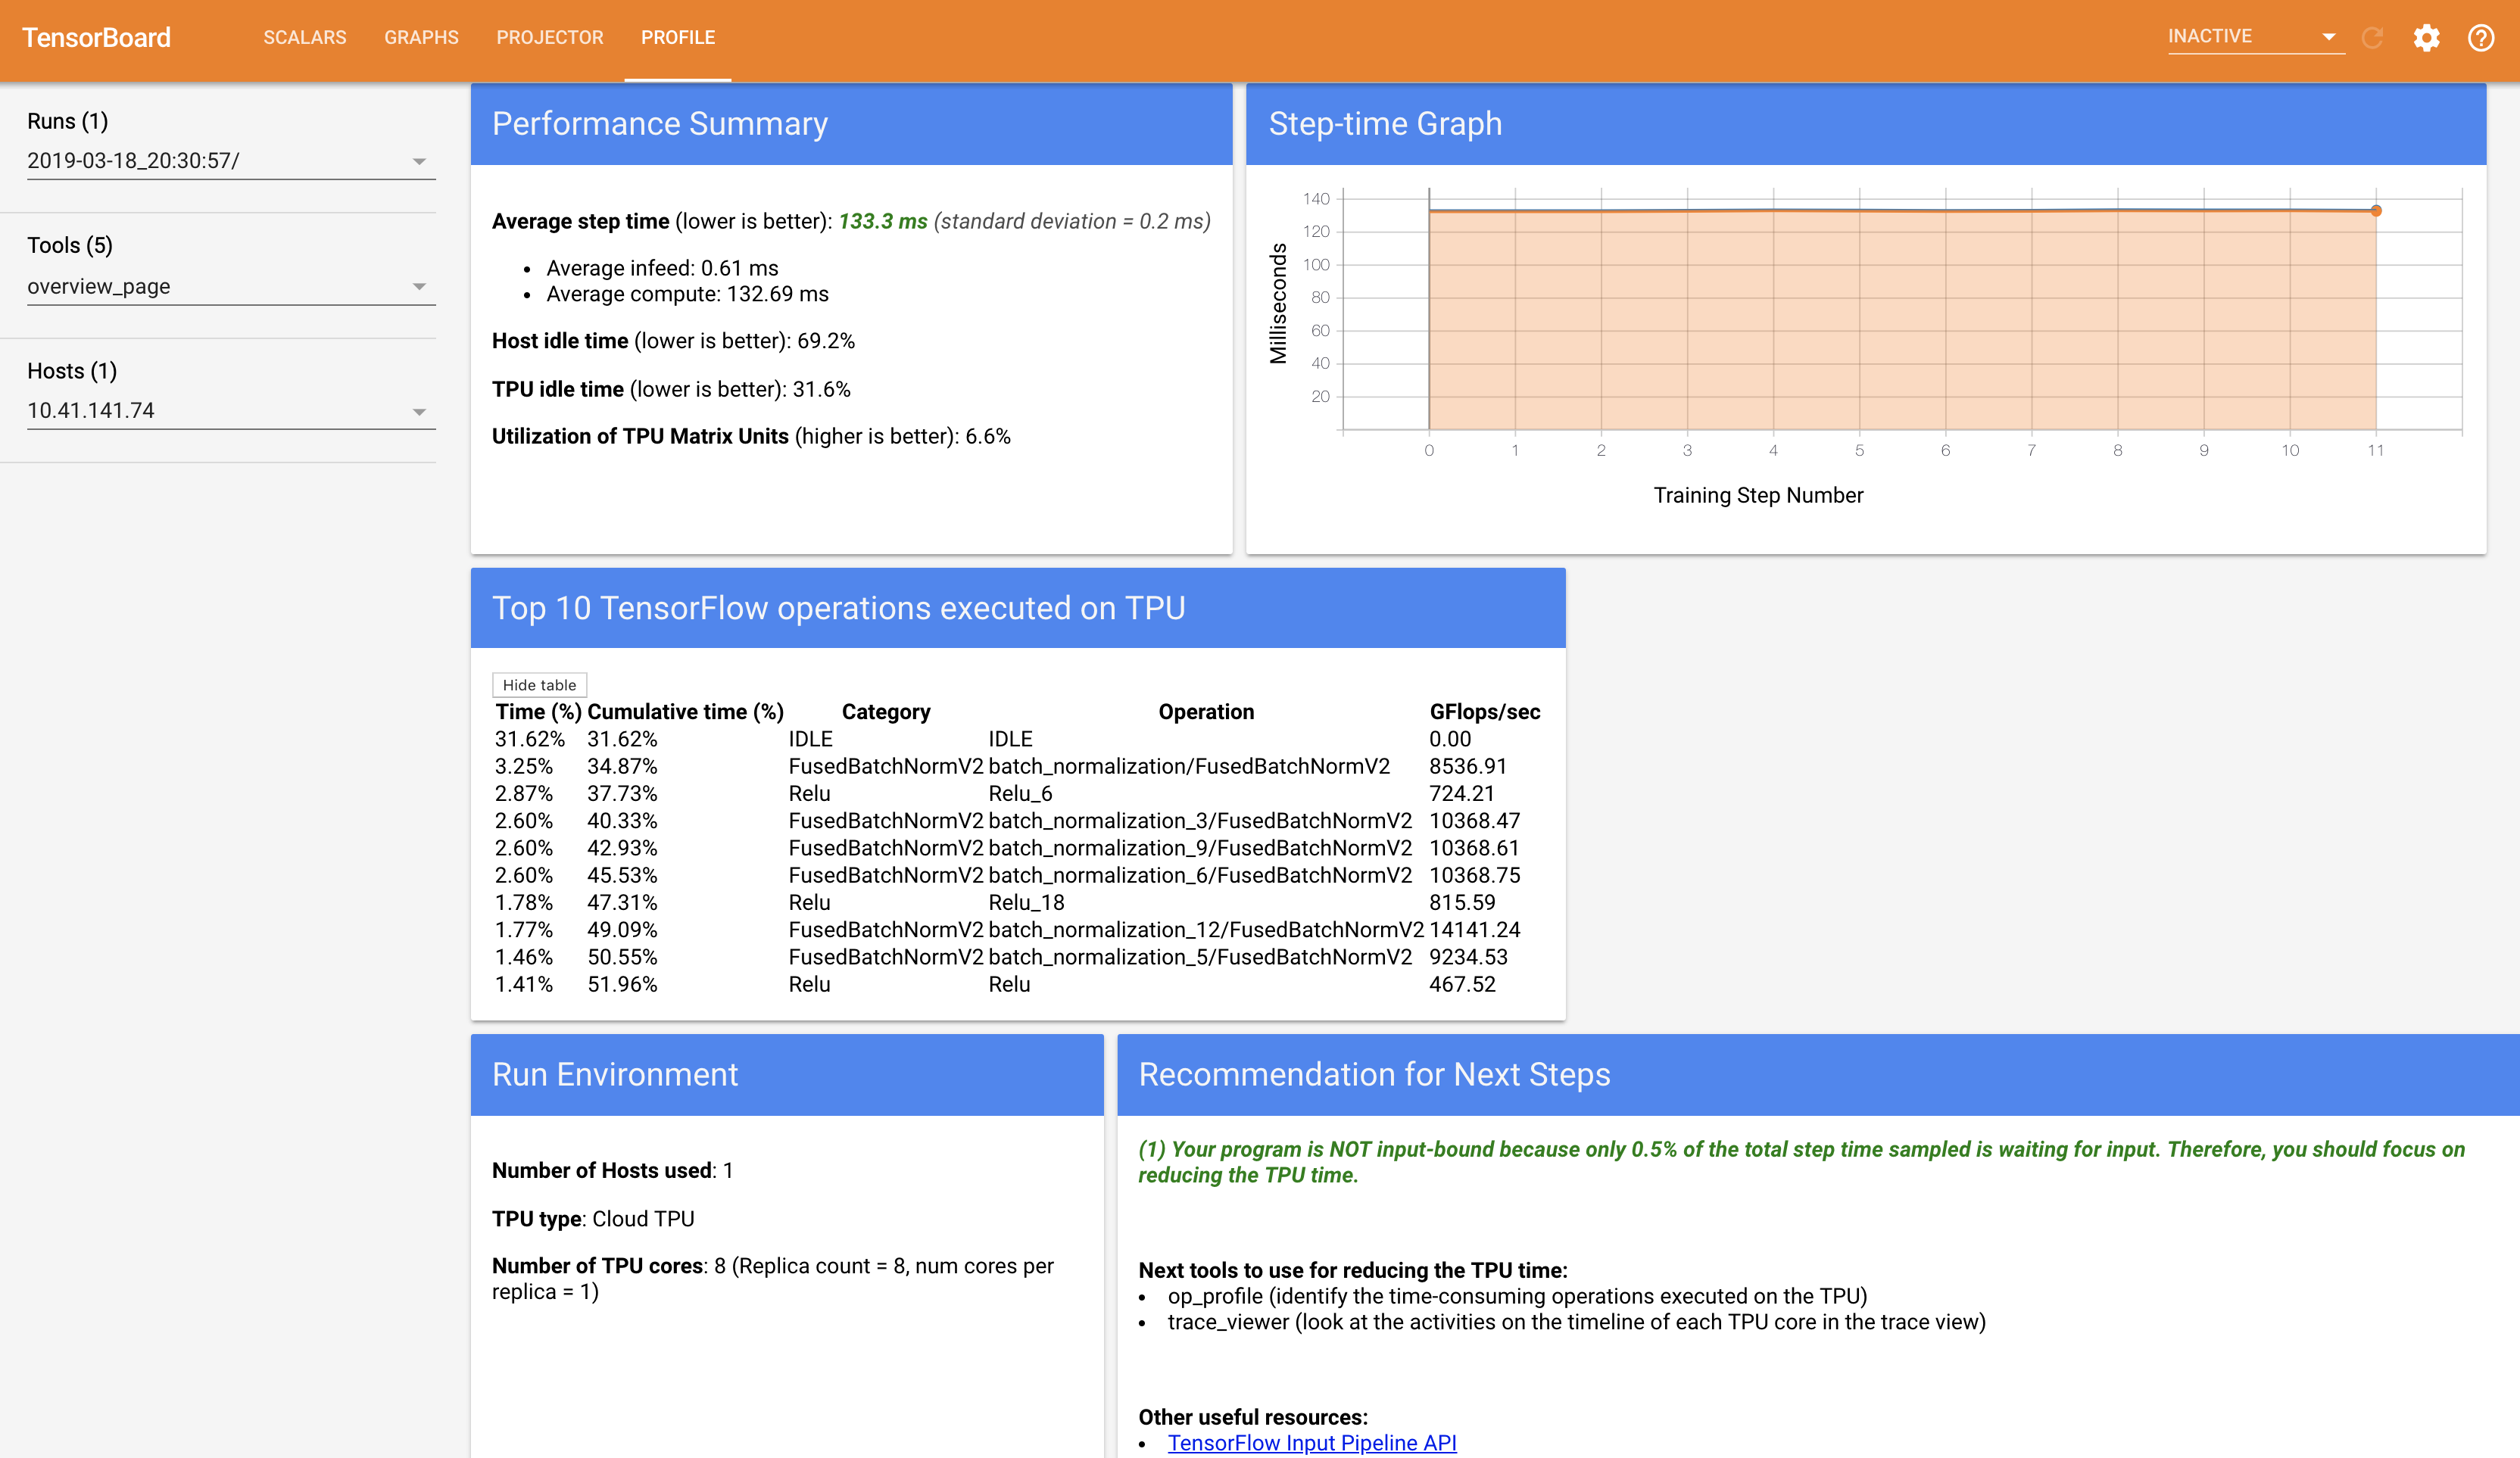
- Then run this cmd to see much better optimised results wherein TPU is churning data most of the time and CPU is running and delivering perfectly for TPU speeds. The tensorboard TPU profiler also states the same only
0.5%of time is spent in waiting for input from CPU, massive improvement from previous95%time yeah!!
tensorboard --logdir tensorboard-trained-tpu-model-optimized-pipeline
- Jump on to http://localhost:6007 to see effects of optimized input pipeline resulting in efficient TPU MXU utilization and keep it busy :)

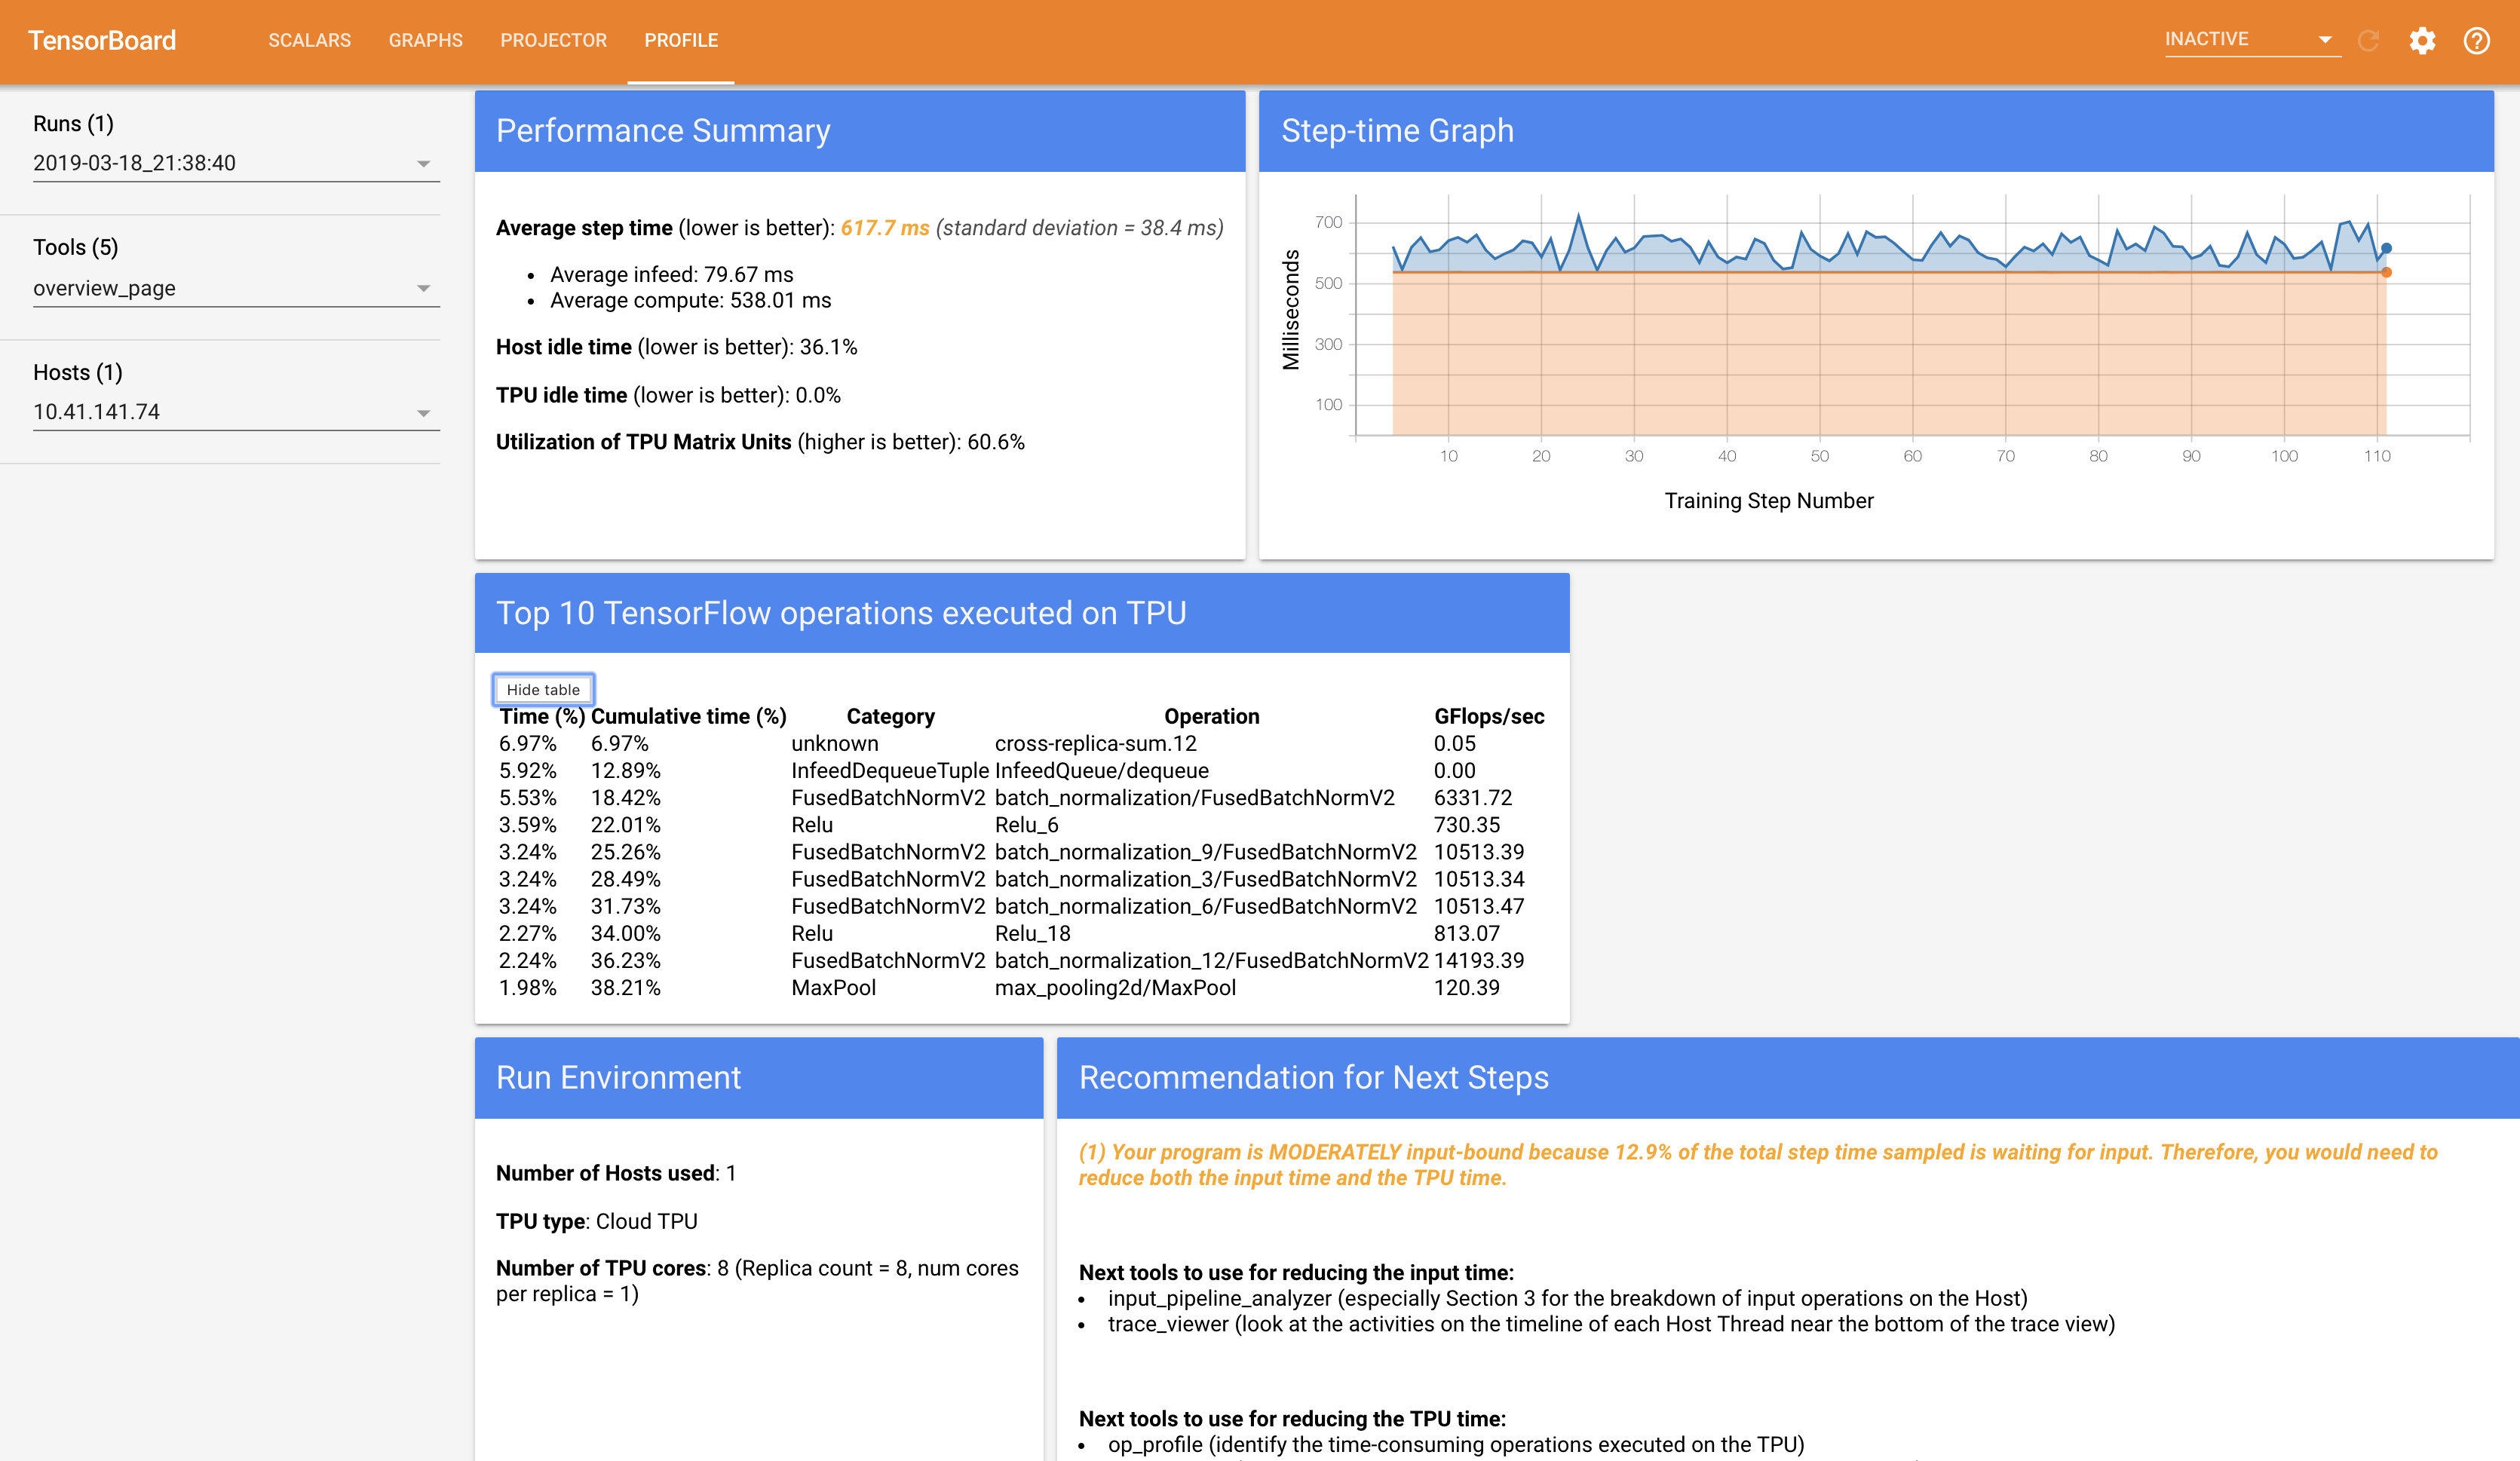
In this case since we only have like 2900 images for training, the TPU utilization will be around 6% and won't shoot that much, to see impressive 60% TPU MXU utilization, run this cmd
tensorboard --logdir tensorboard-TPU-Resnet-1million-Images-At-Scale
- Jump on to http://localhost:6008 to see an impressive
60%TPU MXU utilization!! Just an example at what happens at scale
- I have included the
TPU-Resnet-1million-Images-At-Scale.ipynbnotebook to do the same yourselves on over 1 million images, in my case it was 3 epochs in around 20 mins!! super fast.
- After finetuning on Flowers Dataset with 5 categories for 15 epochs, the validation accuracy is around 84% and test accuracy is around 81% pretty much similar to one on GPU notebook in this repo
- Training time is around 3 minutes total, superfast :)
- To evaluate on test set and make predictions, run following cmd
!python2 resnet_main.py \
  --tpu=$TPU \
  --data_dir="gs://<YOUR BUCKET NAME>/data" \
  --model_dir="gs://<YOUR BUCKET NAME>/resnet-tpu-model" \
  --mode=predict \
  --predict_batch_size=360 \
  --num_test_images=372
- I have included the
Flowers-GPU-Resnet-Keras-TfRecords.ipynbnotebook to finetune resnet50 on keras with tf records on GPU and compare yourselves
Training time for 15 epochs on GPU is around 15mins and accuracy around 82% similar to the one on TPU which was 5x faster in this case, with much larger dataset this 5x can shoot upto 30x!
For more detailed information, read the documentation within each file.
imagenet_input.py: Constructs thetf.data.Datasetinput pipeline which handles parsing, preprocessing, shuffling, and batching the data samples.resnet_main.py: Main code which constructs the TPUEstimator and handles training and evaluating the model.resnet_model.py: ResNet model code which constructs the network via modular residual blocks or bottleneck blocks.resnet_preprocessing.py: Useful utilities for preprocessing and augmenting ImageNet data for ResNet training. Significantly improves final accuracy.
The model is based on network architecture presented in Deep Residual Learning for Image Recognition by Kaiming He, et. al.
Specifically, the model uses post-activation residual units for ResNet-18, and 34 and post-activation bottleneck units for ResNet-50, 101, 152, and 200. There are a few differences to the model and training compared to the original paper:
- The preprocessing and data augmentation is slightly different. In particular, we have an additional step during normalization which rescales the inputs based on the stddev of the RGB values of the dataset.
- We use a larger batch size of 1024 (by default) instead of 256 and linearly scale the learning rate. In addition, we adopt the learning rate schedule suggested by Accurate, Large Minibatch SGD: Training ImageNet in 1 Hour and train for 90 epochs.
- We use a slightly different weight initialization for batch normalization in the last batch norm per block, as inspired by the above paper.
- Evaluation is performed on a single center crop of the validation set rather than a 10-crop from the original paper.
To run the same code on CPU/GPU, set the flag --use_tpu=False. This will use
the default devices available to TensorFlow on your machine. The checkpoints
created by CPU/GPU and TPU are all identical so it is possible to train on one
type of device and then evaluate/predict using the trained model on a different
device.
To serve the exported model on CPU, set the flag --data_format='channels_last'
as inference on CPU only supports channels_last. Inference on GPU supports
both channels_first and channels_last.
The default ResNet-50 has been carefully tested with the default flags but
resnet_model.py includes a few other commonly used
configurations including ResNet-18, 34, 101, 152, 200. The 18 and 34 layer
configurations use residual blocks without bottlenecks and the remaining
configurations use bottleneck layers. The configuration can be controlled via
--resnet_size. Bigger models require more training time and more memory, thus
may require lowering the --train_batch_size to avoid running out of memory.