This application show you how to get started using the Cisco Meraki CMX API.
CMX (Connected Mobile Experiences) is Cisco’s location analytics and engagement platform, and it’s integrated into Cisco Meraki wireless products.
To learn more about what you can do with CMX, see the Cisco Meraki CMX site and at Cisco Meraki Developers
Forked https://github.com/meraki/cmx-api-app and merged Readme.
- Network infrastructure requirements
- Setting up the Cisco Meraki Dashboard
- Starting docker container
- Sample output code
- Copyright and license
-
This code is for sample purposes only. Before running in production, you should probably add SSL/TLS support by running this server behind a TLS-capable reverse proxy like nginx.
-
You should also test that your server is capable of handling the rate of events that will be generated by your networks. A good rule of thumb is that your server should be able to process all your network's nodes once per minute. So if you have 100 nodes, your server should respond to each request within 600 ms. For more than 100 nodes, you will probably need a multithreaded web app.
- The app requires using one or more Cisco Meraki MR wireless access points (APs).
- A valid license is required for each Meraki AP.
- Note: this app does not work with other Cisco APs or non-Cisco APs.
Let’s say you plan to run this app on a docker host you control called pushapi.myserver.com.
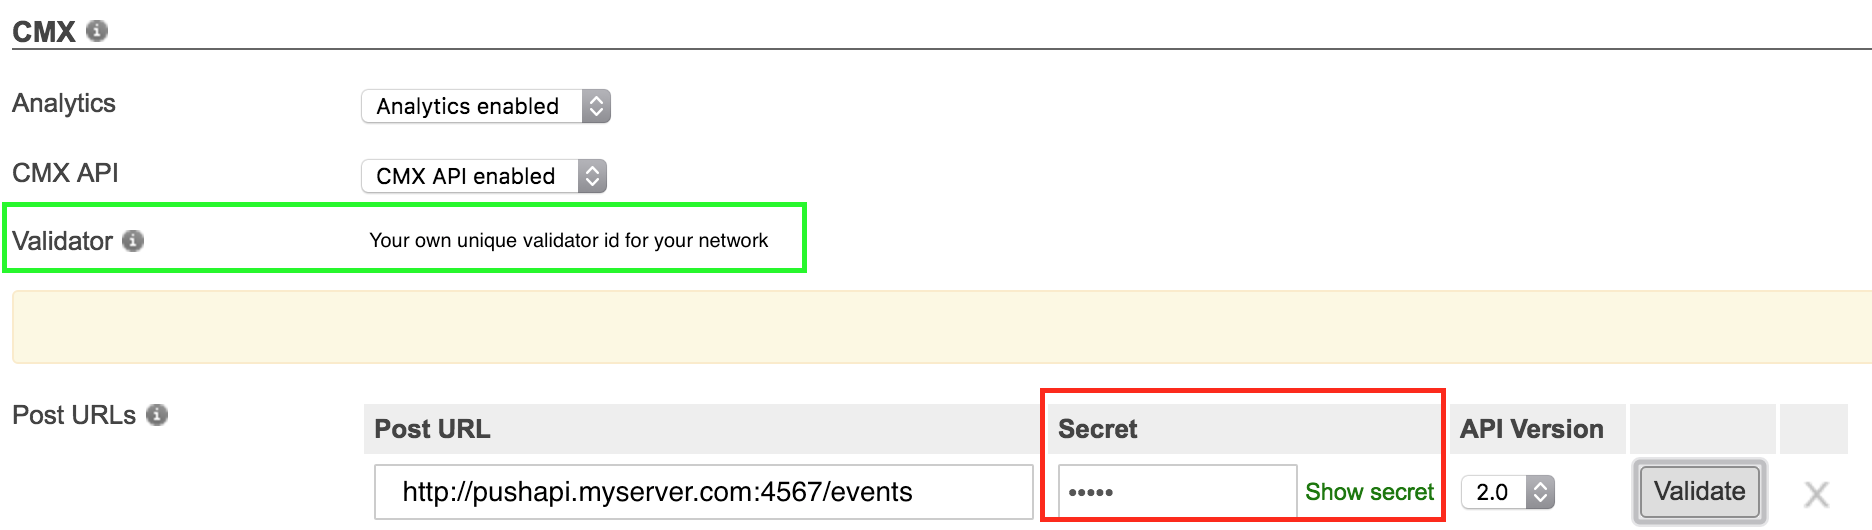
- Go to the Cisco Meraki dashboard and configure the CMX API (find it under Network-wide > Configure > General) with the url
http://pushapi.myserver.com:4567/events - Choose a secret and enter it into the dashboard.
- Make note of the validation code that dashboard provides.
- Pass the secret (red box) and validation code (green box) to your docker container when you start it - Starting docker container
- Start your app by running this interactive container to show output
docker run --rm -it -p 4567:4567 \
-e CMX_SECRET=secret \
-e CMX_VALIDATOR=validator \
robertcsapo/cisco-meraki-cmx-api-app
- If you want to use another port then 4567
docker run --rm -it -p 80:80 \
-e CMX_SECRET=secret \
-e CMX_VALIDATOR=validator \
-e CMX_PORT=80 \
robertcsapo/cisco-meraki-cmx-api-app
- If you want to bind your server to a certain ip-address of the host
docker run --rm -it -p 4567:4567 \
-e CMX_BIND=0.0.0.0 \
-e CMX_SECRET=secret \
-e CMX_VALIDATOR=validator \
--net=host robertcsapo/cisco-meraki-cmx-api-app
docker run -d -p 4567:4567 \
-e CMX_SECRET=secret \
-e CMX_VALIDATOR=validator \
robertcsapo/cisco-meraki-cmx-api-app
- Accessing the container when running as daemon
docker exec -it <containerid/containername> /bin/bash
- git clone https://github.com/robertcsapo/cisco-meraki-cmx-api-app.git
docker build -t robertcsapo/cisco-meraki-cmx-api-app .
It's now possible to host this application through ciscoshipped.io.
README.md in ciscoshipped folder.
-
Click the “Validate server” button in CMX Location Push API configuration in the dashboard. Meraki cloud servers will perform a GET to your server, and you will see a log message like this:
[26/Mar/2014 11:52:09] "GET /events HTTP/1.1" 200 6 0.0024 -
If you do not see such a log message, check your firewall and make sure you’re allowing connections to port 4567. You can confirm that the server is receiving connections on the port using
telnet pushapi.myserver.com 4567 -
Once the Meraki cloud has confirmed that the URL you provided returns the expected validation code, it will begin posting events to your URL. For example, when a client probes one of your access points, you’ll see a log message like this:
[2014-03-26T11:51:57.920806 #25266] INFO -- : AP 11:22:33:44:55:66 on ["5th Floor"]: {"ipv4"=>"123.45.67.89", "location"=>{"lat"=>37.77050089978862, "lng"=>-122.38686903158863,"unc"=>11.39537928078731}, "seenTime"=>"2014-05-15T15:48:14Z", "ssid"=>"Cisco WiFi","os"=>"Linux", "clientMac"=>"aa:bb:cc:dd:ee:ff","seenEpoch"=>1400168894, "rssi"=>16, "ipv6"=>nil, "manufacturer"=>"Meraki"}
-
After your first client pushes start arriving (this may take a minute or two), you can get a JSON blob describing the last client probe (where {mac} is the client mac address):
pushapi.myserver.com:4567/clients/{mac} -
You can also view the sample frontend at:
http://pushapi.myserver.com:4567/.
Try connecting your mobile device to your network, and entering your mobile device‘s WiFi MAC in the frontend.
The JSON blob sent by Meraki servers to your app is formatted as follows:
{
  "apMac":"00:18:0a:79:08:60",
  "apFloors":["500 TF 4th"],
  "observations":[{
    "clientMac":"00:11:22:33:44:55:66",
    "probeEpoch":1388577600,
    "probeTime":"2014-01-01T12:00:00Z",
    "rssi":23,
    "ssid":"SSID 1",
    "manufacturer":"Meraki",
    "os":"Linux",
    "location":{
      "lat":37.77057805947924
      "lng":-122.38765965945927,
      "unc":15.13174349529074,
    },...]
  }
}
A specific client device’s details can be retrieved, for example:
http://pushapi.myserver.com:4567/clients/34:23:ba:a6:75:70
may return
{
  "id":65,
  "mac":"34:23:ba:a6:75:70",
  "seenAt":"Fri Apr 18 00:01:41.479 UTC 2014",
  "lat":37.77059042088197,"lng":-122.38703445525945
}
Code and documentation copyright 2013-2014 Cisco Systems, Inc. Code released under the MIT license. Documentation released under Creative Commons.