ESP32 Camera Demo
Code provided in this repository gets the image from camera and prints it out as ASCII art to the serial port.
Build Status
Table of Contents
Components
To make this code work, you need the following components:
- This repository. It contains submodules, so make sure you clone it with
--recursiveoption. If you have already cloned it without--recursive, rungit submodule update --init. - ESP32 module
- Camera module
- PC with esp-idf
See the following sections for more details.
ESP32
Any ESP32 module should work, if it has sufficient number of GPIO pins available to interface with camera. See section Connect for more details.
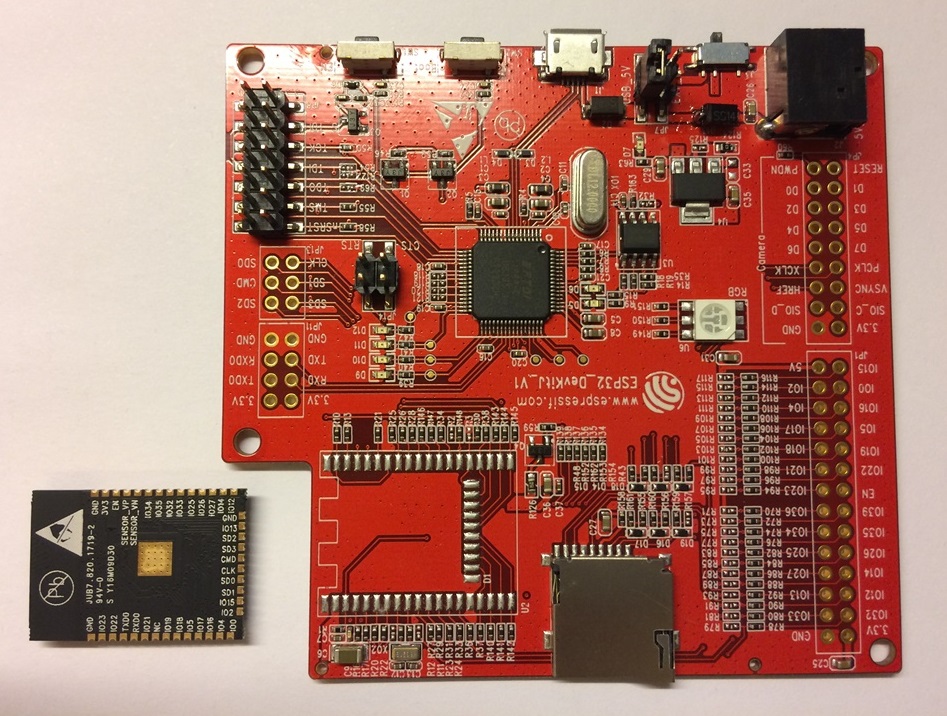
If you are an owner of ESP-WROVER V1 (aka DevKitJ), then camera connector is already broken out.
Camera
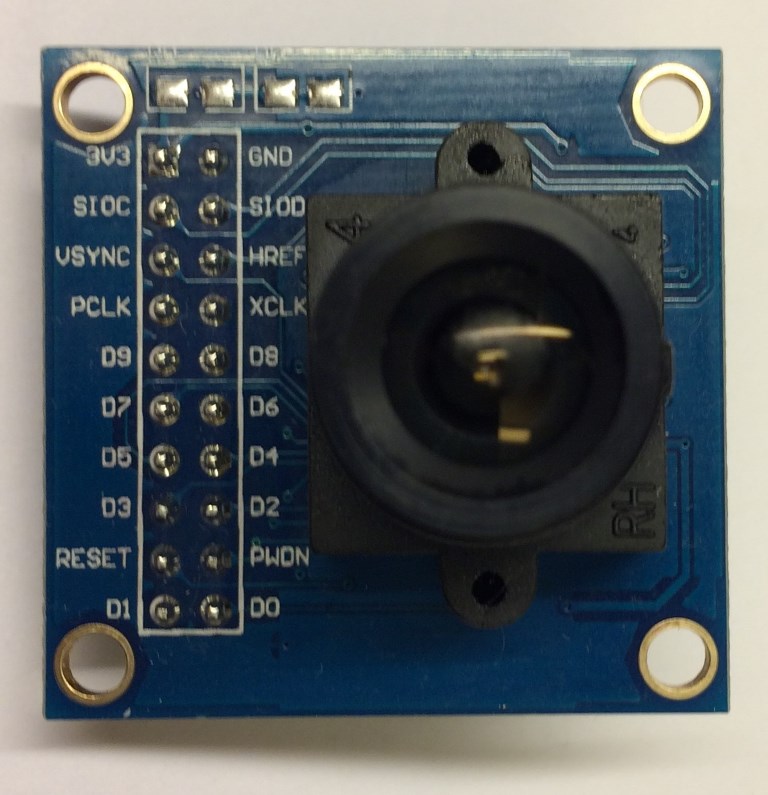
This example has been tested with OV7725 camera module. Use it, if this is your first exposure to interfacing a microcontroller with a camera.
Other OV7xxx series should work as well, with some changes to camera configuration code. OV5xxx can work too, but it is advisable to choose the ones which support RGB or YUV 8-bit wide output bus. The ones which only output 10-bit raw data may be a bit harder to work with. Also choose the camera which can output a scaled down (QVGA or VGA) image. Use of larger frame buffers will require external SPI RAM.
ESP-IDF
Configure your PC according to ESP32 Documentation. Windows, Linux and Mac OS are supported. If this is you first exposure to ESP32 and esp-idf, then get familiar with 01_hello_world and 02_blink examples. Make them work and understand before proceeding further.
Quick Start
If you have your components ready, follow this section to connect the camera to ESP32 module, flash application to the ESP32 and finally shoot and display the image.
Connect
Specific pins used in this example to connect ESP32 and camera are shown in table below. Pinout can be adjusted to some extent in software. Table below provides two options of pin mapping (last two columns).
| Interface | Camera Pin | Pin Mapping for ESP32 DevKitJ | Alternate ESP32 Pin Mapping | M5Cam |
|---|---|---|---|---|
| SCCB Clock | SIOC | IO27 | IO23 | IO23 |
| SCCB Data | SIOD | IO26 | IO25 | IO25 |
| System Clock | XCLK | IO21 | IO27 | IO27 |
| Vertical Sync | VSYNC | IO25 | IO22 | IO22 |
| Horizontal Reference | HREF | IO23 | IO26 | IO26 |
| Pixel Clock | PCLK | IO22 | IO21 | IO21 |
| Pixel Data Bit 0 | D2 | IO4 | IO35 | IO17 |
| Pixel Data Bit 1 | D3 | IO5 | IO17 | IO35 |
| Pixel Data Bit 2 | D4 | IO18 | IO34 | IO34 |
| Pixel Data Bit 3 | D5 | IO19 | IO5 | IO5 |
| Pixel Data Bit 4 | D6 | IO36 | IO39 | IO39 |
| Pixel Data Bit 5 | D7 | IO39 | IO18 | IO18 |
| Pixel Data Bit 6 | D8 | IO34 | IO36 | IO36 |
| Pixel Data Bit 7 | D9 | IO35 | IO19 | IO19 |
| Camera Reset | RESET | IO2 | IO15 | IO15 |
| Camera Power Down | PWDN | see Note 3 | see Note 3 | see Note 3 |
| Power Supply 3.3V | 3V3 | 3V3 | 3V3 | 3V3 |
| Ground | GND | GND | GND | GND |
Notes:
- Important: Make the connections short or you are likely to get noisy or even not legible images. More on that is discussed in section Showcase
- Camera pin column refers to pinout on OV7725 camera module
- Camera Power Down pin does not need to be connected to ESP32 GPIO. Instead it may be pulled down to ground with 10 kOhm resistor.
- OV7725 supports 10 bit image pixels. In this example the upper 8 bits are processed and saved. The pins corresponding with LSB are marked D0 and D1 and are left not connected.
If you have ESP-WROVER V1 (aka DevKitJ), then camera connector is already broken out and labeled Camera / JP4. Solder 2.54 mm / 0.1" double row, 18 pin socket in provided space and plug the camera module right into it. Line up 3V3 and GND pins on camera module and on ESP-WROVER. D0 and D1 should be left not connected outside the socket.
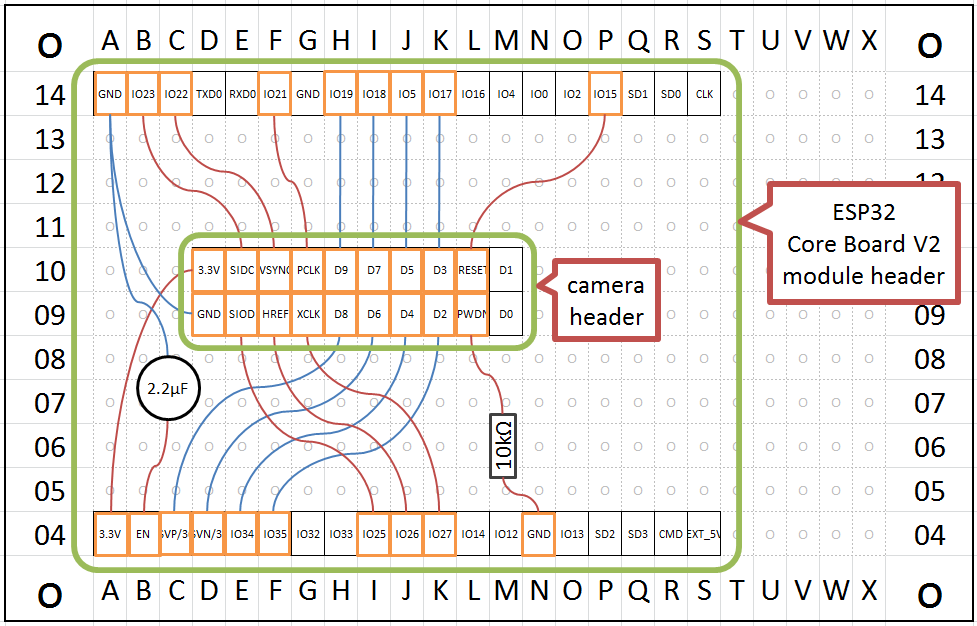
To connect the camera to Core Board V2 (aka DevKitC), consider alternate pin mapping (see the last column of table) that provides clean wiring layout shown below.
2.2uF capacitor conencted between GND and EN pins of ESP32module is added to resolve ESP32 Reset To Bootloader Issues on Windows #136.
Flash
Clone the code provided in this repository to your PC, compile with the latest esp-idf installed from GitHub and download to the module.
If all h/w components are connected properly you are likely to see the following message during download:
Krzysztof@tdk-kmb-op780 MSYS /esp/esp32-cam-demo
$ make flash
Flashing binaries to serial port com18 (app at offset 0x10000)...
esptool.py v2.0-dev
Connecting...

A fatal error occurred: Failed to connect to ESP32: Timed out waiting for packet header
make: *** [C:/msys32/esp-idf/components/esptool_py/Makefile.projbuild:48: flash] Error 2
This is due to a pullup on the camera reset line. It is stronger than the internal pull-down on GPIO2 of the ESP32, so the chip cannot go into programming mode.
There are couple of options how to resolve this issue:
- If you are using ESP-WROVER V1 then connect GPIO2 to GND while flashing.
- Power down the camera module by removing it from the socket (ESP-WROVER V1) or by uplugging 3.3V wire.
- Map Camera Reset line to another GPIO pin on ESP32, for instance
GPIO15.
Shoot
Once module is loaded with code, open a serial terminal.
Camera demo application will first configure XCLK output that is timing operation of the camera chip.
D (1527) camera: Enabling XCLK output
I (1527) ledc: LEDC_PWM CHANNEL 0|GPIO 21|Duty 0004|Time 0
This clock is also timing output of pixel data on camera output interface - see I2S and DMA described below.
Then SCCB interface is set up:
D (1527) camera: Initializing SSCB
I (1537) gpio: GPIO[26]| InputEn: 0| OutputEn: 1| OpenDrain: 0| Pullup: 0| Pulldown: 0| Intr:0
I (1537) gpio: GPIO[27]| InputEn: 0| OutputEn: 1| OpenDrain: 0| Pullup: 0| Pulldown: 0| Intr:0
I (1547) gpio: GPIO[26]| InputEn: 1| OutputEn: 0| OpenDrain: 0| Pullup: 1| Pulldown: 0| Intr:0
I (1557) gpio: GPIO[27]| InputEn: 1| OutputEn: 0| OpenDrain: 0| Pullup: 1| Pulldown: 0| Intr:0
In next step the communication with camera should be established. ESP will retrieve camera's address and signature.
D (1567) camera: Resetting camera
D (1587) camera: Searching for camera address
D (1587) camera: Detected camera at address=0x21
D (1587) camera: Camera PID=0x77 VER=0x21 MIDL=0x7f MIDH=0xa2
If communication fails, the following message is shown:
E (1076) camera: Camera address not found
E (1076) camera_demo: Camera init failed with error = 131073
If communication with camera module is established, ESP will reset the camera sensor and reserve memory for video frame buffer:
D (1587) camera: Doing SW reset of sensor
D (1647) camera: Setting frame size at 320x240
D (1677) camera: Allocating frame buffer (320x240, 76800 bytes)
Image from camera is retrieved using I2S communication for all eight pixel bits at once and saved in memory line by line. Log below shows completion of initialization steps for I2S and DMA:
D (1677) camera: Initializing I2S and DMA
I (1677) gpio: GPIO[35]| InputEn: 1| OutputEn: 0| OpenDrain: 0| Pullup: 0| Pulldown: 0| Intr:0
I (1677) gpio: GPIO[34]| InputEn: 1| OutputEn: 0| OpenDrain: 0| Pullup: 0| Pulldown: 0| Intr:0
I (1687) gpio: GPIO[39]| InputEn: 1| OutputEn: 0| OpenDrain: 0| Pullup: 0| Pulldown: 0| Intr:0
I (1697) gpio: GPIO[36]| InputEn: 1| OutputEn: 0| OpenDrain: 0| Pullup: 0| Pulldown: 0| Intr:0
I (1707) gpio: GPIO[19]| InputEn: 1| OutputEn: 0| OpenDrain: 0| Pullup: 0| Pulldown: 0| Intr:0
I (1717) gpio: GPIO[18]| InputEn: 1| OutputEn: 0| OpenDrain: 0| Pullup: 0| Pulldown: 0| Intr:0
I (1727) gpio: GPIO[5]| InputEn: 1| OutputEn: 0| OpenDrain: 0| Pullup: 0| Pulldown: 0| Intr:0
I (1737) gpio: GPIO[4]| InputEn: 1| OutputEn: 0| OpenDrain: 0| Pullup: 0| Pulldown: 0| Intr:0
I (1747) gpio: GPIO[25]| InputEn: 1| OutputEn: 0| OpenDrain: 0| Pullup: 0| Pulldown: 0| Intr:0
I (1757) gpio: GPIO[23]| InputEn: 1| OutputEn: 0| OpenDrain: 0| Pullup: 0| Pulldown: 0| Intr:0
I (1767) gpio: GPIO[22]| InputEn: 1| OutputEn: 0| OpenDrain: 0| Pullup: 0| Pulldown: 0| Intr:0
D (1777) intr_alloc: Connected src 32 to int 3 (cpu 0)
D (1777) camera: Allocating DMA buffer #0, size=1280
D (1787) camera: Allocating DMA buffer #1, size=1280
D (1817) camera: Init done
Finally ESP32 will retrieve image from camera and show it as ASCII art on serial terminal. Image will be retrieved in a loop once per second.
D (1817) camera: Waiting for positive edge on VSYNC
D (1847) camera: Got VSYNC
D (1847) camera: Waiting for frame
D (1887) camera: Frame done
D (1887) camera_demo: Done
|@@ ......... @@@@@@@@@@@@            .@@@@@@@@@@@@@ .. ....... @@@@@@@+. @@@@@@@|
|@@.    ... .+@@@@@@@@@@@@             @@@@@@@@@@@@@ ..      .. @@@@@@@@@@.:.  %@|
|@+         .@@@@@@@@@@@@@             @@@@@@@@@@@@@ ..       . @@@@@@@@@@@......|
|@           @@@@@@@@@@@@@             @@@@@@@@@@@@@.. .      ..@@@@@@@@@@@......|
|@           @@@@@@@@@@@@@             @@@@@@@@@@@@@-...       .@@@@@@@@@@@......|
|:@@@@@@@@@@@            =@@@@@@@@@@@@@             @@@@@@@%=.  @@@@@@@@@@@ .....|
|%@@@@@@@@@@@            %@@@@@@@@@@@@@            .@@@@@@@@@@@@@    .     @@*   |
|@@@@@@@@@@@@            @@@@@@@@@@@@@@             @@@@@@@@@@@@@        . @@@@@@|
|@@@@@@@@@@@%            @@@@@@@@@@@@@@             @@@@@@@@@@@@@          @@@@@@|
|@@@@@@@@@@@-            @@@@@@@@@@@@@@             @@@@@@@@@@@@@          @@@@@@|
|@@@@@@@@@@@             @@@@@@@@@@@@@@             @@@@@@@@@@@@@          @@@@@@|
How it Works
Software
The core of camera software is contained in camera folder and consists of the following files.
-
camera.c and include/camera.h - main file responsible for configuration of ESP32's GPIO, clock, I2S and DMA to interface with camera module. Once interface is established, it perfroms camera configuration to then retrieve image and save it in ESP32 memory. Access to camera is executed using lower level routines in the following files.
-
ov7725.c, ov7725.h, ov7725_regs.h and sensor.h - definition of registers of OV7725 to configure camera funcinality. Functions to set register groups to reset camera to default configuration and configure specific functionality like resolution or pixel format. Setting he registers is performed by lower level function in files below.
-
sccb.c and sccb.h - implementation of Serial Camera Control Bus (SCCB) protocol to set camera registers.
-
twi.c and twi.h - implementation of software I2C routines used by SCCB protocol.
-
wiring.c and wiring.h - the lowest level routines to set GPIO pin mode, set GPIO pin level and delay program execution by required number of ms.
-
component.mk - file used by C
makecommand to access component during compilation. -
Kconfig.projbuild - file used by
make menuconfigthat provides menu option to switch camera test pattern on / off.
All above are called esp-idf component and placed in components folder. Esp-idf framework provides components folder as a standard place to add modular functionality to a project.
Application starts and the top level control is executed from app_main.c file located in main folder.
Operation
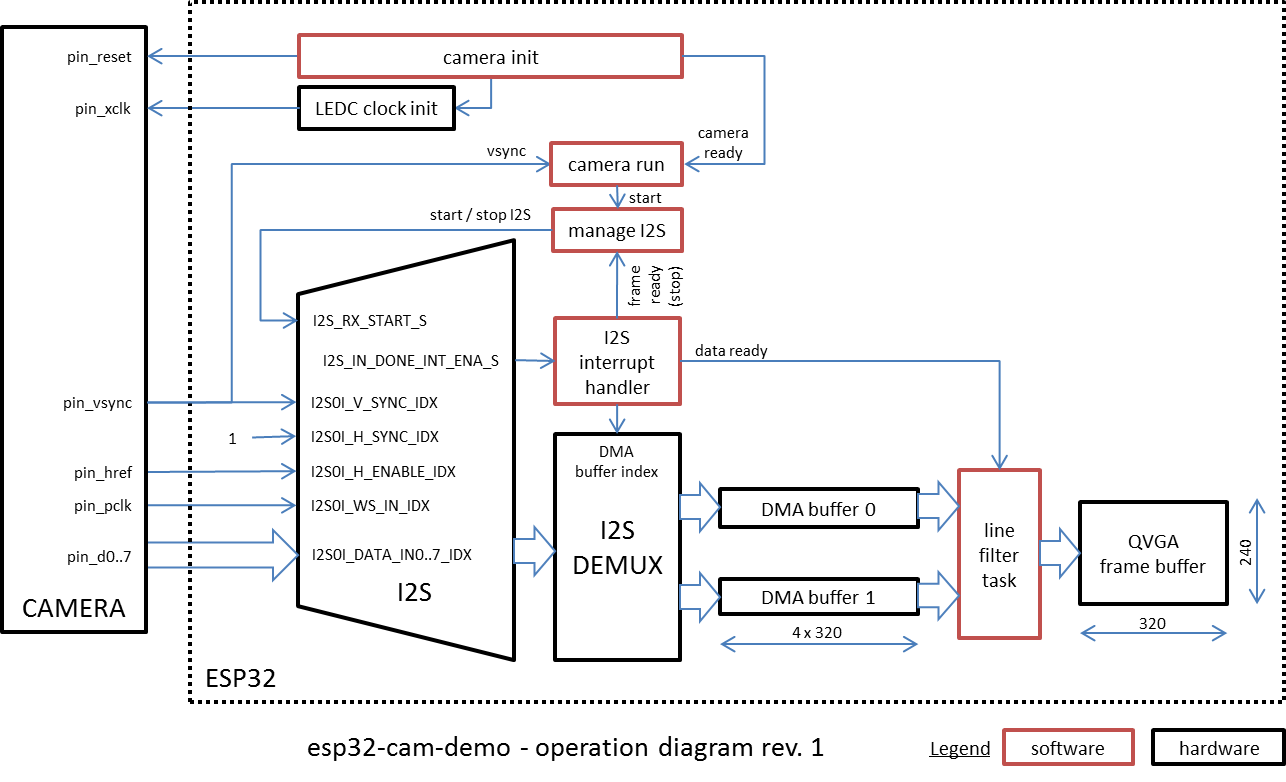
Interconnections between application and h/w internals of ESP32 to acquire an image from the camera is shown on diagram below.
Troubleshooting
If you have issues to get the live image right, enable test pattern and see what is retrieved.
To do so, run make menuconfig, open Example Configuration menu option and check [ ] Enable test pattern on camera output.
Optionally change the following define in file camera.c:
# define ENABLE_TEST_PATTERN CONFIG_ENABLE_TEST_PATTERN
Camera sensor will then output test pattern instead of live image.
D (5692) camera: Waiting for positive edge on VSYNC
D (5722) camera: Got VSYNC
D (5722) camera: Waiting for frame
D (5752) camera: Frame done
D (5752) camera_demo: Done
|@@@@@@@@@@@@@@@@@@@@@%%%%%%%%%########## +++++++++==========-:::::::::          |
|@@@@@@@@@@@@@@@@@@@@@%%%%%%%%%########## +++++++++==========-:::::::::          |
|@@@@@@@@@@@@@@@@@@@@@%%%%%%%%%########## +++++++++==========-:::::::::          |
|@@@@@@@@@@@@@@@@@@@@@%%%%%%%%%########## +++++++++==========-:::::::::          |
|@@@@@@@@@@@@@@@@@@@@@%%%%%%%%%########## +++++++++==========-:::::::::          |
|@@@@@@@@@@@@@@@@@@@@@%%%%%%%%%########## +++++++++==========-:::::::::          |
|@@@@@@@@@@@@@@@@@@@@@%%%%%%%%%########## +++++++++==========-:::::::::          |
|@@@@@@@@@@@@@@@@@@@@@%%%%%%%%%########## +++++++++==========-:::::::::          |
O nce test pattern is enabled, application will calculate standard variance of what is retrieved by ESP32 against pattern generated by the camera module. If there is noise on the lines or some pixels lines not connected or shortcut, this should be reported below displayed image.
Frames / mismatch : 4630 / 70 (1%), (6531449)
The value in brackets with % sign provides number of frames that differ from the test pattern. See code inline comments for more information on this functionality.
Showcase
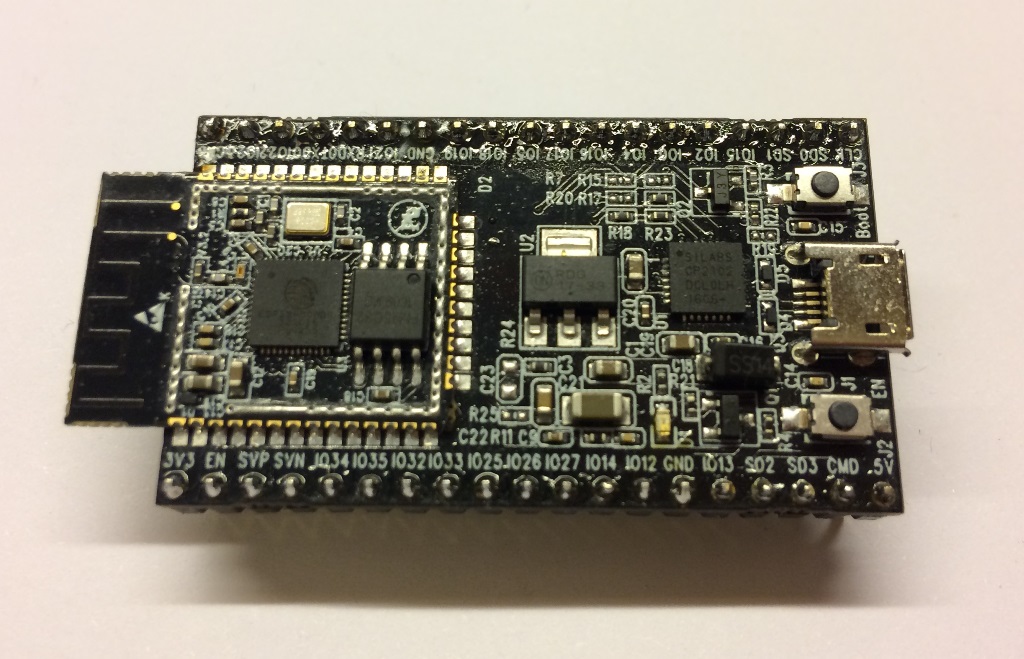
This code has been tested with hardware presented below.
 |
 |
 |
|---|---|---|
| Core Board V2 (aka DevKitC) | ESP-WROVER V1 (aka DevKitJ) | OV7725 Camera module |
Connections between camera and ESP32 should be made short or you are likely to get noisy images. In worst case you will not be able to retrieve any legible data from the camera. Using the above h/w it has been established, that connection length between OV7725 camera module header and ESP32 chip should not be longer than 90 mm.
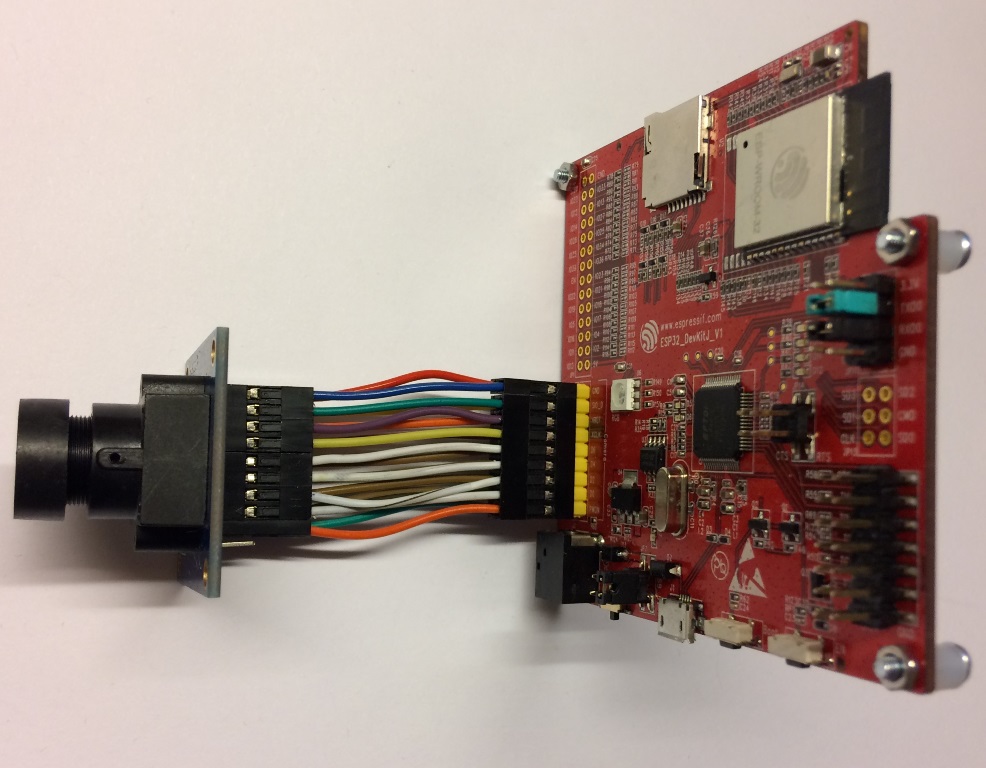
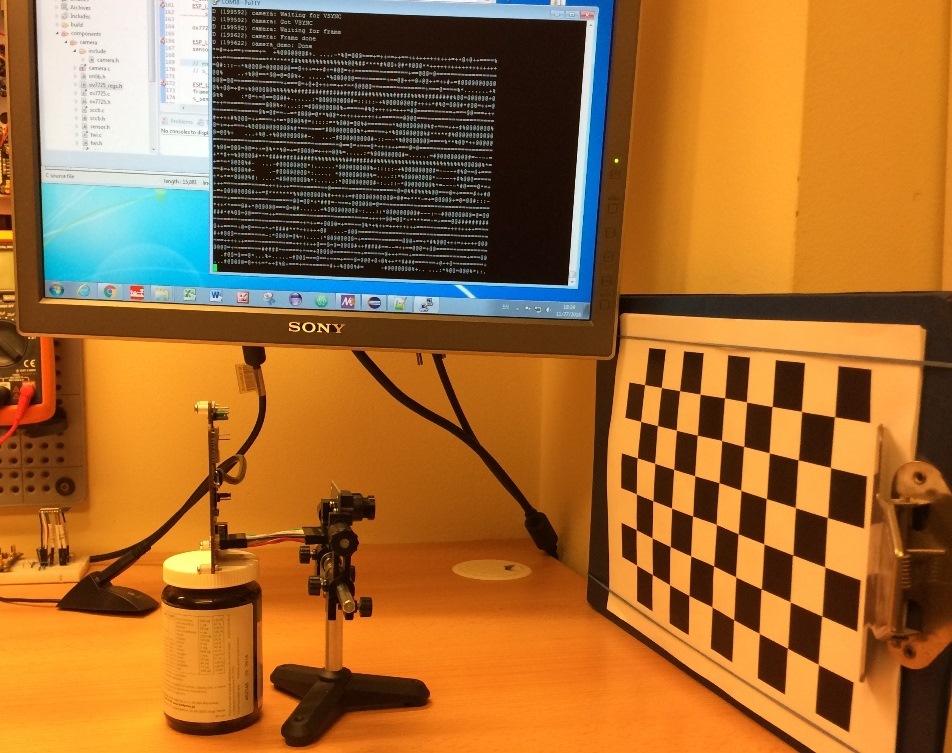
In particular, if you are using ESP-WROVER V1 (aka DevKitJ), then camera module should be plugged right into socket soldered to the board. Attempt to use a cable header as shown below on left did not work. Image retrieved from camera was not legible. Test stand on right is showing ESP-WROVER V1 with a cable header. The chessboard test pattern retrieved in such set up is not legible. Module should be plugged right into the socket soldered on ESP-WROVER V1.
 |
 |
|---|---|
| Wiring of OV7725 to ESP-WROVER V1 - SUCH LONG WIRING DOES NOT WORK! | Not legible chessboard test pattern for ESP-WROVER V1 with a cable header |
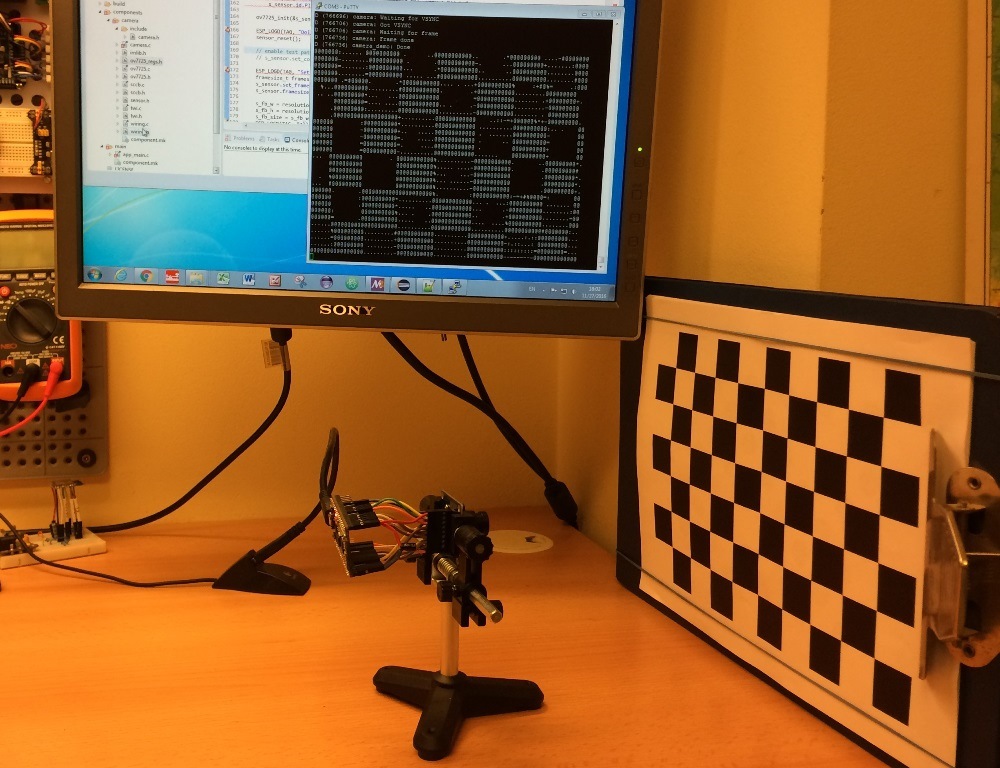
To give you the idea of length of cable connection that does not cause issues with image retrieval, below is an example of wiring of Core Board V2 (aka DevKitC).
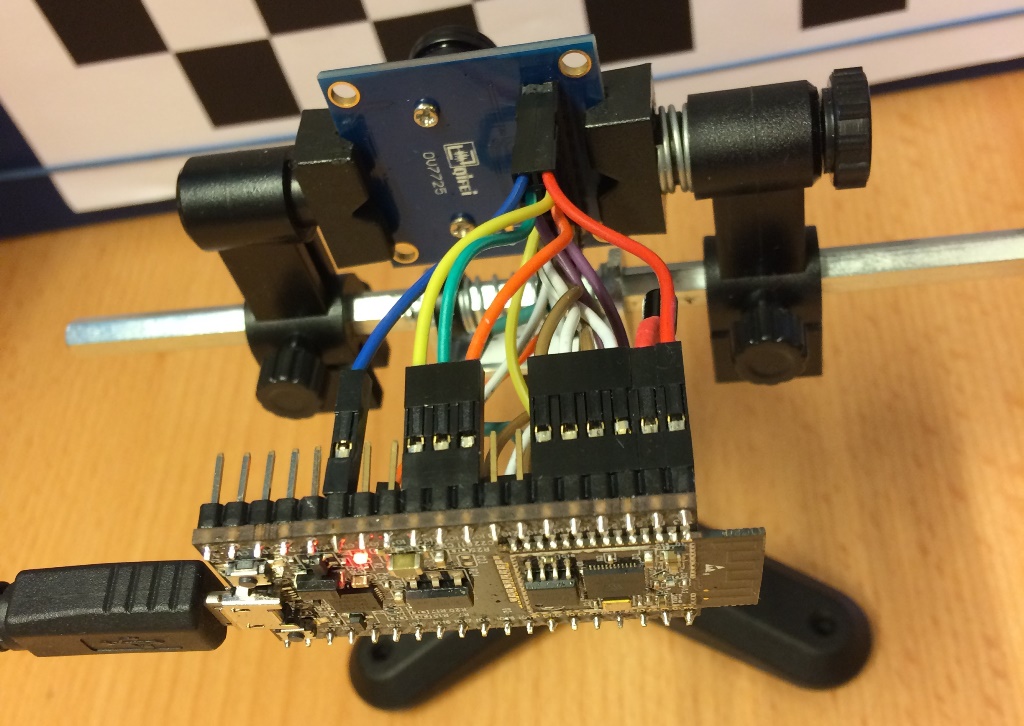 |
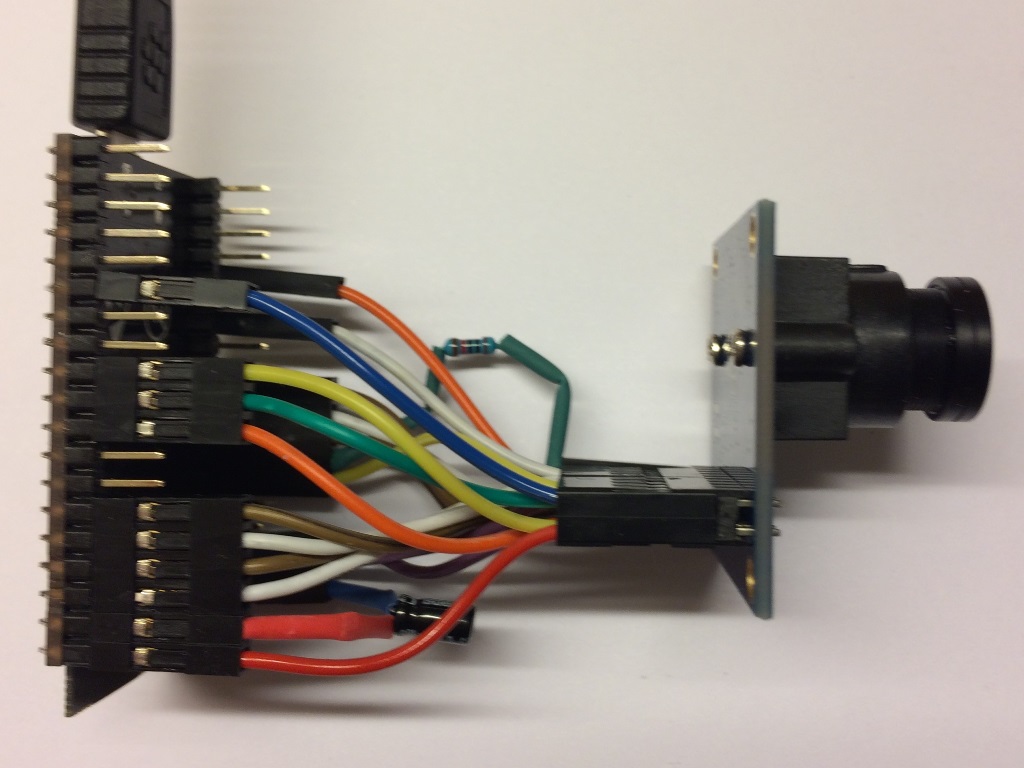 |
|---|---|
| Core Board V2 and camera on test stand | Core Board V2 and camera wiring |
A rigid test rig without any loose wires may be constructed using a proto-board and standard 2.54" sockets. It will work as a daughter board placed in-between Core Board V2 and camera module. Pictures below shows both sides of such rig wired according to alternate pin mapping.
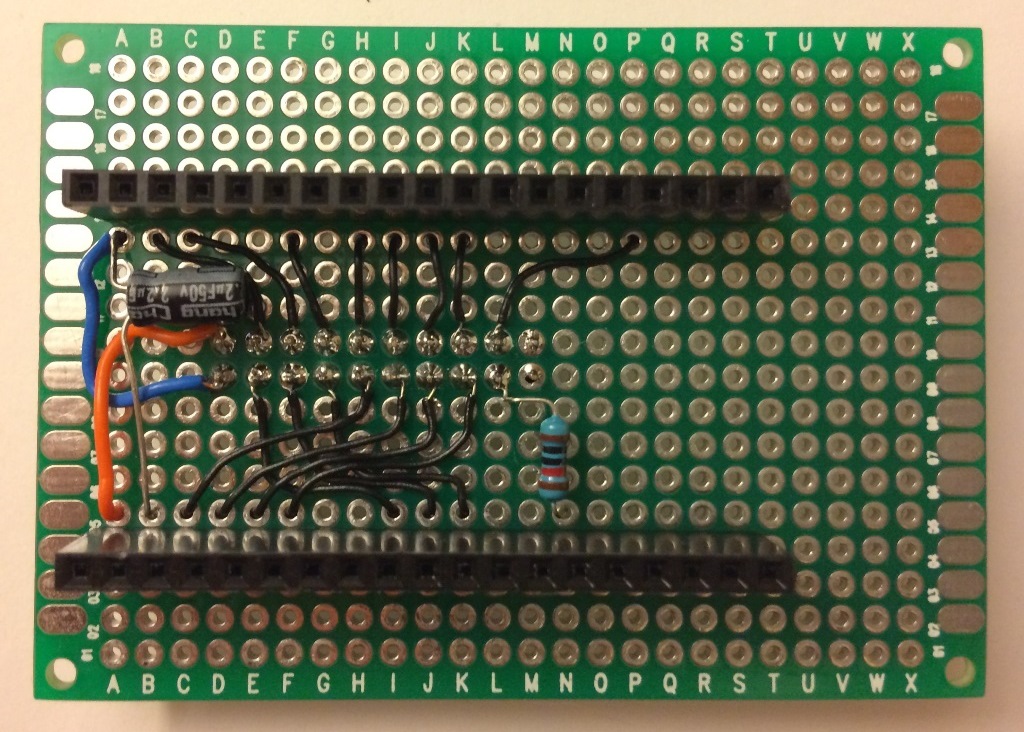 |
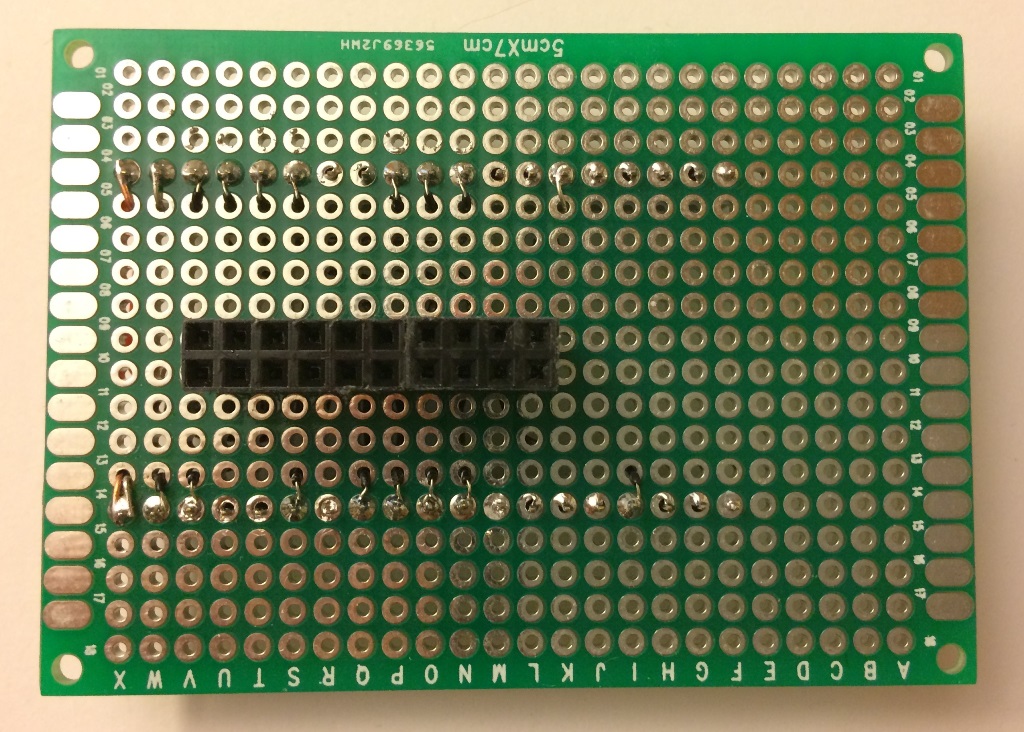 |
|---|---|
| Daughter board - ESP32 Core Board V2 side | Daughter board - OV7725 camera module side |
Using short wires or a daughter board there are no problems with noise on the chessboard test pattern retrieved from the camera.
Next Steps
We are planning to test and compare images captured using:
- ESP-WROVER V1 with camera module directly plugged in.
- Core Board V2 and camera module interconnected with a daughter board instead of loose cables.
In longer perspective we plan the following:
- Describe what's inside camera component
- LCD support
- QR Code reading
- Web interface to control the camera
- Camera component API development
Contribute
You are welcome to contribute to this repository by providing documentation to code, submitting issue reports, enhancement requests and pull requests. Contributions should follow Contributions Guide section of ESP32 Programming Guide.
Acknowledgments
This application is using code developed by:
- OpenMV implementation for OV7725 by Ibrahim Abdelkader
- Software I2C library for ESP31B by Hristo Gochkov
