A/ Sign-in to your GitHub account... If you don't have a GitHub account, please create it
- Tips : GitHub website => https://github.com
If you create your GitHub repo for the first time, please do not forget to verify your GitHub email address by looking at your mail messages
B/ Send your GitHub user name to rovland in order to grant you access to collaborate to the following repo => https://github.com/rovland/descodeuses
C/ Once rovland added you, accept the invitation here : https://github.com/rovland/descodeuses/invitations
C/ Reminders
- Ensure that your git setting is correctly configured as follows :
- Cloning a GitHub project
- Submit a code to a specific branch
Your Pull request (branch name) should appear here => https://github.com/rovland/descodeuses/pulls
Then find a way to merge it into master branch
A/ Install docker system on your local machine
B/ Clone this repository on local => https://github.com/rovland/descodeuses
- Tips : For windows you can use Visual Studio Code application or for Linux, use the git clone command
Open the directory 'descodeuses' and create a new directory as follows : [FirstName]_[LastName]_[NameOfYourFavoriteFruit]_codeuse
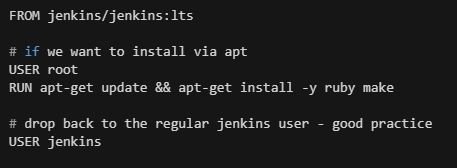
C/ Into the folder created above, create a Dockerfile which contains all required instructions to start a jenkins server on your local machine
- Tips : Your Dockerfile looks like this :
C/ Start building your Dockerfile
- Tips : Use the docker build.... command
D/ Run your jenkins docker container
- Tips : Use the docker run.... command
Caution : take into account that your jenkins is listening on port 8080 inside the container.
Also the port 50000 can be added while running your container if you intend to attach a jenkins node agent
E/ Ensure that your jenkins docker container is up and running on local
- Tips : Use the docker ps.... command
F/ Open your browser and check that your jenkins server is up and running and it's reachable at :
- http://[your-ip-address]:8080
or
G/ Once jenkins starts for the first time, it requires an administrator password ... At this stage, find a way to retrieve this password inside the container
- Tips : Use docker exec -ti.... command to log into the container
A/ Submit the folder containing your dockerfile to a specific branch on GitHub repository : https://github.com/rovland/descodeuses.git
- Tips : Use GitHub Desktop application for windows or directly use git command line such as : git add ., git commit -m, git push
- Tips : have a look at the Exercise I/ and go through the C/ section
A/ Once connected to jenkins, start installing docker plugin by browsing this url : http://[localhost OR IP-Address]:8080/pluginManager/available?filter=Cloud+Providers
Check 'Docker' plugin as shown above and click on 'install without restart' button
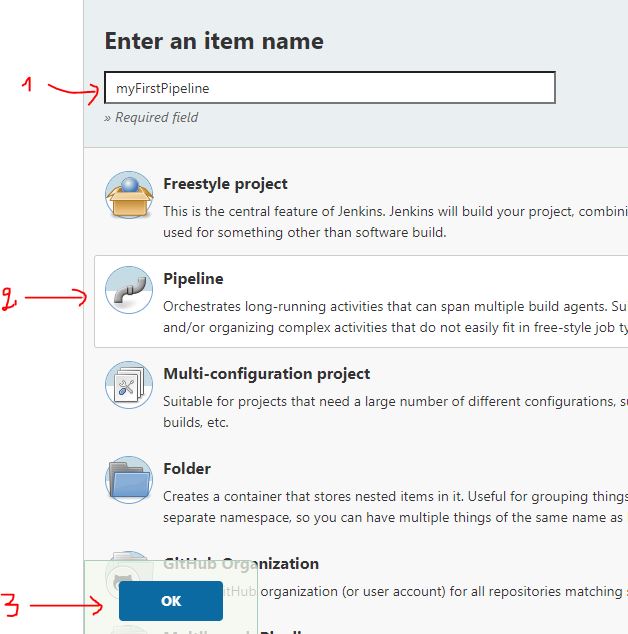
B/ Go back to the Jenkins Home page and create your first jenkins pipeline job by clicking on "Create a job"
-
Enter a jenkins job name : myFirstPipeline
-
Select 'pipeline'
-
Validate by clicking on OK button
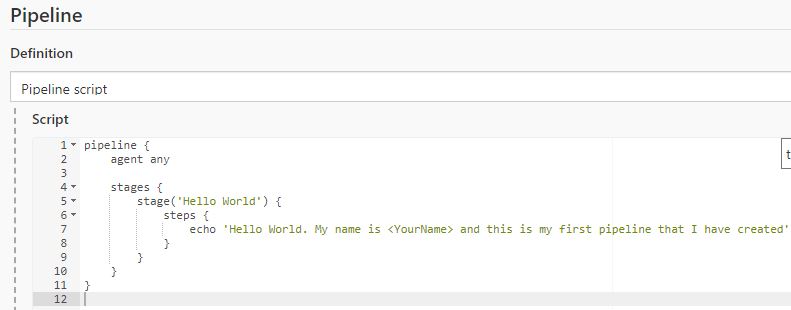
C/ In your jenkins job configuration, write the "Hello World" code inside the pipeline script console as follows :
Save your configuration by clicking on 'save' button
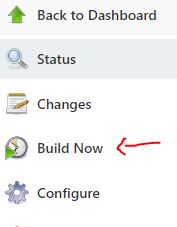
Start building your project by clicking on "Build Now" button
Check-out the console output of the job
A/ Create a Jenkinsfile into the folder created at Exercise I
B/ Start editing the file with your desired editor [Visual Studio Code for example]
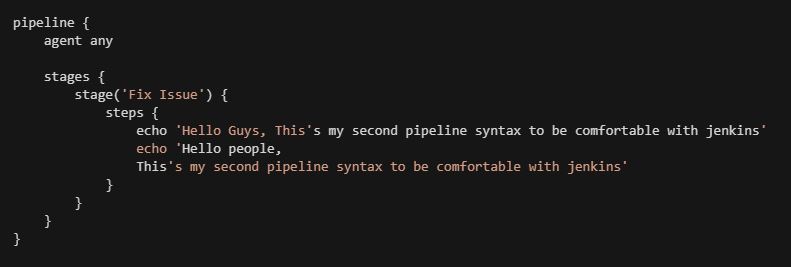
C/ write the code below in your Jenkinsfile
Submit the jenkinsfile to your branch on GitHub repository : https://github.com/rovland/descodeuses.git
Then merge the code on your branch into master
D/ Create a new jenkins pipeline job
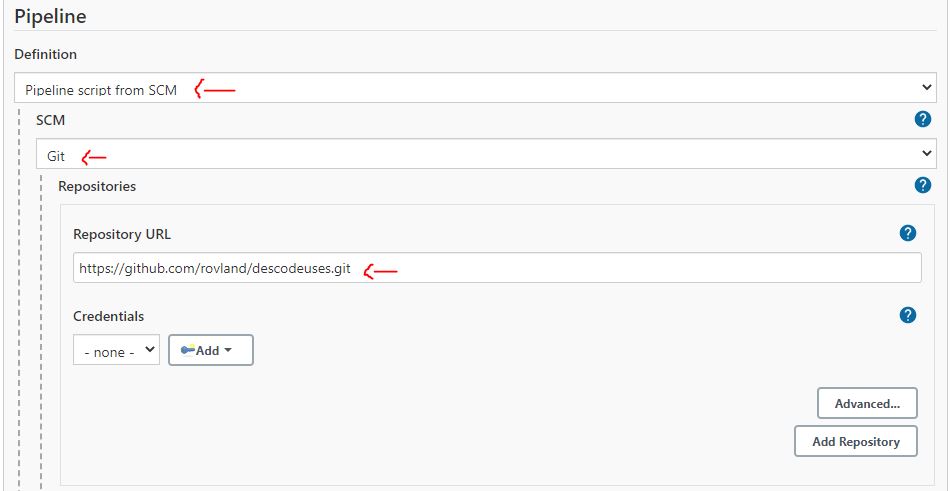
E/ Within your job configuration, Change the pipeline definition to use a Jenkinsfile as follows :
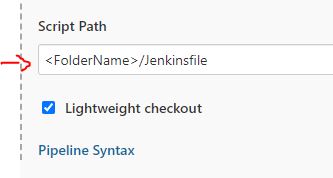
Scroll down at the bottom and change the value of 'Script Path' field and set the full path of your Jenkinsfile submitted to GitHub repository
Save your changes and build the job
F/ Find a way to fix all errors occur by editing your Jenkinsfile on local
- Tips : You can test your modified jenkins code by updating your first jenkins job created
Submit your modified Jenkinsfile to github repository and re-test it on jenkins
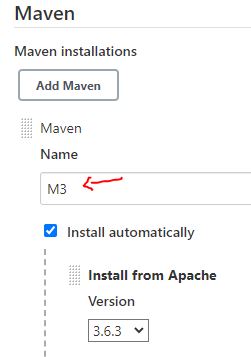
A/ Configure your jenkins server to found the maven M3 tool as follows :
-
Go to : Manage Jenkins → Global Tool Configuration
-
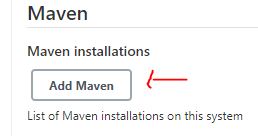
Scroll down, search Maven option and click on 'Add Maven' button
- Configure your Maven installation as follows :
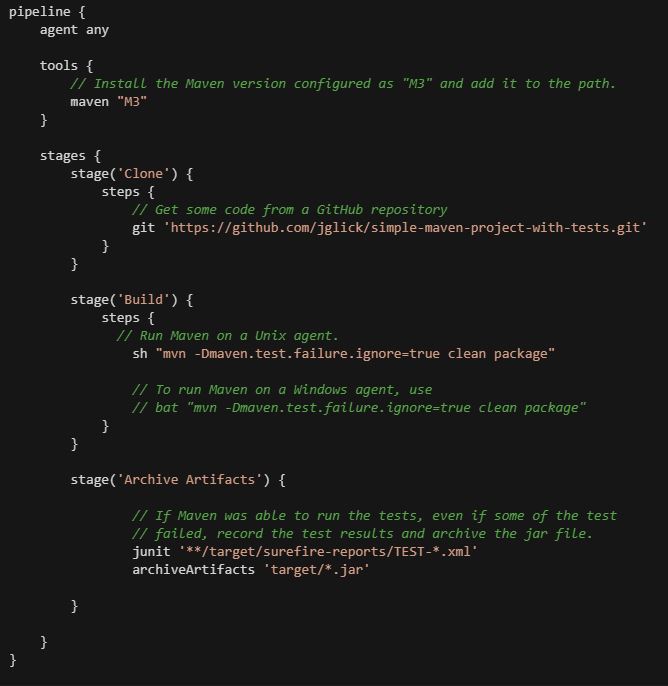
B/ Create a new Jenkinsfile called : Jenkinsfile_maven and save it inside the folder created at Exercise I
C/ Write the code below on your Jenkinsfile_maven
D/ Submit the code to github repo
E/ Create a new jenkins pipeline job using your jenkins_maven file
F/ Save your changes and build the jenkins job
G/ Some expected errors occur ... Please fix them by editing your Jenkinsfile_maven
H/ Submit your modified Jenkinsfile_maven to Github repo
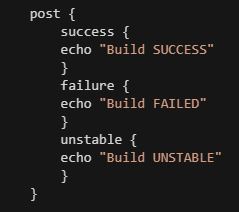
I/ Modify your Jenkinsfile_maven by adding the code below :
Submit your modified Jenkinsfile_maven to GitHub repo
Build the jenkins job accordingly and check each pipeline stages
