Digdag


Documentation
Please check digdag.io and docs.digdag.io for installation & user manual.
Development
Prerequirements
- JDK 8
- Node.js 8.x
Installing Node.js using nodebrew:
$ curl -L git.io/nodebrew | perl - setup
$ echo 'export PATH=$HOME/.nodebrew/current/bin:$PATH' >> ~/.bashrc
$ source ~/.bashrc
$ nodebrew install-binary v8.x
$ nodebrew use v8.x
Installing Node.js using Homebrew on Mac OS X:
$ brew install node
- Python 3
- sphinx
- sphinx_rtd_theme
- recommonmark
Check Digdag REST API
Use --enable-swagger option to check the current Digdag REST API.
$ ./gradlew cli
$ ./pkg/digdag-<current version>.jar server --memory --enable-swagger # Run server with --enable-swagger option

$ docker run -dp 8080:8080 swaggerapi/swagger-ui # Run Swagger-UI on different console
$ open http://localhost:8080/?url=http://localhost:65432/api/swagger.json # Open api/swagger.json on Swagger-UI
Running tests
$ ./gradlew check
Test coverage report is generated at didgag-*/build/reports/jacoco/test/html/index.html.
Findbugs report is generated at digdag-*/build/reports/findbugs/main.html.
$ CI_ACCEPTANCE_TEST=true ./gradlew digdag-tests:test --info --tests acceptance.BuiltInVariablesIT
To execute tests in digdag-tests subproject locally, tests option that is provided by Gradle is useful.
Environment variable CI_ACCEPTANCE_TEST=true is needed to execute digdag-tests only.
Testing with PostgreSQL
Test uses in-memory H2 database by default. To use PostgreSQL, set following environment variables:
$ export DIGDAG_TEST_POSTGRESQL="$(cat config/test_postgresql.properties)"
Building CLI executables
$ ./gradlew cli
$ ./gradlew cli -PwithoutUi  # build without integrated UI
(If the command fails during building UI due to errors from node command, you can try to add -PwithoutUi argument to exclude the UI from the package).
It makes an executable in pkg/, e.g. pkg/digdag-$VERSION.jar.
Releasing a new version
You need to set Bintray user name and API key in BINTRAY_USER and BINTRAY_KEY environment variables.
In the following instructions, assumed that upstream is set to treasure-data/digdag and origin is set to your private repository.
- run
git pull upstream --tags. - run
./gradlew setVersion -Pto=<version>command. - write release notes to
releases/release-<version>.rstfile. It must include at least version (the first line) and release date (the last line). - run
./gradlew clean cli site check releaseCheck. - make a release branch.
git checkout -b release_v<version>and commit. - push the release branch to origin and create a PR.
- after the PR is merged to master, checkout master and pull latest upstream/master.
- run
./gradlew clean cli site check releaseCheckagian. - if it succeeded, run
./gradlew release. - a few minutes later, run
digdag selfupdateand confirm the version.
If major version is incremented, also update version = and release = at digdag-docs/src/conf.py.
If you are expert, skip 5. to 7. and directly update master branch.
Post-process of new release
You also need following steps after new version has been released.
- create next snapshot version, run
./gradlew setVersion -Pto=<next-version>-SNAPSHOT. - push to master.
- create a tag
git tag -a v<version>and pushgit push upstream v<version> - create a release in GitHub releases.
Releasing a SNAPSHOT version
./gradlew releaseSnapshot
Develop digdag-ui
Node.js development server is useful because it reloads changes of digdag-ui source code automatically.
First, put following lines to ~/.config/digdag/config and start digdag server:
server.http.headers.access-control-allow-origin = http://localhost:9000
server.http.headers.access-control-allow-headers = origin, content-type, accept, authorization, x-td-account-override, x-xsrf-token, cookie
server.http.headers.access-control-allow-credentials = true
server.http.headers.access-control-allow-methods = GET, POST, PUT, DELETE, OPTIONS, HEAD
server.http.headers.access-control-max-age = 1209600
Then, start digdag-ui development server:
$ cd digdag-ui/
$ npm install
$ npm run dev    # starts dev server on http://localhost:9000/
Updating documents
Documents are in digdag-docs/src directory. They're built using Sphinx.
Website is hosted on www.digdag.io using Github Pages. Pages are built using deployment step of circle.yml and automatically pushed to gh-pages branch of digdag-docs repository.
To build the pages and check them locally, run following command:
$ ./gradlew site
This might not always update all necessary files (Sphinx doesn't manage update dependencies well). In this case, run ./gradlew clean first.
It builds index.html at digdag-docs/build/html/index.html.
Release Notes
The list of release note is here.
Development on IDEs
IntelliJ IDEA
Digdag is using a Java annotation processor org.immutables:value. The combination of Java annotation processing and Gradle on IntelliJ IDEA sometimes introduces some troubles. In Digdag's case, you may run into some compile errors like cannot find symbol: class ImmutableRestWorkflowDefinitionCollection.
So we'd recommend the followings to avoid those compile errors if you want to develop Digdag one the IDE.
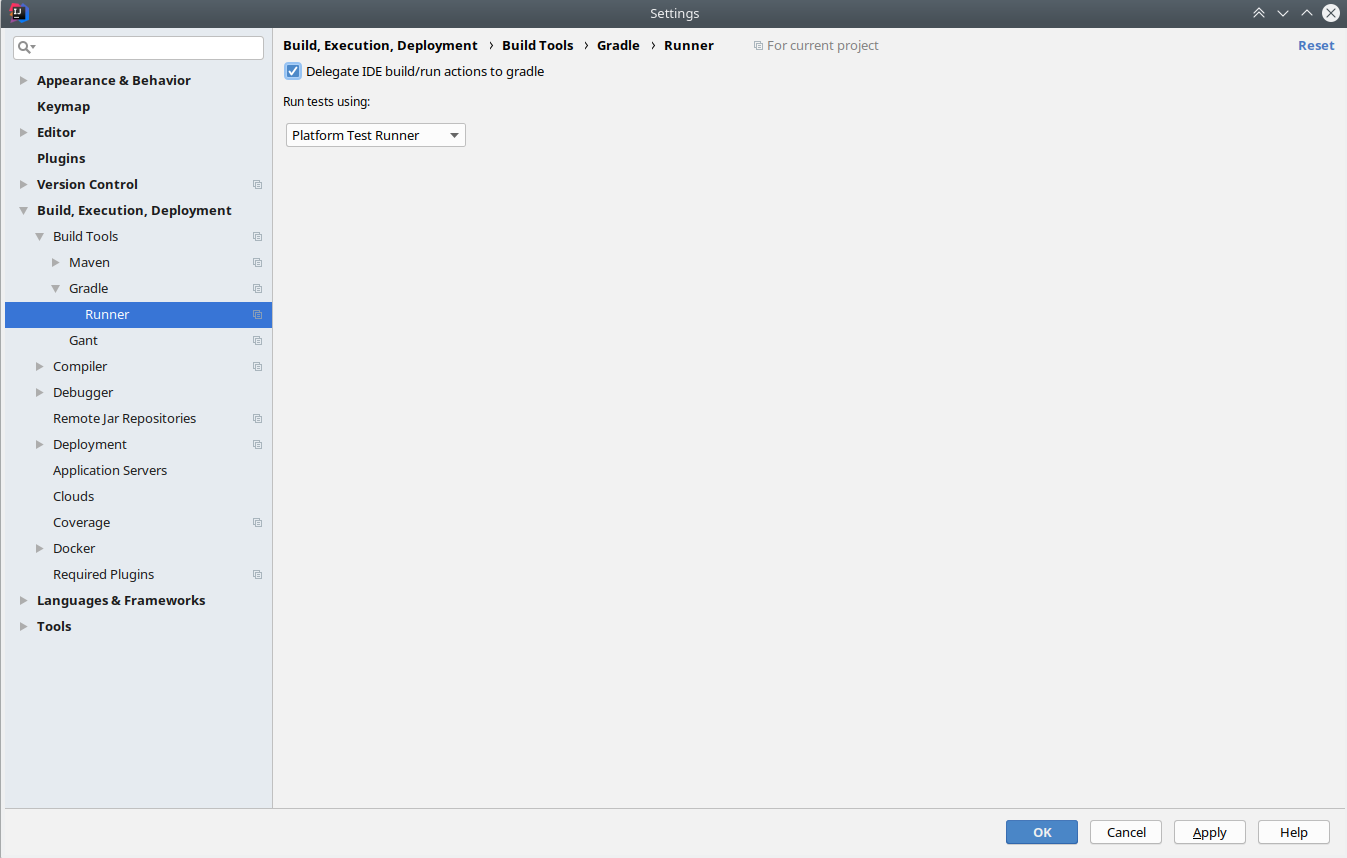
- There's an important configuration option to be enabled to fully have IntelliJ be fully integrated with an existing gradle build configuration:
Delegate IDE build/run actions to gradleneeds to be enabled.